Agent Builder
Use the Agent Builder or Workflow Builder to build, test, and deploy intelligent agents for any use case. Automate complex processes by combining modular components such as language models, data connectors, APIs, and specialized agents, all without extensive programming.
Agent Factory includes the following features:
- Drag-and-drop interface: Construct workflows visually by connecting nodes that represent specific actions, tools, or data sources.
- AI and automation integration: Build intelligent workflows using components such as large language models (LLMs), chat agents, and data processing tools.
- Custom agent creation: Define agents that autonomously perform tasks, make decisions, or interact with systems according to workflows.
- Multi-agent orchestration: Set up hierarchical agent flows, allowing a manager agent to delegate work to multiple specialist sub-agents.
- Connectivity: Integrate with enterprise systems, third-party services, cloud APIs, and databases.
- Reusable templates: Access adaptable workflow templates to meet various business requirements.
- Conversational context: Converse with the context of the previous 10 queries or messages retained within the conversational history.
- Validation and error messaging: Use enhanced workflow validation and improved error messages to construct workflows efficiently.
- Diagnostics collection: Collect application logs as a ZIP file for troubleshooting and support. See Collect Diagnostics.
Build Agents
An Agent Builder workflow is a graph of nodes connected by typed inputs and outputs. At runtime, Agent Factory evaluates the graph, passes values between connected nodes, invokes model or tool calls when a node requires them, and returns the final output through an output node.
Common output and input types include message, language model, dataframe, JSON, markdown, tool, embedding, agent, and Select AI. When a node cannot connect to another node, verify that the source output type matches the target input type. See Agent Builder Nodes and Sample Workflows to learn about the nodes available in Agent Builder and how to use them to build your custom workflows.
Use these practices when building workflows:
- Keep each node’s purpose narrow and explicit.
- Name prompts, tools, and agents with action-oriented descriptions.
- Use parser and type conversion nodes when a model response must become JSON, text, or another structured type.
- Restrict REST and MCP tools to the operations the workflow actually needs.
- Test in Playground after each major change instead of building a large graph all at once.
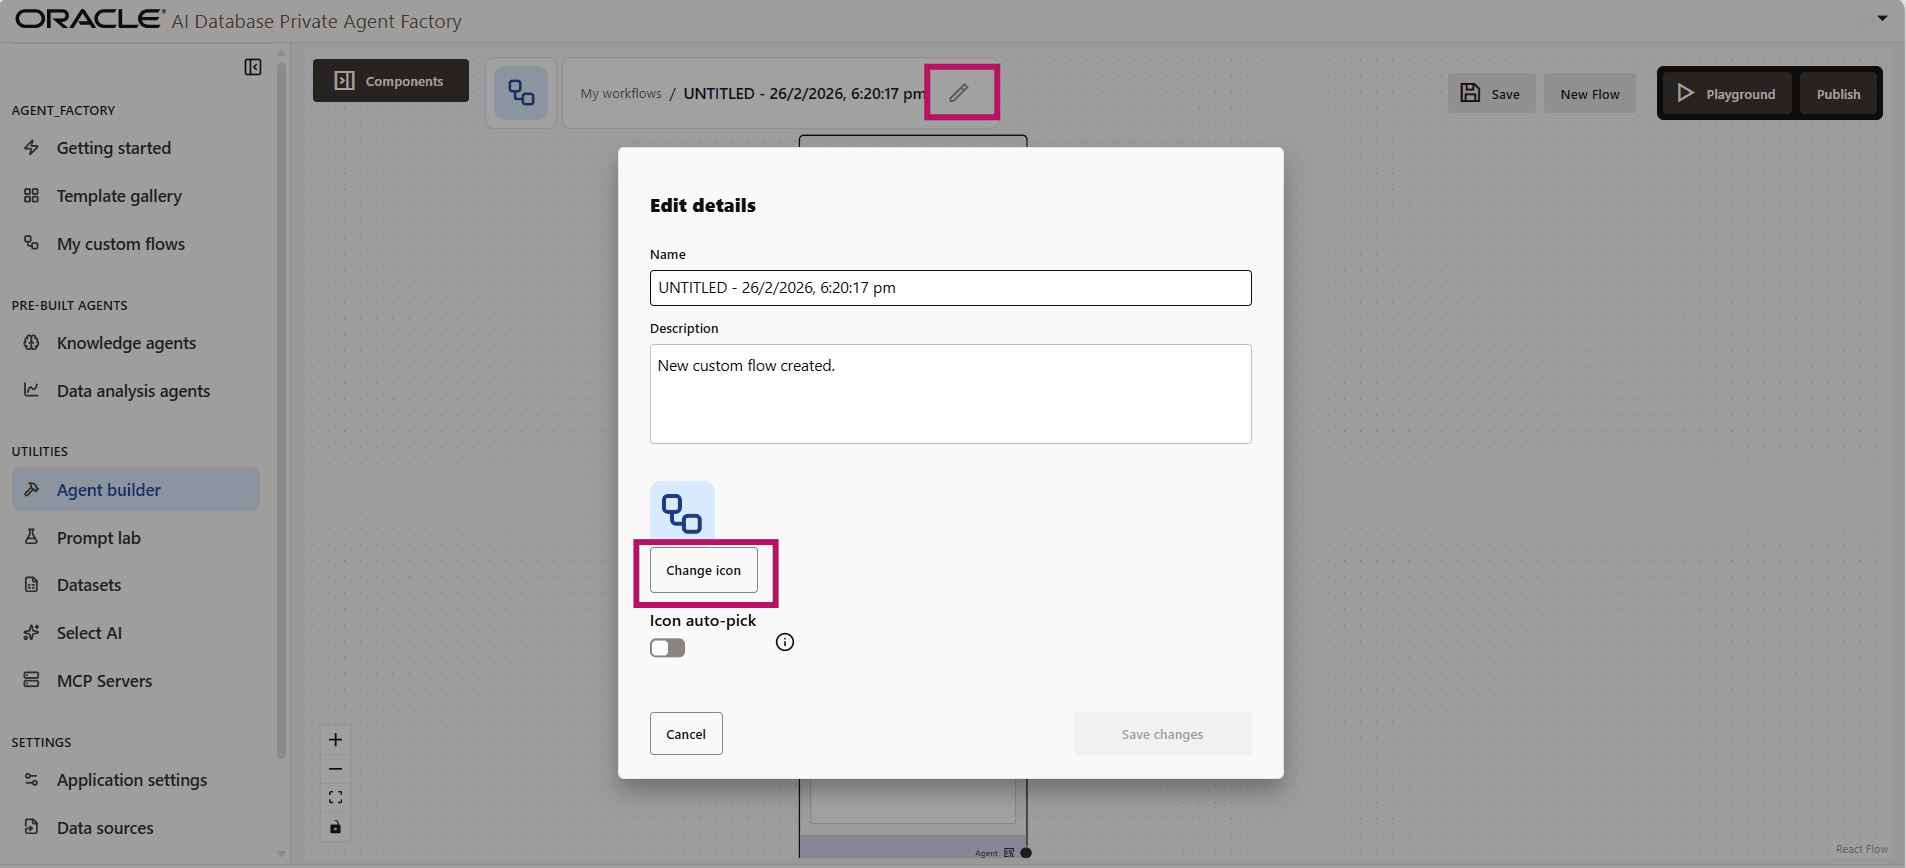
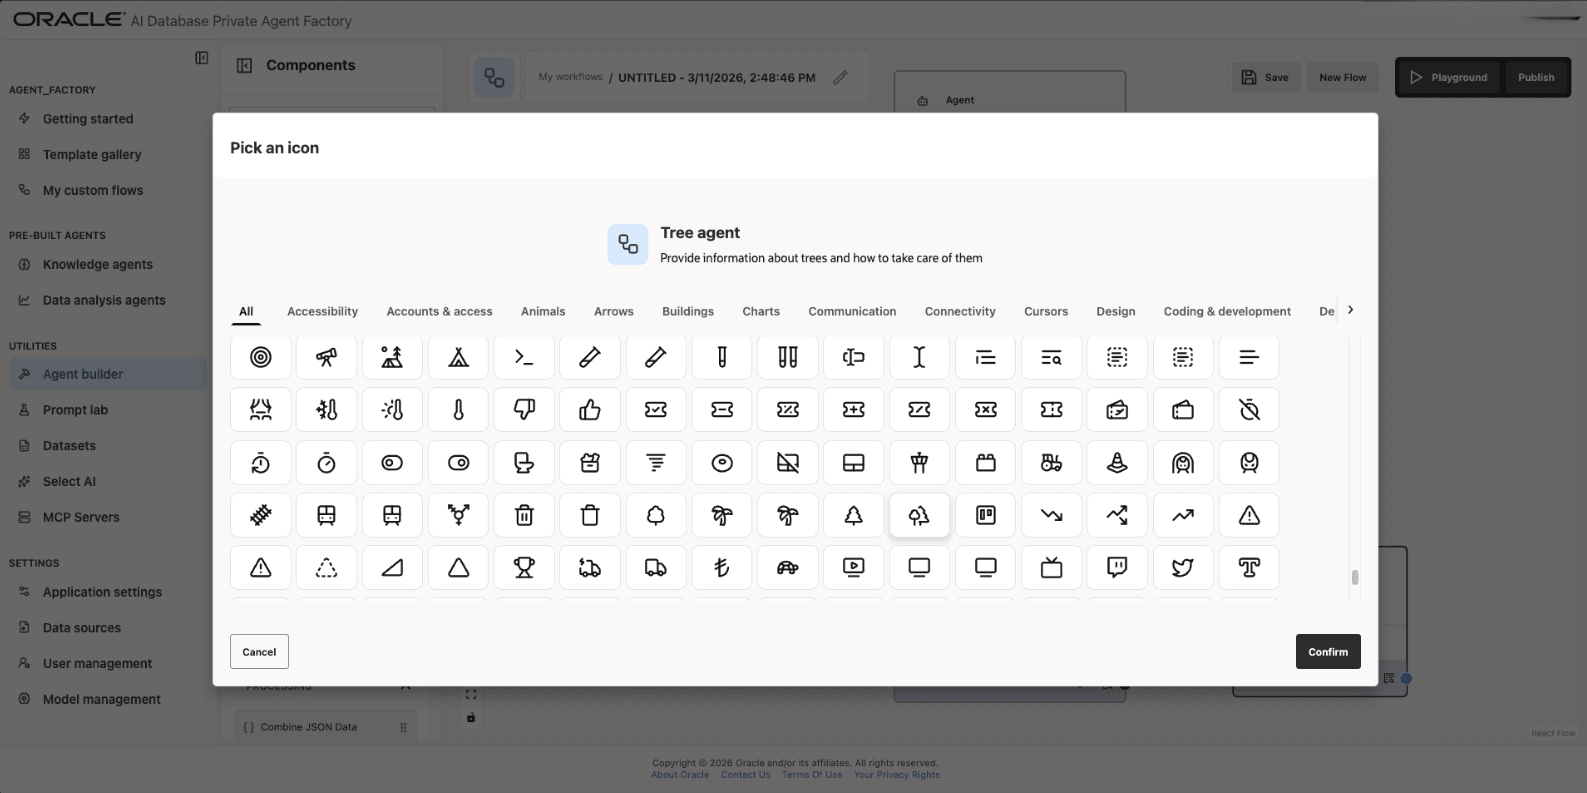
Provide a Name and Description for your custom flows by clicking the Edit icon. To personalize your agent, select an icon of your choice by clicking Change Icon and choosing from the full icon library. Enable Icon auto-pick to automatically select an icon based on the agent’s name and description.
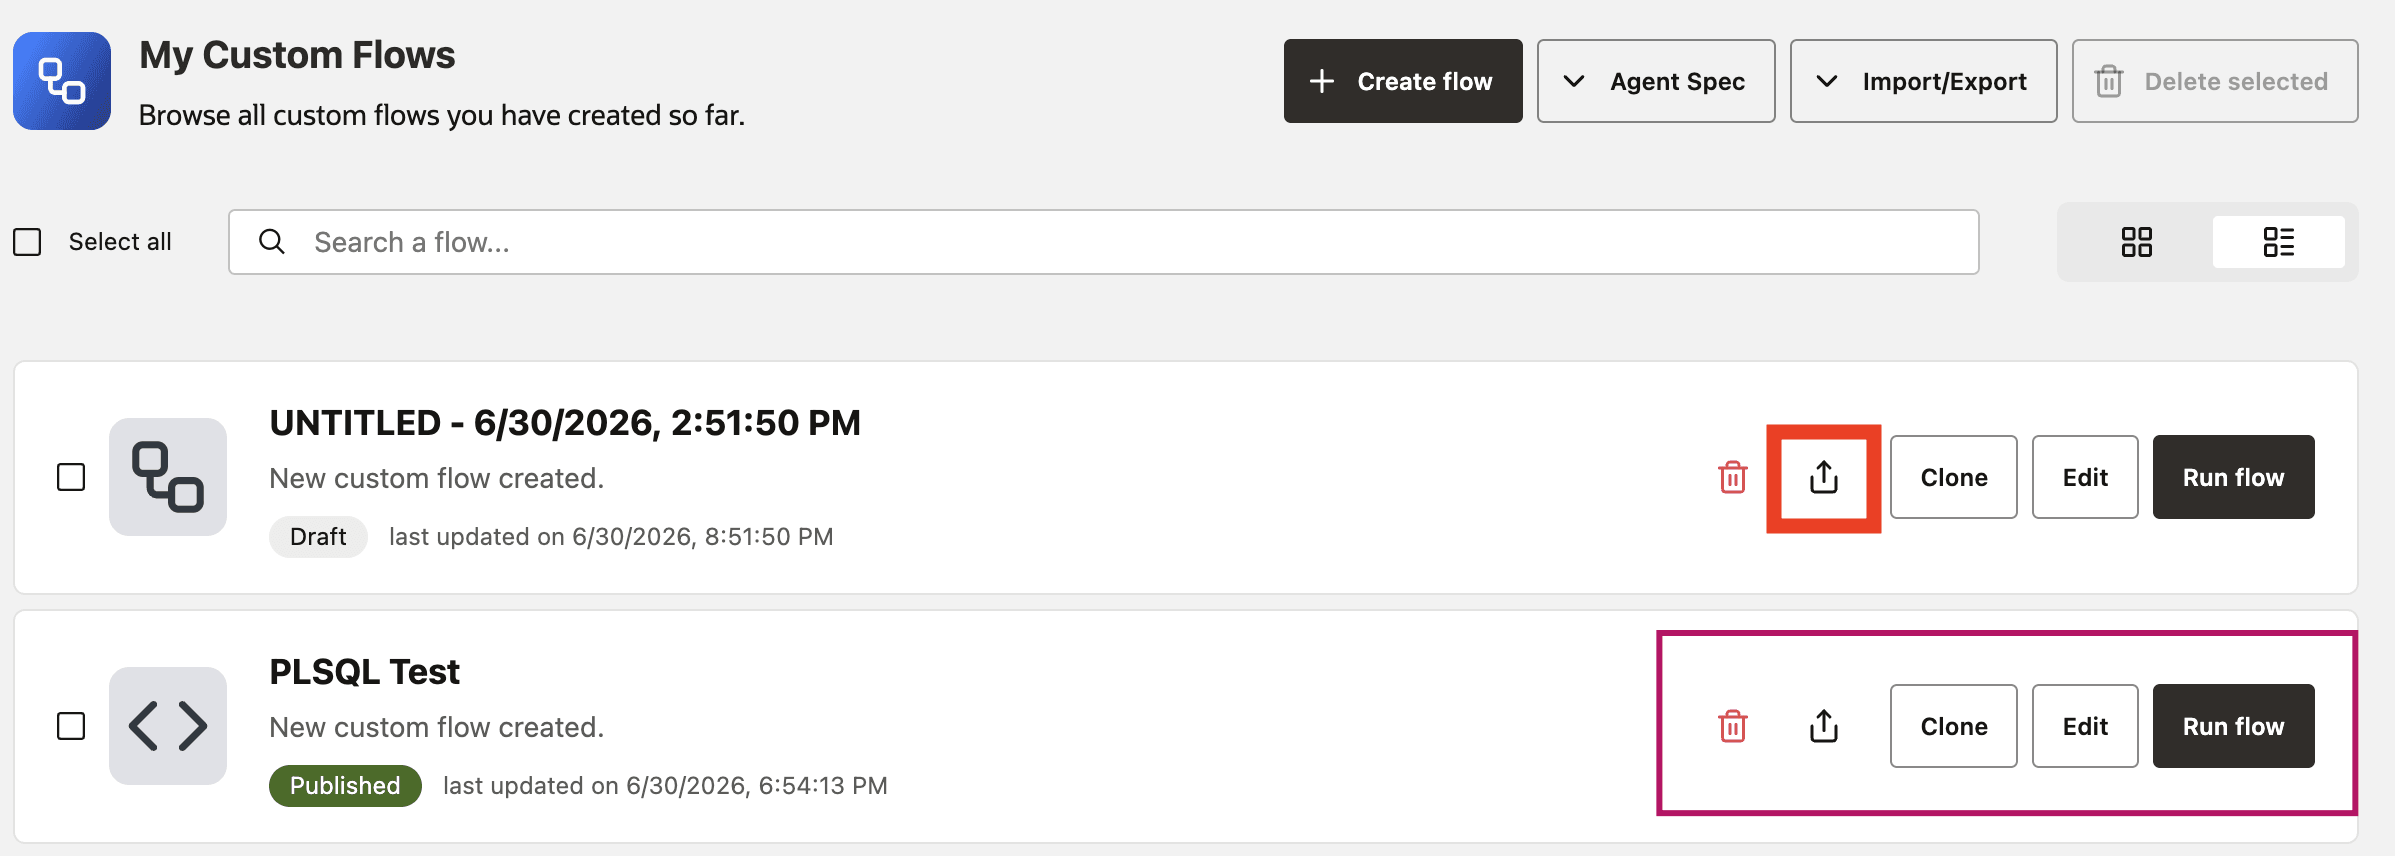
You can view your workflows under My Custom Flows in the left navigation menu. From there, you can edit, delete, share, run (to execute and validate), or clone a workflow to create a copy.
Undo and Redo Canvas Changes
Use Undo and Redo to revert or reapply canvas changes while you build a workflow. The controls apply to graph changes such as adding nodes, deleting nodes, moving nodes, and connecting nodes.
- Click Undo in the canvas controls or press
Ctrl/Cmd+Zto restore the previous canvas state. - Click Redo in the canvas controls, press
Ctrl/Cmd+Y, or pressShift+Ctrl/Cmd+Zto reapply an undone canvas state. - Use Undo and Redo before saving the workflow. The restored canvas state is persisted only when you save the workflow.
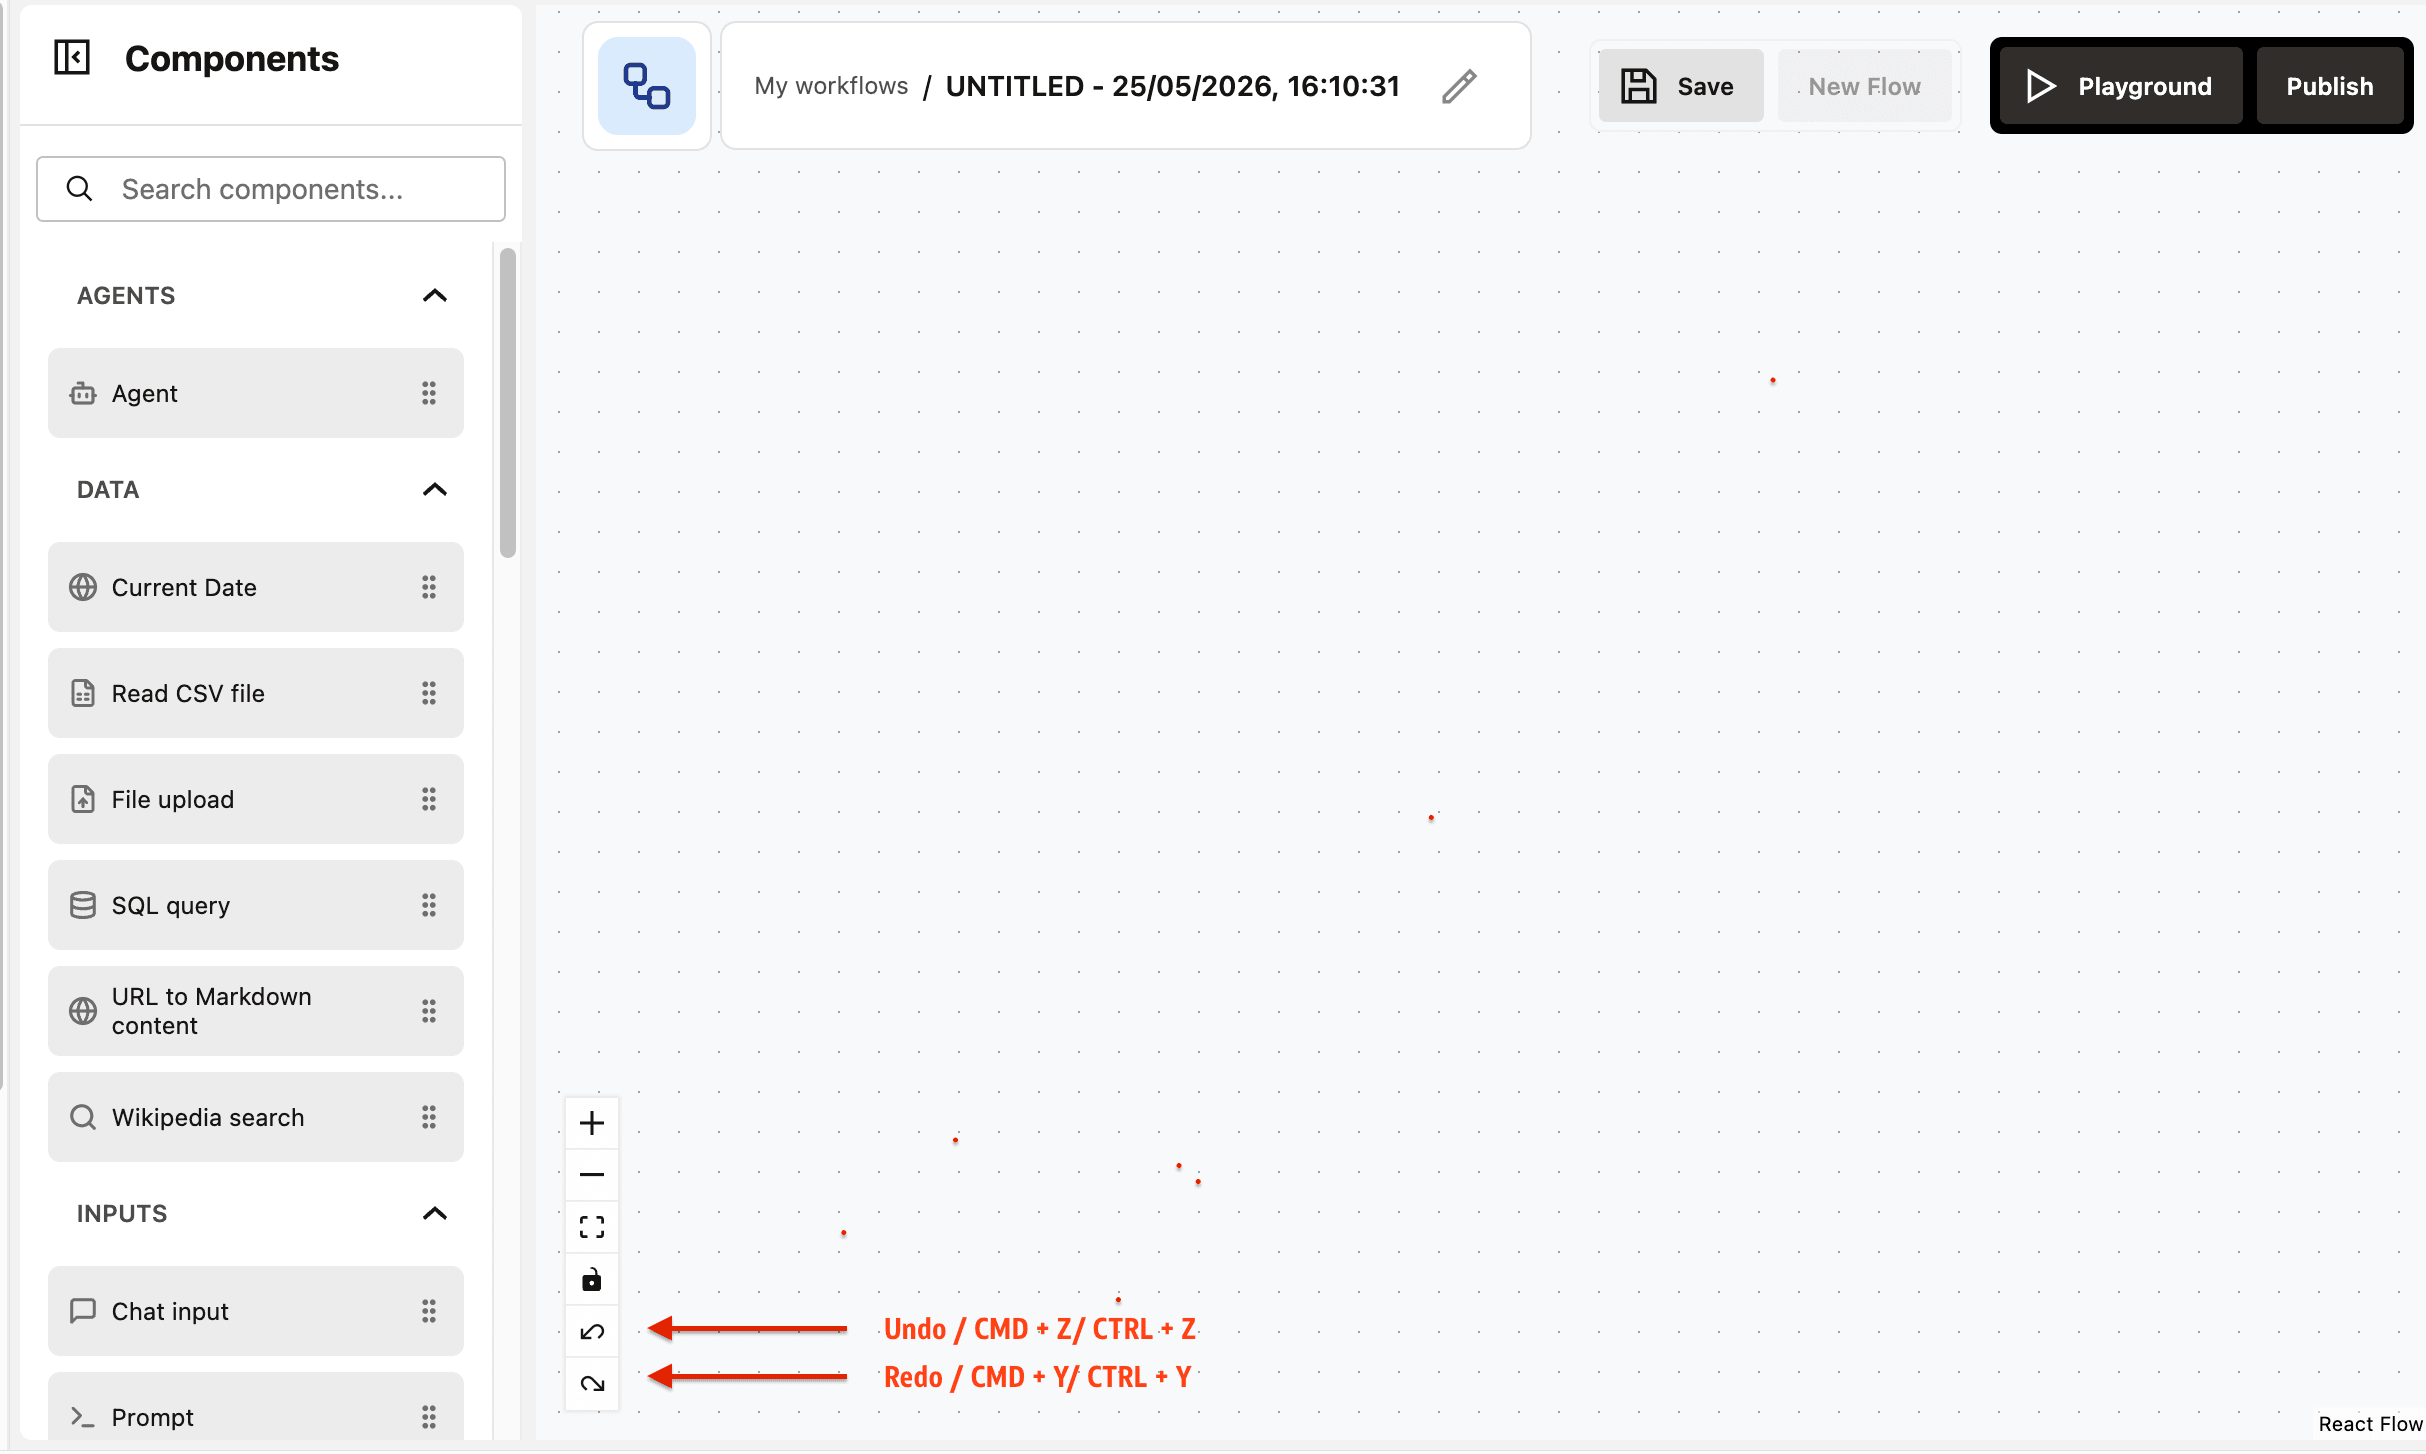
Undo and Redo operate on local canvas history for the current Agent Builder session. History is cleared when you switch workflows, load a workflow, create a new workflow, or reset the workspace. The buttons are disabled when no previous or future canvas state is available. Keyboard shortcuts do not override native text editing in editable fields. The canvas history stores up to 100 previous states.
Share a Custom Flow
You can share a custom flow that you own or for which you have the Can manage access level.
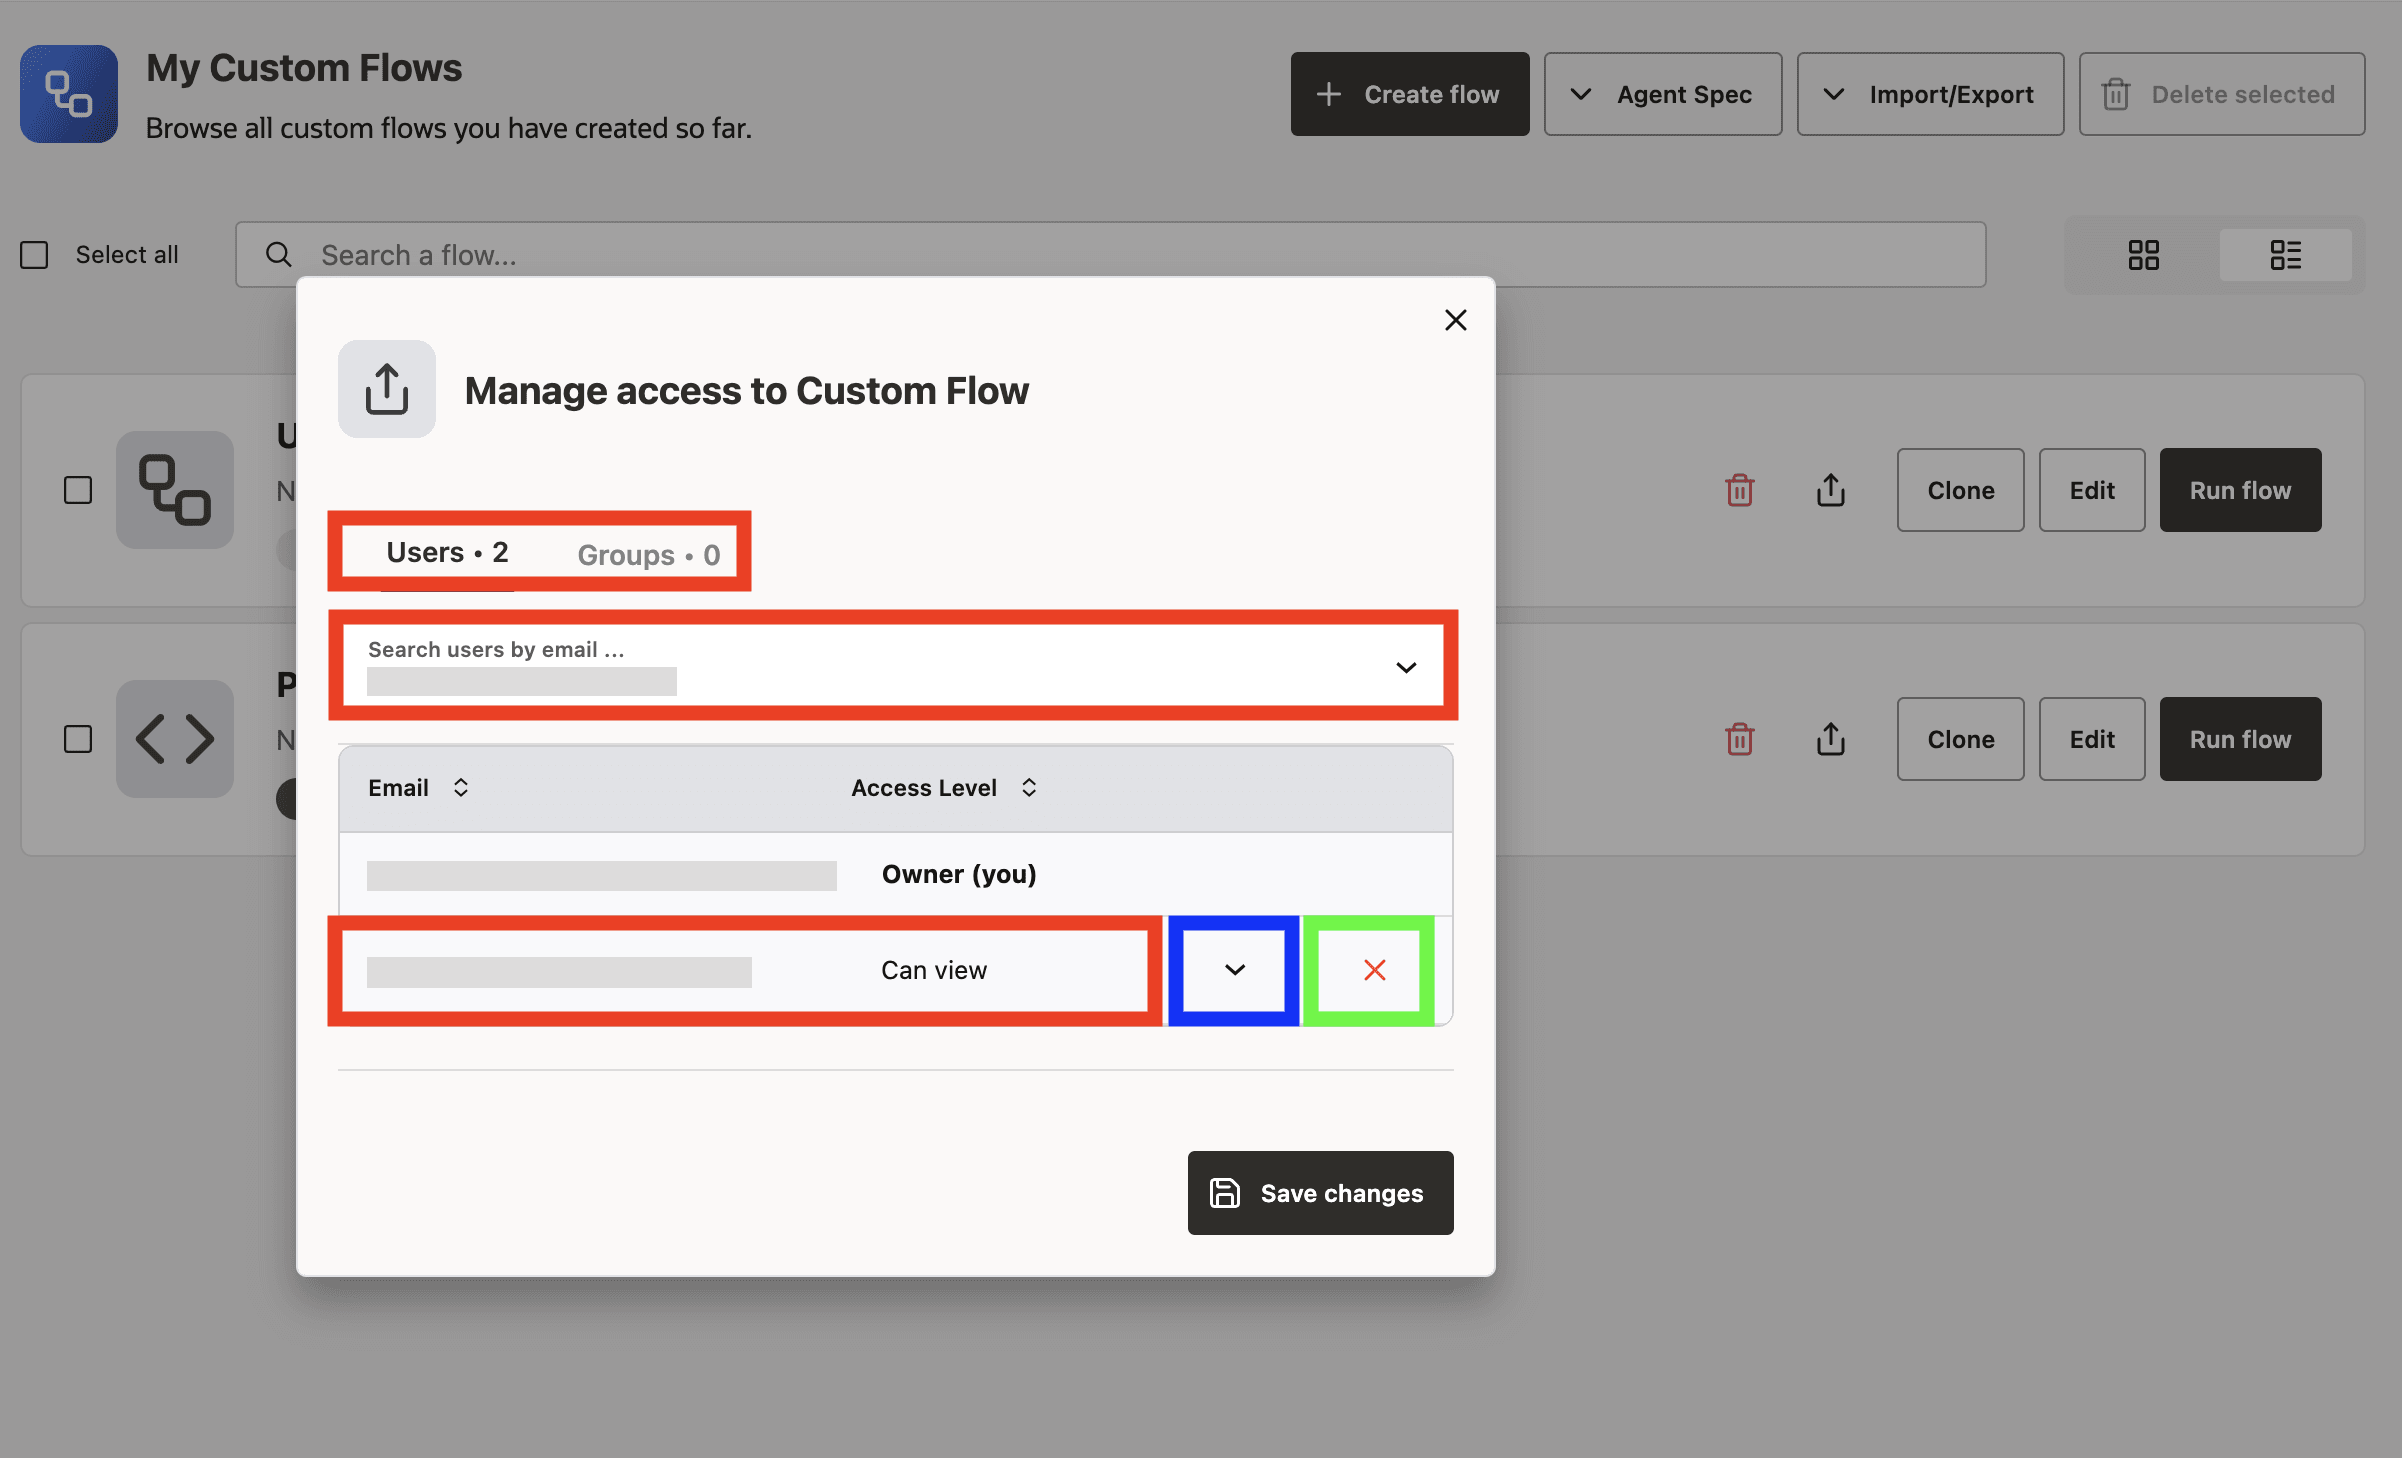
- Open My Custom Flows and select the Share action for the flow.
- In the Share dialog, review the users and groups that have access and their current access levels.
- Search for and select users or groups to add. You can also change an existing access level or remove a user or group.
- Click Save changes to apply the changes.
The Share dialog identifies the resource owner as Owner. You cannot change or remove the owner’s access. See Manage Identity and Access for access-level definitions.
Enable Agent Memory for a Workflow
Use the Agent Settings drawer to control memory for each workflow.
Important: If you upgraded Agent Factory from release 26.4 to 26.7 and use a database release earlier than 23.26.1.0, run the following commands before you enable Agent Memory in Agent Builder. This requirement applies to both Quick Start and Production installation modes.
-
Connect to the database container as the
oracleuser:podman exec -it -u oracle oracle-database bash -c "sqlplus / as sysdba" -
Run the following SQL commands:
SHOW CON_NAME;

ALTER SESSION SET CONTAINER = CDB$ROOT;
ALTER SYSTEM SET vector_memory_size = 512M SCOPE=SPFILE SID='*';

SHUTDOWN IMMEDIATE;
STARTUP;

ALTER PLUGGABLE DATABASE ALL OPEN;

ALTER SESSION SET CONTAINER = FREEPDB1;
ALTER SYSTEM SET vector_memory_size = 256M SCOPE=BOTH;
SELECT value FROM v$parameter WHERE name = 'vector_memory_size';
-
Open Agent Builder.
-
Open an existing workflow or create a new workflow.
-
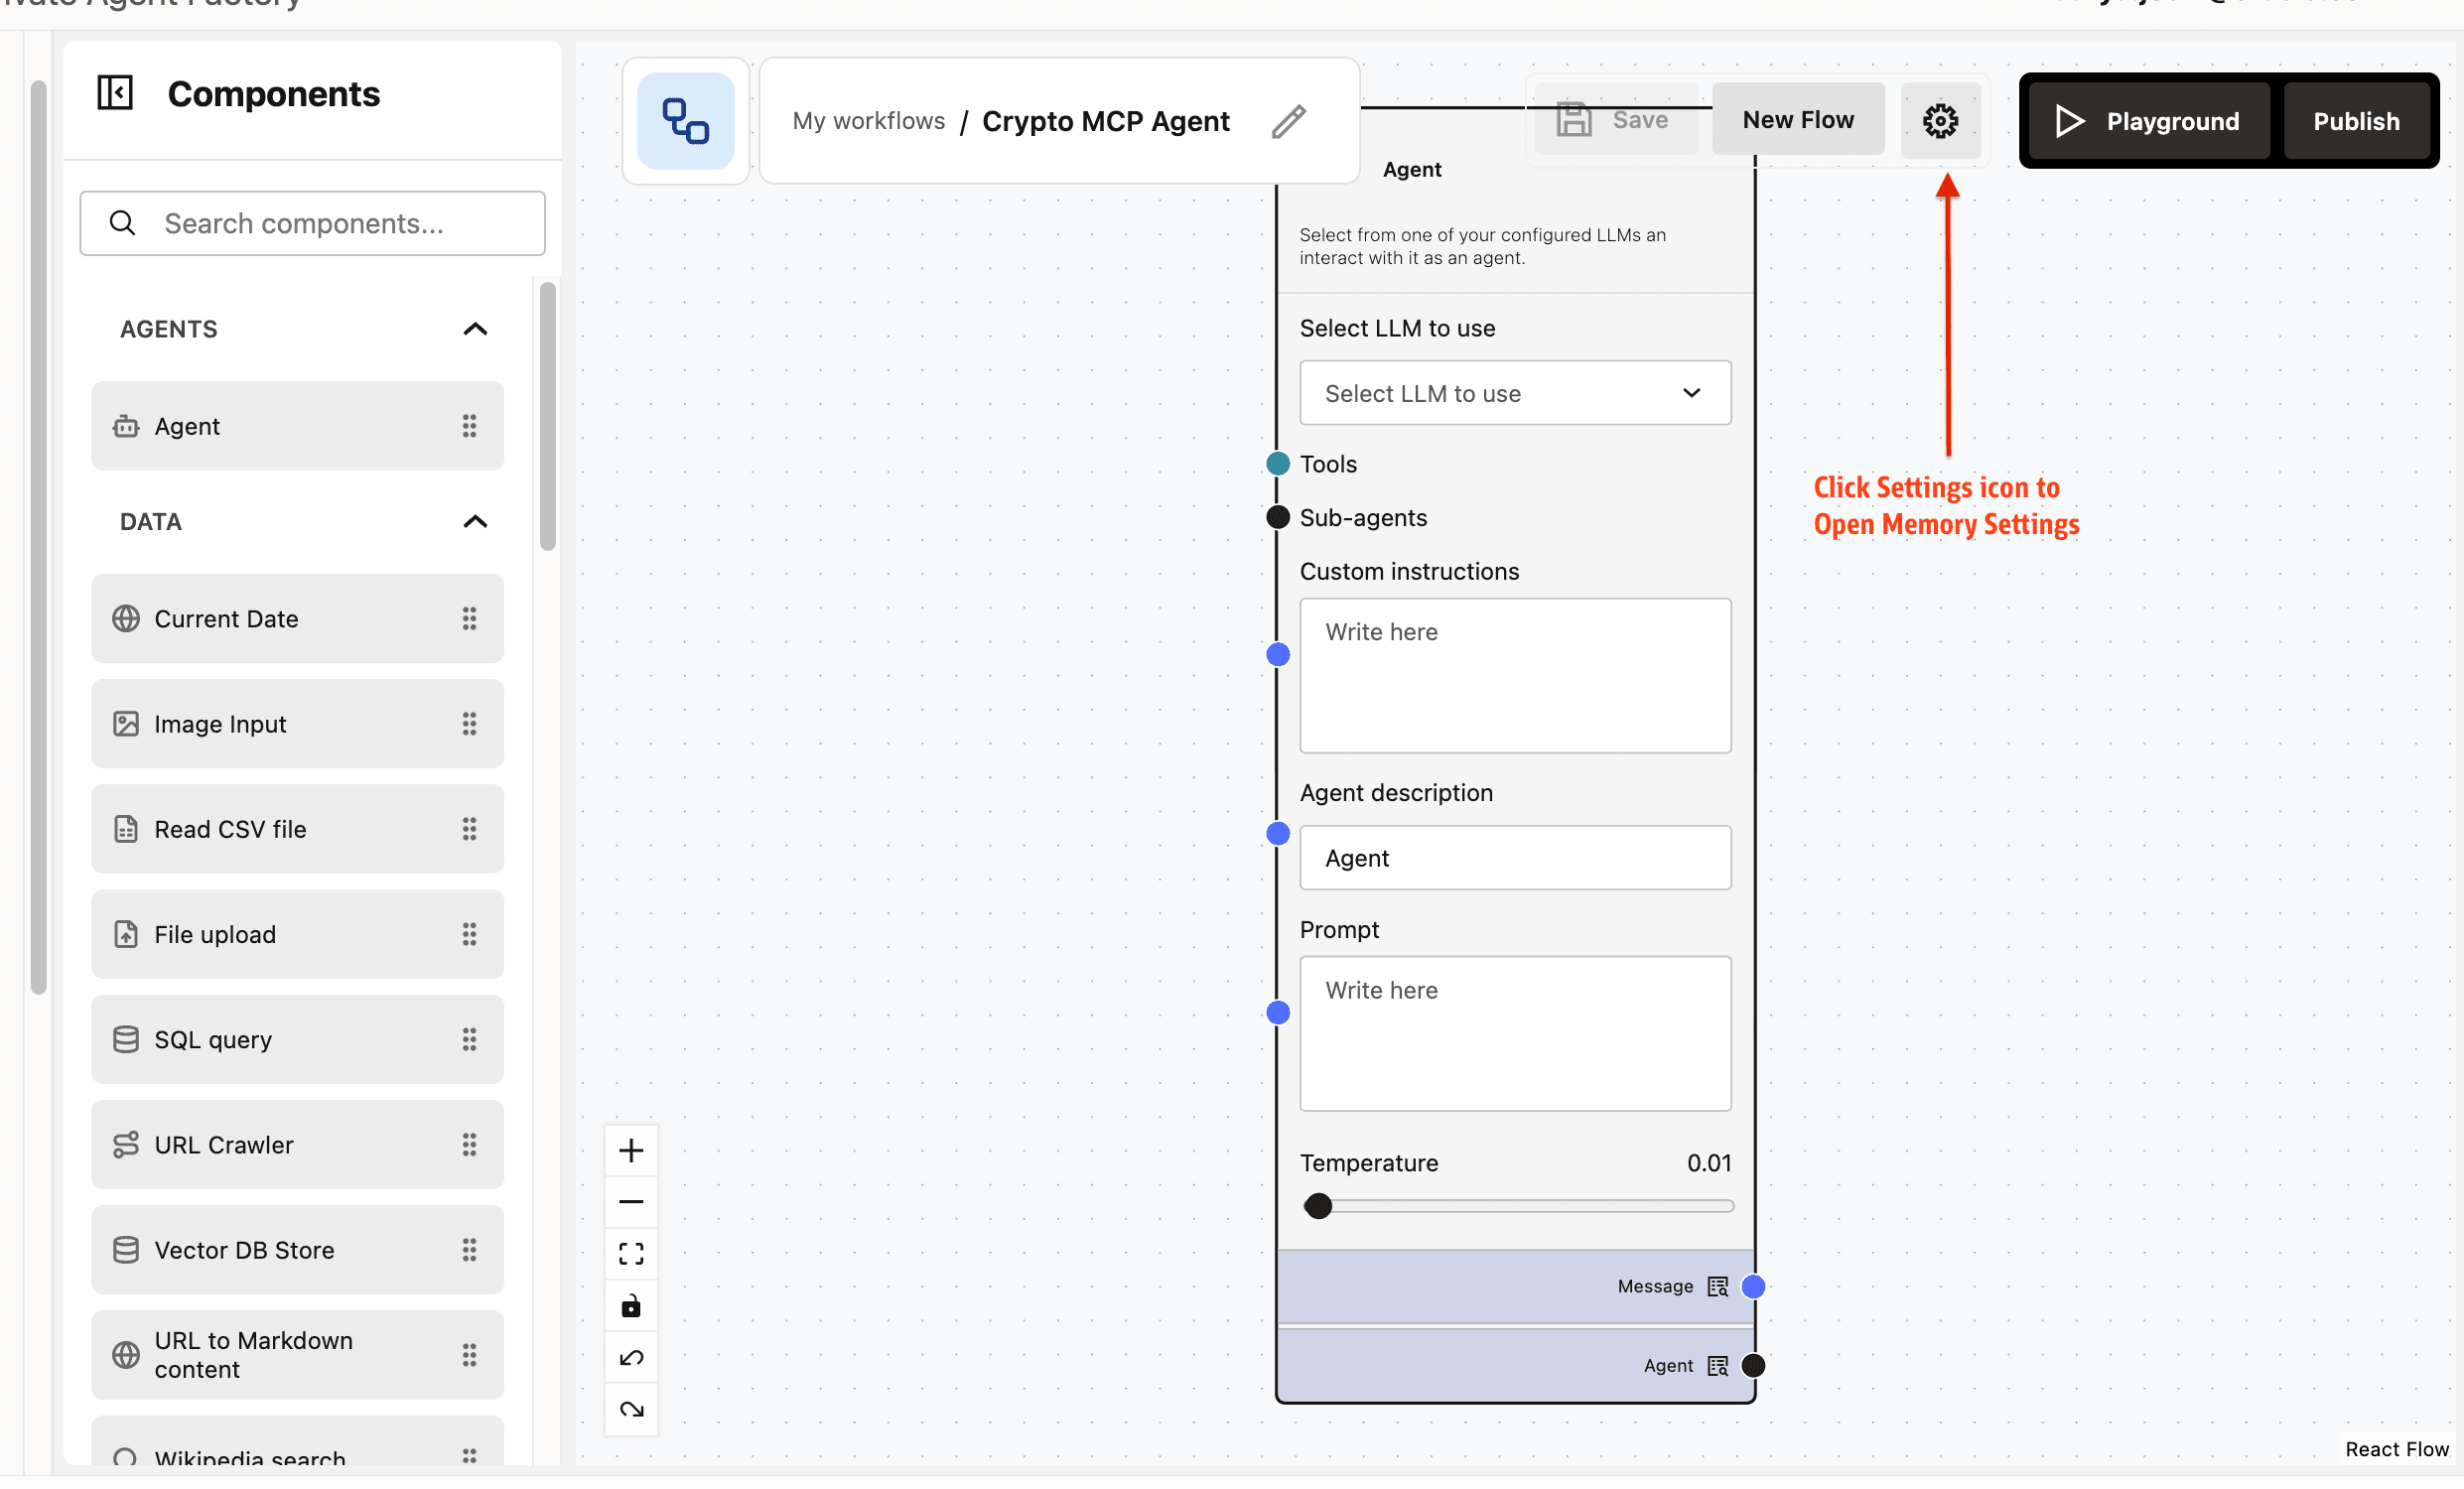
Click the settings icon in the Agent Builder toolbar.
-
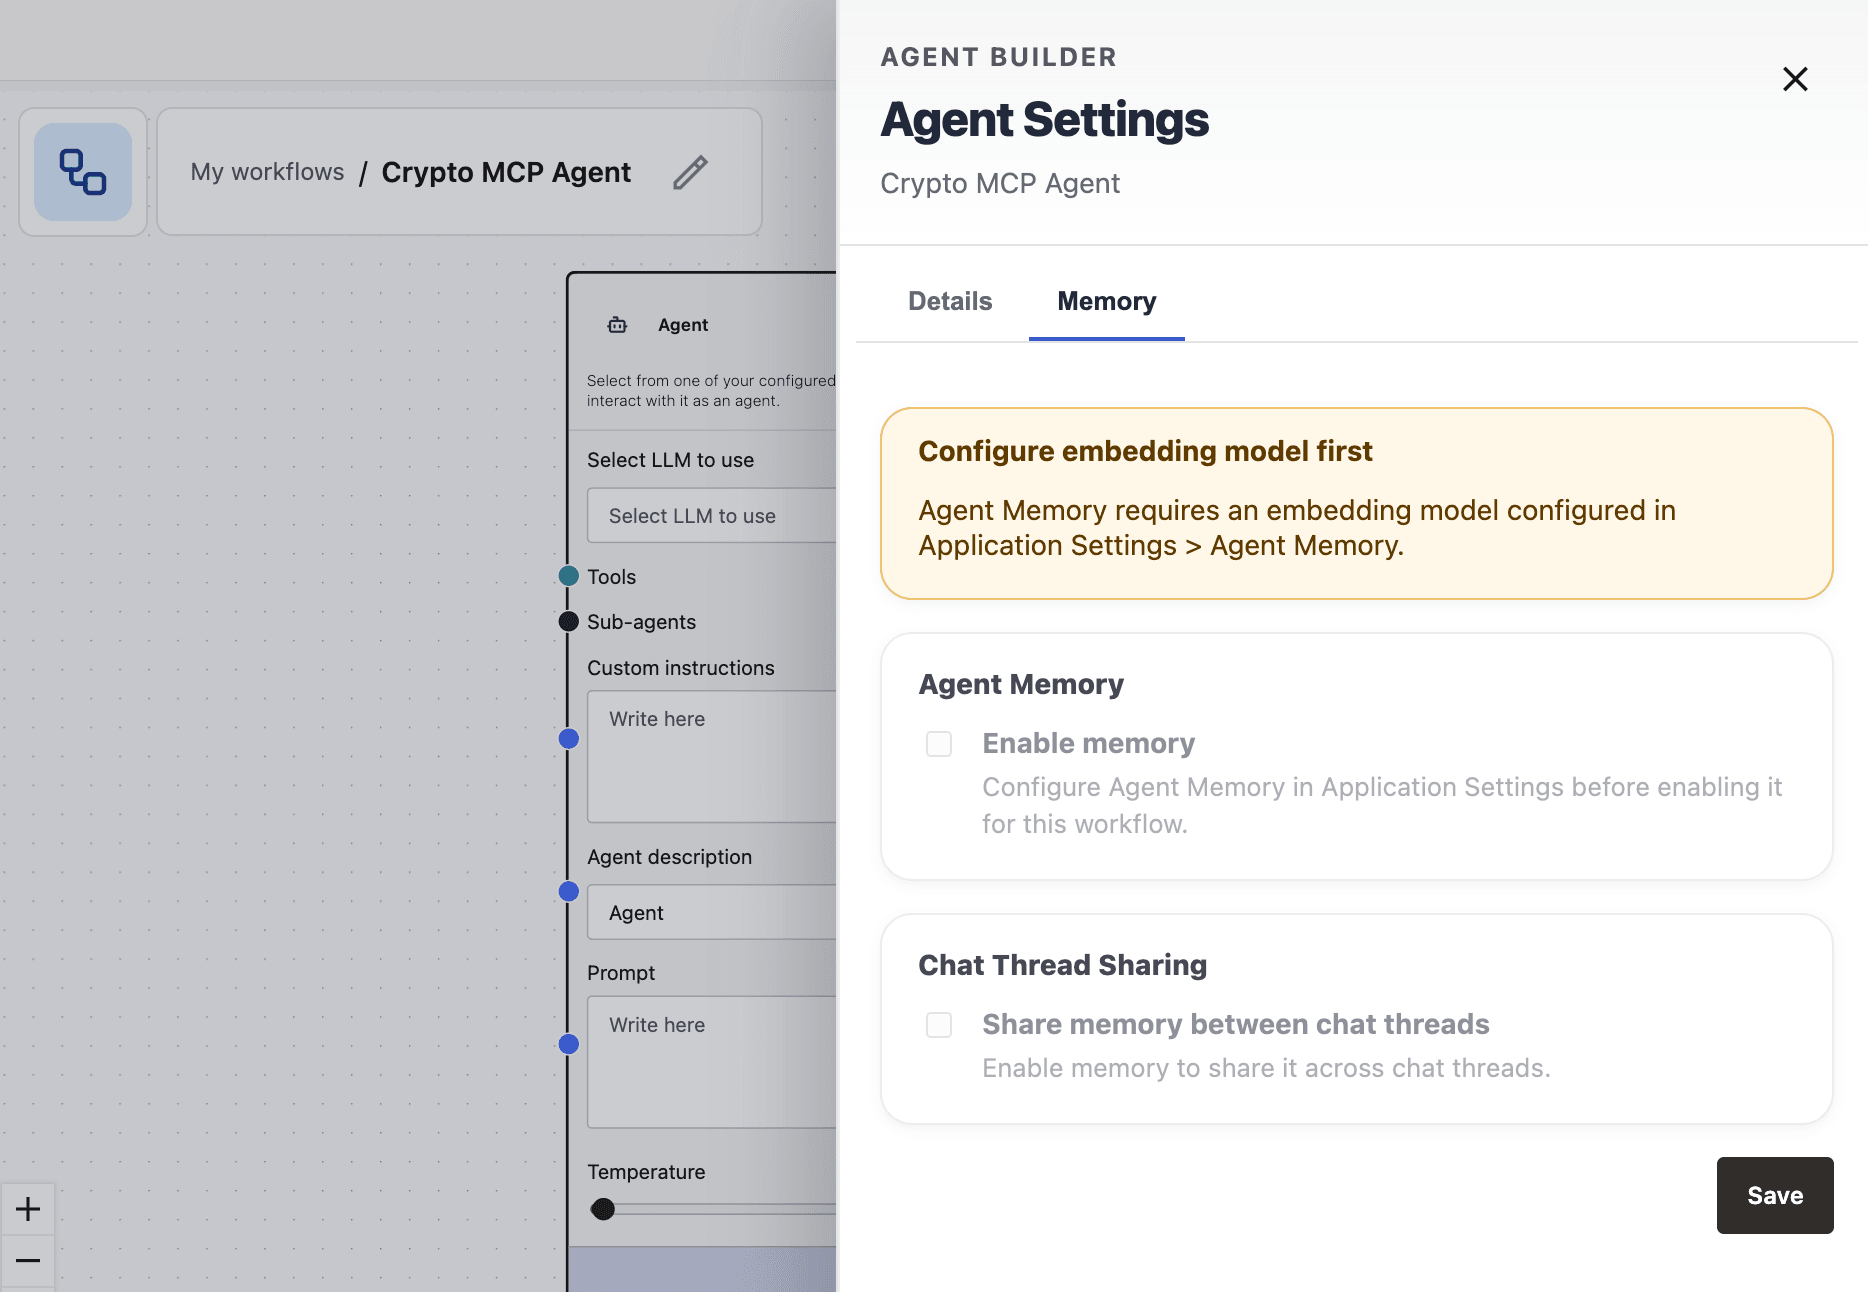
In the Agent Settings drawer, select the Memory tab.
Note: If the embedding model for Agent Memory is not configured, the Memory tab shows a warning, and the memory controls are disabled. See Configure Agent Memory Embedding Model.
-
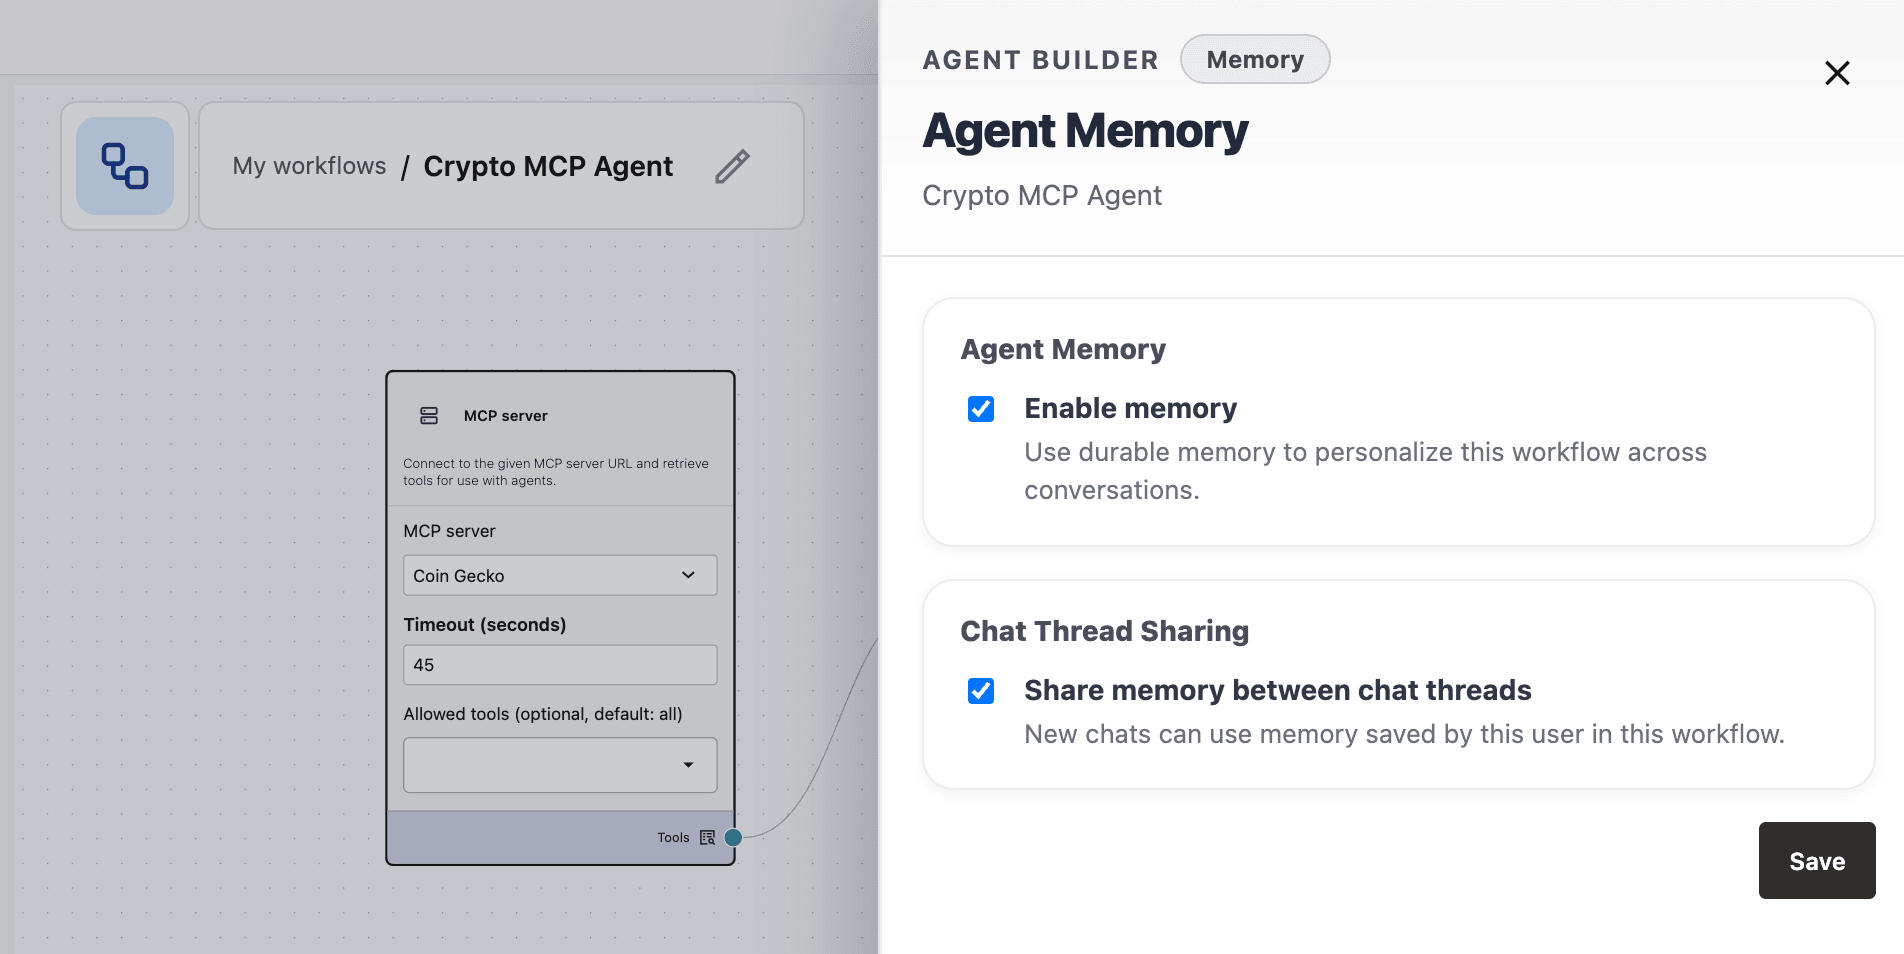
Turn on Enable memory.
-
To let new chats use memories from earlier chats for the same user and workflow, keep Share memory between chat threads turned on. To limit retrieval to the current chat thread, turn off Share memory between chat threads. You must turn on Enable memory before you can set this option.
Note: Turning sharing off does not delete, migrate, or rewrite existing memories. Turning sharing back on can make earlier same-user, same-workflow memories retrievable again.
-
Save the settings.
When memory is enabled, Agent Factory retrieves relevant durable memories before a workflow responds and persists new conversation details after the response.
Security Note: Agent Memory is constrained by existing Agent Builder authorization checks.
- Memory is scoped to the current user and workflow.
- Cross-user memory sharing is not supported.
- Cross-workflow memory sharing is not supported.
Inspect Agent Memory
Use Inspect Memory to review the durable memories and source summaries associated with a chat.
-
Open the workflow in Agent Builder.
-
Open Playground.
-
Open Chat History.
-
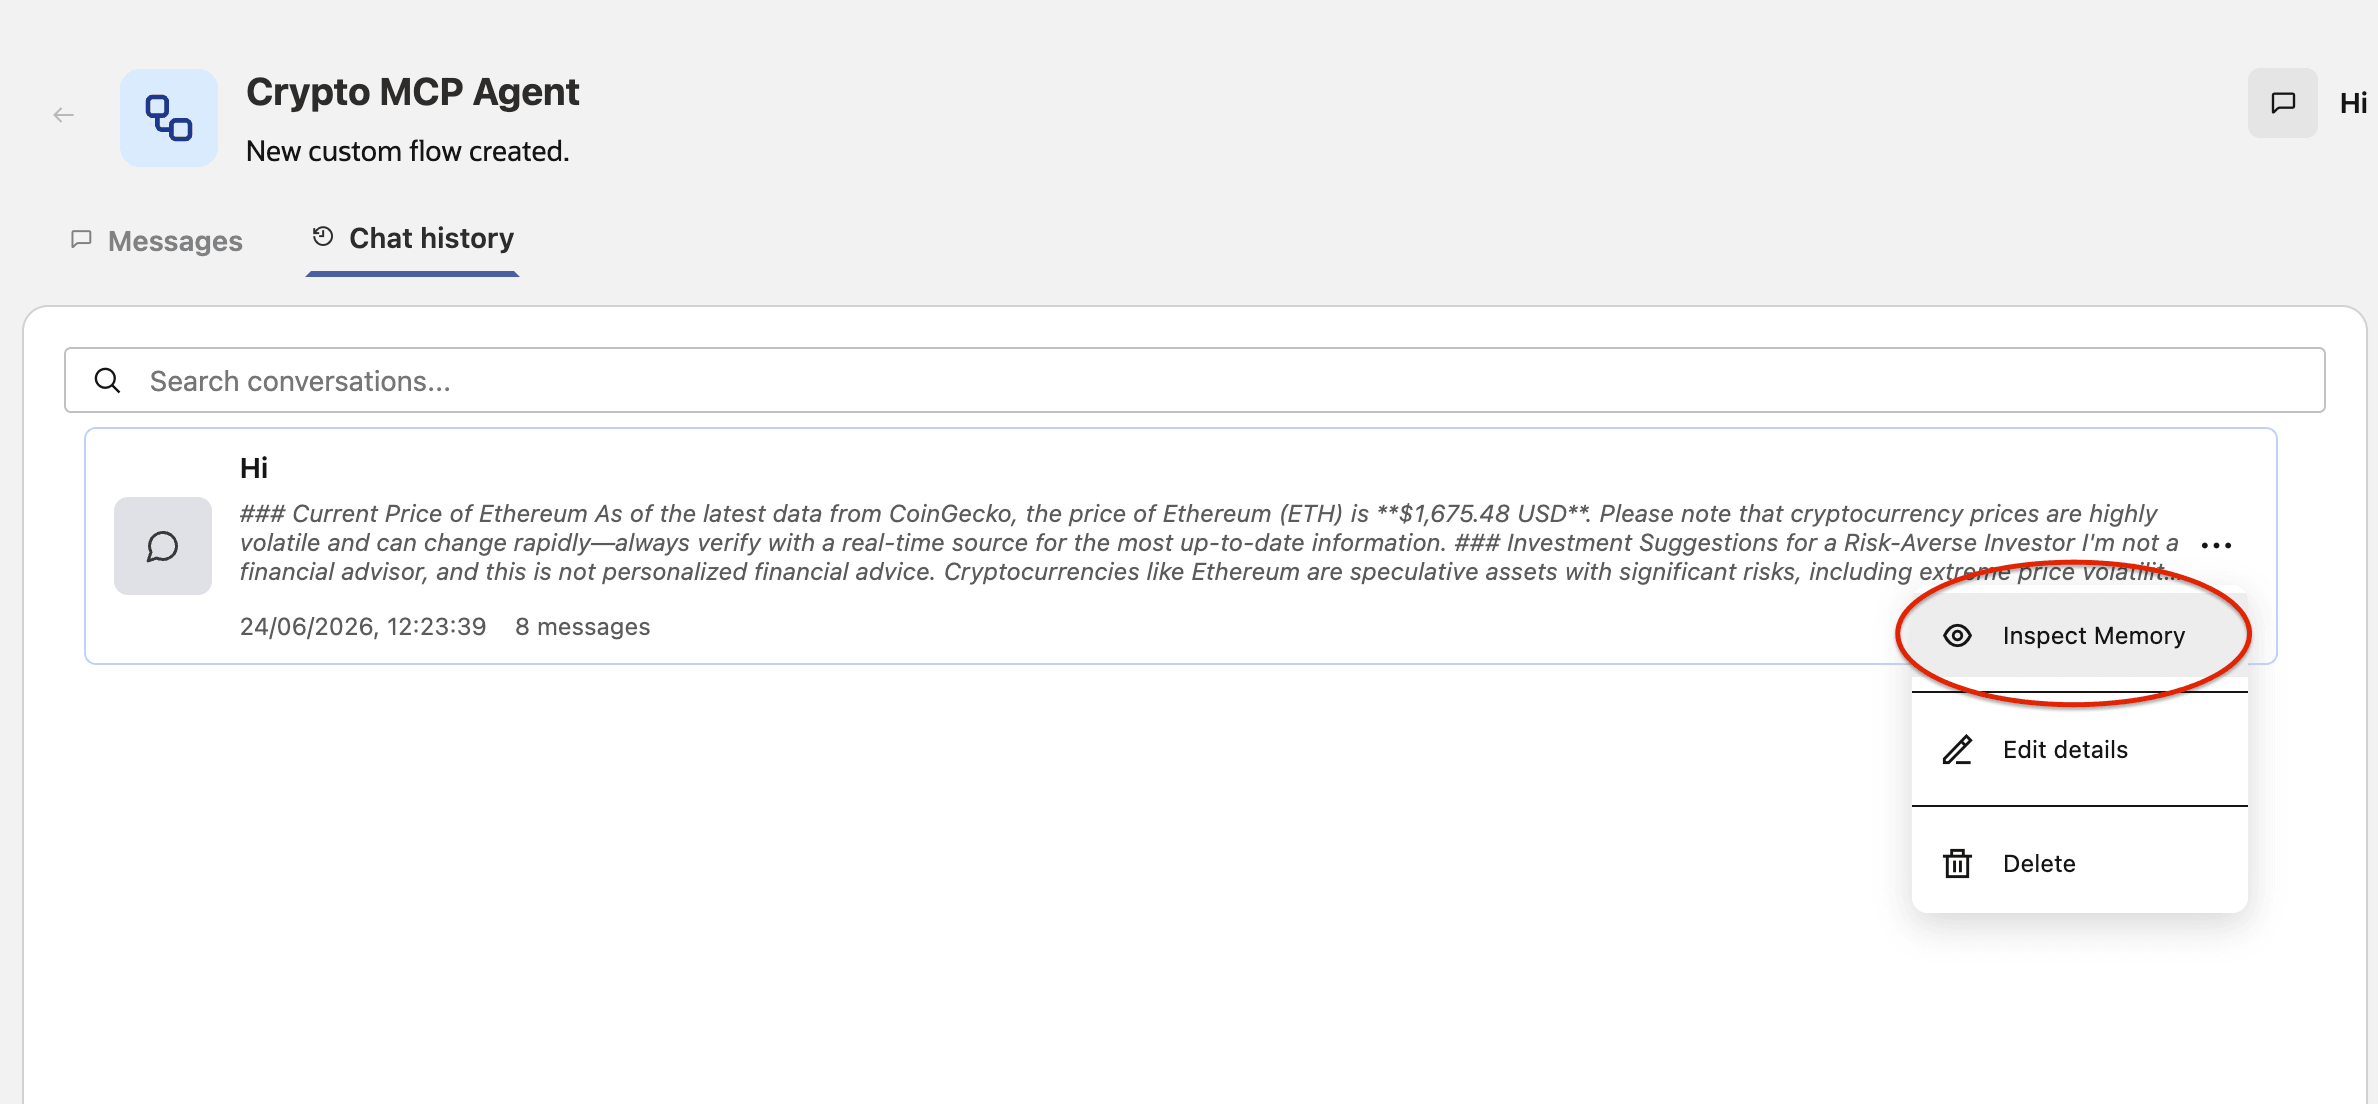
From the row menu for a chat, select Inspect Memory.
-
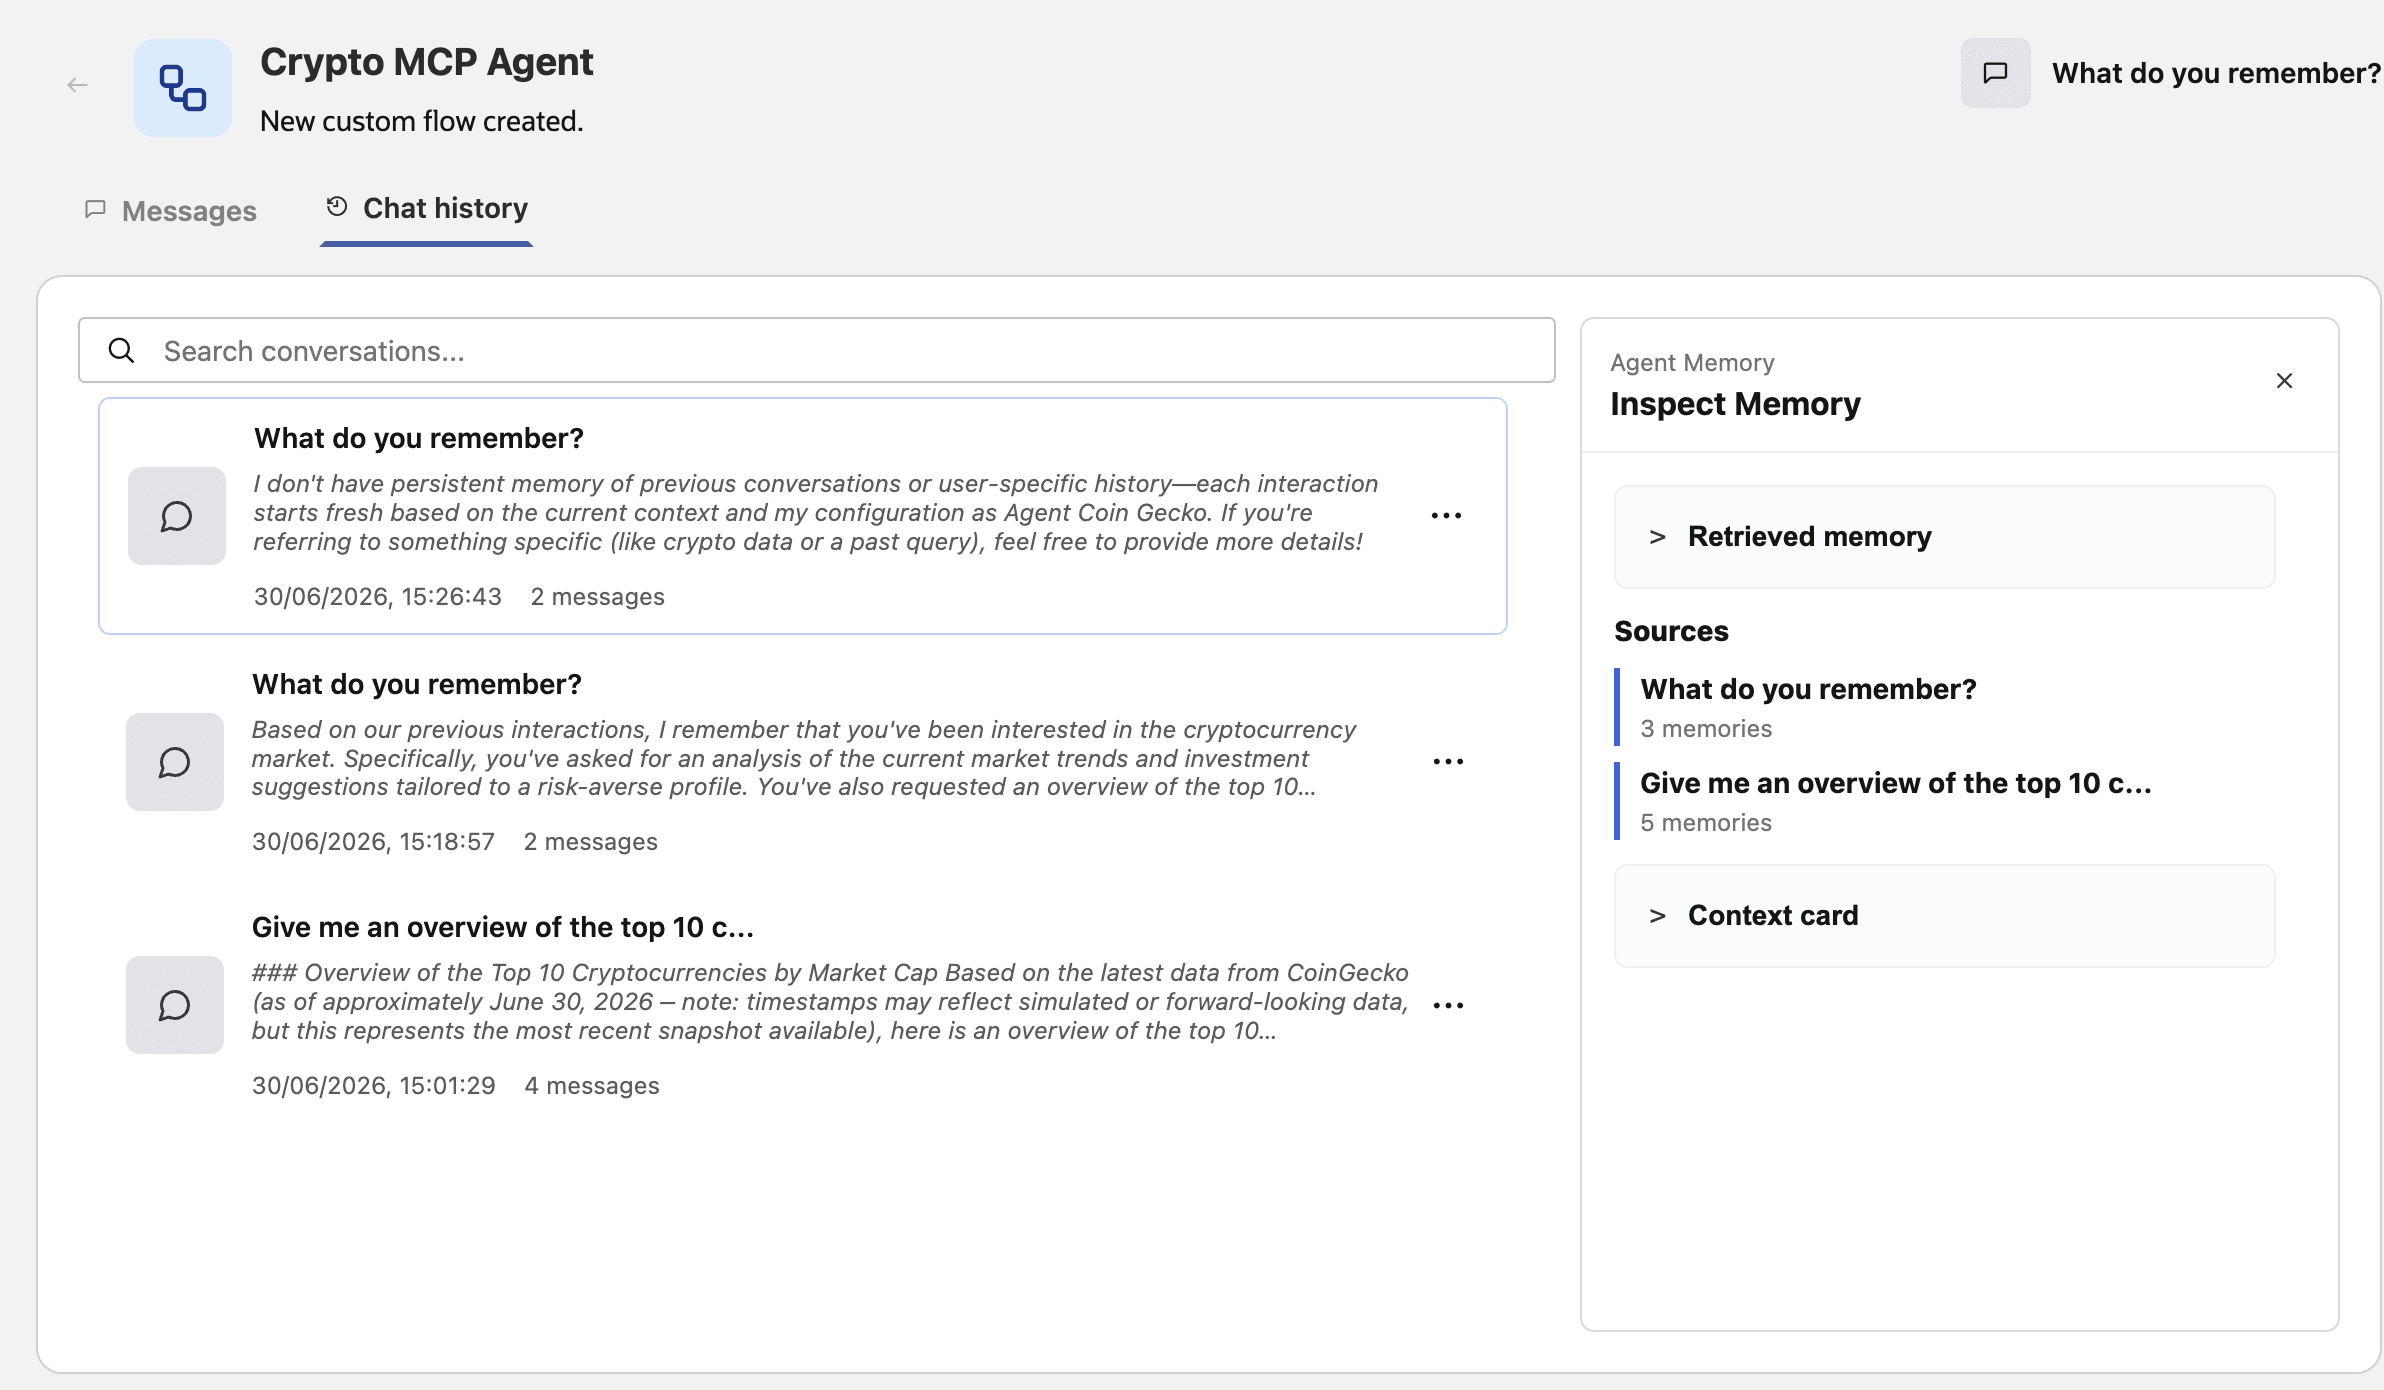
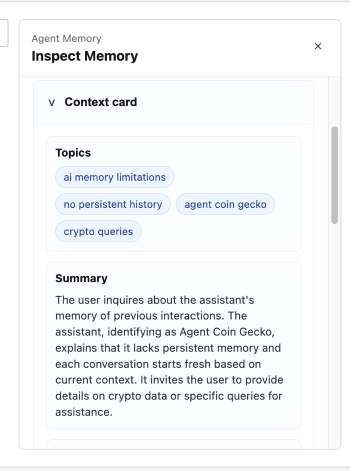
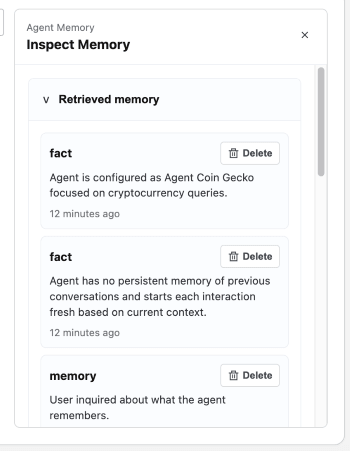
Inspect Memory displays memory records as cards with the record type, content, and timestamp. Source summaries are grouped by source chat or thread. Review retrieved memories, stored messages, sources, and context card details. Context card details load only when you expand the context card section.
-
To remove a durable memory, use the delete action for the memory record.
Note: Agent Factory handles chat deletion and memory deletion separately.
- Deleting a durable memory from Inspect Memory removes that memory record when the current user, workflow, and chat scope pass authorization checks.
- Deleting a single chat message deletes the raw memory package message for that chat message, but does not delete durable memories that were already extracted from it.
- Deleting a full chat conversation deletes memory package records associated with that chat thread.
Tip:
- Durable memory extraction runs asynchronously, so a newly stated fact may not be available immediately.
- Memory retrieval has a timeout. If retrieval is slow or fails, the workflow runs without memory context.
- Similar durable records can be created from repeated evidence. Agent Factory deduplicates retrieved memories for display and prompt use.
- Inspect and delete actions verify Agent Builder access, chat ownership, and workflow binding.
- The context card is shown in Inspect Memory for debugging and transparency. Chat responses do not show raw context cards or internal memory instructions.
Test and Debug Agents
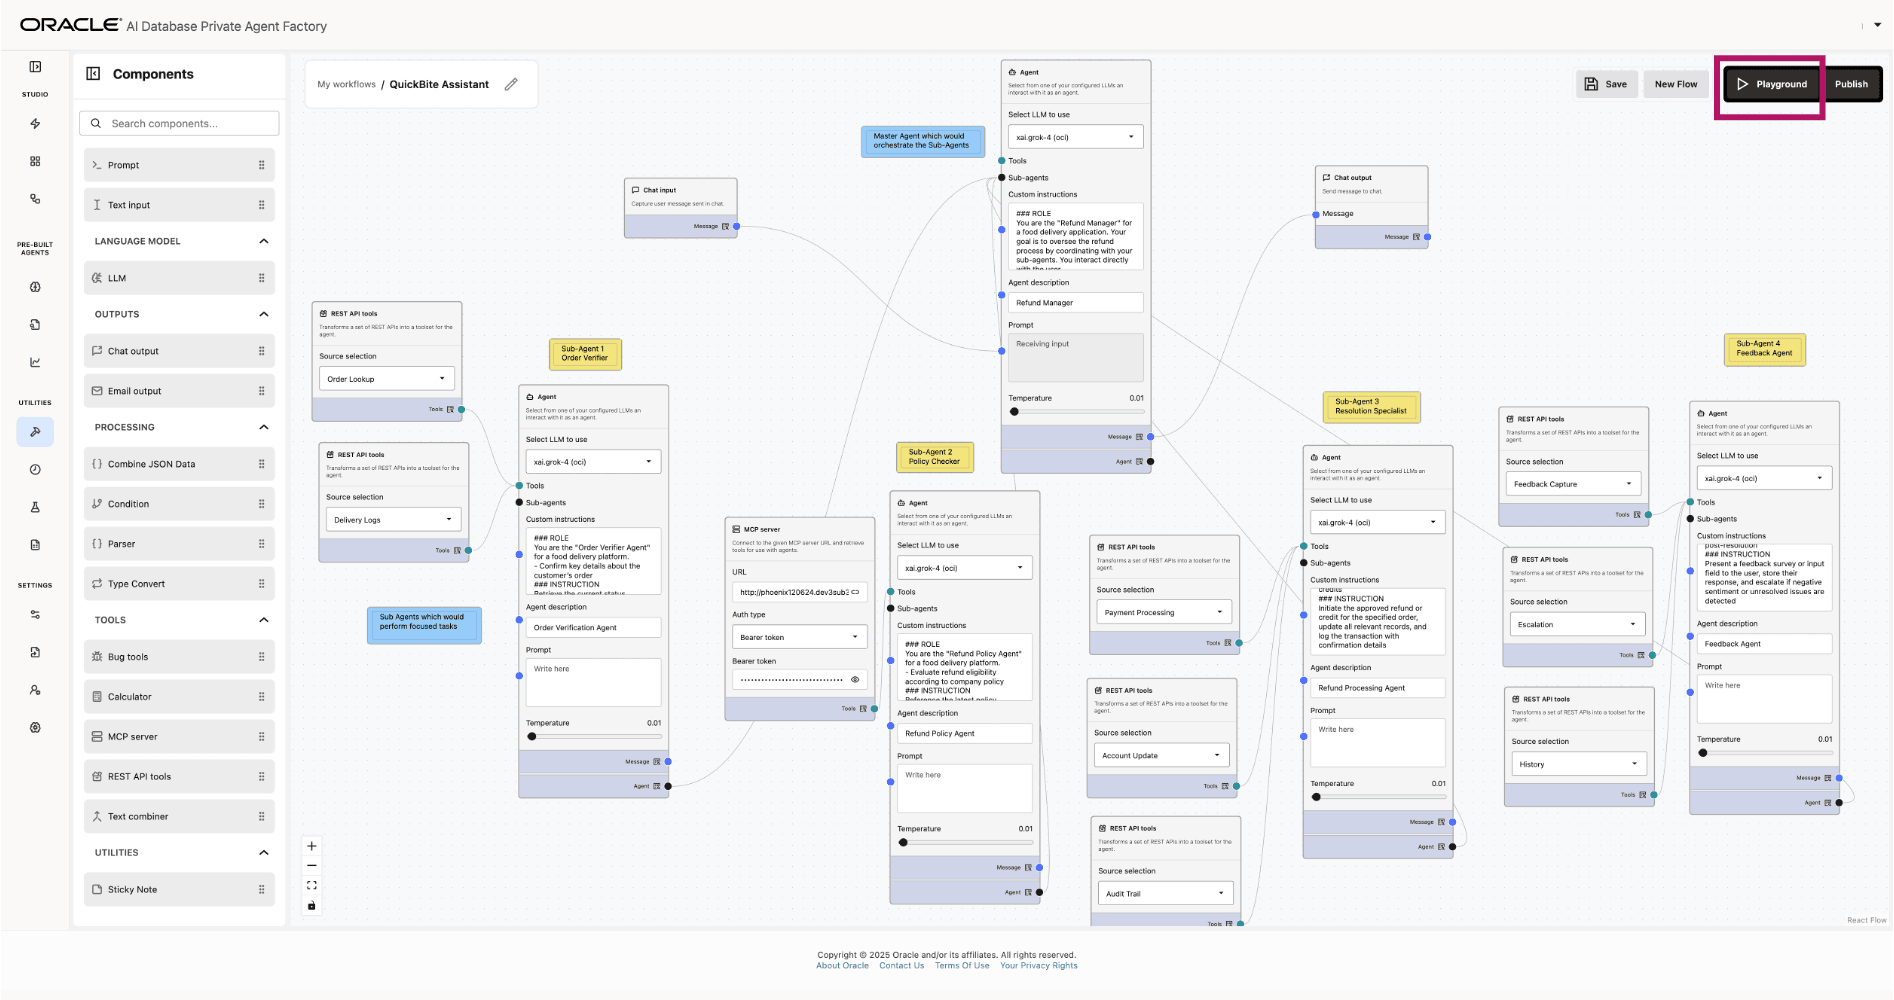
After you build your custom workflow, save the workflow by clicking Save. You can then quickly test the agent by clicking the Playground button. This will run your workflow so you can verify that the behavior is as expected or edit the workflow as needed. You can also run any of your agents by clicking Run Flow on the “My Custom Flows” page.
When you open Playground for a workflow with no chat messages, Agent Factory can show suggested questions that help you test the workflow. The suggestions are based on workflow metadata, node types, prompts, tool summaries, and available workflow capabilities. You can type and send your own prompt while suggestions are loading.
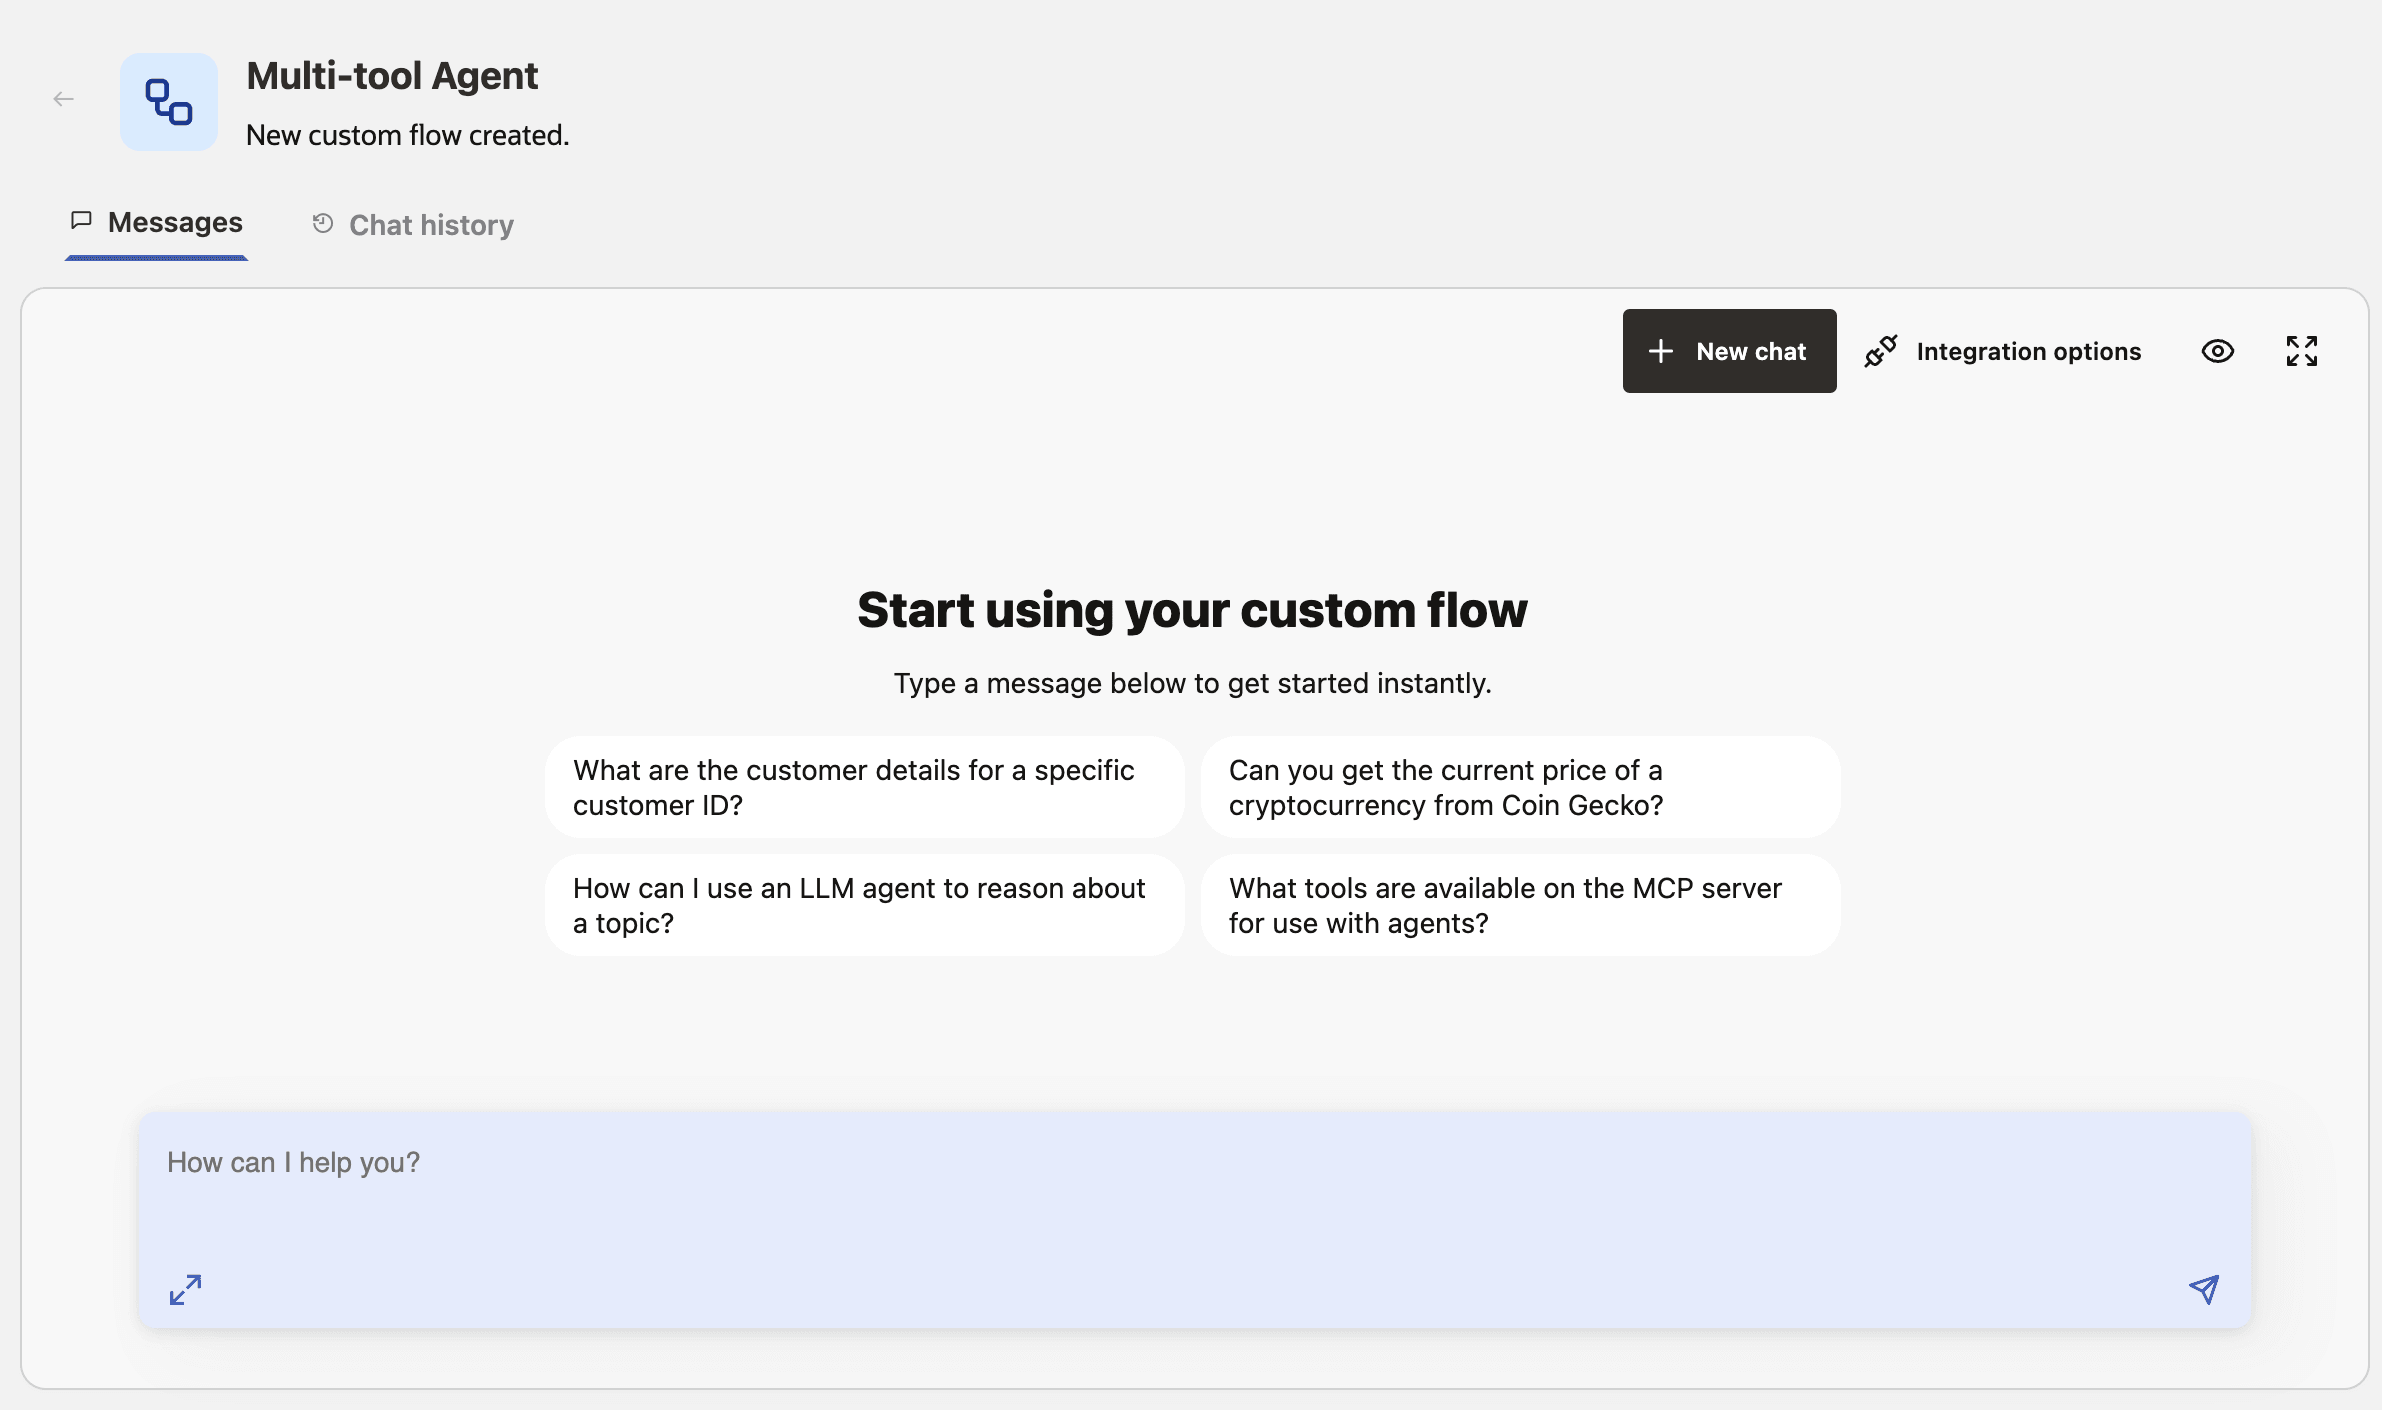
Suggested questions are starter prompts, not agent responses. Click a suggestion to send it through the same chat path as a manually entered prompt. Suggestions disappear after the chat contains messages, and they are disabled while the chat is loading or waiting for a response.
When a workflow fails:
- Confirm that the workflow saves without validation errors.
- Check node connections for type mismatches.
- Test model, REST API, MCP, database, or Select AI configurations outside the workflow.
- Simplify the workflow to the smallest failing path.
- Inspect tool descriptions and allowed-tool selections if the agent calls the wrong tool.
- Increase a tool timeout only after confirming the target service receives the request.
- Collect diagnostics if the UI error is not enough to identify the cause.
See Configure Observability and Collect Diagnostics for debugging and support.
Publish and Chat With Your Agents Outside the Application
Use Integration options in the chat window to connect to the agent from an external application by using an API key or the A2A protocol. Before connecting, publish the workflow: go to My Custom Flows, open the workflow, and click Publish.
Note: The SDK is not currently supported and will be available in upcoming releases.
API Key
Use an API key to invoke a Custom Workflow, Data Analysis Agent, Deep Research Agent, or Knowledge Agent without an agent_factory_session cookie. Custom Workflows must be published before external API-key execution.
Who Can Create and Manage API Keys
Only administrators can access API-key functionality in the user interface. Administrators see the API Key and Sample Code tabs in Integration options and can generate keys. Workflow owners and editors who are not administrators do not see these tabs, even when they can create or edit workflows.
Administrators can manage keys for all supported agents from Settings > Resource Management > API keys.
Create and Use an API Key
- Open the agent in the chat window and select Integration options.
- Select the API Key tab.
-
Click Generate API key. Agent Factory displays the generated API key in the user interface.
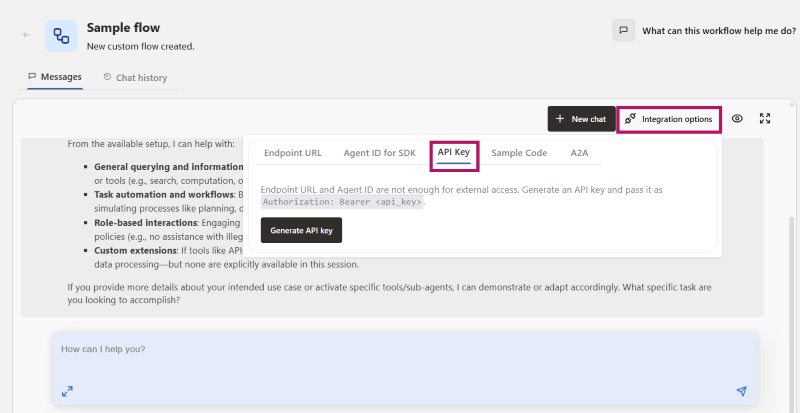
- Copy and securely store the generated key. Agent Factory displays the full value only at creation. You cannot view it later.
-
Use the API key to connect to the workflow or agent from an external application. For a request example, see the Sample Code tab. To send the request directly, use the agent ID and API key as a Bearer token in a
POSTrequest to the integration endpoint:curl -k --location 'https://<host_name>/agentFactory/v1/integrations/agents/<agent_id>/run' \ --header 'Authorization: Bearer <api_key>' \ --header 'Content-Type: application/json' \ --data '{"message":"what tools are available?"}'The service also accepts the
x-api-keyheader. IncluderoomIdin the request body to continue an existing conversation. A key is bound to one agent and runs requests as the user who created it.The procedure for using Knowledge Agents, Deep Data Research Agents, and Data Analysis Agents, outside the application remains the same. The URLs will be in the following format:
Knowledge Agent:
https://<hostname>/agentFactory/v1/knowledge/run/<agentId>Data Analysis Agent:https://<hostname>/agentFactory/v1/dataAnalysis/run/<agentId>Deep Data Research Agent:https://<hostname>/agentFactory/v1/deepResearch/run/<agent_id>
Manage the API Key Lifecycle
In Settings > Resource Management > API keys, administrators can review the agent or workflow, type, owner, key prefix, expiry, status, creation date, and last-use date. Full key values are never displayed.
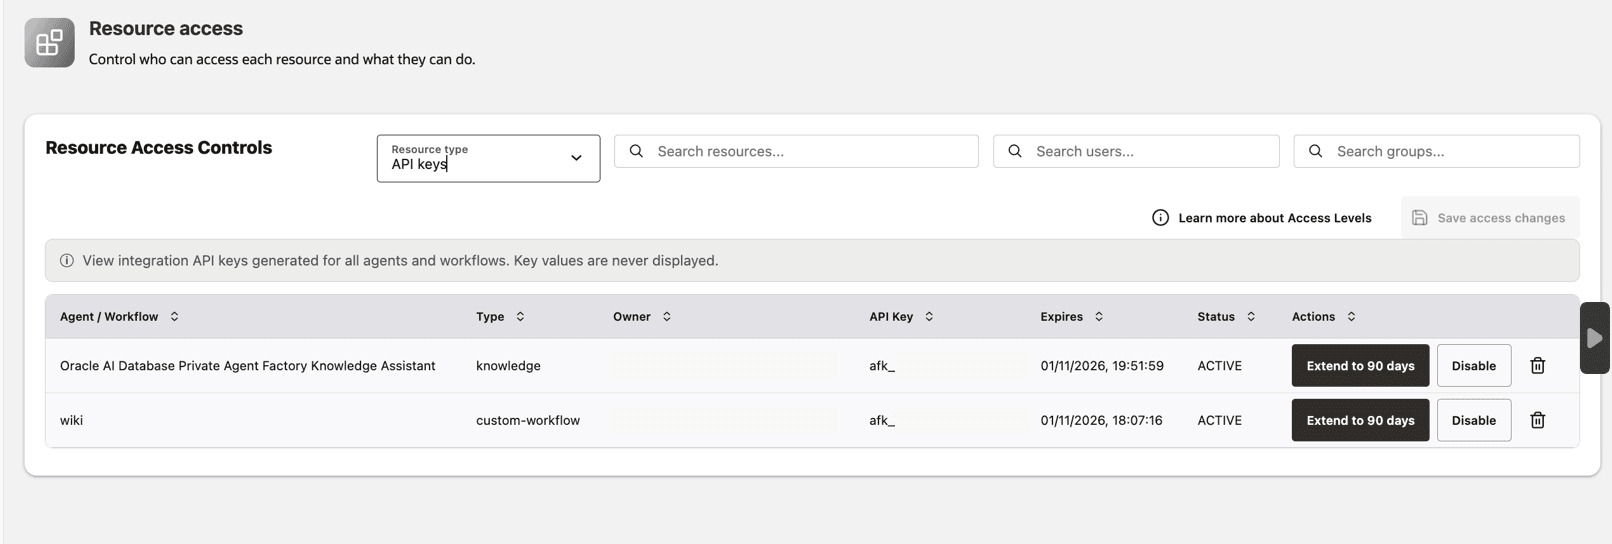
| Action | Result |
|---|---|
| Extend | Sets an active key expiry to 90 days from the current time. The expiry must be future-dated and cannot be more than 90 days ahead. |
| Disable | Changes an active key to revoked. Requests made with the key are rejected. |
| Enable | Reactivates a revoked key when the key is still unexpired. |
| Delete | Permanently marks the key deleted and removes it from the inventory. You cannot restore a deleted key. |
Resolve Integration Validation Errors
Use the error code in the integration response to resolve API-key validation issues.
| HTTP status | Error code | Action |
|---|---|---|
| 400 | INTEGRATION_REQUEST_INVALID |
Verify the request body and key expiry value. |
| 400 | INTEGRATION_AGENT_NOT_PUBLISHED |
Publish the Custom Workflow before invoking it through the integration endpoint. |
| 401 | INTEGRATION_KEY_INVALID |
Verify that you supplied a valid API key in the authorization header. |
| 401 | INTEGRATION_KEY_INACTIVE |
Generate a new key or use an active key. |
| 401 | INTEGRATION_KEY_EXPIRED |
Generate a new API key. |
| 403 | INTEGRATION_KEY_NOT_AUTHORIZED_FOR_TARGET |
Use the agent ID that is bound to the API key. |
| 403 | INTEGRATION_AGENT_NOT_AUTHORIZED |
Sign in as an administrator before managing keys. |
| 404 | INTEGRATION_AGENT_NOT_FOUND |
Verify that the agent ID identifies a supported agent. |
| 404 | INTEGRATION_ENDPOINT_NOT_FOUND |
Verify the integration endpoint URL. |
A2A
Use this option to expose a published Agent Factory agent to authorized external Agent2Agent (A2A) clients. Publishing an agent does not automatically enable A2A access.
- Publish the workflow.
- Open the published agent in the chat window and select Integration options.
- Select the A2A tab, then enable A2A access.
- Copy the Agent Card URL and provide it to the external A2A client.
- Generate an agent-specific A2A API key and provide it to the client as a Bearer token.
Use Utilities > A2A Agents to view the agent’s A2A status, endpoint, Agent Card, and API keys. See A2A Agents. Keep the generated key private. Agent Factory displays the raw key only when you create it.
A workflow that contains an External Agent node cannot be enabled as an inbound A2A agent. It can still use the External Agent node to delegate work to a trusted external A2A agent.