3.1.5 Understanding and Managing Reports and Output
Oracle Orachk and Oracle Exachk generate a detailed HTML report with findings and recommendations.
- Temporary Files and Directories
While running compliance checks, Oracle Orachk and Oracle Exachk create temporary directories and files for the purposes of data collection and assessment, and then delete them upon completion of compliance check runs. - Output Files and Directories
Oracle Orachk and Oracle Exachk create an output directory that contains various files for you to examine. - HTML Report Output
- Tagging Reports
The compliance check HTML report is typically named:orachk_hostname_database_date_timestamp.htmlorexachk_hostname_database_date_timestamp.html. - Tracking File Attribute Changes and Comparing Snapshots
Use the Oracle Orachk and Oracle Exachk-fileattroption and command flags to record and track file attribute settings, and compare snapshots. - Comparing Two Reports
Oracle Autonomous Health Framework automatically compare the two most recent HTML reports and generate a third diff report, when run in automated daemon mode. - Merging Reports
Merging reports is useful in role-separated environments where different users are run different subsets of checks and then you want to view everything as a whole. - Maintaining Temporary Files and Directories
Oracle Orachk and Oracle Exachk create a number of temporary files and directories while running compliance checks. - Consuming Multiple Results in Other Tools
Optionally integrate compliance check results into various other tools. - Generate Reports Only in the Formats You Need
With AHF 25.11, Oracle Exachk allows you to specify the desired report output formats, such as JSON, HTML, or XML, as a comma-delimited list. Oracle Exachk then generates reports only in the selected formats, reducing both the collection size and the overall processing time.
Related Topics
Parent topic: Compliance Checking with Oracle Orachk and Oracle Exachk
3.1.5.1 Temporary Files and Directories
While running compliance checks, Oracle Orachk and Oracle Exachk create temporary directories and files for the purposes of data collection and assessment, and then delete them upon completion of compliance check runs.
By default, Oracle Orachk and Oracle Exachk create temporary files and directories in the /opt/oracle.SupportTools/exachk or /opt/oracle.SupportTools/orachk directories if they exist, or in the $HOME directory of the user who runs the tool.
RAT_TMPDIR=tmp_directory before using the
tools:$ export RAT_TMPDIR=/tmp
$ orachk$ export RAT_TMPDIR=/tmp
$ exachkIf you are using sudo access for root, and change the RAT_TMPDIR=tmp_directory, then you must also reflect this change in the /etc/sudoers file.
/etc/sudoers file on each server must contain the entry for the root script in the new temporary directory location: oracle ALL=(root) NOPASSWD:/tmp/root_orachk.shoracle ALL=(root) NOPASSWD:/tmp/root_exachk.shroot script only by setting the environment variable.export RAT_ROOT_SH_DIR=/mylocation /etc/sudoers file as follows:oracle ALL=(root) NOPASSWD:/mylocation/root_orachk.shNote:
Any directory specified in RAT_TMPDIR must exist on the hosts for all cluster nodes.
Parent topic: Understanding and Managing Reports and Output
3.1.5.2 Output Files and Directories
Oracle Orachk and Oracle Exachk create an output directory that contains various files for you to examine.
utility_name host_name database date time_stamputilityis eitherorachkorexachkhost_nameis the host name of the node on which Oracle Orachk or Oracle Exachk was rundatabaseis the name of the database or one of the databases against which compliance checks were performed, if applicabledateis the date the compliance check was runtimestampis the time the compliance check was run
–output option as follows:$ orachk –output output_dir$ exachk –output output_dirRAT_OUTPUT environment variable as
follows:$ export RAT_OUTPUT=output_dir
$ orachk$ export RAT_OUTPUT=output_dir
$ exachk The contents of this directory is available in a zip file with the same name.
After completing the compliance checks, Oracle Orachk and Oracle Exachk report the location of this zip file and the HTML report file.
...
Detailed report (html) - /orahome/oradb/orachk/orachk_myhost_rdb11204_041816_055429/orachk_myhost_rdb11204_041816_055429.html


UPLOAD(if required) - /orahome/oradb/orachk/orachk_myhost_rdb11204_041816_055429.zip


$ ls -la
total 61832
drwxr-xr-x  4 oradb oinstall     4096 Apr 18 05:55 .
drwx------ 34 oradb oinstall     4096 Apr 18 05:58 ..
drwxr--r--  3 oradb oinstall     4096 Mar 28 17:36 .cgrep
-rw-r--r--  1 oradb oinstall  4692868 Mar 28 17:35 CollectionManager_App.sql
-rw-r--r--  1 oradb oinstall 41498425 Apr 18 05:54 collections.dat
-rwxr-xr-x  1 oradb oinstall  2730651 Mar 28 17:35 orachk
drwxr-xr-x  7 oradb oinstall     4096 Apr 18 05:55 orachk_myhost_rdb11204_041816_055429
-rw-r--r--  1 oradb oinstall    36141 Apr 18 05:55 orachk_myhost_rdb11204_041816_055429.zip
-rw-r--r--  1 oradb oinstall  9380260 Mar 28 19:02 orachk.zip
-rw-r--r--  1 oradb oinstall     3869 Mar 28 17:36 readme.txt
-rw-r--r--  1 oradb oinstall  4877997 Apr 18 05:54 rules.dat
-rw-r--r--  1 oradb oinstall    40052 Mar 28 17:35 sample_user_defined_checks.xml
-rw-r--r--  1 oradb oinstall     2888 Mar 28 17:35 user_defined_checks.xsd
-rw-r--r--  1 oradb oinstall      425 Mar 28 17:36 UserGuide.txt
The output directory contains several other directories and the main HTML report file.
$ cd orachk_myhost_rdb11204_041816_055429
$ ls -la
total 60
drwxr-xr-x 7 oradb oinstall  4096 Apr 18 05:55 .
drwxr-xr-x 4 oradb oinstall  4096 Apr 18 05:55 ..
drwxr-xr-x 2 oradb oinstall  4096 Apr 18 05:55 log
-rw-r--r-- 1 oradb oinstall 30815 Apr 18 05:55 orachk_myhost_rdb11204_041816_055429.html
drwxr-xr-x 4 oradb oinstall  4096 Apr 18 05:55 outfiles
drwxr-xr-x 2 oradb oinstall  4096 Apr 18 05:55 reports
drwxr-xr-x 2 oradb oinstall  4096 Apr 18 05:55 scripts
drwxr-xr-x 2 oradb oinstall  4096 Apr 18 05:55 upload
Oracle Oracle Orachk and Oracle Exachk each creates an output directory containing the following information depending on which tool you use:
Table 3-4 Output Files and Directories
| Output | Description |
|---|---|
|
|
Contains several log files recording details about the compliance check, including: Oracle Orachk:
Oracle Exachk:
|
|
|
Contains several the collection results. |
|
|
Contains subreports used to build the main report. |
|
|
Contains scripts used during collection. |
|
|
Contains files to upload collection results to a database for the Oracle Health Check Collections Manager to consume, integrate the results into your own application, or integrate into other utilities. |
|
|
Oracle Orachk: Main HTML report output using the same name format as the output directory: |
|
|
Oracle Exachk: Main HTML report output using the same name format as the output directory: |
3.1.5.3 HTML Report Output
The compliance check HTML report contains the following:
-
High level health score
-
Summary of the run
-
Table of contents that provides easy access to findings
-
Findings and recommendations to resolve the issues
- System Health Score and Summary
Oracle Orachk and Oracle Exachk calculate a high-level System Health Score based on the number of passed or failed compliance checks. - HTML Report Table of Contents and Features
The Table of Contents provides links to each of the major sections within the HTML report. - Security Checks Section in Oracle Orachk and Oracle Exachk Reports
Beginning with AHF 24.5, Oracle Orachk and Oracle Exachk reports include a new Security section that consolidates all best practice security-related checks. - HTML Report Findings
Report findings are grouped by Oracle Stack component. - Maximum Availability Architecture (MAA) Scorecard
The Maximum Availability Architecture (MAA) Scorecard is displayed after the Findings group. - Findings Needing Further Review
Issues that compliance checks have only a partial view and need user reviews to determine if they are relevant are displayed in the Findings needing further review section. - Platinum Certification
The Platinum Certification section shows a list of compliance status items for the Oracle Platinum service. - Viewing Clusterwide Linux Operating System Compliance Check (VMPScan)
On Linux systems, view a summary of the VMPScan report in the Clusterwide Linux Operating System Health check (VMPScan) section of the compliance check report. - "Systemwide Automatic Service Request (ASR) healthcheck" Section
asrexacheckis designed to check and test ASR configurations to ensure that communication to the ASR Manager is possible. - File Attribute Changes
The File Attribute Changes section is shown in the report only when Oracle Orachk and Oracle Exachk is run with the–fileattroption. - Skipped Checks
Any checks that were not able to be run and skipped for some reason are shown in the Skipped Checks section. - Component Elapsed Times
The Component Elapsed Times gives a breakdown of time required to check various components. - Top 10 Time Consuming Checks
The Top 10 Time Consuming Checks section shows the slowest 10 checks that were run. - How to Find a Check ID
Each compliance check has a unique 32 character ID. - Finding Execution Time (in Seconds) for Checks
Starting with AHF 26.1, you can view the execution time for each check to better understand where time is spent during a run. Use the Show Check Timings option from the left pane under Other Settings to display the time taken by individual checks. - How to Remove Checks from an Existing HTML Report
Hide individual findings from the report using Remove findings .
Parent topic: Understanding and Managing Reports and Output
3.1.5.3.1 System Health Score and Summary
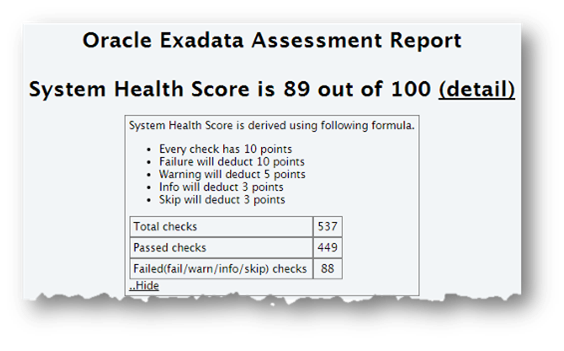
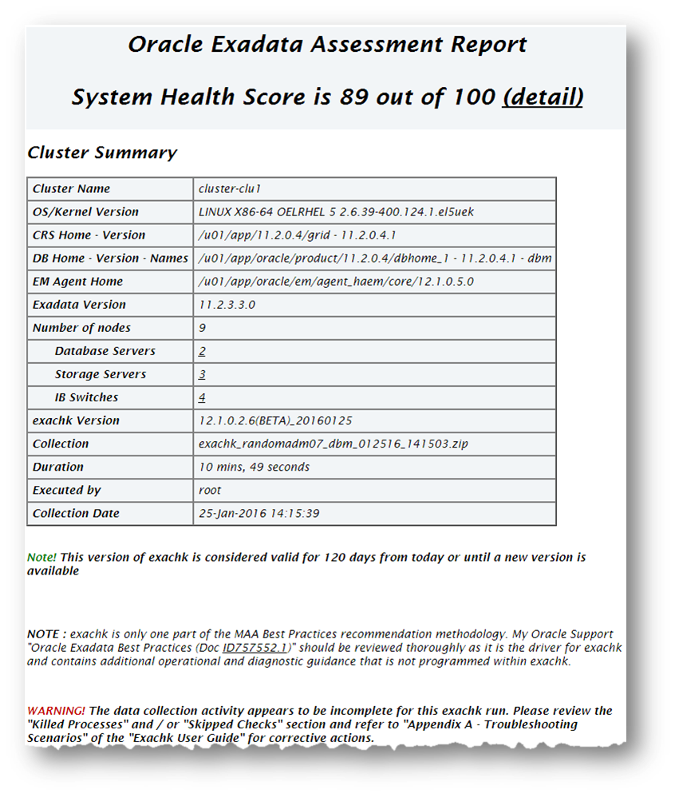
Oracle Orachk and Oracle Exachk calculate a high-level System Health Score based on the number of passed or failed compliance checks.
A summary of the run shows, where and when it was run, which version was used, how long it took, which user it was run as, and so on.
Figure 3-3 System Health Score and Summary
Description of "Figure 3-3 System Health Score and Summary"
Click the detail link to expand the System Health Score section to view details of how this is calculated.
–noscore
option:$ orachk –noscore$ exachk –noscoreRelated Topics
Parent topic: HTML Report Output
3.1.5.3.2 HTML Report Table of Contents and Features
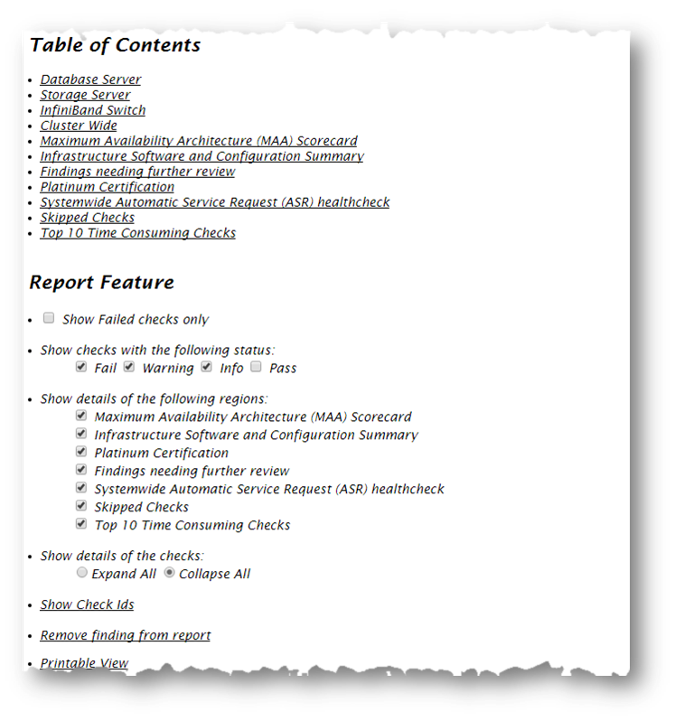
The Table of Contents provides links to each of the major sections within the HTML report.
The next section in the HTML report after the summary is the Table of Contents and Report Features:
-
The Table of Contents provides links to each of the major sections within the HTML report
-
What is shown in the Table of Contents will depend on the Oracle Stack components found during the compliance check run.
-
-
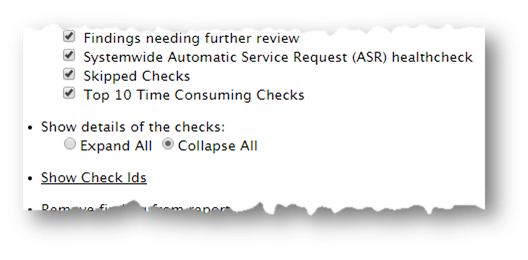
The Report Features allow you to:
-
Filter checks based on their statuses.
-
Select the regions.
-
Expand or collapse all checks.
-
View check IDs.
-
Remove findings from the report.
-
Get a printable view.
-
–nopass
option:$ orachk –nopass$ exachk –nopassFigure 3-5 Report Table of Contents and Features
Description of "Figure 3-5 Report Table of Contents and Features"
Related Topics
Parent topic: HTML Report Output
3.1.5.3.3 Security Checks Section in Oracle Orachk and Oracle Exachk Reports
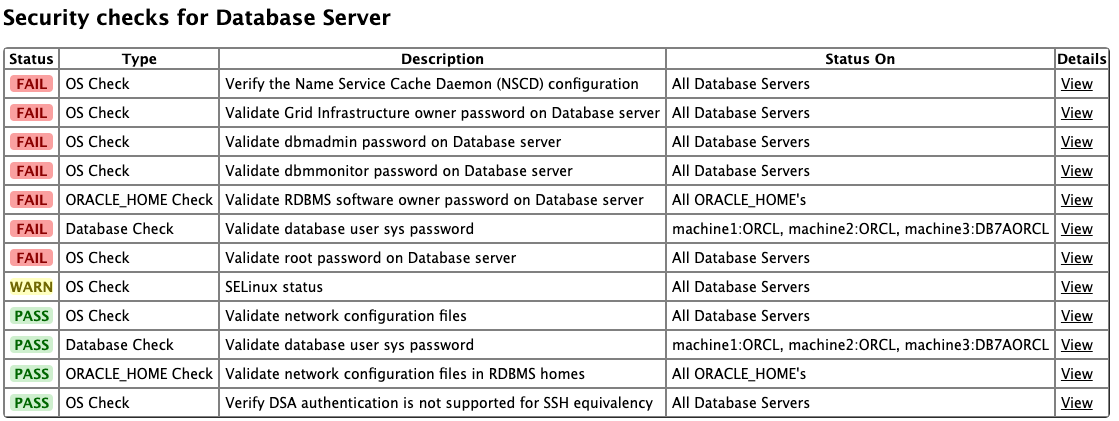
Beginning with AHF 24.5, Oracle Orachk and Oracle Exachk reports include a new Security section that consolidates all best practice security-related checks.
The Security section contains selected controls that may impact the overall security of a system.
Security controls are typically reviewed for impact against Confidentiality, Integrity, and Availability (CIA). The National Institute of Standards and Technology (NIST) definition of CIA is as follows:
- Confidentiality: Preserving authorized restrictions on information access and disclosure, including means for protecting personal privacy and proprietary information
- Integrity: Guarding against improper information modification or destruction and ensuring information non-repudiation and authenticity
- Availability: Ensuring timely and reliable access to and use of information
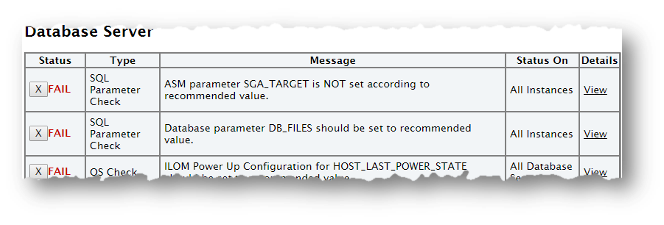
Figure 3-6 Security checks for Database Server
For more information about general security guidelines, refer to Oracle Exadata Database Machine Security FAQ (Doc ID 2751741.1).
Parent topic: HTML Report Output
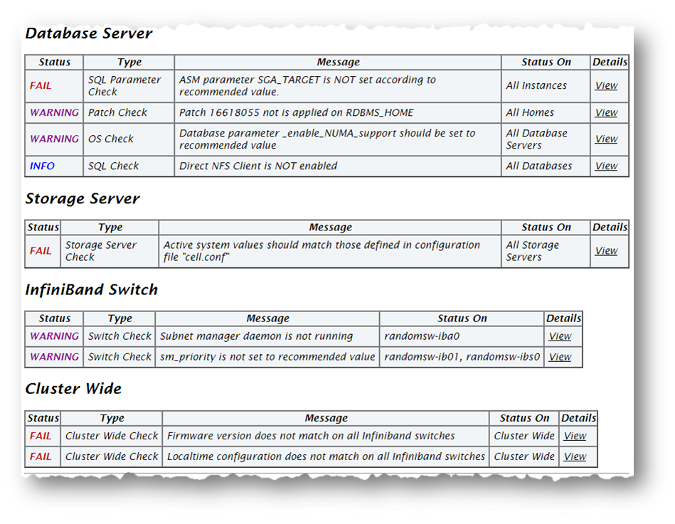
3.1.5.3.4 HTML Report Findings
Report findings are grouped by Oracle Stack component.
Findings include:
-
Status of check (
FAIL,WARNING,INFO, orPASS) -
Type of check
-
Check message
-
Location where the check was run
-
Link to expand details for further findings and recommendations
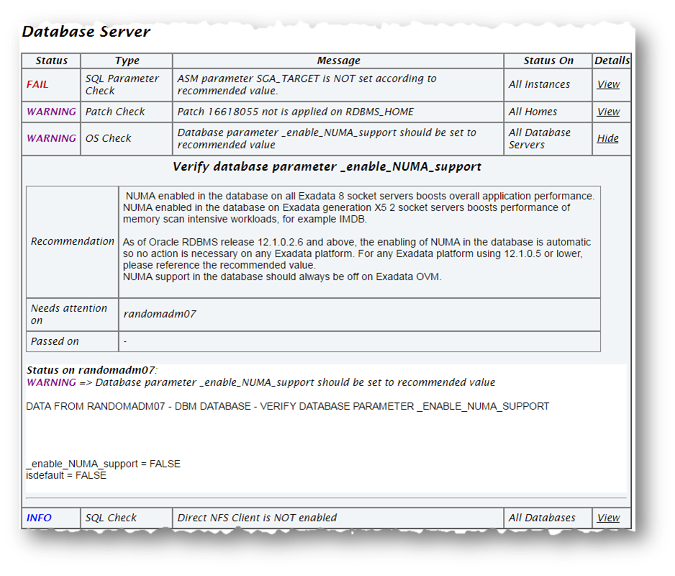
Click view details to view the findings and the recommendations.
-
Solution to solve the problem
-
Applicable recommendations
-
Where the problem does not apply
-
Links to relevant documentation or My Oracle Support notes
-
Example of data the recommendation is based on
Parent topic: HTML Report Output
3.1.5.3.5 Maximum Availability Architecture (MAA) Scorecard
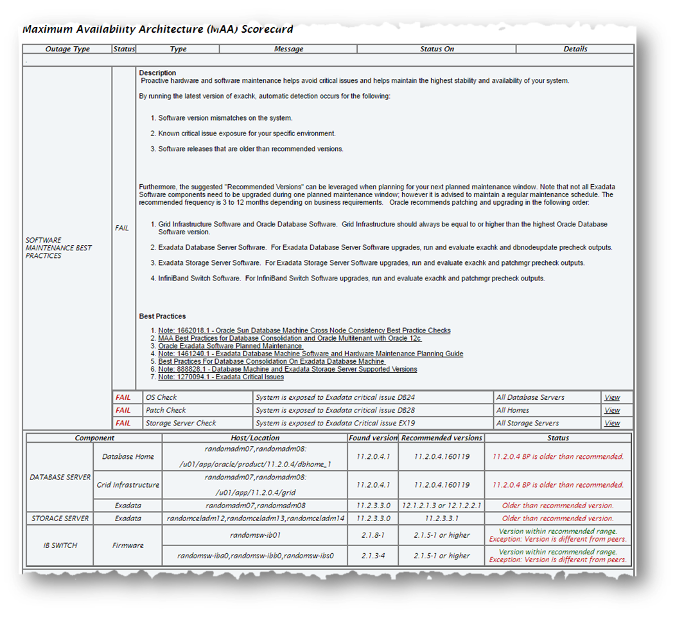
The Maximum Availability Architecture (MAA) Scorecard is displayed after the Findings group.
The MAA Scorecard provides a set of best practices for maximum availability architecture. It also shows results related to maximum availability, such as the installed software versions checked for noncurrent software, and use of incompatible features.
Figure 3-9 Maximum Availability Architecture (MAA) Scorecard
Description of "Figure 3-9 Maximum Availability Architecture (MAA) Scorecard"
-m
option:$ orachk –m$ exachk –mRelated Topics
Parent topic: HTML Report Output
3.1.5.3.6 Findings Needing Further Review
Issues that compliance checks have only a partial view and need user reviews to determine if they are relevant are displayed in the Findings needing further review section.
Figure 3-10 Findings needing further review

Description of "Figure 3-10 Findings needing further review"
Parent topic: HTML Report Output
3.1.5.3.7 Platinum Certification
The Platinum Certification section shows a list of compliance status items for the Oracle Platinum service.
For the existing Platinum customers it is a review. For customers not yet participating in Oracle Platinum, it is an indication of readiness to participate in Oracle Platinum.
Note:
This section is seen when compliance checks are run on Oracle Engineered Systems.
Parent topic: HTML Report Output
3.1.5.3.8 Viewing Clusterwide Linux Operating System Compliance Check (VMPScan)
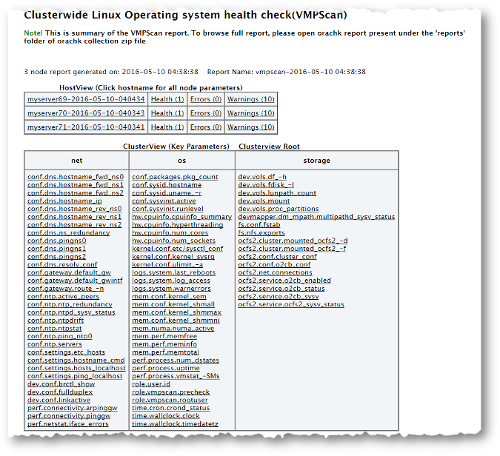
On Linux systems, view a summary of the VMPScan report in the Clusterwide Linux Operating System Health check (VMPScan) section of the compliance check report.
The full VMPScan report is also available within the collection/reports and collection/outfiles/vmpscan directory.
Figure 3-12 Clusterwide Linux Operating System Health Check (VMPScan)
Description of "Figure 3-12 Clusterwide Linux Operating System Health Check (VMPScan)"
Note:
The VMPScan report is included only when Oracle Orachk is run on Linux systems.
Parent topic: HTML Report Output
3.1.5.3.9 "Systemwide Automatic Service Request (ASR) healthcheck" Section
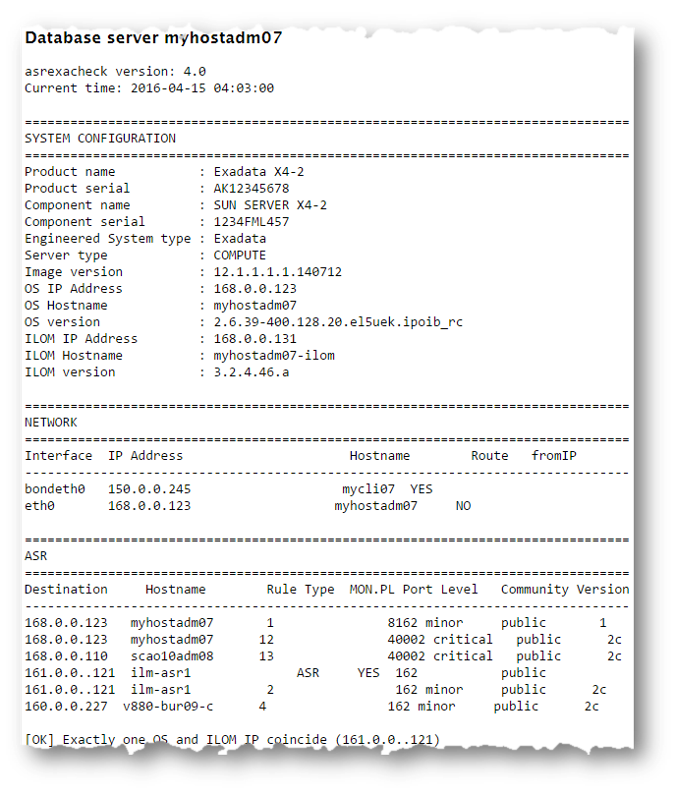
asrexacheck is designed to check and test ASR configurations to ensure that communication to the ASR Manager is possible.
This is a non-invasive script that checks configurations only and does not write to any system or configuration files. The script checks for known configuration issues and any previous hardware faults that may not have been reported by ASR due to a misconfiguration on the BDA.
This section is included in the report only when the compliance checks are run on Oracle Engineered Systems.
The following is a sample of the Systemwide Automatic Service Request (ASR) healthcheck section truncated for brevity:
Figure 3-13 Systemwide Automatic Service Request (ASR) healthcheck
Description of "Figure 3-13 Systemwide Automatic Service Request (ASR) healthcheck"
Related Topics
Parent topic: HTML Report Output
3.1.5.3.10 File Attribute Changes
The File Attribute Changes section is shown in the report only when Oracle Orachk and Oracle Exachk is run with the –fileattr option.
Parent topic: HTML Report Output
3.1.5.3.11 Skipped Checks
Any checks that were not able to be run and skipped for some reason are shown in the Skipped Checks section.
Related Topics
Parent topic: HTML Report Output
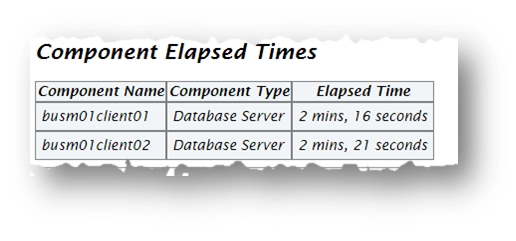
3.1.5.3.12 Component Elapsed Times
The Component Elapsed Times gives a breakdown of time required to check various components.
This can be useful when diagnosing performance problems.
Related Topics
Parent topic: HTML Report Output
3.1.5.3.13 Top 10 Time Consuming Checks
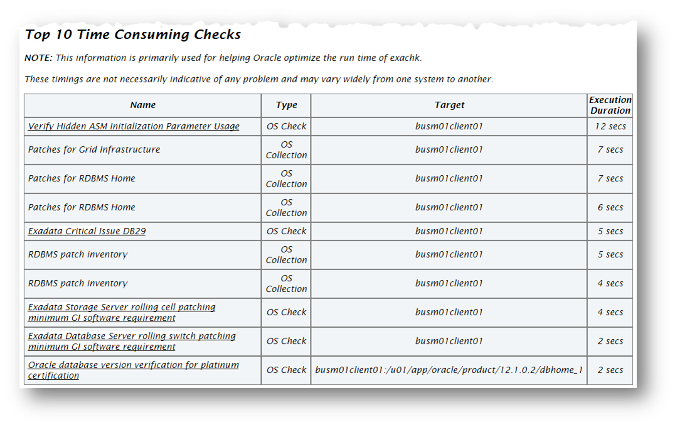
The Top 10 Time Consuming Checks section shows the slowest 10 checks that were run.
This can be useful when diagnosing performance problems.
Related Topics
Parent topic: HTML Report Output
3.1.5.3.14 How to Find a Check ID
Each compliance check has a unique 32 character ID.
You may want to find a check id while:
-
Communicating to Oracle or your own internal teams about a specific check
-
Excluding or only running one or more checks
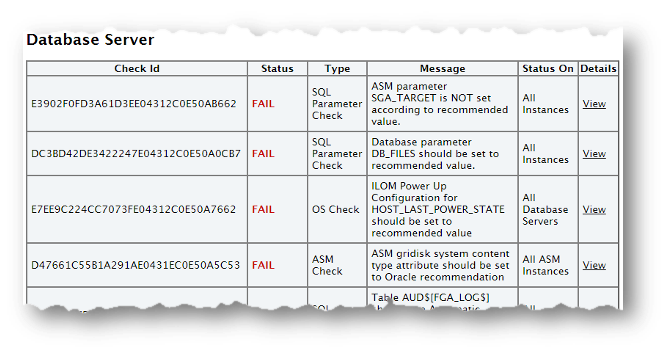
To find a particular check id using a generated report, click the Show Check Ids link.
The findings will then display an extra column to the left with the Check Id.
Related Topics
Parent topic: HTML Report Output
3.1.5.3.15 Finding Execution Time (in Seconds) for Checks
Starting with AHF 26.1, you can view the execution time for each check to better understand where time is spent during a run. Use the Show Check Timings option from the left pane under Other Settings to display the time taken by individual checks.
This information helps you identify checks that consume the most time and may require further investigation or tuning. For better clarity and traceability, it is recommended to use this option in combination with Show Check IDs, which allows you to easily correlate execution times with specific checks.
Figure 3-20 Show Check Timings
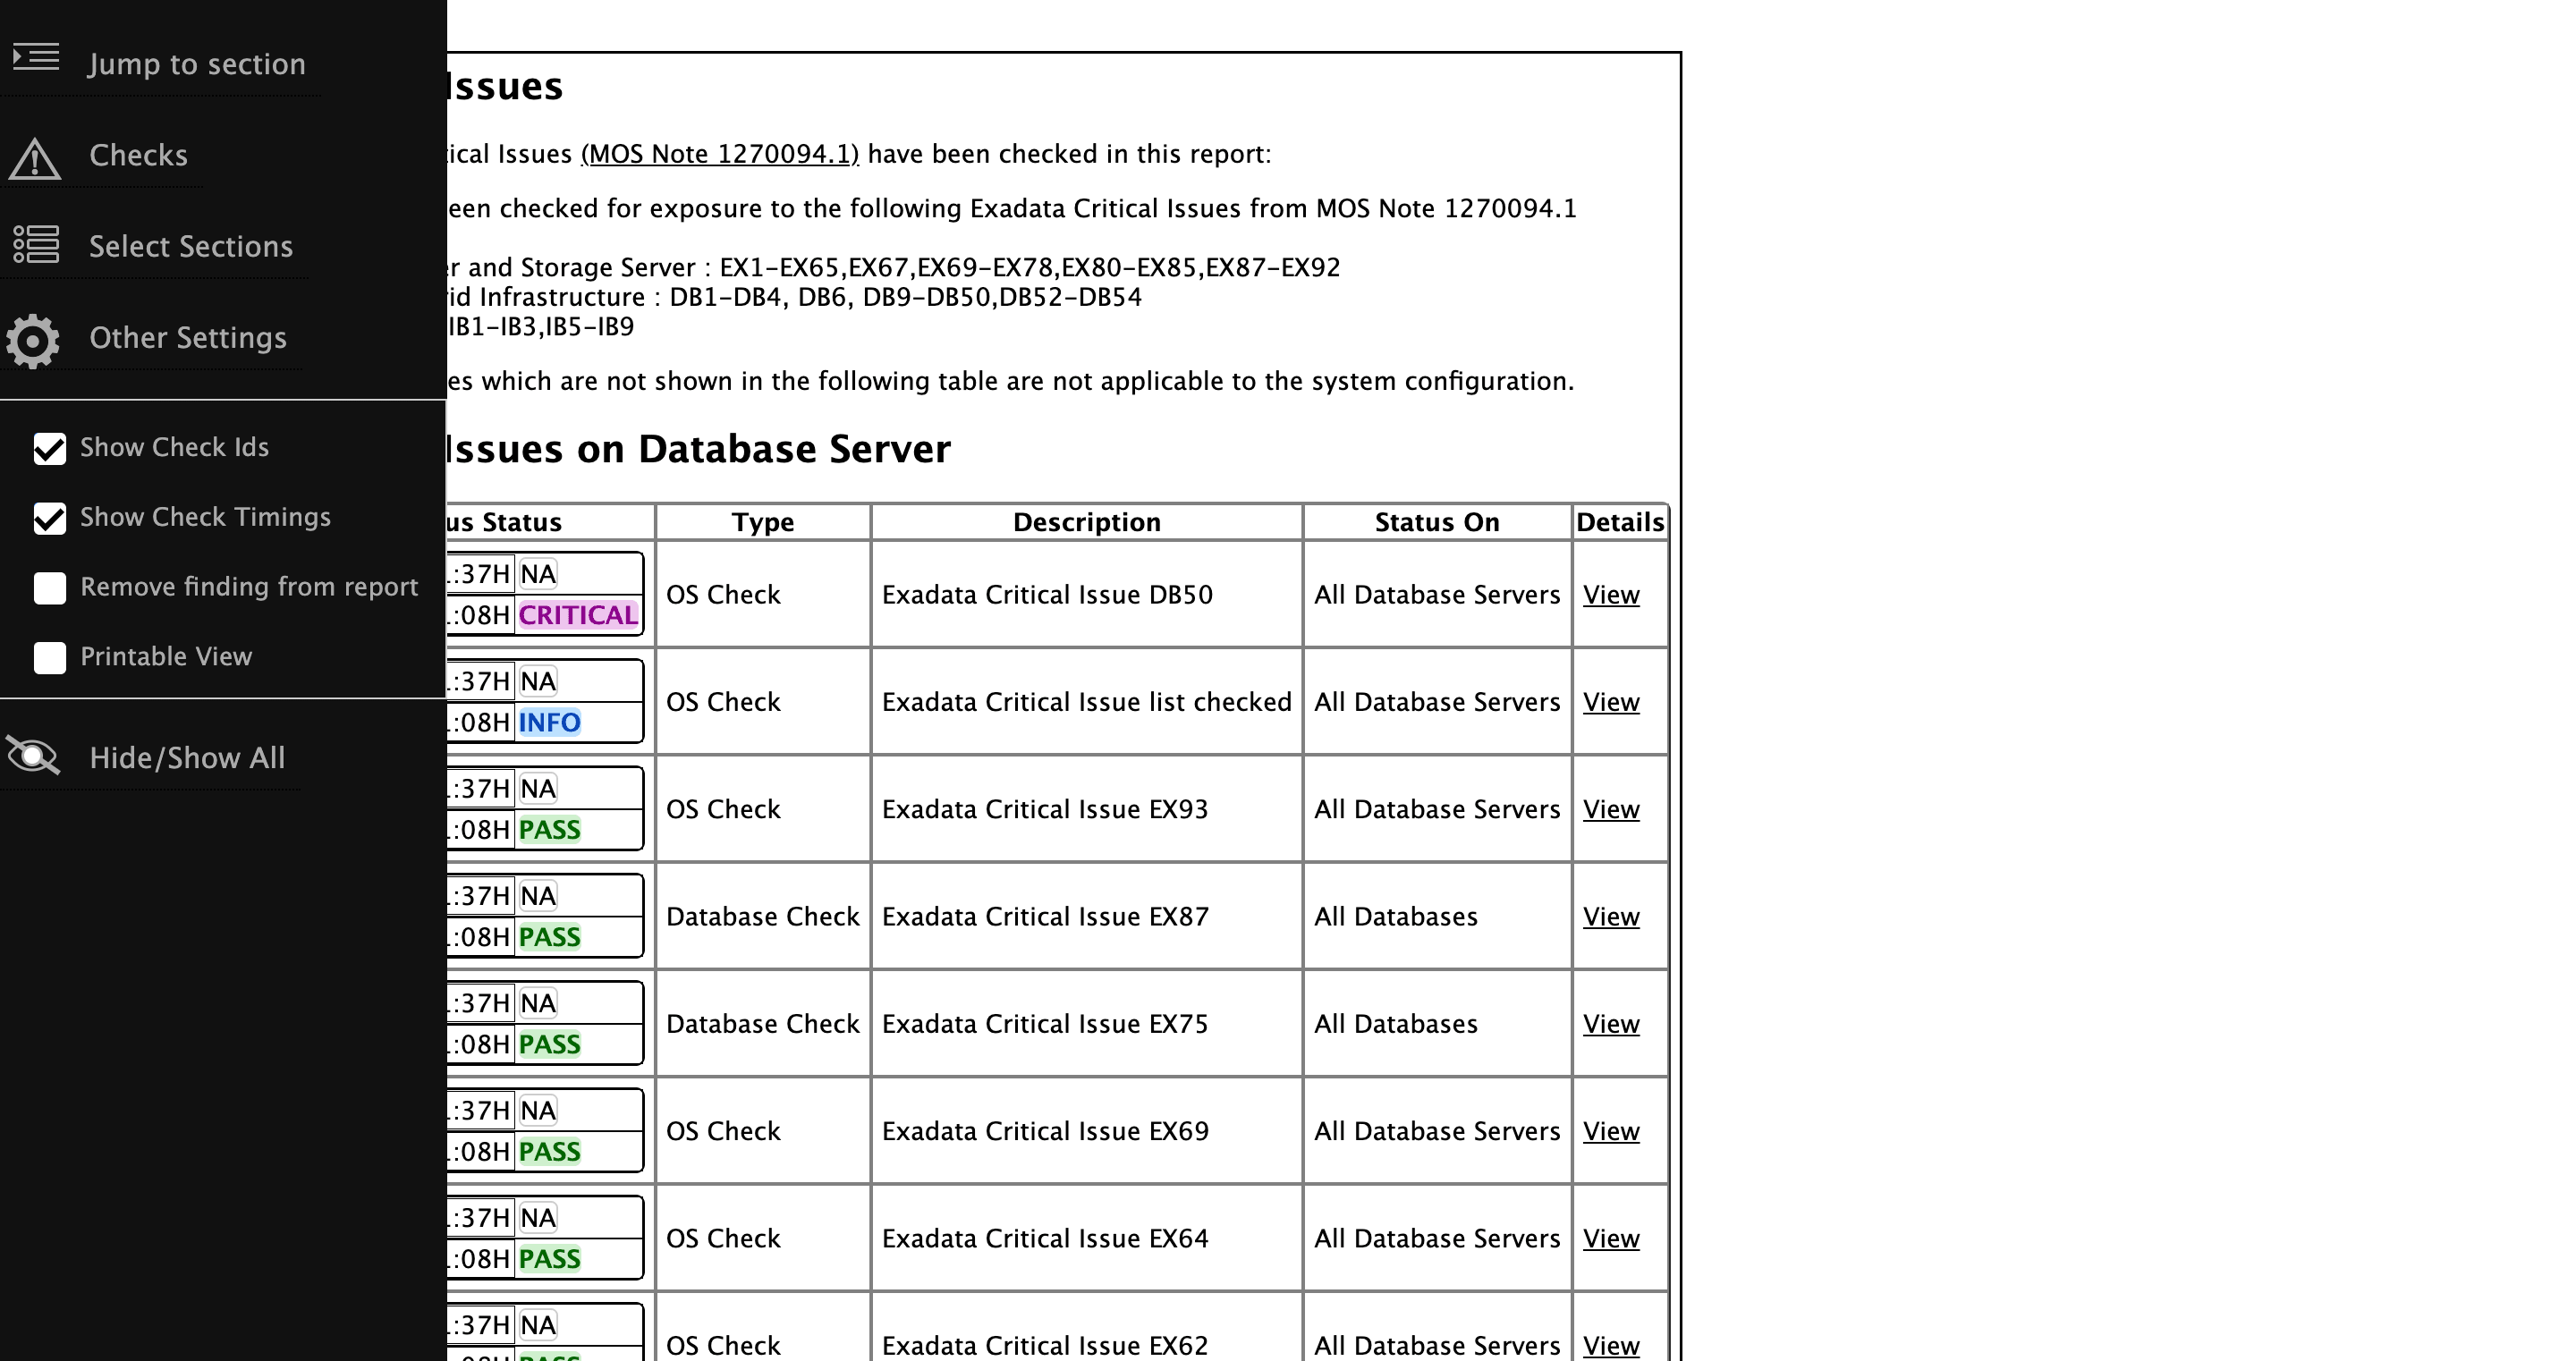
Figure 3-21 Execution Time

Parent topic: HTML Report Output
3.1.5.3.16 How to Remove Checks from an Existing HTML Report
Hide individual findings from the report using Remove findings .
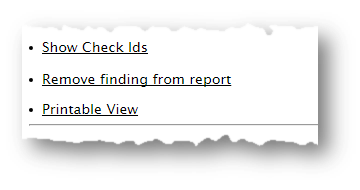
Click Remove finding from report.
A button with an X appears next to each finding.
Click X to hide the finding. This does not remove the finding from the source of the HTML report it simply hides it. If the HTML report is reloaded the finding will appear again.
To permanently hide the finding use your browser’s Save Page option to save the report once the finding is hidden.
If there are findings that you never want to see in the report, then they can be excluded altogether so the checks are never run in the first place.
Related Topics
Parent topic: HTML Report Output
3.1.5.4 Tagging Reports
The compliance check HTML report is typically named: orachk_hostname_database_date_timestamp.html or exachk_hostname_database_date_timestamp.html.
You can include other tags in the HTML report name to facilitate differentiation and identification.
Include a custom tag in the HTML report name as follows:
$ orachk –tag tag_name$ exachk –tag tag_nameorachk_host_name_database_date_timestamp_tag_name.htmlexachk_host_name_database_date_timestamp_tag_name.htmlParent topic: Understanding and Managing Reports and Output
3.1.5.5 Tracking File Attribute Changes and Comparing Snapshots
Use the Oracle Orachk and Oracle Exachk -fileattr option and command flags to record and track file attribute settings, and compare snapshots.
Changes to the attributes of files such as owner, group, or permissions can cause unexpected consequences. Proactively monitor and mitigate the issues before your business gets impacted.
- Using the File Attribute Check With the Daemon
You must have Oracle Grid Infrastructure installed and running before you use-fileattr. - Taking File Attribute Snapshots
By default, Oracle Grid Infrastructure homes and all the installed Oracle Database homes are included in the snapshots. - Including Directories to Check
Include directories in the file attribute changes check. - Excluding Directories from Checks
Exclude directories from file attribute changes checks. - Rechecking Changes
Compare the new snapshot with the previous one to track changes. - Designating a Snapshot As a Baseline
Designate a snapshot as a baseline to compare with other snapshots. - Restricting System Checks
Restrict Oracle Orachk and Oracle Exachk to perform only file attribute changes checks. - Removing Snapshots
Remove the snapshots diligently.
Parent topic: Understanding and Managing Reports and Output
3.1.5.5.1 Using the File Attribute Check With the Daemon
You must have Oracle Grid Infrastructure installed and running before you use -fileattr.
To use file attribute check with the daemon:
Parent topic: Tracking File Attribute Changes and Comparing Snapshots
3.1.5.5.2 Taking File Attribute Snapshots
By default, Oracle Grid Infrastructure homes and all the installed Oracle Database homes are included in the snapshots.
To take file attribute snapshots:
–fileattr start
command.orachk –fileattr startexachk –fileattr startExample 3-4 orachk -fileattr start
orachk -fileattr start
CRS stack is running and CRS_HOME is not set. Do you want to set CRS_HOME to /u01/app/11.2.0.4/grid?[y/n][y]
Checking ssh user equivalency settings on all nodes in cluster
Node mysrv22 is configured for ssh user equivalency for oradb user
Node mysrv23 is configured for ssh user equivalency for oradb user

List of directories(recursive) for checking file attributes:
/u01/app/oradb/product/11.2.0/dbhome_11202
/u01/app/oradb/product/11.2.0/dbhome_11203
/u01/app/oradb/product/11.2.0/dbhome_11204
orachk has taken snapshot of file attributes for above directories at: /orahome/oradb/orachk/orachk_mysrv21_20160504_041214
Parent topic: Tracking File Attribute Changes and Comparing Snapshots
3.1.5.5.3 Including Directories to Check
Include directories in the file attribute changes check.
To include directories to check:
Run the file attribute changes check command with the –includedir
directories
option.
Where, directories is a comma-delimited list of
directories to include in the check.
orachk -fileattr start -includedir "/home/oradb,/etc/oratab"exachk -fileattr start -includedir "/home/oradb,/etc/oratab"Example 3-5 orachk -fileattr start -includedir
orachk -fileattr start -includedir "/root/myapp/config/"
CRS stack is running and CRS_HOME is not set. Do you want to set CRS_HOME to /u01/app/12.2.0/grid?[y/n][y]
Checking for prompts on myserver18 for oragrid user...
Checking ssh user equivalency settings on all nodes in cluster
Node myserver17 is configured for ssh user equivalency for root user
List of directories(recursive) for checking file attributes:
/u01/app/12.2.0/grid
/u01/app/oradb/product/12.2.0/dbhome_1
/u01/app/oradb2/product/12.2.0/dbhome_1
/root/myapp/config/
orachk has taken snapshot of file attributes for above directories at: /root/orachk/orachk_ myserver18_20160511_032034
Parent topic: Tracking File Attribute Changes and Comparing Snapshots
3.1.5.5.4 Excluding Directories from Checks
Exclude directories from file attribute changes checks.
To exclude directories from checks:
Run the file attribute changes check command to exclude directories that
you do not list in the -includedir discover list by
using the -excludediscovery option.
Example 3-6 orachk -fileattr start -includedir -excludediscovery
orachk -fileattr start -includedir "/root/myapp/config/" -excludediscovery
CRS stack is running and CRS_HOME is not set. Do you want to set CRS_HOME to /u01/app/12.2.0/grid?[y/n][y]
Checking for prompts on myserver18 for oragrid user...
Checking ssh user equivalency settings on all nodes in cluster
Node myserver17 is configured for ssh user equivalency for root user
List of directories(recursive) for checking file attributes:
/root/myapp/config/
orachk has taken snapshot of file attributes for above directories at: /root/orachk/orachk_myserver18_20160511_032209
Parent topic: Tracking File Attribute Changes and Comparing Snapshots
3.1.5.5.5 Rechecking Changes
Compare the new snapshot with the previous one to track changes.
To recheck changes:
Run the file attribute changes check command with the check option to take a
new snapshot, and run a normal health check collection.
The –fileattr check command compares the new snapshot with the
previous snapshot.
orachk –fileattr checkexachk –fileattr checkNote:
To obtain an accurate comparison between the snapshots, you must use
–fileattr check with the same options that you used with the previous
snapshot collection that you obtained with –fileattr start.
For example, if you obtained your first snapshot by using the options
-includedir "/somedir" –excludediscovery when you ran –fileattr
start, then you must include the same options with –fileattr check
to obtain an accurate comparison.
Example 3-7 orachk -fileattr check -includedir -excludediscovery
orachk -fileattr check -includedir "/root/myapp/config" -excludediscovery
CRS stack is running and CRS_HOME is not set. Do you want to set CRS_HOME to /u01/app/12.2.0/grid?[y/n][y]
Checking for prompts on myserver18 for oragrid user...
Checking ssh user equivalency settings on all nodes in cluster
Node myserver17 is configured for ssh user equivalency for root user
 List of directories(recursive) for checking file attributes:
/root/myapp/config
Checking file attribute changes...
.
"/root/myapp/config/myappconfig.xml" is different:
Baseline :       0644     oracle       root /root/myapp/config/myappconfig.xml
Current  :       0644       root       root /root/myapp/config/myappconfig.xml
...
Results of the file attribute changes are reflected in the File Attribute Changes section of the HTML output report.
Parent topic: Tracking File Attribute Changes and Comparing Snapshots
3.1.5.5.6 Designating a Snapshot As a Baseline
Designate a snapshot as a baseline to compare with other snapshots.
To designate a snapshot as a baseline:
Run the file attribute changes check command
with the –baseline path_to_snapshot option.
The –baseline path_to_snapshot command
compares a specific baseline snapshot with other
snapshots, if you have multiple different
baselines to check.
orachk -fileattr check -baseline path_to_snapshotexachk –fileattr check –baseline path_to_snapshotExample 3-8 orachk -fileattr check
orachk -fileattr check -baseline "/tmp/Snapshot"Parent topic: Tracking File Attribute Changes and Comparing Snapshots
3.1.5.5.7 Restricting System Checks
Restrict Oracle Orachk and Oracle Exachk to perform only file attribute changes checks.
–fileattr check also performs a full health check
run.
To restrict system checks:
Run the file attribute changes check command with the
–fileattronly option.
orachk -fileattr check –fileattronlyexachk -fileattr check –fileattronlyParent topic: Tracking File Attribute Changes and Comparing Snapshots
3.1.5.5.8 Removing Snapshots
Remove the snapshots diligently.
To remove snapshots:
remove
option:orachk –fileattr removeexachk –fileattr removeExample 3-9 orachk -fileattr remove
orachk -fileattr remove
CRS stack is running and CRS_HOME is not set. Do you want to set CRS_HOME to /u01/app/12.2.0/grid?[y/n][y]y
Checking for prompts on myserver18 for oragrid user...
Checking ssh user equivalency settings on all nodes in cluster
Node myserver17 is configured for ssh user equivalency for root user

List of directories(recursive) for checking file attributes:
/u01/app/12.2.0/grid
/u01/app/oradb/product/12.2.0/dbhome_1
/u01/app/oradb2/product/12.2.0/dbhome_1
Removing file attribute related files...
...
Parent topic: Tracking File Attribute Changes and Comparing Snapshots
3.1.5.6 Comparing Two Reports
Oracle Autonomous Health Framework automatically compare the two most recent HTML reports and generate a third diff report, when run in automated daemon mode.
–diff
option:$ orachk –diff report_1 report_2$ exachk –diff report_1 report_2where, report_1 and report_2 are the path and name of any of the following:
- HTML reports
- Output directories
- Output zip files
The diff output lists a summary of changes found and the location of the new diff HTML report.
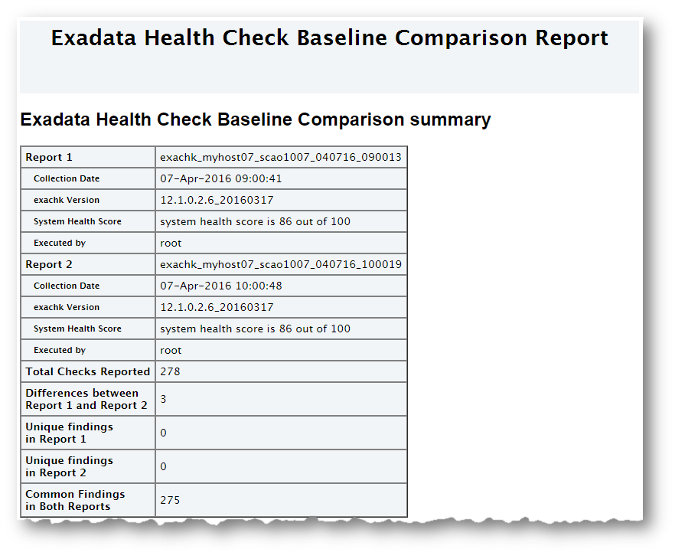
$exachk -diff exachk_myhost07_scao1007_040716_090013.zip exachk_myhost07_scao1007_040716_100019.zip
Summary
Total   : 278
Missing : 0
New     : 0
Changed : 3
Same    : 275
Check comparison is complete. The comparison report can be viewed in: /opt/oracle.SupportTools/exachk/exachk_040716090013_040716100019_diff.html
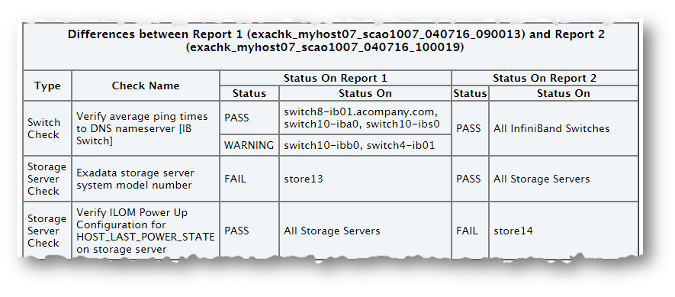
The diff HTML report shows a summary of both compared reports.
Figure 3-24 Health Check Baseline Comparison Report
Description of "Figure 3-24 Health Check Baseline Comparison Report"
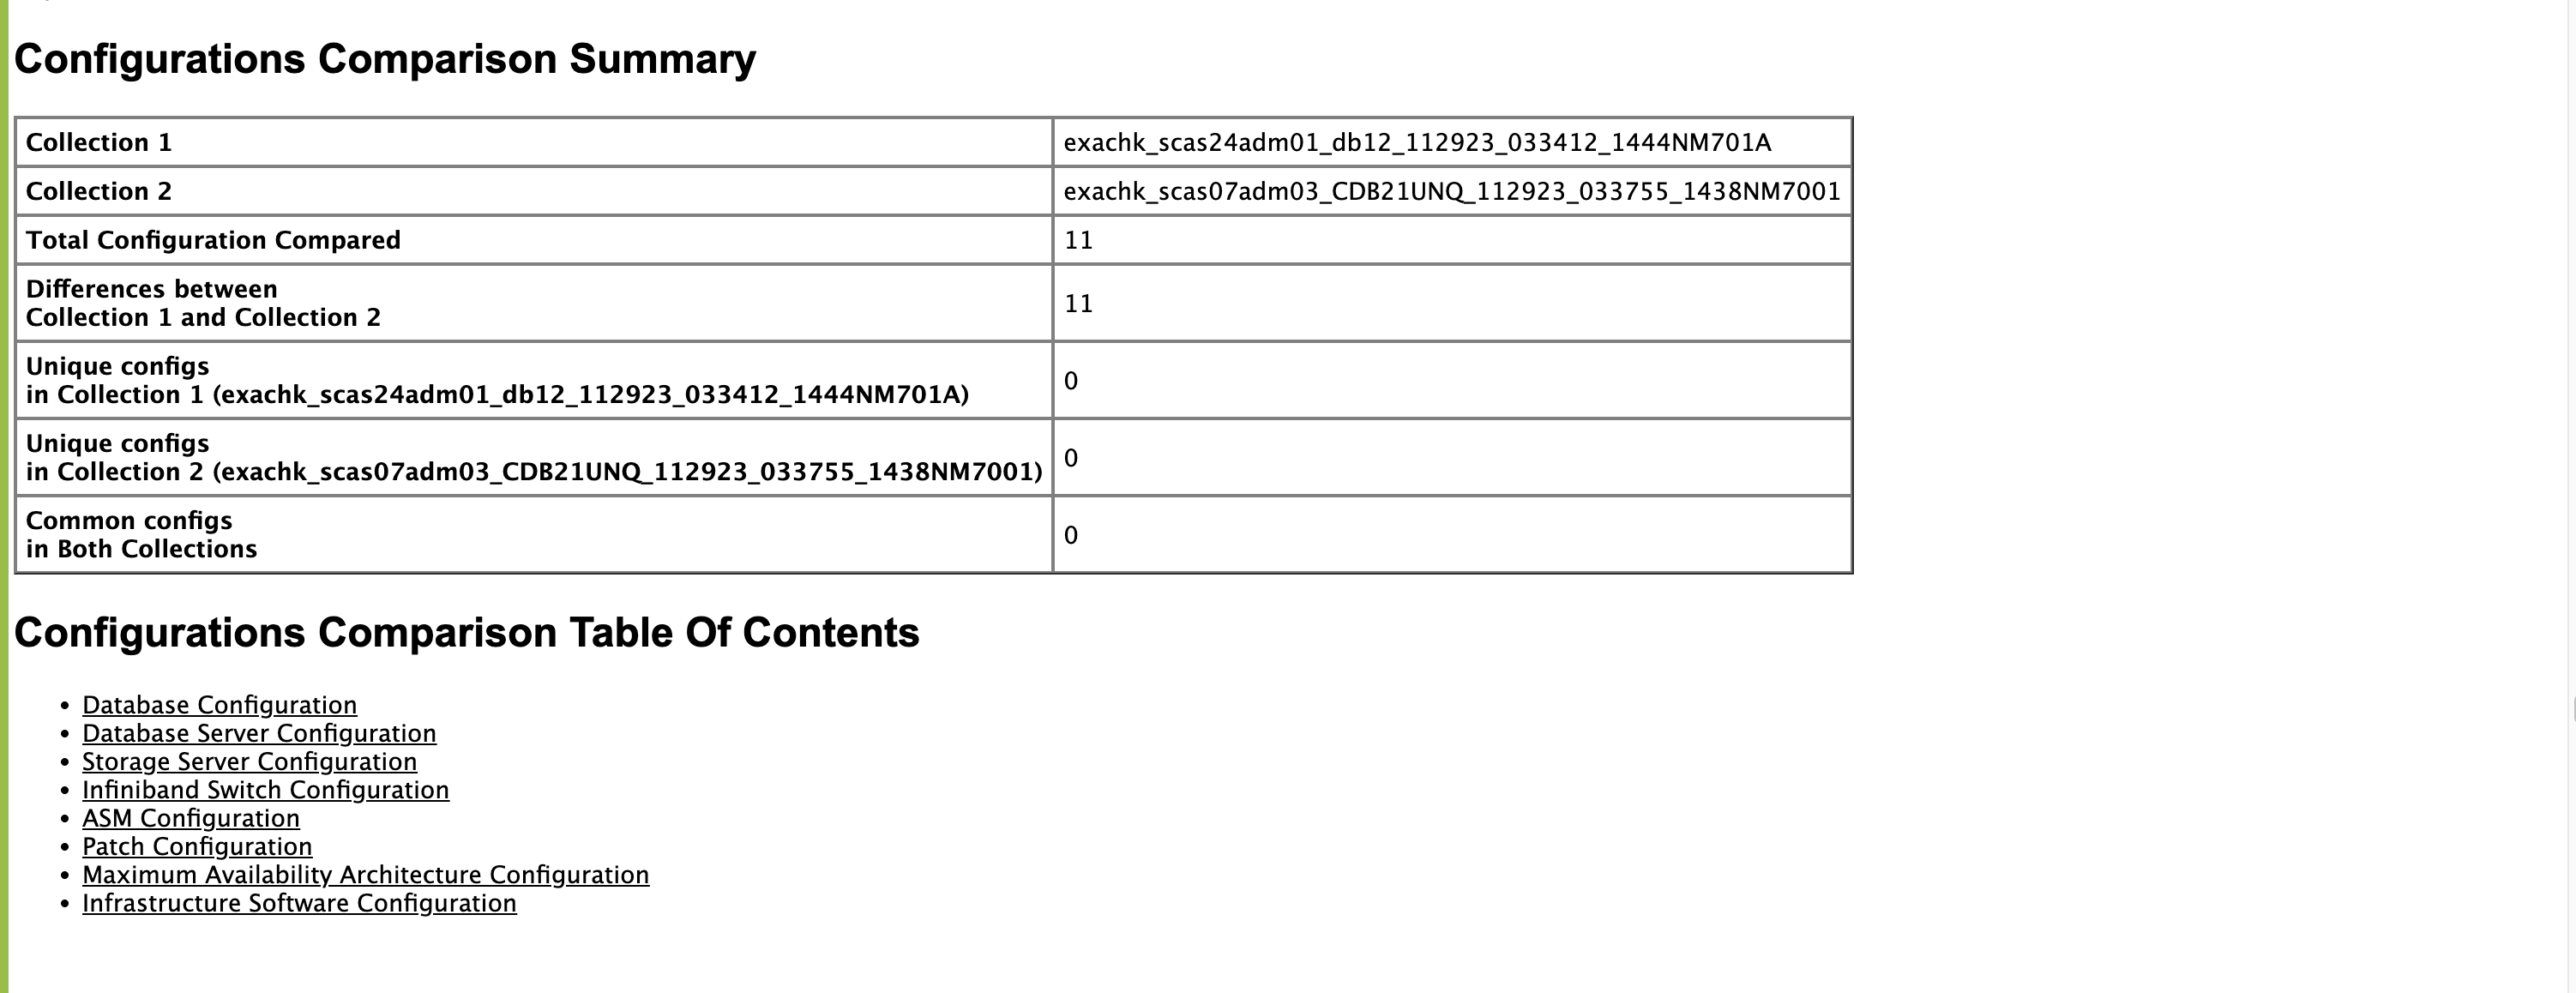
The Table of Contents provides quick access to the major sections in the report. You can also access various check Ids listed in the Show Check Ids section.
The Differences between Report 1 and Report 2 section shows what checks have different results.
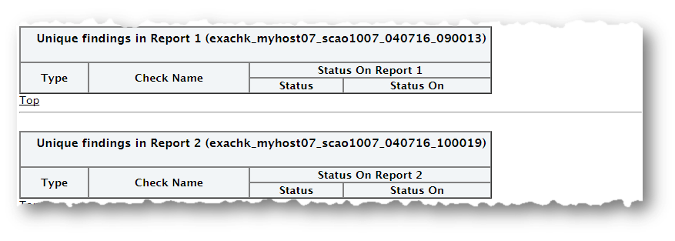
The Unique findings section shows any check findings that were unique to either of the reports
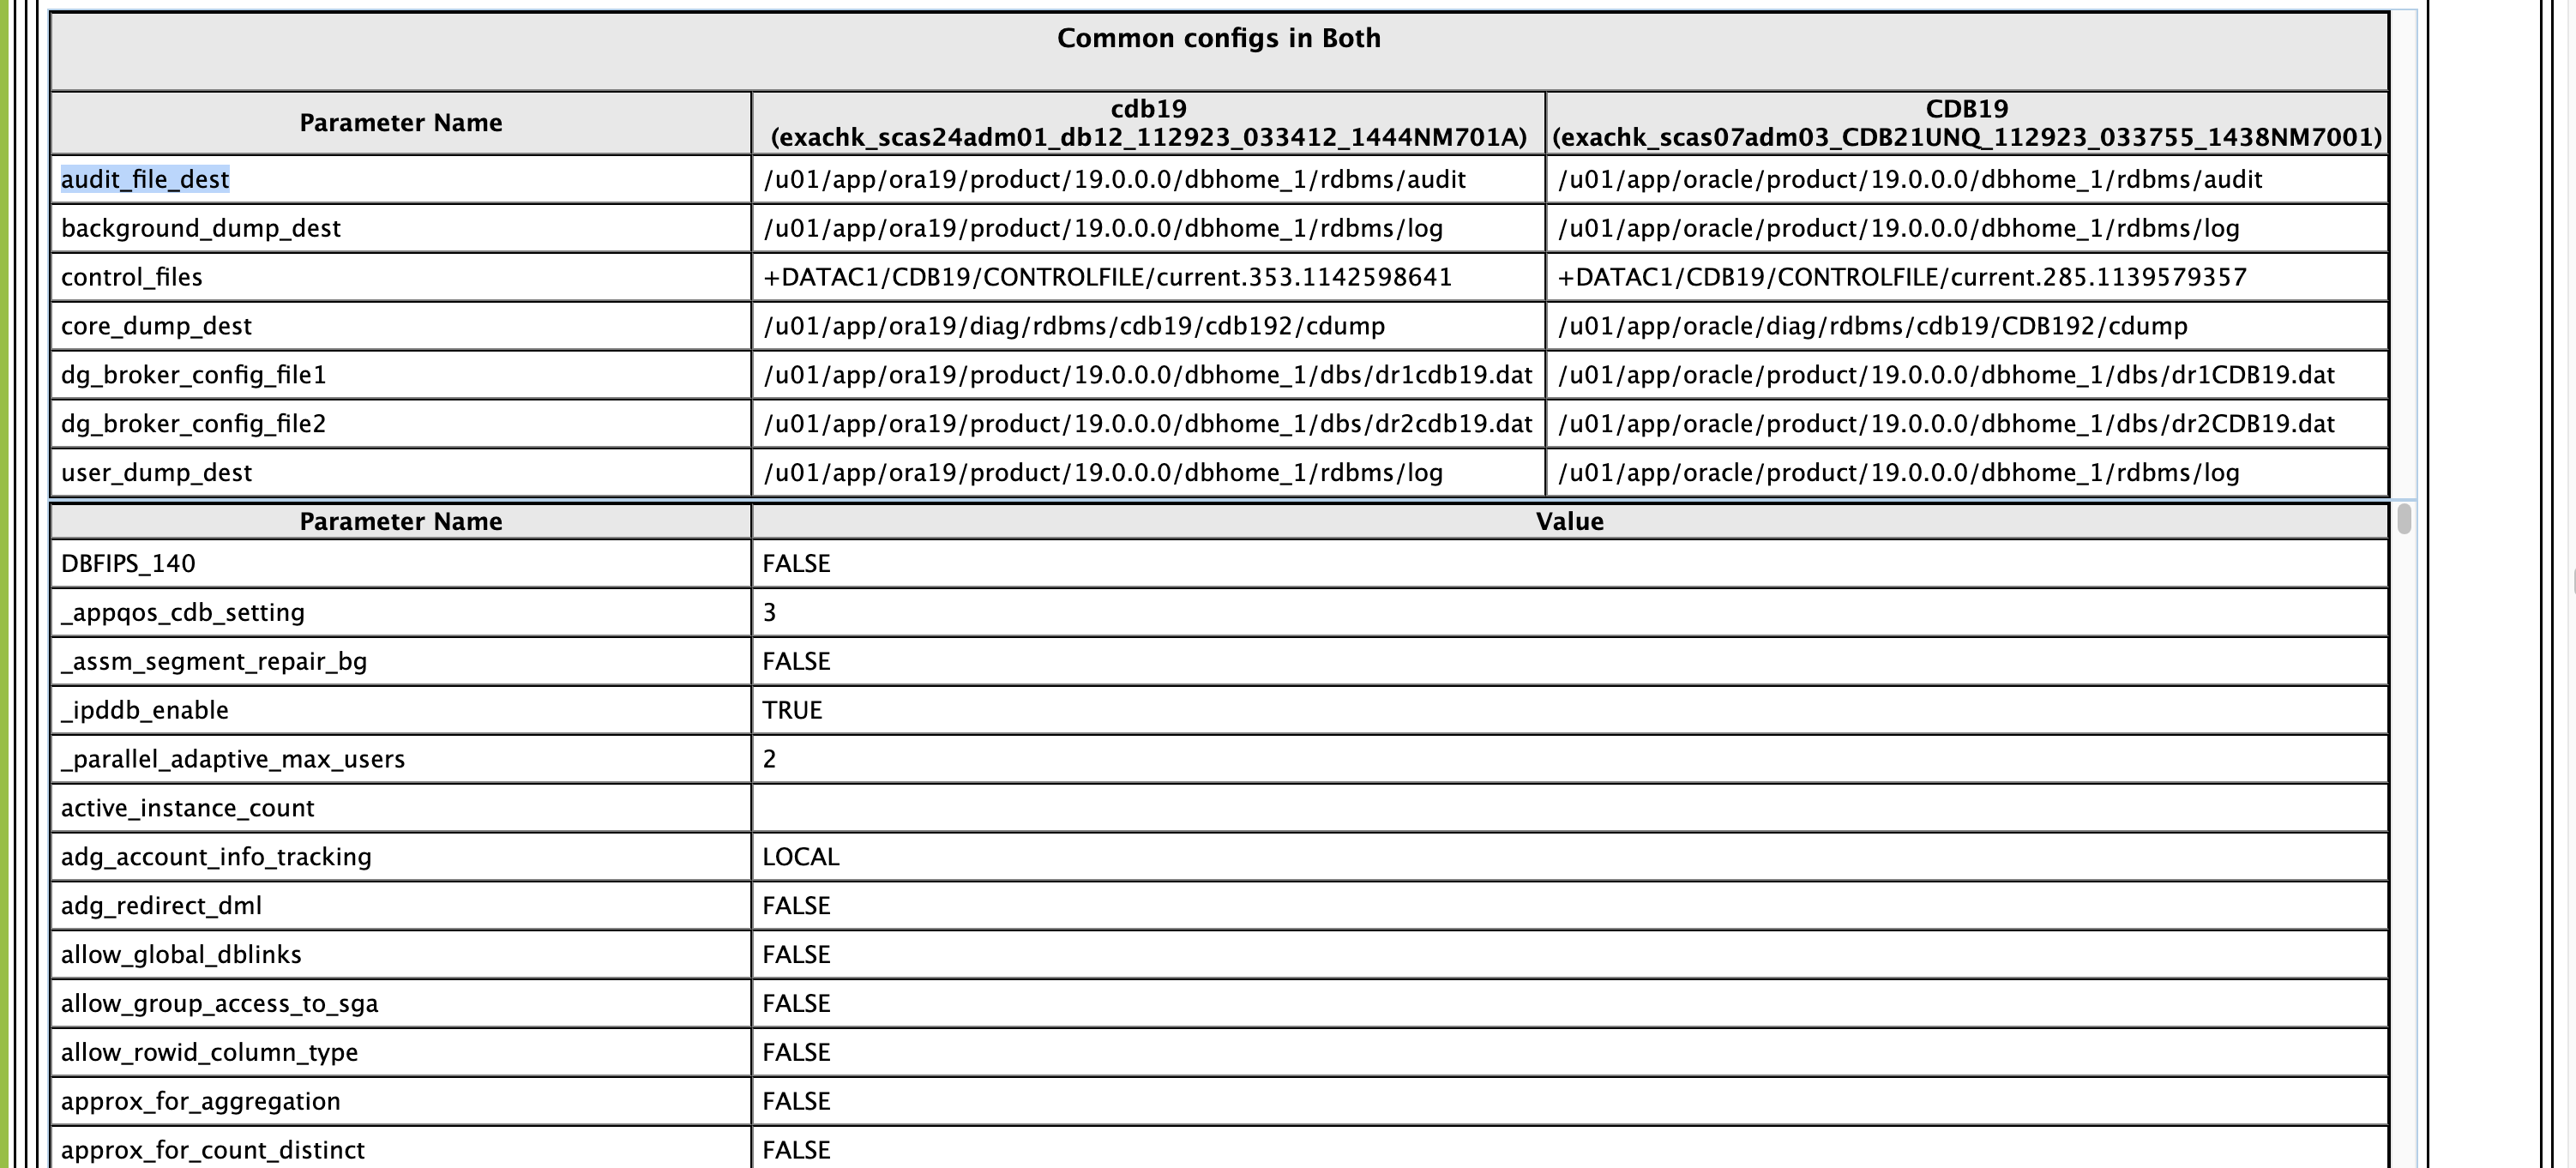
The Common Findings in Both Reports section shows all the check results that had the same results in both the reports.
Figure 3-28 Common Findings in Both Reports
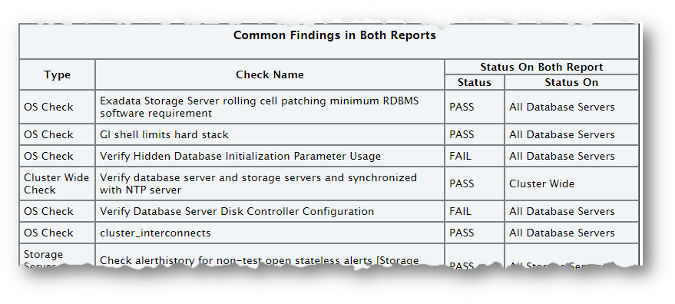
Description of "Figure 3-28 Common Findings in Both Reports"
Parent topic: Understanding and Managing Reports and Output
3.1.5.7 Merging Reports
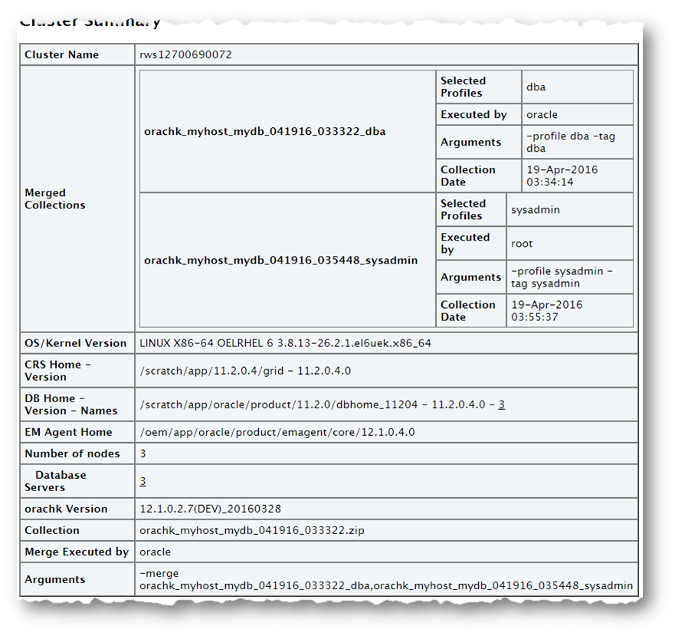
Merging reports is useful in role-separated environments where different users are run different subsets of checks and then you want to view everything as a whole.
–merge option, followed by a
comma-delimited list of directories or zip
files:orachk -merge orachk_myhost_mydb_041916_033322_dba,orachk_myhost_mydb_041916_035448_sysadminexachk -merge exachk_myhost_mydb_041916_033322_dba,exachk_myhost_mydb_041916_035448_sysadminThe resulting merged HTML report summary will show the collections it was merged from.
The merged findings appear together.
Note:
For Oracle Exachk, use the –force option to force merge collections from dom0 and domu, or global and local zones.
Parent topic: Understanding and Managing Reports and Output
3.1.5.8 Maintaining Temporary Files and Directories
Oracle Orachk and Oracle Exachk create a number of temporary files and directories while running compliance checks.
Oracle Orachk and Oracle Exachk create an output directory that contains various files for you to examine. The total size of the output directory and .zip file is under 5 MB. However, the size depends on the number of Oracle stack components evaluated.
If you are running compliance checks in automated daemon mode, then set the collection_retention duration to purge old collections.
If you are running compliance checks on-demand or in silent mode, then it is your responsibility to implement processes and procedures to purge result output.
- Reducing the Accumulated Data Files
Use the Oracle ORAchk and Oracle EXAchk options discussed in this section to reduce accumulated data files.
Related Topics
Parent topic: Understanding and Managing Reports and Output
3.1.5.8.1 Reducing the Accumulated Data Files
Use the Oracle ORAchk and Oracle EXAchk options discussed in this section to reduce accumulated data files.
There are three options available:
- Using the
RAT_PURGE_SIZEenvironment variable without the daemon - Using the daemon option
COLLECTION_RETENTION - Manual reduction
Note:
Uploading to an Oracle Health Check Collections Manager repository or thetfa_web does not perform any accumulated data file reduction.
- Using the RAT_PURGE_SIZE Environment Variable Without the Daemon
- Using the Daemon Option COLLECTION_RETENTION
- Manually Reducing the Accumulated Data Files
Parent topic: Maintaining Temporary Files and Directories
3.1.5.8.1.1 Using the RAT_PURGE_SIZE Environment Variable Without the Daemon
Syntax
export RAT_PURGE_SIZE=size_in_MBFor example:
export RAT_PURGE_SIZE=2048When this environment variable is set, the files in the working directory from which Oracle ORAchk or Oracle EXAchk was launched are reduced after the current Oracle ORAchk or Oracle EXAchk run completes based on two conditions:
- The total size of the working directory from which Oracle ORAchk or Oracle EXAchk run was launched exceeds the configured threshhold.
- There are files in the working directory that are more than 24 hours old from the time of the current Oracle ORAchk or Oracle EXAchk run.
Oracle ORAchk or Oracle EXAchk removes the date-and-timestamp subdirectories and the corresponding *.zip files that meet the above conditions.
For example without the *.zip files for brevity:
du -hs .
1.6G    .
[root@randomclient02 autopurge]# ls -l | egrep ^d | egrep exachk_
drwxr-x--- 9 root root 282624 Mar 26 09:46 exachk_randomclient02_PDB1_032619_090342
drwxr-x--- 9 root root 278528 Mar 26 10:33 exachk_randomclient02_PDB1_032619_095101
drwxr-x--- 9 root root 270336 Mar 26 11:16 exachk_randomclient02_PDB1_032619_103421
.
.
.
drwxr-x--- 9 root root 282624 Mar 26 15:03 exachk_randomclient02_PDB1_032619_141952
drwxr-x--- 9 root root 294912 Mar 26 15:48 exachk_randomclient02_PDB1_032619_150534
drwxr-x--- 9 root root 286720 Mar 27 08:00 exachk_randomclient02_PDB1_032719_071614export RAT_PURGE_SIZE=1024
exachkAfter the run completes:
[root@randomclient02 autopurge]# du -hs .
1.5G    .
[root@randomclient02 autopurge]# ls -l | egrep ^d | egrep exachk_
drwxr-x--- 9 root root   270336 Mar 26 11:16 exachk_randomclient02_PDB1_032619_103421
drwxr-x--- 9 root root   290816 Mar 26 11:59 exachk_randomclient02_PDB1_032619_111713
.
.
.
drwxr-x--- 9 root root   294912 Mar 26 15:48 exachk_randomclient02_PDB1_032619_150534
drwxr-x--- 9 root root   286720 Mar 27 08:00 exachk_randomclient02_PDB1_032719_071614
drwxr-x--- 9 root root   282624 Mar 27 10:36 exachk_randomclient02_PDB1_032719_094859
Two runs were purged, but the size did not reduce to 1 GB:
drwxr-x--- 9 root root   282624 Mar 26 09:46 exachk_randomclient02_PDB1_032619_090342
drwxr-x--- 9 root root   278528 Mar 26 10:33 exachk_randomclient02_PDB1_032619_095101
Note:
The reduction process did not reduce the total directory size to 1 GB in this example because there were not enough files in the working directory that were at least 24 hours earlier than the current Oracle ORAchk or Oracle EXAchk execution. If there are enough earlier files available, then the reduction comes close to the target size, depending upon the exact file sizes of the file set eligible for reduction.
Parent topic: Reducing the Accumulated Data Files
3.1.5.8.1.2 Using the Daemon Option COLLECTION_RETENTION
This daemon option operates only upon the dates of the files eligible for reduction. Once set, any files older then the chosen target date are removed at the end of Oracle ORAchk or Oracle EXAchk run by the daemon.
Note:
Specify theCOLLECTION_RETENTION in days.
For example, set the daemon to run the -profile switch every hour, retain files for 1 day.
exachk -id fname -set "AUTORUN_SCHEDULE=* * * *;\
NOTIFICATION_EMAIL=fname.lname@somewhere.com;\
COLLECTION_RETENTION=1;\
AUTORUN_FLAGS=-profile switch"
exachk -id fname -get all
------------------------------------------------------------
ID: exachk.testuser
------------------------------------------------------------
AUTORUN_FLAGS = -profile switch
NOTIFICATION_EMAIL = fname.lname@somewhere.com
COLLECTION_RETENTION = 1
AUTORUN_SCHEDULE = * * * *
------------------------------------------------------------After letting the daemon run for more than a day, it can be seen the fileset has stabilized around one day's worth of hourly runs.
[root@randomclient02 retention]# ls -ltr | egrep ^d | egrep exachk_
drwxr-x--- 8 root root     20480 Mar 27 15:03 exachk_randomclient02_032719_150039
.
.
.
drwxr-x--- 8 root root     20480 Mar 28 04:03 exachk_randomclient02_032819_040026
drwxr-x--- 8 root root     20480 Mar 28 15:03 exachk_randomclient02_032819_150022
drwxr-x--- 8 root root     20480 Mar 28 16:03 exachk_randomclient02_032819_160022
Note:
The actual file reduction varies a bit depending upon the exact timestamps of the file set eligible for reduction and the timestamp of the current Oracle ORAchk or Oracle EXAchk run that is being executed by the daemon.
Parent topic: Reducing the Accumulated Data Files
3.1.5.8.1.3 Manually Reducing the Accumulated Data Files
Parent topic: Reducing the Accumulated Data Files
3.1.5.9 Consuming Multiple Results in Other Tools
Optionally integrate compliance check results into various other tools.
For more information, see Integrating Compliance Check Results with Other Tools.
Related Topics
Parent topic: Understanding and Managing Reports and Output
3.1.5.10 Generate Reports Only in the Formats You Need
With AHF 25.11, Oracle Exachk allows you to specify the desired report output formats, such as JSON, HTML, or XML, as a comma-delimited list. Oracle Exachk then generates reports only in the selected formats, reducing both the collection size and the overall processing time.
By default, Oracle Exachk generates a comprehensive collection containing:
- JSON, XML, and HTML reports
- Logs
.outfiles- Scripts
- Additional diagnostic data
This results in ZIP archives that can reach gigabytes in size with only 10-20% of the space actually being occupied by reports.
Many internal teams, including Platinum and MAA, primarily consume only HTML or JSON, making the remaining content unnecessary overhead.
This feature introduces a new flag, -output_format that lets users specify exactly which formats Oracle Exachk should generate.
exachk -output_format <type1>,<type2>...
Example:
exachk -output_format json,html
This command generates an Oracle Exachk collection containing only JSON and HTML reports.
Benefits include:
- Smaller ZIP size (only relevant files included)
- Faster execution time (skips generation of unused formats)
What Does the Exachk ZIP Contain?
Below are the expected ZIP directory structures based on the format(s) specified.
- When
jsonis specified:exachk_<collection_name>/ |-- exachk.log |-- upload/ │ |-- *.json - When
htmlis specified:exachk_<collection_name>/ |-- exachk_<collection_name>.html |-- exachk.log |-- reports/ │ |-- *.html - When
xmlis specified:exachk_<collection_name>/ |-- exachk.log |-- upload/ │ |-- *.xml
Parent topic: Understanding and Managing Reports and Output
