Managing Outage Events
Managing outage events requires interaction between the Events list, Crews list, Event Details, and the Map. The rest of this section explains these tools and provides procedures for performing actions in the Flex Operations client. All of the actions may be performed in the NMS Web Workspace with Switching client and have been described in detail in the relevant chapters (Managing Events with Web Trouble Management, Managing Crews with Web Trouble Management, and Web Switching Management). The focus of this chapter is on taking advantage of the unique features that Flex Operations offers.
Working with the Events and Crews Tool
Events and Crews are displayed together (in a tab view) because of their close association when managing outages.
Note: You can change the relative height of the Events and Crews panes by dragging the separator bar up or down.
The columns in the Events pane and in the Crews pane are the same as the Web Workspace Work Agenda and Crew Actions List View, respectively.
• Common outage management procedures are documented in Chapter 3, Managing Events with Web Trouble Management.
Viewing Events and Crews
The Events and Crews tab is displayed by default, but may be closed. If you want to open it again, select Events and Crews from the Tool Selector ( ). Events, such as outages, are displayed in the Events pane; crews are displayed in your Crews pane.
). Events, such as outages, are displayed in the Events pane; crews are displayed in your Crews pane.Notes:
• You only see events and crews in control zones that you have subscribed to.
• Right-click an event row to see the actions available for the event.
• Double-click an event row to view its Event Details page.
Understanding the Events and Crews Page Controls
Icons in the Events pane and Crews pane title bars allow you to control the position and display of the panes.

1. Relative Position ( ;Events Panel Only): Click to arrange the Events and Crews panels side-by-side. The icon will update to a clockwise arrow (
 ) that, when clicked, will restore the top and bottom layout.
;Events Panel Only): Click to arrange the Events and Crews panels side-by-side. The icon will update to a clockwise arrow () that, when clicked, will restore the top and bottom layout.2. Minimize Pane ( ): Click to minimize the pane to its title bar, which will maximize the other pane. When a pane is minimized, you can display it temporarily by clicking the title bar. The button will change to a Restore button (
 ); click the Restore button to restore the pane to its previous layout.
): Click to minimize the pane to its title bar, which will maximize the other pane. When a pane is minimized, you can display it temporarily by clicking the title bar. The button will change to a Restore button (); click the Restore button to restore the pane to its previous layout.3. Maximize Pane ( ): Click to maximize the pane, which will minimize the other pane. Alternatively, you can double-click the title bar to maximize it. The button will change to a Restore button (); click the Restore button to restore the pane to its previous layout.
): Click to maximize the pane, which will minimize the other pane. Alternatively, you can double-click the title bar to maximize it. The button will change to a Restore button (); click the Restore button to restore the pane to its previous layout.4. Close Events and Crews Tab ( ): Click to close the pane.
): Click to close the pane.Note: These pane controls are also available when viewing a safety document associated with a switching sheet.
Viewing Event Notifications
In the Events List, the Notifications column displays an icon ( ) whenever a new notification related to the event is generated. You may perform the following actions with notifications.
) whenever a new notification related to the event is generated. You may perform the following actions with notifications.• Mouse over the icon to see the notification text. If more than one notification is associated with the event, each message is displayed on a new line in the tooltip.

• Clear the notification by right clicking on the row and selecting Clear Notifications.
• Click the Notification button (), which is to the right of the Actions menu, to filter on all events in the current filtered view that have uncleared notifications.
), which is to the right of the Actions menu, to filter on all events in the current filtered view that have uncleared notifications.Working with the Events Condensed View
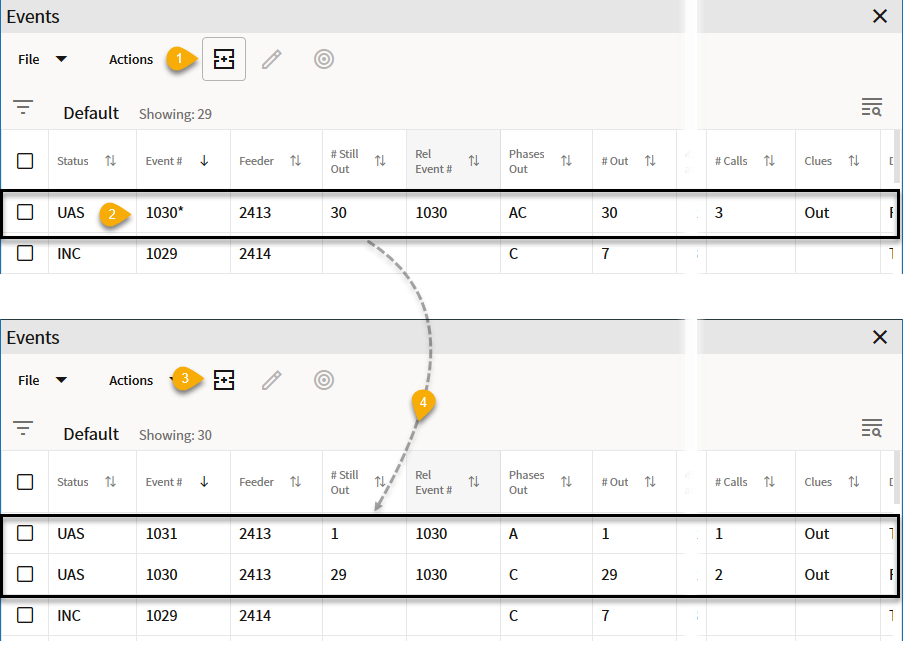
The Condensed View shows only the lead event among related events. The lead event is displayed with an asterisk (*) following the Event #. Condensed View is activated by clicking the Condensed View icon ( ). Once Condensed View has been enabled, the icon is displayed inside a box.
). Once Condensed View has been enabled, the icon is displayed inside a box.In the following example, two events have been related. In the upper half, the Condensed View is enabled (1), only the lead event is shown, and it has an asterisk next to its Event # (2). After the Condensed View is toggled off (bottom half), the icon changes to the unselected Condensed View (3), and both events are displayed separately.
In the Condensed View, the lead event summarizes the conditions in all grouped and/or related events. For example, Phases Out shows that both the A and C phases are out, but once the related events are shown individually, you can see that Event 1030 is for a C phase outage, while Event 1031 is an A phase outage.
For more information on grouping and relating events, see “Understanding Event Grouping”.
View an Outage Event on the Map
To view the location of an outage event on the Map, select an event then click the Focus button ( ). The Map displays as a new tab in your browser, but, if desired, you can detach it and display side-by-side with your Events and Crews tool.
). The Map displays as a new tab in your browser, but, if desired, you can detach it and display side-by-side with your Events and Crews tool. When enabled, the Map’s Selection panel provides the actions available on a selected device.
Note: For information on using the Flex Operations Map see the “Working with the Map”.
Filtering the Crews List
The Crews pane provides filter criteria that you may select to define crews to display. The filter criteria are arranged in groups. Click on each group to display and select the combination of filter criteria you require:
• Zones
• Zone Filtering Enabled: When selected, only displays Crews in the zones you are subscribed to. Deselect this option to display Crews for all zones.
• Include Crews from Parent Zones: When selected, includes Crews in zones higher up the Zone hierarchy. (This option is only available when Zone Filtering Enabled is selected.
• Event Zone Filtering: Only enabled when Zone Filtering is Enabled, displays crews based on the currently selected event(s) in the Event List:
• Off: Does not filter the Crew List based on the currently selected event(s)
• Region: Filters the Crew List based on the region(s) for the currently selected event(s).
• Branch: Filters the Crew List based on the branch(es) for the currently selected event(s).
• Other levels in the hierarchy may be available.
• Crew Type
• Show Crews Matching Event Work Queues - when selected, filters the Crew Type based on the selected events' Work Queue(s).
• Shift Status
• Filter on a combination of Shift Status(es).
• Event Status
• Filter on a combination of Event Status(es).
Note that as you apply Crew filter options, the filters are summarized in the Filter breadcrumb above the table heading row:

When you hover your mouse over the breadcrumbs, the filter criteria will be highlighted and a selector will allow you to remove that criteria by deselecting.
Assign a Crew to an Event
Crew Assignment is managed in the Events and Crews tool.
1. Select an unassigned event in the Event pane.
2. Select a crew in the Crews pane.
3. Right-click the crew row, and select the option to assign the crew to the event.

Progressing Crew Status
After a crew is assigned to an event, you can record crew status updates:
• Right-click the crew or the event row and click En Route ( ) to mark the selected Crew as En Route.
) to mark the selected Crew as En Route.• Right-click the crew or the event row and click Onsite ( ) to mark the selected crew as onsite
) to mark the selected crew as onsiteOther Crew Status updates include:
• Suspend: Marks the crew as Suspended.
• Off Site: Marks the crew as off site.
•  Availability...: Allows you to mark the crew as available or unavailable
Availability...: Allows you to mark the crew as available or unavailable •  Release: Removes the crew from the selected event.
Release: Removes the crew from the selected event.Confirming an Outage Event
When the crew arrives onsite, they can confirm the outage device. The system predicts the location of the outage based on customer calls, but sometimes the prediction is incorrect.
When the Prediction is Correct
To confirm the outage from the Events and Crews tool's Events table, do the following:
1. Select the event.
2. Right-click and select Confirm Outages... from the Confirm/Restore Outage context menu option.
3. In the Confirm Outages dialog box, confirm whether it was a service outage or secondary outage.
To confirm the outage at the predicted location on the Map, do the following:
1. Select the device in the Map.
2. In the Map’s Selection panel, choose Open from the Operate menu.
3. In the Operate Device dialog box, view the conditions, and then click the Open [device] button.
Upon opening the device, the event status changes from Predicted to Real/Confirmed.
When the Operated Device is Upstream from the Predicted Device
To confirm a predicted outage is further upstream, you can move the prediction upstream either from the Map or the Event List.
To Repredict Upstream from the Event List
1. Click on the Event and choose Repredict Upstream. This extends the predicted extent of the outage to the next protection device upstream.
To Repredict Upstream from the Map
1. Click on the currently predicted device, and then, from the Map's Selection List, select the device you clicked on.
2. Select Repredict and then select Repredict Upstream. This extends the predicted extent of the outage to the next protection device upstream.
Another option is to navigate the Map to the outage device, and operate that device. Any predicted outages downstream of the device will be subsumed into the confirmed outage you create.
Working with Event Details
The Flex Operations Event Details allows you to view and update event information from a page that is very similar to the Web Workspace Event Details (see “Understanding Event Details” for more information). It's window has key event information in the top pane and a set of tabs with different types of discrete data for the event below.
Opening Event Details
You can access Event Details from the Events List, Crew List, and Map.
Opening Event Details from the Events List
From the Events List, you can open Event Details for an event by doing any of the following.
• Double-click an event row.
• Select Edit from the Actions menu.
• Right-click an event row and select Event Details... from the context menu.
Opening Event Details from the Crews List
For a crew that is associated with an event, you can right-click the crew row and select Show Event Details... from the Manage [OMS Crew ID] on [Event ID] context menu option. The Show Event Details... option is also available from the Crews List Actions menu.
Opening Event Details from the Map
If you have the Map focused on an event, you can select the event symbol and then select Open Event... from the Selection pane's Event menu.
Understanding Flex Operations Event Details Information Pane
The Event Information pane at the top of Event Details, contains the following information.
• The Event # is the number the system has assigned to the event.
• The Phases Out is the event phases.
• The # Calls is the number of calls for the event.
• Customers Out contains the estimated number of customers experiencing an outage for this event.
• The # Emer., # Med., # Key, and # Sens. list the critical customers affected by the event.
• Start Date contains the date and time when the event began. This field is editable except for switching events. For switching events, you must edit the Completed Date in the switching step itself. See “Steps Tab” for more information.
• Est Restore Date contains the estimated restore date for the event. You may edit or clear the estimated restore date using standard Date/Time controls (see “Using Date/Time Pickers” for details).
• Restore Date contains the date and time of event restoration (that is, when the outage area was restored). This field is editable except for switching events. For switching events, you must edit the Completed Date in the switching step itself.
• Est Time to Repair contains the estimated time to repair the event.
• The Device is the name and type of device associated with the event
• The Sheet # is the switching sheet number associated with the event, if any. The switching sheet number is prefixed by the switching sheet type.
• Clues contains any clues contained in the customer calls.
• Zone displays the control zone where the associated device is located.
Understanding Flex Operations Event Details Tabs
Flex Operations Event Details provides many of the tabs available in the Web Workspace. One key difference is that Flex Operations displays tabs for the calls and customer information available through the Trouble Info tab in the Web Workspace Event Details.
• Attachments: see “Working with Attachments” for details on working with Flex Operations Event Details Attachments.
Updating Outage Events with Flex Operations Event Details
You can record outage updates as information is provided from crews and callers. This ensures that an accurate record of the outage is preserved, and important information can be relayed between callers and crews.
Update the ERT from the Events List
You can update the ERT by selecting the event row and selecting Update ERT... from the context menu. Edit the ERT in the Set ERT field and click OK. Click Cancel to close the dialog box without saving changes.
Update Event Dates and Times
Update dates and times in the Event Details summary panel, which is at the top of the Event Details:
• Change the time in the Est Restore Date field, then click Save.
• Change the time in the Start Date field, then click Save.
• Change the time in the Est Time to Repair field, then click Save.
• After an outage is restored, you can edit the Restore Date, then click Save.
Record Event Notes
1. In the Event Details, click the Job Actions tab, if not already in focus.
2. Enter your note in the Add Event Note field, then click the Add button ( sign in the middle of the callout box.") ) to add the note to the event.
) to add the note to the event.
) to add the note to the event.Record Completion Actions
As the Crew provides information relating to the cause of the outage, and other pertinent information, you can record this in the event Details.
1. In the Event Details, click the Completion Actions tab.
2. From the drop‑down lists, select the relevant entries, then click Save.
Some fields may be configured to be mandatory before the outage event can be completed. If you attempt to complete an outage event with unpopulated mandatory fields, you will receive a message notifying you that you are missing required fields and then provide a list of those fields.
Record Equipment Failure Information
You can record detailed information about any failed equipment related to an event.
1. In the Event Details, click the Equipment Failure tab.
2. Update the information as required, then click Save.
Record and View Damage Assessments
You can view and record Damage Assessments. See “Managing Damage Assessments” for details.
Using the Flex Operations Steps Tab
The Flex Operations Steps tab displays the switching steps that have been recorded and linked to the event. These steps will continue to be displayed in the event's Steps tab up until you create an Emergency switching sheet for the event. When an Emergency switching sheet is created, the steps will be moved to that sheet.
When this Steps tab is first selected for an event, any steps linked to that event will be pulled from the Miscellaneous Log to this Steps list.
Steps can be cut/copied from other sheets and pasted into this Steps list; steps can be cut/ copied form this Steps list and pasted into other sheets as well. Steps cannot be cut/copied from one event's Steps list and pasted into another event's Steps list. For pasting of steps to work, the source tool or sheet has to be loaded. To work around this limitation, the steps can be sent to the Miscellaneous Log and then later cut and pasted into a different event's Steps list.
Steps Tab Toolbar and Context Menus
When the Steps tab is selected, additional buttons are displayed in the toolbar and Actions menu for actions that you can perform. If a button is grayed, then that action is not currently permitted.
Most toolbar actions are also available through a context menu that is displayed when you right-click a step row. The context menu contains some options that do not appear on the toolbar.
The “Understanding Steps Tab Actions” for descriptions of the actions that can be performed on the Steps tab with toolbar buttons, keyboard shortcuts, and/or context menu items with the following exceptions:
1. Actions not available in Flex
• Clear crews
• Copy steps as go-back steps
2. Actions only available in Flex Operations:
• Clear Clipboard: Clears copied steps from your computer clipboard.
• Edit Step: Opens Edit Step dialog.
• Undo: Reverts the latest cut, paste, or delete action.
Refer to the “Using the Steps Tab” for the list of columns available in the Steps table.
Crews List
The Crews List on the event’s Steps tab functions the same as the Crews List on a switching sheet’s Steps tab, but only has the Select Crew..., Update Instructed To in Steps, and Remove Crew actions accessible through the context menu. See “Crews List” for more details.
Working with Attachments
The Event Details Attachments tab allows you to work with files that are relevant to the event.
Adding Event Details Attachments
1. To add an attachment, select the Event Details Attachments tab.
2. Click the Add Attachment button ( ) on the toolbar (or you may select the option from the Actions menu).
) on the toolbar (or you may select the option from the Actions menu).3. Drag and drop a file to the Attachment dialog box.
4. You may, optionally, add a URL and/or description of the file.
Editing Event Details Attachments
1. To edit an attachment, select the attachment row in the Attachments tab.
2. Right-click and select  Edit Attachment.
Edit Attachment.3. In the Attachment dialog box, you can change the data in any of the fields and/or replace the file with a new version, as necessary.
Removing Event Details Attachments
1. To remove an attachment, select the attachment row in the Attachments tab.
2. Right-click and select  Remove Attachment. The attachment will be deleted and the attachment row removed from the Attachments table.
Remove Attachment. The attachment will be deleted and the attachment row removed from the Attachments table.Downloading Event Details Attachments
1. To download an attachment, select the attachment row in the Attachments tab.
2. Right-click and click  Download Attachment; alternatively, you may double-click the row and the file will download. The file will be saved to your browser's default download folder.
Download Attachment; alternatively, you may double-click the row and the file will download. The file will be saved to your browser's default download folder.Working with Events in Flex Operations
Restoring an Outage Event
When the Crew reports they have restored supply, you can record this from the Event List or from the Map.
To restore an outage:
• In the Event List, right-click on the event, and select View on Map....
• From the Map, click to select the device, then from the Selection Panel:
• Select Close from the Operate menu.
• View the information in the Look Ahead dialog box, then Close the device.
Upon closing the device, the event status changes from Real/Confirmed to Restored.
Updating Multiple Outage Events
You can update multiple outage events at the same time. Specifically, for a selected group of outage events you can:
• Update the Estimated Restore Time
• Record a note
• Update Completion Actions
To do this:
1. In the Event List, click to select the outage events you wish to update.
2. From the Actions menu, select Update Events.
3. In the Update Events dialog box, enter the updates, and then click Update.
Completing Outage Events
You can complete an outage when:
• All customers have been restored.
• All mandatory fields are populated.
To complete an outage, in the Event Details, click the Complete button ( ).
).
).See “Using the Completion Actions Tab” for more information on the fields and requirements for completing an outage event.
Creating a New Event
You can create a new event on a device or conductor.
1. In the Map, select a device or conductor
2. From the Selection Panel’s Event menu, select Create Event ( ) to display the Create Event for Device dialog box.
) to display the Create Event for Device dialog box.3. Enter the information, then click OK.
For more information on creating events, see “Creating an Event”.
Managing Crews in Flex Operations
Flex Operations allows you to:
• Assign crews to outage events.
• Record crew status updates.
• Add, edit, and delete crews.
Assigning Crews to Outage Events
Crew Assignment is managed in the Events and Crews tool and from certain context menus in the Map.
To assign a crew to an outage event
1. In the Crew List, click to select a Crew.
2. Click to assign the crew to the event. You can also right-click to reveal crew assignment context menu options.
To assign a crew to multiple outage events
1. In the Event List select the outage events by one of the following methods:
• Press and hold the Ctrl key and click to select the event rows.
• Select the applicable event row check boxes.
2. In the Crew List, click to select a crew.
3. Right-click to reveal valid crew assignment options.
To assign multiple crews to an outage
1. In the Crew List select the Crews by one of the following methods:
• Hold the Ctrl key and click to select the crews.
• Select the applicable crew row check boxes.
2. In the Event List, click to select the Event.
3. Right-click to reveal valid crew assignment options.
Progressing and Modifying Crew Status
Progressing Crew Status
Once a crew is assigned to an outage event, you can progress its status.
Note: You can update the crew status from the Event List, the Crew List, the crew symbol in the Map, or from the Event Details Job Actions tab.
1. Right-click the event or crew.
2. From the context menu, select the appropriate option from the Manage Crew [Name] on Event [#] options:
• En Route: Places the crew en route to the event.
• Onsite: Places the crew onsite at the event location.
• Offsite: Places the crew offsite and sets their status back to En Route.
• Suspend: Suspends a crew from its active event. Once a crew is suspended from an event, they can be placed En Route to another assignment.
• Release: Removes the crew from its current assignment.
The only time that an event and a crew must both be selected is when initially assigning a crew to an event. From an event in the Events pane or the event symbol on the Map, you can update the status of any crew currently assigned to that event. A submenu will be shown for each crew currently assigned to that event. Similarly, from a Crew in the Crews pane or a Crew symbol on the Map, you can update the status of that crew on any event that the crew is currently assigned to. A submenu will be shown for each event that the Crew is currently assigned to.
Place a Crew On Shift or Off Shift
1. Select the crew.
2. From the Actions menu, select Set Off Shift... or Set On Shift....
3. Enter a time, then click Done, and then click OK.
Creating, Editing, and Deleting Crews
As a Flex Operations user, you can create, edit, and delete crews.
Creating a Crew
1. From the Crew List, select the File menu and then select New.
2. In the Crew Makeup dialog box, enter the crew's information, and then click OK.
The information displayed in the Crew Makeup dialog is the same as in the NMS Crew Makeup dialog; see “Using Crew Makeup” for more information.
Editing Crew Details
1. In the Crew List, slick to select a crew.
2. Click Edit to open the Crew Makeup dialog.
3. Make your changes, then click OK.
Deleting a Crew
1. Select the crew and ensure it is not assigned to any events.
2. Click Delete.