Viewing the Electronic Journal
-
At the Journal menu, select the Electronic Journal option and press Enter.
-
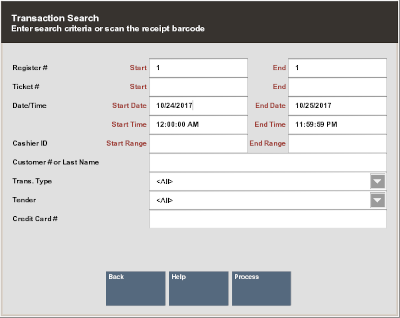
The system displays the Transaction Search form. Enter your search criteria and select Process.
Note:
Depending on your store's configuration, a Check Account Number search field displays as well as a Read Check from MICR button.
Figure 15-3 Transaction Search Form

The following search parameters are available:
-
Register Number - Enter the identifier for a specific register, a range of registers, or leave these fields blank to view information for all registers.
-
Ticket Number - Enter a transaction identifier for a specific transaction, a range of transactions, or leave these fields blank to view information for all transactions.
-
Date/Time - Enter a start date and time, an end date and time, or accept the default for today.
-
Cashier ID - Enter the identifier for a specific associate, a range of associates, or leave these fields blank to view information for all associates.
-
Customer - Enter a customer name or number to view information about a specific customer.
-
Transaction Type - Select a transaction type from the list or select ALL to view all transaction types. Transaction types include options such as TIME CLOCK, NO SALE, RETAIL SALE, POST VOID, and so on.
-
Tender - Select a tender type from the list or select ALL to view all tender types. Tender types include options such as Store Credit, Cash, Check, and so on.
-
Credit Card # - Enter the credit card number used for a transaction.
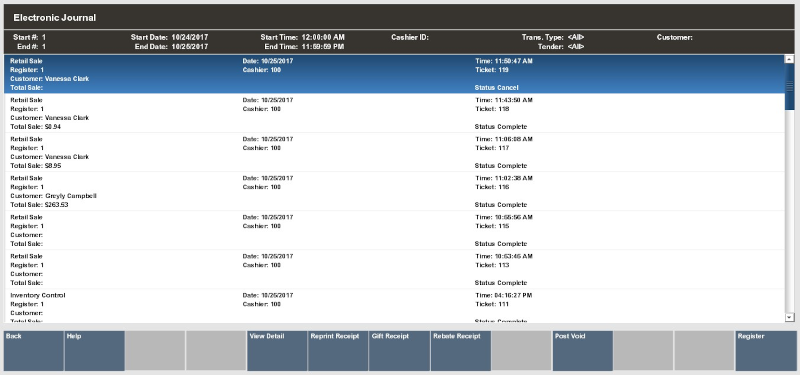
Oracle Retail Xstore Point of Service displays the Electronic Journal screen.
Figure 15-4 Electronic Journal Screen

The following options are available at this screen:
-
Invoice Functions - Select this option to issue or reprint a tax-free invoice.
-
View Detail - Select this option to view additional information about the selected transaction. Refer to Viewing Transaction Detail for more information.
-
Reprint Receipt - Select this option to reprint a receipt for the selected transaction. The receipt is clearly labeled as a reprint. Refer to Reprinting a Receipt for more information.
-
Gift Receipt - Select this option to print a gift receipt for the selected transaction. Refer to Printing a Gift Receipt for more information.
-
Rebate Receipt - Select this option to print a Rebate Authorization receipt. Refer to Printing a Rebate Receipt for more information.
-
Post Void - Select this option to post void the selected transaction. Refer to Post Voiding a Transaction for more information.
-
-