Cycle Count Process
The initial step in the Cycle Count process is to find an existing Inventory Count document, or to create a new document if allowed by your store policy. See Inventory Count Documents for detailed information about locating an Inventory Count document.
Once the Inventory Count document is located, perform the following steps.
-
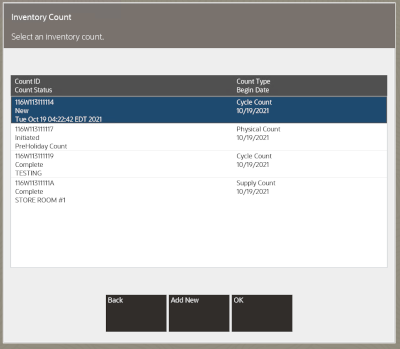
Select the Cycle Count document you want to count, and press Enter.
Figure 5-14 Inventory Count Document List
The Cycle Count screen displays showing the Cycle Count status for both the Inventory Count document and for the count:
Figure 5-15 Cycle Count Screen - Count Cycle 1
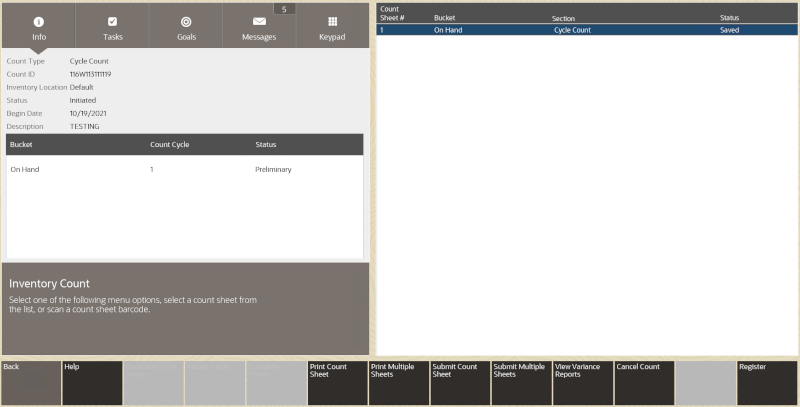
The top area of the screen displays the information for the Inventory Count document: Store ID, Count ID number, Count Type, Begin Date, and Count Status (New, Initiated, or Complete).
Beneath this area displays information for the count sheet:
-
Bucket: The inventory bucket identifier for this count sheet. Inventory buckets are pre-defined for your store. For cycle counts, only the On Hand bucket is counted.
-
Count Cycle: Indicates the number of times the bucket has been counted so far in order to reconcile any count variances and complete the count. The count cycle will always be set to 1 for the first count. If additional counts are needed to resolve a discrepancy, this number will increment for each recount.
-
Status: The status of the bucket within the current count and cycle:
-
Preliminary - The beginning status for a new count.
-
Printed - Indicates the count sheet has been printed.
-
Saved - Indicates the count sheet has been saved.
-
Complete - Indicates the count sheet has been completed.
-
-
-
To begin the counting process, you have the following options:
-
OPTIONAL If you want to see the items on the count sheet, press Enter to open the selected count sheet; or, if you have a printed count sheet available, scan the barcode on the sheet. The items to be counted are listed on the view port.
Figure 5-16 Count Sheet Items
Press Back to return to the previous screen and print the count sheet.
-
Select the Print Count Sheet menu option to print the count sheet on the report printer. The count sheet status is updated to Printed and a count sheet is created.
Figure 5-17 Printed Count Sheet
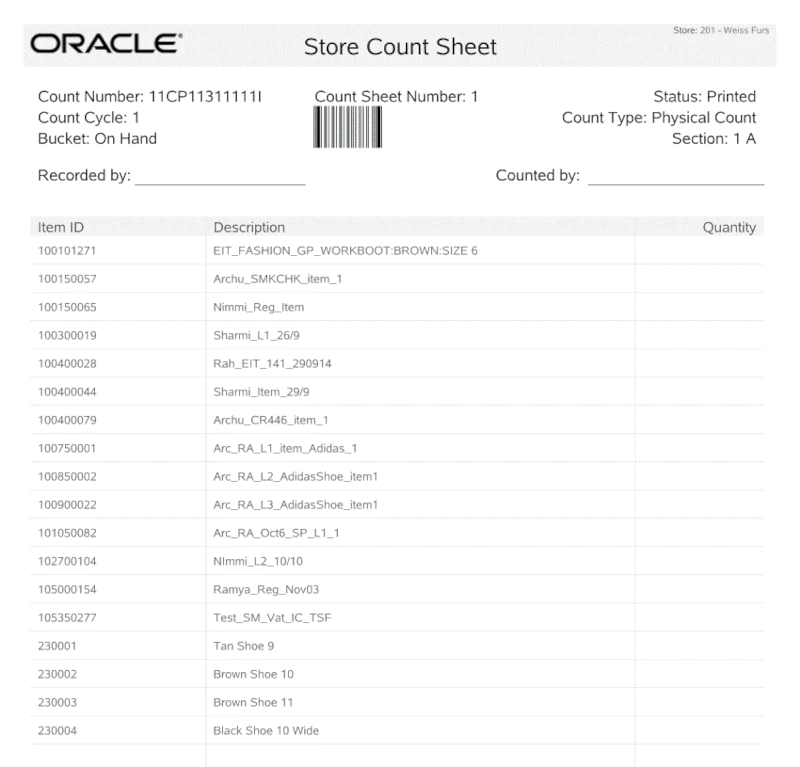
Use this sheet to manually record your item counts.
Note:
The Print Multiple Sheets option is usually used for Physical Counts of the entire store when more than one count sheet exists, not for Cycle Counts.
To print multiple count sheets, select the Print Multiple Sheets menu option. Select the count sheets to be printed. When prompted, select Yes to confirm. The count sheet status will be updated from Preliminary to Printed.
Note:
The store no longer needs to be closed to initiate a count and submit your counts. However, a warning message is displayed if you are performing an inventory count while the store is open. Counts are usually initiated on the day the inventory count takes place.
If enforced by your store policy, you cannot enter your counts until the count has been initiated.
Note:
About the count menu options:
-
Initiate Count BASED ON SECURITY PRIVILEGE - This process allows your counts to be compared to the snapshot system- expected quantity. Depending on your store policy, you may be required to initiate the count before entering any counts into the system. Or, if your store policy allows, you may be able to enter your counts before initiating the count.
-
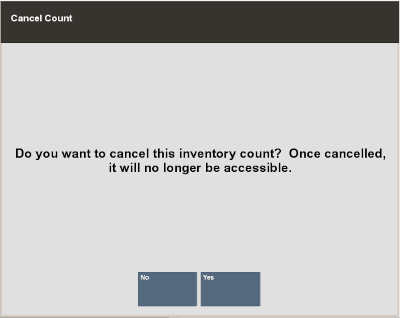
Cancel Count BASED ON SECURITY PRIVILEGE - This option allows you to cancel your count up until it is completed. Only store-created Inventory Counts can be cancelled. When prompted, select Yes to cancel the count.
-
Complete Count BASED ON SECURITY PRIVILEGE - This option marks the count sheet as complete. The Complete Count menu option will only be enabled after the count cycles for the inventory count are complete.
-
Esc - This option will exit the current Count document, and take you back to the Inventory Count search form (Figure 5-4).
-
-
-
Select Initiate Count to take a snapshot of current inventory. If the store is open, a warning message is displayed. Select Yes to continue or No to exit the count.
This initiation process takes a snapshot of your current inventory ledger to be used to calculate variances between the expected (snapshot) quantity and the quantity you entered in to the system.
Counts must be initiated before they can be submitted.
-
Count the items listed on the cycle count sheet. When you have finished counting the inventory items, return to the Inventory module to enter your counts into the system. Refer to the Cycle Count Process, if you need instructions for locating the Inventory Count document you are working on.
-
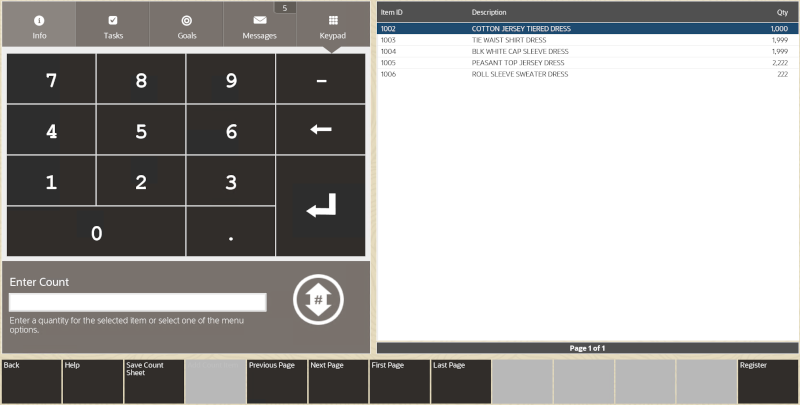
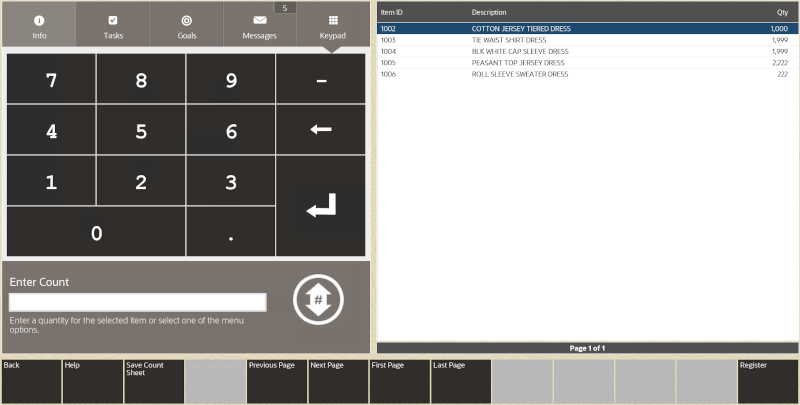
If the item to be counted is keyed, select the item to be counted from the list and enter the count. Xstore moves to the next item on the list.
If the item to be counted is scanned, scan the item. Xstore will increment the counted quantity by 1, unless your store is setup to prompt for quantity.
Figure 5-18 Cycle Count Item List - Enter Count
Note:
You cannot add new items to a Cycle Count sheet. Only items listed on the count sheet can be included in the count.
-
Select Save Count Sheet.
-
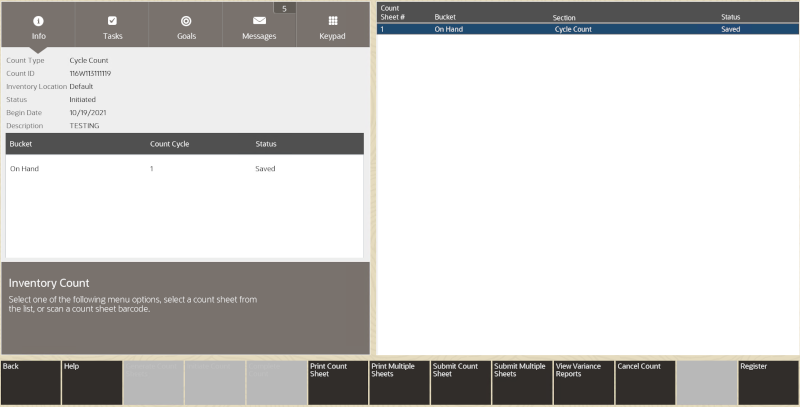
Select Yes to confirm. The count sheet status changes to saved.
-
Select Submit Count Sheet.
Figure 5-19 Saved Count Sheet Screen
Note:
The Submitting Multiple Sheets option is usually used for physical counts of the entire store when more than one count sheet exists.
To submit multiple count sheets at one time, select the Submit Multiple Sheets menu option. With the count sheet highlighted, press the Spacebar to select each sheet.
The system compares the count quantity you entered with the expected quantity based on the snapshot taken of the inventory ledger:
-
If the counted quantity and the expected quantity match, the inventory bucket for the item is marked as settled - no variance, and the count is complete. Skip to step 13.
-
If the counted quantity and the expected quantity do not match, the inventory bucket for the item is marked as having a variance.
-
If your system is set up for Automatic Variance Processing, any variances will automatically result in a new count cycle: count cycle 2. See Automatic Variance Processing for detailed information about this type of variance processing.
-
If your system is set up for Manual Variance Processing, you can choose whether to perform a recount. See Manual Variance Processing for detailed information about this type of variance processing.
-
-
-
If you must recount any items, perform the same steps you used for count cycle 1:
Note:
Since subsequent count cycles are always compared to the initial snapshot taken for the first count cycle, you cannot initiate the count again.
-
Print the count sheet. Only the items with variances will be listed for a recount.
-
When the recount is finished and saved, select the Submit Count Sheet menu option. Once again, the system will compare the entered counts with the expected counts.
-
-
OPTIONAL You can select the View Variance Reports menu option to create a variance report showing the count discrepancies. See Figure 5-27. If prompted, select a Variance Report from the list.
-
The system creates and displays the report. See Variance Report for more information about these reports.
Figure 5-20 Inventory Count Variance Report

-
After the final count cycle sheet is submitted, the system displays a prompt indicating you have completed all count cycles:
Figure 5-21 Inventory Count Cycles Complete Prompt
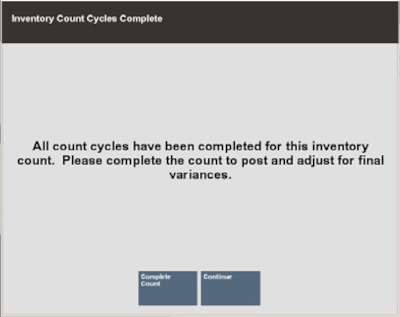
Select one of the following options to continue the counting process:
-
Select Continue to return to the Inventory Count screen. From the Inventory Count screen, you can:
-
View/Print Variance Reports from all count cycles that had variances.
Note:
No Variance Report will be available for a count cycle that had no variances since all variance values would be 0.
-
Save the submitted count cycles and post inventory counts at another time.
-
Print count sheets (if available).
-
Cancel the count BASED ON SECURITY PRIVILEGE.
-
Complete the count to post inventory counts and adjust the inventory counts in the system BASED ON SECURITY PRIVILEGE.
<OR>
-
-
Select Complete Count to post inventory counts and adjust the inventory counts in the system BASED ON SECURITY PRIVILEGE.
-
-
After completing the count sheets, the system marks the Inventory Count document as Complete and inventory quantity will be adjusted accordingly.