Additional Customer Options
Click Customer Options to perform the actions in this section.
Figure 8-27 Customer Options Menu
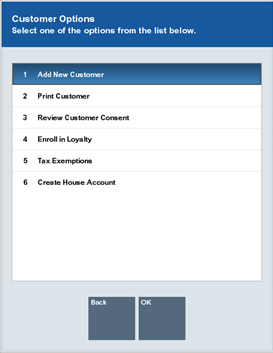
This includes the following options:
Add New Customer
To add a new customer:
-
Click Add New Customer in the Customer Options window.
-
Follow the steps in Add a Customer Record.
Review Customer Consent
This option is only shown when Customer Information Consent functionality is enabled.
To access the consent preferences:
-
Select Review Customer Consent in the Customer Options window. See Figure 8-3.
Update the relevant check boxes as required.
-
Select Accept. The terms and conditions print on the receipt for the customer to sign manually and a prompt is displayed to confirm the customer acknowledges the terms and conditions. Ask the customer to sign the receipt. See Figure 8-4.
-
Select Yes to confirm the customer has acknowledged the terms and conditions and signed the receipt. The customer's acceptance is associated to the customer record.
A confirmation screen is displayed indicating that the customer's consent selections have been updated in the system. Select OK to continue.
Enroll in Loyalty
Many stores offer Loyalty Programs to their customers. A Loyalty Program typically offers benefits (such as savings) to the customer and provides the store with information about customer shopping preferences.
The store may offer various levels of programs that are available to customers.
To enroll a customer in a loyalty program:
-
Click Enroll in Loyalty in the Customer Options window.
Xstore Point of Service prompts whether to add the customer to a loyalty program. See Figure 3-8.
-
Select whether to add the customer to a loyalty program:
-
Scan or enter the card number, the click Process to add the customer to the loyalty program (card-centric programs).
-
Click Yes to add the customer to the loyalty program (non-card-centric programs).
-
Click Not Now to not add the customer to the loyalty program but open the prompt the next time the customer performs a transaction.
-
Click Never to not add the customer to the loyalty program and never ask the customer again.
-
-
Click Save Changes to save the new loyalty configuration for the customer.
About Loyalty Programs
Loyalty values are accumulated according to the rules for each individual program. Rules for assigning points and awards are defined in Oracle Retail Customer Engagement. Swiping or entering a loyalty card number during a transaction records the customer's participation in the program so that the loyalty values may be adjusted in the system.
Tax Exemptions
To manage customer tax exemptions in Xstore Point of Service, perform the proper procedure:
Add a Tax Exemption
To add a tax exemption to a customer record:
-
Click Tax Exemptions in the Customer Options window.
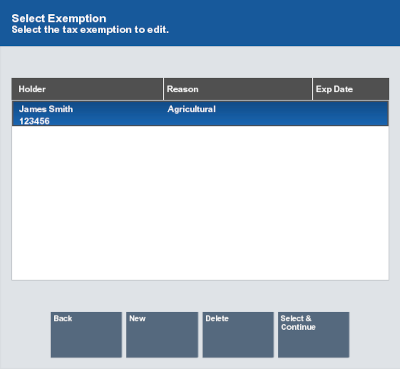
The Select Exemption window opens.
Figure 8-28 Customer Tax Select Exemption
-
Select New.
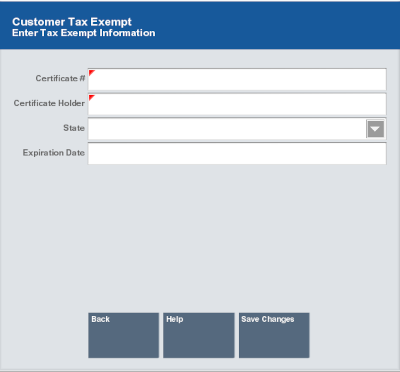
A blank Customer Tax Exempt window opens.
Figure 8-29 Customer Tax Exempt Form
-
Enter the information for the tax exemption:
Note:
Required fields are marked with a red triangle in the upper-left corner.
-
Certificate # - ID number for the certificate.
-
Certificate Holder - Name of the entity to whom the certificate belongs.
-
State - If applicable, the state or province to which the certificate belongs.
-
Expiration Date - Expiration date of the certificate.
-
-
Select Save Changes.
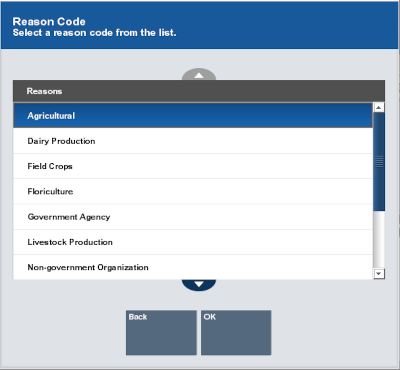
A Reason Code window opens.
Figure 8-30 Tax Exemption Reason Codes
-
Select the reason for adding the tax exemption:
-
Click the reason.
-
Use the up and down arrows to highlight the correct reason, then press the Spacebar.
-
-
Select OK.
The Tax Exemption is added to the system and associated with the customer.
Edit a Tax Exemption
To edit an existing tax exemption:
-
Click Tax Exemptions in the Customer Options window.
The Select Exemption window opens. See Figure 8-28.
-
Select the tax exemption:
-
Click the tax exemption.
-
Use the up and down arrows to highlight the correct tax exemption, then press the Spacebar.
-
-
Click Select & Continue.
The tax exemption opens in a Customer Tax Exempt window.
-
Make any necessary changes to the tax exemption:
Note:
Required fields are marked with a red triangle in the upper-left corner.
-
Certificate # - ID number for the certificate.
-
Certificate Holder - Name of the entity to whom the certificate belongs.
-
State - If applicable, the state or province to which the certificate belongs.
-
Expiration Date - Expiration date of the certificate.
-
-
Select Save Changes.
A Reason Code window opens.
-
Select the reason for the changes to the tax exemption:
-
Select the reason.
-
Use the up and down arrows to highlight the correct reason, then press the Spacebar.
-
-
Click OK.
The changes to the Tax Exemption saved in the system.
Delete a Tax Exemption
To delete a tax exemption:
-
Click Tax Exemptions in the Customer Options window.
The Select Exemption window opens. See Figure 8-28.
-
Select the tax exemption:
-
Click the tax exemption.
-
Use the up and down arrows to highlight the correct tax exemption, then press the Spacebar.
-
-
Click Delete.
Note:
There is no confirmation prompt after clicking Delete. Double-check that you have selected the correct tax exemption before deleting it.
The tax exemption is deleted from the system.
Create House Account
To create a house account for a customer:
-
Click Create House Account in the Customer Options window.
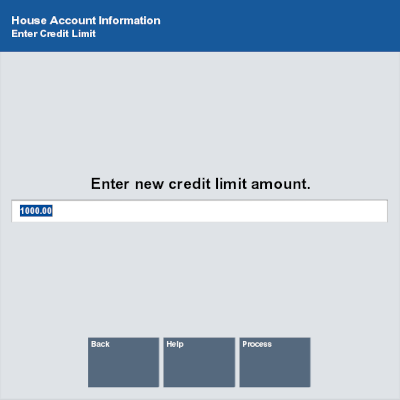
The House Account Credit Limit window opens with the default initial credit limit for a house account.
Figure 8-31 House Account Credit Limit
-
If necessary, change the initial credit limit for the house account.
-
Click Process.
The house account is created with the customer as the primary buyer.