Enabling Document Management
Add the Content Manager task flow to a portal page to enable users to work with libraries, folders, and files in the Content Server repository.
See Also: For an overview of the different options available in WebCenter Portal for working with portal content and adding content to a portal, see Introduction to Working with Content in a Portal.
Permissions: To perform the tasks in this chapter, you must be a portal manager or a portal member with the following portal-level permissions:
-
Standard permissions:
-
Basic Services: Edit Page Access, Structure, and ContentorBasic Services: Edit Page Access and Structure -
Basic Services: View Pages and Content -
Documents: Create and Edit Documents -
Documents: View Documents- Advanced permissions: -
Pages: Edit Pages -
Documents: Create and Edit Documents -
Documents: View Documents
-
See About Roles and Permissions for a Portal.
Topics
About the Content Manager Task Flow
The Content Manager task flow enables you to work with libraries, folders, and files in the Content Server repository. It offers an easy and intuitive user interface with sophisticated searching capabilities. For information about the Content Manager interface and the features it offers, see Adding and Managing Documents in Using Portals in Oracle WebCenter Portal.
The Documents page in a portal and in the Home portal exposes the Content Manager task flow. You can access the Documents page by using the following syntax: http://host:port/webcenter/portal_name/page_name/Documents. The Documents page is not enabled in a portal by default. For information about enabling the Documents page in a portal, see Adding an Existing Page to the Portal Navigation.
You can also choose to add one or more instances of the Content Manager task flow to pages in your portal.
You can configure the Content Manager task flow to present a customized view to users, rather than the default view listing the folders and files. A customized view of the Content Manager task flow is called a pin. A pin is specific to an instance of the Content Manager task flow on a page, and is stored in the page definition. Whenever the page is rendered, it shows the pin, rather than the default view.
To enable portal members to work with the Content Manager task flow, ensure the Documents tool for the portal is enabled. If the Documents tool is not enabled in a portal, adding the Content Manager task flow to a page does not auto-populate the task flow with folders and files. If the Documents tool is enabled in a portal template and you create a portal based on that template, the Documents tool is also enabled in the new portal upon creation.
WebCenter Portal handles any necessary configuration with the back-end server at first use, not at portal creation. This is known as “lazy provisioning” and speeds the successful creation of a new portal by deferring the provisioning of tools until they are first used. Alternately, you can manually enable tools such as the Documents tool in a portal; in this case, WebCenter Portal immediately handles any necessary configuration with the back-end server.
The Content Manager task flow also supports multiple Content Server connections.
Note:
The permissions on WebCenter Portal are independent from the Oracle Content and Experience Cloud permissions and the WebCenter Portal roles cannot be paired with the Oracle Content and Experience Cloud roles. The following table lists the tasks you can perform with the specified WebCenter Portal document permissions.
Table 34-1 Permissions for Oracle Content and Experience Cloud Tasks
| WebCenter Portal Document Permissions | Available Tasks on Oracle Content and Experience Cloud |
|---|---|
Document: View |
|
|
|
|
Prerequisites for Working with the Content Manager Task Flow
For the Content Manager task flow to be available, ensure the following prerequisites are in place:
-
Content Server is configured and all required components are enabled as described in Managing Connections to Oracle WebCenter Content Server in Administering Oracle WebCenter Portal.
-
A Content Server connection is available for WebCenter Portal.
-
Documents tool is enabled in the portal in which you want to add the Content Manager task flow. For information, see Enabling and Disabling Tools and Services Available to a Portal.
Adding the Content Manager Task Flow to a Page
To add the Content Manager task flow to a page:
-
Open the page in which you want to add the task flow in the page editor (see Opening a Page in the Page Editor).
-
Click Add Content to open the resource catalog.
-
Click Content Management.
Tip: The presence or location of the section of the resource catalog that provides access to folders and files in the connected content repository depends on how the resource catalog is configured. In the default resource catalog, content selections are available under the Content Management section.
-
Click Content Manager to add the Content Manager task flow.
-
Save the page. To view your changes, publish the page draft as described in Publishing a Portal Page.
If the Documents tool is enabled in a portal, by default the Content Manager task flow displays the content of the root folder of the current portal. If the Documents tool is not enabled, the Content Manager task flow is added to the page and the following message is shown in the task flow.
Documents tool disabled.
Enable the Documents tool in Tools and Services, or contact the portal manager.
For information about enabling the Documents tool, see Enabling and Disabling Tools and Services Available to a Portal.
Configuring the Content Manager Task Flow
You can configure the Content Manager task flow to present a customized view to users, rather than the default view listing folders and files from the current portal’s root folder.
To configure the Content Manager task flow to display a customized, pinned content view:
-
Open the page containing the Content Manager task flow in the page editor.
-
Click anywhere inside the task flow, and then click Configure.
- In the Configure Content Manager dialog, select options to define the Content Manager view:
Element Description Access selection area options
Click to select options to define the Content Manager view: Search, Browse, Favorites, Clipboard, and Home.
Search
Click to open the Searching Documents page where you can search for documents, and filter and sort the results to define the default view of the selected instance of the Content Manager task flow. You can choose to view the search results as lists, thumbnails, or tables and specify the number of items displayed per page.
Browse
Click to open the Libraries page where you can search for libraries and filter the results to define the default view of the selected instance of the Content Manager task flow.
While setting the default view, you can create a new library, sort and refresh the result list, choose to view the results as lists, thumbnails, or tables, and specify the number of items displayed per page.
Favorites
Click to open the Favorites page to set the default view to the display the items marked as favorites. Favorites are listed in the order selected, with the most recent favorite at the top of the list.
You can refresh the result list and choose to view the results as lists, thumbnails, or tables. You can also specify the number of items to be displayed per page.
Clipboard
Click to open the Rendition Clipboard page, which lists any renditions added to the clipboard. You can specify the number of items to be displayed per page.
Home
Click to view contents of the enterprise library of the current portal.
Note: When you create a portal, the portal’s enterprise library is attributed to the user who created the Content Server connection. While defining the custom view for the Content Manager task flow, the ` Created By You` filter will not show the libraries that you created as a portal manager through portal provisioning or portal creation. This filter will continue to show the folders or files you created, and the enterprise libraries that you created directly instead of those created implicitly through portal provisioning.
-
Click Save to save the current view as the default view for your Content Manager task flow instance. Every time users access the page containing this instance of the task flow, the selected view will be displayed.
You can navigate to the view mode of the page to see the pinned view.
Figure: Creating a Customized View Using Content Manager Filters

Description of the illustration wcc_conmanr_filter.gif
Working with Content Manager Task Flow Properties
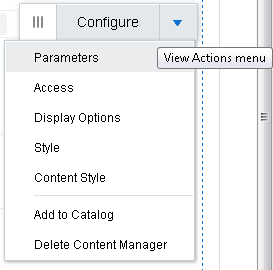
The Content Manager task flow has associated properties, which users with sufficient privileges can access through the task flow’s View Actions menu. For example, you select Parameters from the View Actions menu to set parameters in the Parameters dialog (Figure 34-2).
Figure: Content Manager Parameters

Description of the illustration conmgr_params.png
The following sections provide information about properties and parameters of the Content Manager task flow.
Setting Content Manager Task Flow Properties
The View Actions menu (Figure 34-3) in the toolbar of the Content Manager task flow in the page editor provides access to the following properties dialogs: Parameters, Access, Display Options, Style, and Content Style.
Figure: Content Manager Properties
Description of the illustration wcc_conmanr_prop.png
To set the Content Manager task flow component properties:
-
Open the page containing the Content Manager task flow in the page editor (see Opening a Page in the Page Editor).
-
In the component toolbar, click the View Actions menu and select the properties you want to set:
-
Parameters control the default task flow content. For descriptions of each parameter, see Table 34-2. Parameters can be wired to events, and can be used to facilitate the wiring of the task flow to page parameters and page definition variables. For more information, see Wiring Pages and Components.
Note: If you use page parameter wiring, to ensure the Content Manager task flow displays the content correctly you need to edit the page definition of the page containing the task flow. In the page source code (Viewing and Modifying Page Source Code), on the PageDef tab, change the Content Manager task flow's refresh condition from
Refresh="IfNeeded"toRefreshCondition="IfNeeded". -
Access settings show or hide the component to specific roles, users, or groups. For more information, see Setting Component Access.
-
The Display Options, Style, and Content Style properties affect the appearance and behavior of the task flow for all users. These properties are common to all task flows. For more information, see Modifying Component Properties.
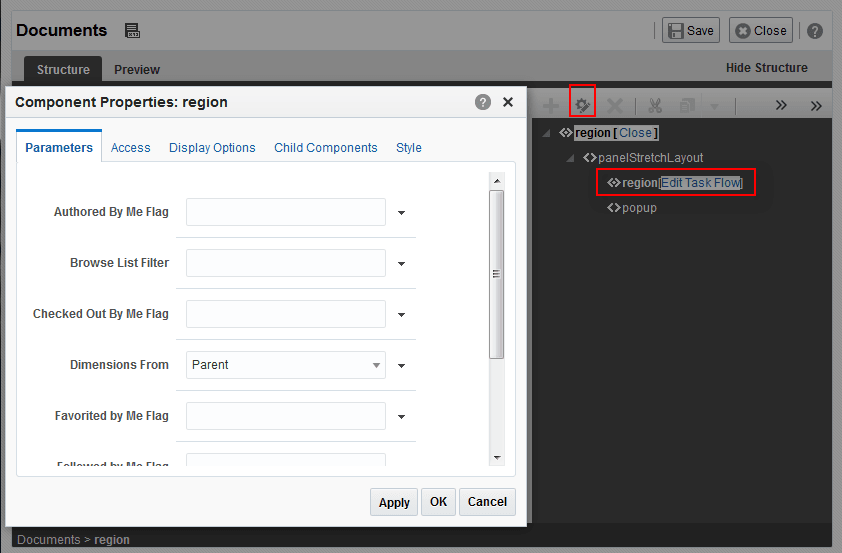
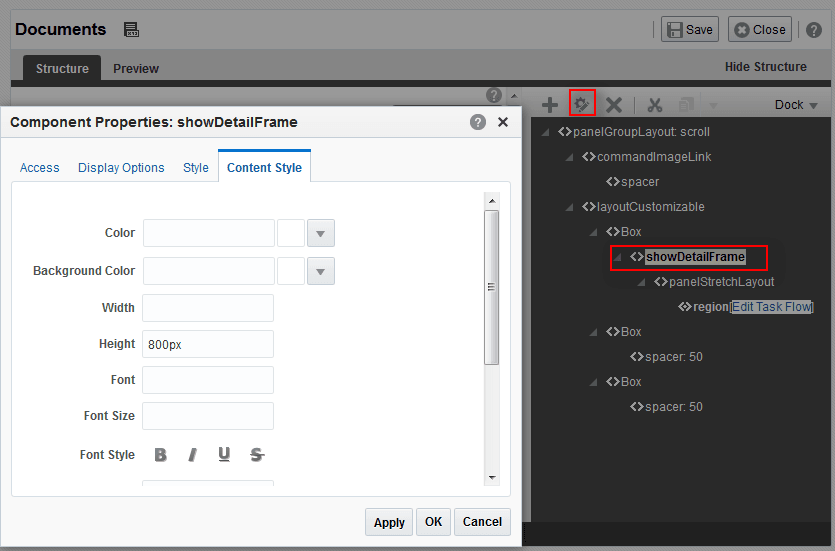
To support Hybrid Enterprise Content Management, ensure that you edit the following properties to stretch the DOCS embed UI:
-
Display option—Set
StretchContentproperty totrue. -
Content Style—set the height of the container as required. For example, 800px.
Alternatively, you can enable the Allow Resize properties in the Display option to increase the height of task flow.
To override the customization or set the customization to support Hybrid Enterprise Content Management, do the following:
-
Select the Tools and Service icon, then enable the Documents service and click Customize the Tool Console.
-
Set the following document property in the system pages:
-
In the Parameters tab set
dimensionsFromtoparent.To set the parameters, click the Show the properties of region icon.
-
In the Display Options tab, set
StretchContenttotrueTo set the Display Options, select showDetailFrame node and click the Show the properties of showDetailFrame icon.

-
In the Content Style tab, set the height as required. For example, 800px.
To set the Content Style, select showDetailFrame node and click the Show the properties of showDetailFrame icon.
-
For more information about updating the properties in the Structure view, see Setting Component Properties in Structure View.
-
The Parameters and Display Options dialogs provide access to an Expression Language (EL) editor, which you can use to select or specify a variable value instead of a constant value. Click the Expression Editor icon icon next to a property, then select Expression Builder to open the editor.
Note: When you enter EL in the Display Options dialog, the parser reports an error only if it detects invalid syntax, such as a missing closing bracket. Validation is performed only on syntax, not on the expression value. Generic Display Options are those cataloged in Table 10-1.
EL validation is not performed on non-generic display options.
If you need EL assistance, an application developer can provide an EL expression; see Expression Language Expressions in Developing for Oracle WebCenter Portal.
On the** View Actions** menu, the Add to Catalog action adds the task flow to a resource catalog, and the Delete Content Manager action removes the task flow from the page.
-
-
Save your changes.
Content Manager Task Flow Parameters
Table 34-2 describes the parameters that are unique to the Content Manager task flow.
Table 34-2 Content Manager Task Flow Parameters
| Parameter | Description |
|---|---|
|
|
Filter to show the items that are authored by the current user. The supported values are |
|
|
Filter to indicate whether to list folders or files. The supported values are |
|
|
Filter to show the items that are checked out by the current user. The supported values are |
|
|
This is the name of the Content Server connection. If no value is selected from the list, the default connection specified by the application developer or administrator is used. For information about creating a connection to Oracle WebCenter Content Server, see Managing Connections to Oracle WebCenter Content Server in Administering Oracle WebCenter Portal. |
|
|
Specifies whether the geometric dimensions of task flow should be inherited from its children or parent. The supported values are We recommend to use If you specify
If you specify
For more information, see Modifying Component Properties |
|
|
Filter to show the items that are favorited by the current user. The supported values are |
|
|
Filter to show the items that are followed by the current user. The supported values are |
|
|
Specifies the JavaScript Object Notation (JSON) string that defines a specific UI state that the task flow needs to display. Oracle recommends that you do not modify the Pin Data parameter. The value for this parameter is set when you configure the pin. |
|
|
The name of the folder to be used as the root folder in the task flow content. Default is the root folder of the content repository for the current portal. Use the Search icon to locate the required folder.
When you specify the Start Folder Path and if Pin Data value is present, the Pin Data value is used to render the view of the task flow. |