17 Working with Resource Catalogs

This chapter describes how to create, modify, and manage a resource catalog in WebCenter Portal.

This chapter includes the following topics:

Permissions

To perform the tasks in this chapter on shared resource catalogs, you must have the application-level Create, Edit, and Delete Resource Catalogs permission. Users with the Application Specialist role have this permission by default. For more information about application-level permissions, see About Application Roles and Permissions in Administering Oracle WebCenter Portal.

To perform the tasks in this chapter, you need one of the following portal-level permissions:

  • Assets: Create, Edit, and Delete Assets or Create Assets and Edit Assets (standard permissions)

    or
  • Resource Catalogs: Create, Edit, and Delete Resource Catalogs or Create Resource Catalogs and Edit Resource Catalogs (advanced permissions).

For more information about portal-level permissions, see About Roles and Permissions for a Portal.

17.1 About Resource Catalogs

Resource catalogs are portal assets that expose components and connections that you can select to populate pages, page templates, page styles, and task flows. The items listed in a resource catalog are collectively referred to as resources.

If a resource catalog is a shared asset (available to all portals), it is shown on the Assets page of all portals along with portal-specific resource catalogs. You can not edit shared assets from a portal's Assets page; to edit a shared asset, see Editing Shared Assets.

The resource catalog that is available to you as you edit a page, page template, page style, or task flow is established by the portal administration settings, and may be a built-in or a custom resource catalog.

When you edit a page, page template, page style, or task flow, the resource catalog is shown when you click Add Content in any region, or when you click the Show Catalog icon. A resource catalog is organized into folders and subfolders to categorize resources. You can click a folder to expand the resource category, then select the resource that you want to add.

You can navigate back through the resource catalog hierarchy using the icons in the resource catalog menu bar. Use the Search field to locate resources by name or description. Click the Refresh icon to update the resource catalog with newly added resources.

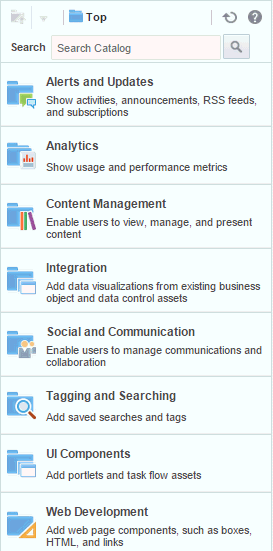
Figure 17-1 shows the Default Portal Catalog, one of the built-in resource catalogs described in About the Built-In Resource Catalogs.

Figure 17-1 Default Portal Catalog
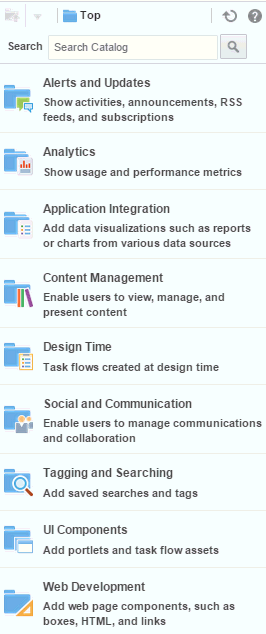
Default Portal Resource Catalog

17.1.1 About the Built-In Resource Catalogs

WebCenter Portal includes three built-in resource catalogs:

  • Default Portal Catalog

  • Default Home Portal Catalog

  • Default Page Template Catalog

Table 17-1 describes and contrasts the three built-in resource catalogs.

Note:

You can create also a custom resource catalog specific to your needs that include a subset of these categories and resources, or add more resources from the resource registry, then make it available to pages and page templates. See Creating a Resource Catalog and Setting the Default Resource Catalogs.

Table 17-1 Built-in Resource Catalogs

Default Portal Catalog Default Home Portal Catalog Default Page Template Catalog

The Default Portal Catalog is assigned to portal pages by default. It contains resources to add to pages and task flow assets in a portal.

The Default Home Portal Catalog is assigned to pages in the Home portal by default. It contains resources to add to a personal or business role page.

For more information about the Home portal, see Exploring WebCenter Portal in Using Oracle WebCenter Portal.

The Default Page Template Catalog is assigned to page templates and page styles by default. It contains a Navigations folder and a Portal Components folder, which provide access to resources specifically used in page templates and page styles.

For more information about page templates and page styles, see Working with Page Templates and Working with Page Styles.

Default Portal Catalog

The Integration category is available in the Default Portal Catalog only when one or more business objects and/or data controls have been created.

Default Home Portal Catalog
Default Page Template Catalog

Table 17-2 provides a description of each category in the default resource catalogs.

Table 17-2 Resources in the Built-In Resource Catalogs

Folder Description

Alerts and Updates

Includes task flows to track alerts and notifications:

Analytics

Includes task flows to help to track and display different metrics, such as response times and usage behavior.

  • Blog Metrics

  • Discussion Forum Metrics

  • Document Metrics

  • Login Metrics

  • Page Traffic

  • Portal Response Time

  • Portal Traffic (summary)

  • Portal Traffic (detailed)

  • Portlet Instance Response Time

  • Portlet Instance Traffic

  • Portlet Response Time

  • Portlet Traffic

  • Search Metrics

  • Wiki Metrics

For more information, see Adding Analytics to a Portal.

Application Integration

This category is not available in the Default Page Template Catalog.

Includes the Data Presenter Visualization component, which is the default starting point for an empty data visualization.

  • Data Presenter Visualization

For more information, see Working with Data Visualizations.

Content Management

Includes task flows to access, add, and manage folders and files, or display content in a predefined template:

  • Content Manager to view and manage documents in a configurable manner. This resource is not available in the Default Page Template Catalog.

  • Content Presenter to select documents and display them in a predefined template.

  • Image to enable users to contribute an image.

  • Styled Text to enable users to contribute styled text.

  • Text to enable users to contribute richly formatted text.

For more information, see Working with Content in a Portal.

Integration

This category is available in the Default Portal Catalog only when one or more business objects and/or data controls have been created.

Includes business objects and data controls created as portal assets:

  • Business Objects folder, which contains business objects available on the portal Assets page. Select a business object to display it on the current page. For more information, see Working with Business Objects.

  • Data Controls folder, which contains data controls available on the portal Assets page. Select a data control to display it on the current page. For more information, see Working with Web Service Data Controls.

Navigation

This category is available only in the Default Page Template Catalog.

Includes built-in navigation task flows that you can add to page templates:

  • Navigation Breadcrumb to display a series of horizontal or vertical links that show users their current position in the navigation hierarchy. Breadcrumbs are particularly useful for deep hierarchies, and when users might want to get back to a specific place.

  • Navigation Menu to display navigational links as a series of tabs, menus, bars, buttons, choices, or as a list. Menu navigation is appropriate when the number of items is known, such that there is enough room to display all the options.

  • Navigation Tree to display navigational links in a hierarchical structure. Tree navigations can provide relatively simple access to a complex structure and often appear in a left pane in page templates.

For more information, see Adding Navigation to a Page Template.

Portal Components

This category is available only in the Default Page Template Catalog.

Includes portal components that are available to add to portal pages, page templates, and page styles.

For more information and descriptions of all available portal components, see Portal Components.

Social and Communication

Includes resources to enable social networking and communication among users:

Tagging and Searching

Includes task flows to enable effective searching of WebCenter Portal and other sources:

  • Saved Searches folder, which contains saved searches that have been created. Select a saved search to display the results of the search on the current page.

  • All Saved Searches to display a list of saved searches. For more information, see Working with the Non-Faceted Search Task Flows.

  • Similarly Tagged Items to display items that have at least one tag in common with the current page. For more information, see Adding Tagging to a Portal.

  • Tag Cloud to display the tags that have been created by all users. For more information, see Adding Tagging to a Portal.

  • Tag Cloud Related Resources to display resources for a tag selected in the Tag Cloud task flow. For more information, see Adding Tagging to a Portal.

  • Tags to display tags created by the current user. For more information, see Adding Tagging to a Portal.

UI Components

Includes the following resources:

  • Portlets folder, which contains portlets for presenting data from multiple sources in a meaningful and related way, and administrator-level tools for registering and managing portlet producers. Select a portlet to display it on the current page.

  • Task Flows folder, which contains task flows created in the Assets or Shared Assets page at runtime. These are visualizations created by gathering data from various data sources and publishing to different layouts such as charts, tables, and graphs. Select a task flow to display it on the current page. For more information, see About Task Flows.

  • Omniportlet to publish data from a variety of data sources (including SQL, XML, web services, spreadsheets, and web pages) to several different layouts, such as customizable charts and tables. For more information, see Working with OmniPortlet.

Web Development

Includes components that add dynamic content to a page, such as images, HTML, and links, as well as components that end users can modify at runtime, such as language selection and areas to add their own content:

  • Box

  • Change Language

  • HTML Markup

  • Hyperlink

  • Links

  • Movable Box

  • Separator

  • Web Page

For more information about these components, see Working with Web Development Components on a Page.

17.2 About the Resource Registry

The Resource Registry is a central repository of all the resources available to WebCenter Portal. It contains all the resources that you can add to custom resource catalogs. In addition to including the built-in resources, the Resource Registry is also updated dynamically to include new resources, such as task flows, application integration components and portlets when they are created in WebCenter Portal or deployed as shared libraries from Oracle JDeveloper. As a result, a resource that is created and published in WebCenter Portal is available for consumption right away.

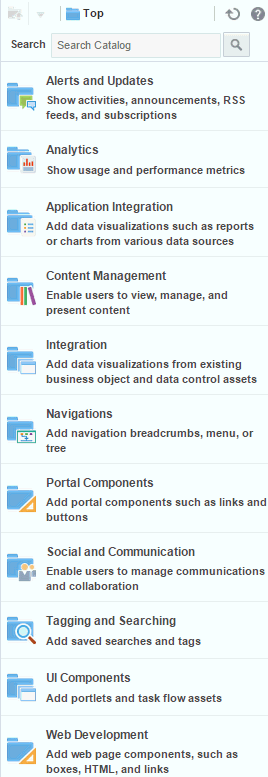
In the Edit dialog for a custom resource catalog (Figure 17-2), click the Add menu and select Add From Library to open the Resource Registry (Figure 17-3).

Figure 17-2 Add From Library Option to Access the Resource Registry
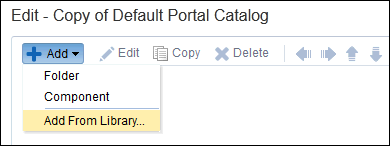
Description of Figure 17-2 follows
Description of "Figure 17-2 Add From Library Option to Access the Resource Registry"

Figure 17-3 Add Resource Catalog Item Dialog (Resource Registry)
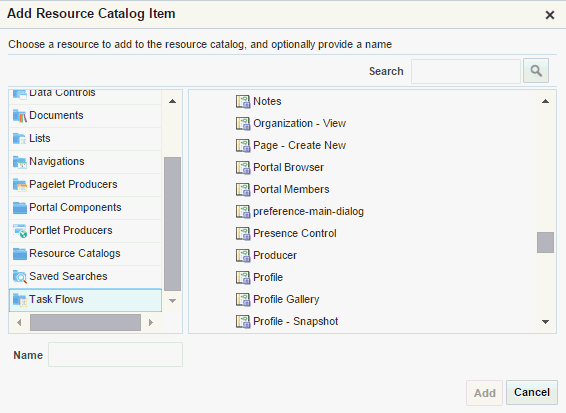
Description of Figure 17-3 follows
Description of "Figure 17-3 Add Resource Catalog Item Dialog (Resource Registry)"

Table 17-3 describes the folders in the Resource Registry.

Table 17-3 Folders in the Resource Registry

Resource Folder Description

Analytics

Displays all the Analytics task flows. These task flows help to track and display different metrics, such as response times and usage behavior, for WebCenter Portal. For more information, see Adding Analytics to a Portal.

Components

Lists a selection of components that can be used to design pages, page templates, page styles, and task flows. For more information, see Working with Web Development Components on a Page.

Connections

Lists all available repository connections. Many resources, such as portlets, external applications, and some WebCenter Portal tools and services, require a connection to a database schema where relevant information is stored.

The chapters describing the various resources provide information about whether a connection is required for that resource.

Data Controls

Lists all data controls available in WebCenter Portal. This includes data controls created at runtime and data controls deployed from JDeveloper.

  • Design Time: At a minimum, this folder displays the built-in WebCenter Portal tools and services data controls. In addition, it also displays data controls that an application developer may have created in JDeveloper and deployed to WebCenter Portal.

    For information about the data controls available for WebCenter Portal tools and services, refer to the appropriate chapter in this guide.

    To expose a custom data control created in JDeveloper, you must deploy the application containing the data control as a shared library to the WebCenter Portal instance. The data control is then included automatically in the Resource Registry. You can add the data control to custom catalogs from the Resource Registry.

    WebCenter Portal provides a template specifically for deploying and undeploying WebCenter Portal shared libraries. You must use that workspace to deploy data controls to WebCenter Portal. For more information, see Developing Shared Libraries in Developing WebCenter Portal Assets and Custom Components with Oracle JDeveloper.

  • Runtime: When you add runtime data controls in a resource catalog, you enable users to consume them in task flows using different visualizations such as tables, graphs, buttons, and so on.

    For more information, see Working with Web Service Data Controls.

    This folder is empty if there are no runtime data controls in your WebCenter Portal instance.

Documents

Lists all documents to which the current user has access. For more information, see Working with Content in a Portal

Lists

Displays all available lists. For more information, see Adding Lists of Information to a Portal.

Navigations

Lists all available navigation models. These resources are available in the Default Page Template Catalog. For more information, see Adding a Built-in Navigation Task Flow to a Page Template.

Pagelet Producers

Lists all registered pagelet producers. For more information, see Working with Pagelets.

Portal Components

Lists components, such as menus, links, copyright message, and so on, that are typically used in page templates. These resources are available in the Default Page Template Catalog, in a folder named Template Development.

For more information, see Portal Components.

Portlet Producers

Lists all registered portlet producers.

Resource Catalogs

Lists all available resource catalogs. You can embed multiple resource catalogs inside a catalog.

Saved Searches

Displays all saved searches. For more information, see Adding Search to a Portal.

Task Flows

Lists all task flows available in WebCenter Portal. This includes task flows created at runtime and data controls deployed from JDeveloper.

  • Design Time: At a minimum, this folder displays the built-in WebCenter Portal tools and services task flows. In addition, it also displays task flows that an application developer may have created in JDeveloper and deployed to WebCenter Portal.

    For information about the WebCenter Portal task flows, refer to the appropriate chapter in this guide.

    To expose a custom task flow created in JDeveloper, you must deploy the application containing the task flow as a shared library to the WebCenter Portal instance. The task flow is then included automatically in the Resource Registry. You can add the task flow to custom catalogs from the Resource Registry.

    WebCenter Portal provides a workspace specifically for deploying and undeploying WebCenter Portal shared libraries. You must use that workspace to deploy task flows to WebCenter Portal. For more information, see Developing Shared Libraries in Developing WebCenter Portal Assets and Custom Components with Oracle JDeveloper.

  • Runtime: For more information, see About Task Flows.

    This folder is empty if there are no runtime task flows in your WebCenter Portal instance.

17.3 Setting the Default Resource Catalogs

When a user creates a new page, page template, page style, or task flow asset, the default resource catalogs determine what can be added to it.

This section includes the following topics:

17.3.1 Setting the Default Resource Catalogs for a Portal

Permissions

To perform this task, you must be a portal manager or member with Administration: Manage Security and Configuration or Administration: Manage Configuration permission in the portal.

For more information about permissions, see About Roles and Permissions for a Portal.

Every portal has a set of default assets, including default resource catalogs. When you create a portal, it initially inherits the application-level default resource catalog settings.

If you create a custom resource catalog for your portal, you can set it to be the default resource catalog available to pages, page templates, page styles, and task flows assets in the portal. For more information, see Changing the Resource Catalogs in a Portal.

17.3.2 Setting the Default Resource Catalog for All Portals

Note:

To perform this task, you must be a system administrator (have the Administrator role, or the Portal Server: Manage All or Portal Server: Manage Configuration permission).

Default resource catalogs can be set at the application level for the following:

  • Pages in all portals

  • Pages in the Home portal

  • Business role pages

  • Page templates in all portals

  • Page templates in the Home portal

System administrators can change the application-level default resource catalog settings, as described in Choosing Default Resource Catalogs in Administering Oracle WebCenter Portal.

17.4 Creating a Resource Catalog

If the built-in resource catalogs do not meet your requirements, you can create your own. When you create a resource catalog, you can build it from scratch or by extending an existing resource catalog.

You can create resource catalogs at the application level or at the portal level. Application-level resource catalogs are available for use in all portals, unless the portal has been specifically excluded. Portal-level resource catalogs are available for use only in the portal in which they are created.

To create a resource catalog:

  1. Navigate to one of the following:
    • To create an application-level resource catalog, go to the Shared Assets page. For more information, see Accessing Shared Assets.

    • To create a portal-level resource catalog, go to the Assets page for the portal in which you want to create it. For more information, see Accessing Portal Assets.

  2. In the left panel, under Structure, click Resource Catalogs.
  3. In the toolbar, click Create (Figure 17-4).

    Figure 17-4 Creating a Resource Catalog

    img/GUID-BAB19186-F897-4D5E-AAD3-F79570F63AD4-default.gif
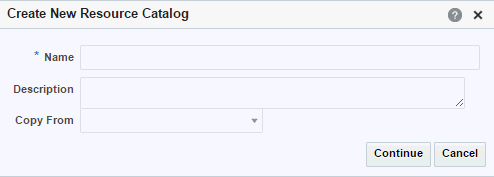
  4. In the Create New Resource Catalog dialog (Figure 17-5), in the Name field, enter a name for the resource catalog.

    The name is displayed in the Assets or Shared Assets page and in lists when selecting a resource catalog. You should make the name as descriptive as possible.

    Figure 17-5 The Create New Resource Catalog Dialog

    Description of Figure 17-5 follows
    Description of "Figure 17-5 The Create New Resource Catalog Dialog"
  5. In the Description field, enter a description for the resource catalog.

    The description is displayed below the name in the Assets or Shared Assets page and as a tool tip when selecting a resource catalog. You should ensure that the description helps users determine if they want to use this particular resource catalog.

  6. From the Copy From list, select an existing resource catalog to use as the starting point for your new resource catalog, if desired. Leave blank to create a new empty resource catalog.

    Tip:

    You can also create a copy of an existing resource catalog as described in Copying an Asset.

  7. Click Continue.

    The newly created resource catalog is listed on the Assets or Shared Assets page.

    The empty check box in the Available column indicates that it is not yet published and hence is not available to other users. To publish the resource catalog, click the check box. For information about publishing a resource catalog, see Showing and Hiding Assets.

    After initial creation, the new resource catalog is either empty or identical to the resource catalog selected from the Copy From list. The next step in creating a resource catalog is to edit it to meet your requirements. For more information, see Editing a Resource Catalog.

  8. To use the new resource catalog to add components to the pages, page templates, page styles, or task flow assets in your portal, see Setting the Default Resource Catalogs.

17.5 Editing a Resource Catalog

You cannot edit the built-in resource catalog, but you can create a custom resource catalog (see Creating a Resource Catalog) and define its structure and content as needed. The resources that you include in the resource catalog determine what users can include in their pages and page templates.

This section includes the following topics:

17.5.1 Adding a Resource to a Resource Catalog

You can add different types of resources to a resource catalog as described in the following sections:

17.5.1.1 Saving a Task Flow to a Resource Catalog

To save a customized task flow to a resource catalog while editing a page, see Saving a Customized Task Flow to a Resource Catalog.

17.5.1.2 Adding a Resource from the Resource Registry

You can add different types of resources to a custom resource catalog from the Resource Registry.

To add a resource from the Resource Registry to a custom resource catalog:

  1. Navigate to one of the following:
    • To add a resource to an application-level resource catalog, go to the Shared Assets page. For more information, see Accessing Shared Assets.

    • To add a resource to a portal-level resource catalog, go to the Assets page for the portal that owns it. For more information, see Accessing Portal Assets.

  2. In the left panel, under Structure, click Resource Catalogs.
  3. Click the Edit quick link in the row for the resource catalog that you want to edit.
  4. In the Edit dialog, from the Add menu, select Add From Library (Figure 17-2).

    Tip:

    To add a resource within a new folder, select Folder to create a folder first and then click Add.

  5. In the Add Resource Catalog Item dialog (Figure 17-3), in the left panel, select a type of resource.
  6. In the right panel, navigate to the resource you want to add to the resource catalog.

    Tip:

    You can select multiple resources using the multi-select shortcut keys appropriate to your operating system (such as Ctrl+click).

  7. Optionally, in the Name field, enter a different name to use for the resource in your resource catalog. This does not change the name of the resource in the library.

    Note:

    If you select multiple resources, you cannot rename them at this point. You can, however, edit them later. For more information, see Setting Properties on a Resource.

  8. Click Add.

    Notes

    • Avoid adding a data control more than once in a resource catalog. The data control is added to the resource catalog as many times, but when you use the resource catalog to populate a page or task flow, you will not be able to add accessors, methods, or attributes from such data control instances.

    • The Design Time data controls folder lists all the WebCenter Portal tools and services data controls. However, adding the ConnectionsNetworkDC and KudosServiceDC data controls at runtime is not supported. Avoid adding these data controls to your page or task flow.

  9. When you are done, click Save and Close.
  10. To use the edited resource catalog to add resources to the pages or page templates in your portal, see Setting the Default Resource Catalogs.

17.5.2 Creating a Custom Component

The Resource Registry in WebCenter Portal provides a large repository of components that you can add to a resource catalog. However, if this is not sufficient and your business requires you to add other components, such as ADF Facelets components, custom JSF, or raw HTML, you can create a custom component and specify the XML code for the component. Using a custom component is the only way to make such components available to a page in the page editor.

You may want to create a custom component to:

  • Create seeded layouts that can be added to a page. You can add a layout component and include a combination of design and container components inside it. The container components provide empty content areas that can be filled later.

  • Add external content by including the raw HTML code.

  • Define seeded layouts in which to consume data controls. You can then bind the data control to the layout.

To create a custom component:

  1. Navigate to one of the following:
    • To add a custom component to an application-level resource catalog, go to the Shared Assets page. For more information, see Accessing Shared Assets.

    • To add a custom component to a portal-level resource catalog, go to the Assets page for the portal. For more information, see Accessing Portal Assets.

  2. In the left panel, under Structure, click Resource Catalogs.
  3. Click the Edit quick link in the row for the resource catalog that you want to edit.
  4. In the Edit dialog, from the Add menu, select Component.
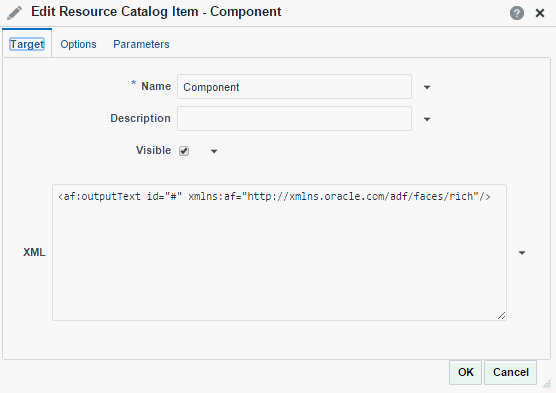
  5. On the Target tab of the Edit Resource Catalog Item - Component dialog, in the Name field, enter a name to display for the component in the resource catalog.

    Figure 17-6 The Edit Resource Catalog Item - Component Dialog

    Description of Figure 17-6 follows
    Description of "Figure 17-6 The Edit Resource Catalog Item - Component Dialog"
  6. In the Description field, enter a brief description of the component.
  7. Select Visible if you want to display the component in the resource catalog.

    Alternatively, you can specify an EL expression to determine under which conditions the resource displays in the resource catalog. For example, to specify that the resource should be visible only to users with the Portal Manager role, use the following EL expression:

    #{WCSecurityContext.userInScopedRole['Moderator']}
    

    If you need EL assistance, an application developer can provide an EL expression; see Expression Language Expressions in Developing WebCenter Portal Assets and Custom Components with Oracle JDeveloper.

  8. In the XML text area, enter the XML code for the component.

    The following are a few examples of custom components:

    • Output Text component:

      <af:outputText xmlns:af="http://xmlns.oracle.com/adf/faces/rich" 
                       value="Weather Forecast for the Day" id="#"/>
      
    • Custom navigation:

      <af:forEach xmlns:af="http://xmlns.oracle.com/adf/faces/rich" 
                  var="level_1_menu"
                   items="#{SiteStructureContext.defaultSiteStructure.listModel['startNode=/, includeStartNode=false']}">
      <af:outputText id="#" 
                     xmlns:af="http://xmlns.oracle.com/adf/faces/rich" 
                     value="#{level_1_menu.title}"/>
      </af:forEach>
      
    • External HTML content:

      <f:verbatim xmlns:f="http://java.sun.com/jsf/core">
        <![CDATA[
          <object width="640" height="385">
            <param name="movie" value="http://www.youtube.com/v/KO2ti-B00gw&hl=en_US&fs=1">
            </param>
            <param name="allowFullScreen" value="true">
            </param>
            <param name="allowscriptaccess" value="always">
            </param>
            <embed src="http://www.youtube.com/v/KO2ti-B00gw&hl=en_US&fs=1" 
                   type="application/x-shockwave-flash" allowscriptaccess="always" 
                   allowfullscreen="true" width="640" height="385">
            </embed>
          </object>]]>
      </f:verbatim>
      

      An alternative to this is to create a new task flow and add an HTML Markup component inside it.

  9. On the Options tab, set the display options for the component. For more information, see Setting Properties on a Resource.
  10. On the Parameters tab, enter values for any parameters supported by the component.

    You can also add custom parameters.

  11. Click OK.
  12. When you are done, click Save and Close.

17.5.3 Creating a Folder

To organize your catalog better, you can group similar resources together. For example, group all components together, or all resources from a particular tool or service.

To create a folder:

  1. Navigate to one of the following:
    • To add a folder to an application-level resource catalog, go to the Shared Assets page. For more information, see Accessing Shared Assets.

    • To add a folder to a portal-level resource catalog, go to the Assets page for the portal. For more information, see Accessing Portal Assets.

  2. In the left panel, under Structure, click Resource Catalogs.
  3. Click the Edit quick link in the row for the resource catalog that you want to edit.
  4. In the Edit dialog, from the Add menu, select Folder.
  5. On the Target tab of the Edit Resource Catalog Item - Folder dialog, in the Name field, enter a name to display for the folder in the resource catalog.
  6. In the Description field, enter a brief description of the contents of the folder.
  7. Select Visible if you want to display the folder in the resource catalog.

    Alternatively, you can specify an EL expression to determine under which conditions the folder displays in the catalog. For example, to specify that the folder should be visible only to users with the Portal Manager role, use the following EL expression:

    #{WCSecurityContext.userInScopedRole['Moderator']}
    

    If you need EL assistance, an application developer can provide an EL expression; see Expression Language Expressions in Developing WebCenter Portal Assets and Custom Components with Oracle JDeveloper.

  8. On the Options tab, set the display options for the folder. For more information, see Setting Properties on a Resource.
  9. On the Parameters tab, enter values for any parameters supported by the folder.

    You can also add custom parameters.

  10. Click OK.
  11. When you are done, click Save and Close.

    You can now add resources inside this folder, or move resources inside it by dragging and dropping them from the top level folder.

17.5.4 Setting Properties on a Resource

You can edit properties on a resource to set the resource name and description, the icon to be associated with the resource, and to add new properties.

To set properties on a resource:

  1. Navigate to one of the following:
    • To set properties on a resource in an application-level resource catalog, go to the WebCenter Portal Shared Assets page. For more information, see Accessing Shared Assets.

    • To set properties on a resource in a portal-level resource catalog, go to the Assets page for the portal. For more information, see Accessing Portal Assets.

  2. In the left panel, under Structure, click Resource Catalogs.
  3. Click the Edit quick link in the row for the resource catalog that you want to edit.
  4. Select the resource that you want to edit.

    Tip:

    If the resource you want to edit is inside a folder in the catalog, expand the folder first.

  5. In the toolbar, click Edit.
  6. On the Target tab of the Edit Resource Catalog Item dialog, in the Name field, edit the name of the resource as it should appear in the resource catalog.
  7. In the Description field, enter a brief description to display below the resource name in the resource catalog.
  8. Select Visible if you want to display the resource in the resource catalog.

    Alternatively, you can specify an EL expression to determine under which conditions the resource displays in the catalog. For example, to specify that the resource should be visible only to users with the Portal Manager role, use the following EL expression:

    #{WCSecurityContext.userInScopedRole['Moderator']}
    

    If you need EL assistance, an application developer can provide an EL expression; see Expression Language Expressions in Developing WebCenter Portal Assets and Custom Components with Oracle JDeveloper.

  9. The remaining fields on this tab are specific to the resource type. See Table 17-4 for details.

    Table 17-4 Fields for Specific Resource Catalog Resources

    Field Applies to Description

    Path

    Links

    Enter the URL to access the resource. The URL format is different depending on what you are linking to:

    • Task Flow: taskflow://Path_to_Task_Flow/Task_Flow_Definition_File_Name#Task_Flow_ID

    • Portlet: portlet://Producer_ID/Portlet_ID

    • Content: content://Content_Connection_ID/Document_ID

    If you do not know the location, click the Select icon to browse for available resources.

    Note: In the Select dialog, the Select button is active only when you select a resource that can be included in the navigation model. For example, if you expand the Portlets node and select a portlet producer, then the Select button is disabled. If you expand the portlet producer and select a portlet, then the Select button is enabled.

    Repository

    Resources that require a repository connection

    The name of the connection used to lookup the resource.

    Include Catalog

    Nested Resource Catalogs

    Select the resource catalog to nest within the current catalog.

    Hide Top-Level Folder

    Custom folders that are populated dynamically at runtime.

    Select to include contents from the selected folder directly under the parent folder; for example, if you select this option for the Data Controls folder, then any data controls created at runtime are displayed directly under Integration. The Data Controls folder is not displayed. You can preview the catalog to see this change.

    Factory Class

    Custom folders that are populated dynamically at runtime

    The factory class used to create the folder.

    The factory classes for the folders available in the default catalog are as follows:

    • Task flow: oracle.webcenter.portalframework.sitestructure.rc.TaskFlowResourceFactory

    • Portlet: oracle.webcenter.portalframework.sitestructure.rc.PortletResourceFactory

    • Content: oracle.webcenter.content.model.rc.ContentUrlResourceFactory

    • Data control: oracle.webcenter.datacomposer.internal.adapter.datacontrol.DataControlContextFactory

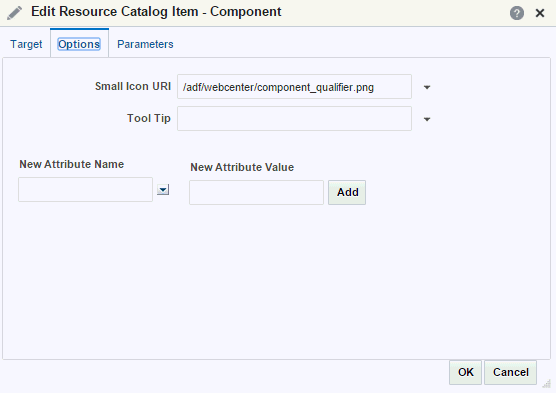
  10. Click the Options tab. (Figure 17-7)

    Figure 17-7 The Options Tab of the Edit Resource Catalog Item Dialog

    Description of Figure 17-7 follows
    Description of "Figure 17-7 The Options Tab of the Edit Resource Catalog Item Dialog"
  11. Set the various display options, as described in Table 17-5.

    Table 17-5 Resource Catalog Item Display Options

    Option Description

    attr.ATTRIBUTE_NAME

    For each attribute, enter an initial value for the attribute.

    These are attributes defined against portlets or task flows at design time. When the task flow or portlet is consumed on a page, the attribute is exposed along with the enclosing chrome's attributes; for example, attr.text defines the default title for the task flow or portlet and attr.contentStyle defines the CSS style to be applied. An attribute is not exposed on the chrome if you do not set an initial value for it.

    parameter.PARAMETER_NAME

    For each parameter, enter an enter initial value for the parameter.

    These are parameters defined against portlets or task flows at design time. When the task flow or portlet is consumed on a page, the parameter is exposed along with the enclosing Show Detail Frame or Movable Box component's properties. A parameter is not exposed on the chrome if you do not set an initial value for it.

    Large Icon URI

    Enter the path of an icon to display next to the resource in the catalog. The icon should preferably be 32 x 32 pixels in size.

    Small Icon URI

    Enter the path of an icon to display next to the resource when it appears in the Up menu in the catalog. The icon should preferably be 16 x 16 pixels in size.

    Tool Tip

    Enter the text to display when users hover the mouse over the resource in the catalog.

  12. In the New Attribute Name field, enter the name of an attribute that has been defined for the resource but is not exposed in the dialog. You can also select an attribute from the drop-down list.
  13. In the New Attribute Value field, enter a value for the attribute specified in the New Attribute Name field, and click Add.

    Tip:

    You can click Add even without specifying a value for the attribute. You can specify the value once the field is displayed in the dialog along with the other display options.

  14. Click the Parameters tab and define parameter values for resources that support wiring, for example, portlets and task flows. For details about supported parameters for a resource, refer to the documentation for that resource.
  15. Click OK.
  16. When you are done, click Save and Close.

17.5.5 Rearranging Resources

To move a resource within a folder, select the resource and click the Move Up or Move Down icons as many times as necessary until the resource is in the desired location.

To indent a resource under another, move the child resource so that it is immediately below the parent resource and click the Indent icon.

To move an indented resource so that it is no longer indented below another resource, select the indented resource and click the Outdent icon.

17.5.6 Copying a Resource

You can create a copy of an existing resource by selecting it in the catalog and clicking Copy. A copy of the resource is placed just below it in the resource hierarchy. You can select the copy and alter its attributes and parameters as described in Setting Properties on a Resource.

17.5.7 Deleting a Resource

You can delete resources from a resource catalog by selecting it in the catalog and clicking Delete. In the Delete dialog, click Delete to confirm that you want to delete the resource from the catalog.

17.5.8 Previewing a Resource Catalog

Click the Preview tab in the Edit dialog to see how the resource catalog appears to users. The preview shows the order in which the resources are displayed. It also shows how dynamic folders are executed.

17.6 Managing a Resource Catalog

The following options are available on the Assets or Shared Assets page to enable you to manage resource catalogs:

  • Create—For more information, see Creating a Resource Catalog.

  • Delete—You can delete a resource catalog when it is no longer required.

    For more information, see Deleting an Asset.

  • Upload—You can upload an archive file that contains a resource catalog that has been developed using JDeveloper.

    For more information, see Uploading an Asset.

  • Download—You can download a resource catalog into an archive file for further development in JDeveloper.

    For more information, see Downloading an Asset.

  • Actions

    • Copy—You can create a copy of a resource catalog.

      For more information, see Copying an Asset.

    • Security Settings—You can control whether all users or only specific users or groups can access a resource catalog.

      For more information, see Setting Security for an Asset.

    • Show Properties—Each resource catalog has an associated Show Properties dialog that summarizes useful information about it.

      For more information, see Viewing Information About an Asset.

    • Edit Source—You can directly edit the source code of a resource catalog.

      For more information, see Editing the Source Code of an Asset.

    • Edit Properties—Each resource catalog has certain properties associated with it that control how it is displayed in the portal. You can edit these properties through the Edit Properties dialog.

      For more information, see Setting Properties on an Asset.

  • Available—You can control whether or not a resource catalog is available for use in a portal by selecting or deselecting this check box.

    For more information, see Showing and Hiding Assets.

    Tip:

    In addition to showing or hiding a page template, you can also control whether a shared page template is available to any, all, or selected portals in WebCenter Portal. For more information, see Setting Properties on a Resource.

  • Edit—For more information, see Editing a Resource Catalog.