31 Pie Chart
This chapter describes a chart that represents data in a form of circle divided into triangular wedges called slices. Each slice represents a percentage that corresponds to a particular value.
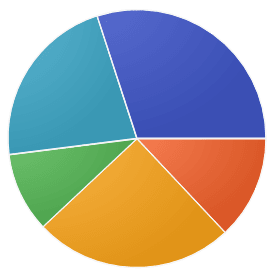
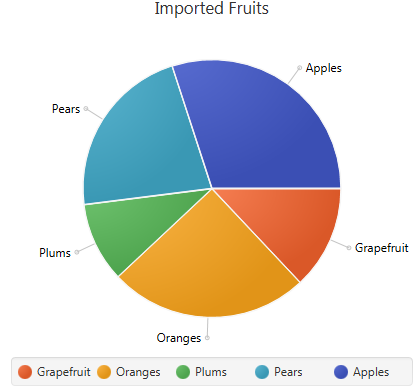
Figure 31-1 shows a pie chart created by using the PieChart class. The colors of the slices are defined by the order of the corresponding data items added to the PieChart.Data array.
Creating a Pie Chart
To create a pie chart in your JavaFX application, at a minimum, you must instantiate the PieChart class, define the data, assign the data items to the PieChart object, and add the chart to the application. When creating the chart data, define as many PieChart.Data objects for as many slices you want to appear. Each PieChart.Data object has two fields: the name of the pie slice and its corresponding value. Example 31-1 creates the basic pie chart.
Example 31-1 Creating a Pie Chart
import javafx.application.Application;
import javafx.collections.FXCollections;
import javafx.collections.ObservableList;
import javafx.scene.Scene;
import javafx.stage.Stage;
import javafx.scene.chart.*;
import javafx.scene.Group;

public class PieChartSample extends Application {

    @Override public void start(Stage stage) {
        Scene scene = new Scene(new Group());
        stage.setTitle("Imported Fruits");
        stage.setWidth(500);
        stage.setHeight(500);

        ObservableList<PieChart.Data> pieChartData =
                FXCollections.observableArrayList(
                new PieChart.Data("Grapefruit", 13),
                new PieChart.Data("Oranges", 25),
                new PieChart.Data("Plums", 10),
                new PieChart.Data("Pears", 22),
                new PieChart.Data("Apples", 30));
        final PieChart chart = new PieChart(pieChartData);
        chart.setTitle("Imported Fruits");

        ((Group) scene.getRoot()).getChildren().add(chart);
        stage.setScene(scene);
        stage.show();
    }

    public static void main(String[] args) {
        launch(args);
    }
}
The result of compiling and running this application is shown in Figure 31-2.
In addition to the basic settings, Example 31-1 specifies the title of the chart by calling the setTitle method.
Setting a Pie Chart and a Legend
The default view of a pie chart includes the pie with the labels and the chart legend. The values of the labels are retrieved from the name field of a PieChart.Data object. You can manage the appearance of the labels by using the setLabelsVisile method. Similarly, you can manage the appearance of the chart legend by calling the setLegendVisible method.
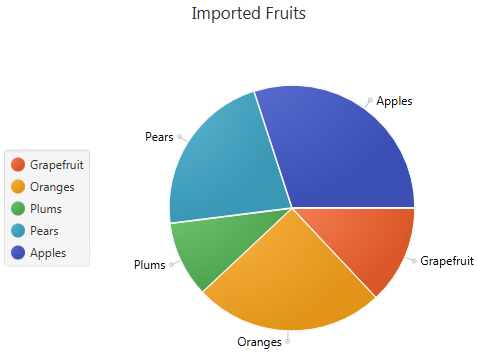
You can alter the position of the labels and the legend. With the setLabelLineLength method, you can specify the length of the line between the circumference of the pie and the labels. Use the setLegendSide method to alter the default position of the legend relative to the pie. Example 31-2 demonstrates how to apply these methods to the chart created in Example 31-1.
Example 31-2 Changing Position of the Labels and the Legend
chart.setLabelLineLength(10);
chart.setLegendSide(Side.LEFT);
The result of adding these lines to the application code, compiling, and then running the application is shown in Figure 31-3.
Figure 31-3 Alternative Position of the Chart Legend and Labels
Description of "Figure 31-3 Alternative Position of the Chart Legend and Labels"
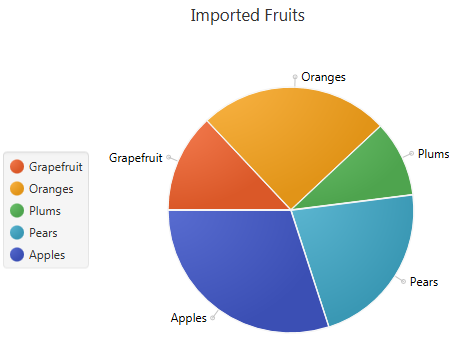
Your application might require that you alter the direction in which the slices are placed in the pie. By default, the slices are placed clockwise. However, you can change this by specifying the false value for the setClockwise method chart.setClockwise(false). Use this method in combination with the setStartAngle method to attain the desired position of the slices. Figure 31-4 shows how the appearance of the pie chart changes when the setStartAngle(180) method is called for the chart object.
Figure 31-4 Changing the Start Angle of the Pie Chart Slices
Description of "Figure 31-4 Changing the Start Angle of the Pie Chart Slices"
Processing Events for a Pie Chart
Although a pie chart slice is not a Node object, each PieChart.Data element has a node associated with it, which can be used to analyze events and process them accordingly. The code fragment shown in Example 31-3 creates an EventHandler object to process a MOUSE_PRESSED event that falls into a particular chart slice.
Example 31-3 Processing Mouse Events for a Pie Chart
final Label caption = new Label("");
caption.setTextFill(Color.DARKORANGE);
caption.setStyle("-fx-font: 24 arial;");

for (final PieChart.Data data : chart.getData()) {
    data.getNode().addEventHandler(MouseEvent.MOUSE_PRESSED,
        new EventHandler<MouseEvent>() {
            @Override public void handle(MouseEvent e) {
                caption.setTranslateX(e.getSceneX());
                caption.setTranslateY(e.getSceneY());
                caption.setText(String.valueOf(data.getPieValue()) + "%");
             }
        });
}
When you add this code fragment to the application code and compile and run it, the application starts reacting to the mouse clicks. Figure 31-5 shows the value displayed for Pears when a user clicks the corresponding slice.
Figure 31-5 Processing the Mouse-Pressed Events for a Pie Chart
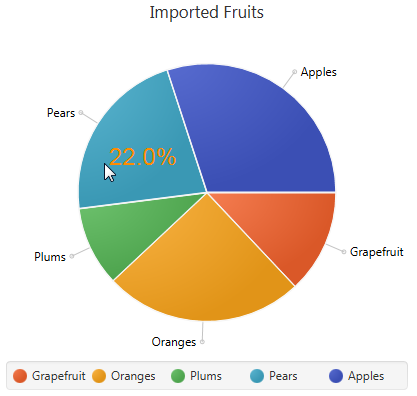
Description of "Figure 31-5 Processing the Mouse-Pressed Events for a Pie Chart"
By using this coding pattern, you can process various events or apply visual effects to the whole chart as well as to its slices.
Related API Documentation
