10g (9.0.4)
Part Number B10356-01
Home |
Solution Area |
Contents |
Index |
| Oracle® Application Server Portal Configuration Guide 10g (9.0.4) Part Number B10356-01 |
|
This chapter discusses the configuration that must be performed to achieve some of the more advanced configurations. To perform these configurations, you must be familiar with the available administrative tools, described in Section 4.1, "Getting Started with OracleAS Portal Administration".
This chapter contains the following sections:
Refer to the chapter "Port Change Procedures" in the Oracle Application Server 10g Administrator's Guide for information about procedures involved in changing ports in Oracle Application Server. If you change the OracleAS Web Cache port you must specify the OracleAS Web Cache settings that Portal should use on the Portal Web Cache Settings screen, as described in Section 7.2.3, "Portal Web Cache Settings Page".
|
Note: To view a list of all the ports currently in use by the components of a particular Oracle Application Server instance, refer to the steps outlined in Section 7.4, "Viewing Oracle Application Server Port Information". |
OracleAS Portal uses a number of different components (such as the Parallel Page Engine, Oracle HTTP Server, and OracleAS Web Cache) each of which may act as a client or server in an HTTP communication. As a result, each component in OracleAS Portal's middle-tier must be configured individually to use the HTTPS protocol.
Configuring SSL is described in Chapter 6, "Securing OracleAS Portal". The following sections describe the various configuration options you have available for SSL with OracleAS Portal:
This section describes how you can set up OracleAS Portal in a multiple middle-tier environment, front-ended by a load balancing router (LBR) to access the same Oracle Application Server Metadata Repository.
The purpose of a Load Balancing Router (LBR) is to provide a single published address to the client tier, and front-end a farm of servers that actually service the requests, based on the distribution of the requests done by the LBR. The LBR itself is a very fast network device that can distribute Web requests to a large number of physical servers.
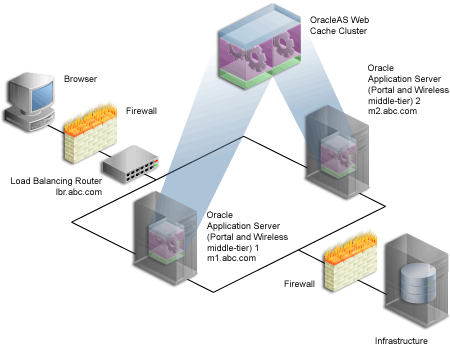
Let us assume that we want to configure the multiple middle-tier configuration, shown in Figure 5-1. In the example, we show OracleAS Web Cache on the same machine as the Portal and Wireless middle-tier, although they can theoretically be on different machines.
Text description of the illustration cg_topo_lbr_sepr_mmtier.gif
|
Notes:
|
To understand how to configure OracleAS Portal with an LBR, it is important to understand a bit more about the internal architecture of Portal.
In order for loopbacks to happen successfully, you must set up a Network Address Translation (NAT) bounce back rule in the LBR, which essentially configures the LBR as a proxy for requests coming to it from inside the firewall. This causes the response to be sent back to the source address on the network, and then forwarded back to the client.
You will notice in Figure 5-1 that the infrastructure is behind the LBR. The infrastructure can be one host, or distributed over multiple hosts. In order to configure the infrastructure properly, refer to the Chapter titled "Advanced Configurations" in the Oracle Application Server Single Sign-On Administrator's Guide.
Note:
To configure OracleAS Portal in a multiple middle-tier environment, front-ended by an LBR, you must perform the following steps:
Install a single Portal and Wireless application server middle-tier, and verify the installation. To do this perform the following steps:
http://m1.abc.com:7777/pls/portal
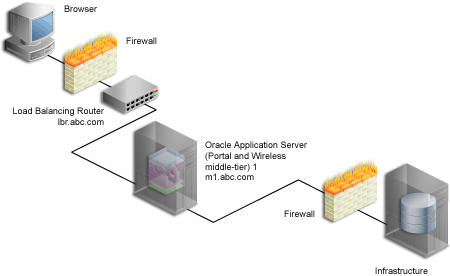
Your configuration now looks like Figure 5-2, with the details described in Table 5-1.
iasconfig.xml file, located in ORACLE_HOME/portal/conf, and verify that it looks something like Example 5-1:
<IASConfig XSDVersion="1.0">
   <IASInstance Name="iAS-1.m1.abc.com" Host="m1.abc.com" Version="9.0.4">
      <WebCacheComponent ListenPort="7777" AdminPort="4002" InvalidationPort="4001"
InvalidationUsername="invalidator" InvalidationPassword="@Bd4D+TnaUYFTJebppI
EqRc3/kleybcc70A==" SSLEnabled="false"/>
      <EMComponent ConsoleHTTPPort="1814" SSLEnabled="false"/>
   </IASInstance>
   <IASInstance Name="iAS.infra.abc.com" Host="infra.abc.com" Version="9.0.4">
      <OIDComponent AdminPassword="@BVs2KPJEWC5a0l4n8lbTxUY=" PortSSLEnabled="true"
LDAPPort="3060" AdminDN="cn=orcladmin"/>
   </IASInstance>
   <PortalInstance DADLocation="/pls/portal" SchemaUsername="portal"
SchemaPassword="@Beyh8p2bOWELQCsA5zRtuYc=" ConnectString="cn=iasdb,cn=oraclecontext">
      <WebCacheDependency ContainerType="IASInstance" Name="iAS-1.m1.abc.com"/>
      <OIDDependency ContainerType="IASInstance" Name="iAS-1.m1.abc.com"/>
      <EMDependency ContainerType="IASInstance" Name="iAS-1.m1.abc.com"/>
   </PortalInstance>
</IASConfig>
You now proceed with the next step where you configure OracleAS Portal to be accessed through an LBR.
To configure OracleAS Portal so it can be accessed through the load balancing router, perform the following steps:
lbr.abc.com) to accept requests on port 80 and forward those to the OracleAS Web Cache port (7777) running on machine m1.abc.com. To do this, you need to:
lbr.abc.com) and LBR port number (80), so that self-referential URLs rendered on OracleAS Portal pages are valid for the browser. To do this, perform the following steps:
lbr.abc.com), using OracleAS Web Cache Manager on M1, as follows:
lbr.abc.com for the Host Name and 80 for Port Number. Keep the default values for all other fields.
lbr.abc.com in the Site Definitions table.
lbr.abc.com to middle-tier m1.abc.com.
lbr.abc.com).
m1.abc.com) specified in the Origin Servers page.
To verify that the site has been mapped correctly, navigate to the Site-to-Server Mapping page, and ensure that M1 is mapped to the site lbr.abc.com.
m1.abc.com so that it can resolve the LBR hostname to have the correct IP address. You can either rely on DNS resolution, or make entries in the /etc/hosts file as follows:
L1.L1.L1.L1 lbr.abc.com
Where L1.L1.L1.L1 is the IP address for the LBR. There is no need to restart the system after making these changes.
m1.abc.com. This ensures that when the PPE makes a loopback request to OracleAS Web Cache, there are no errors.
lbr.abc.com) to accept invalidation requests from the OracleAS Metadata Repository on a separate port (4001 in this example), so that it is forwarded to the OracleAS Web Cache running on machine m1.abc.com on port 4001.
iasconfig.xml file, typically located in ORACLE_HOME/portal/conf. Before editing the file, it is recommended that you make a backup copy of it. The file must be updated to have the correct farmname, hostname, and port information used to access OracleAS Portal, and to perform the OracleAS Web Cache invalidation, as shown in Example 5-2 (all changes are shown in bold):
<IASConfig XSDVersion="1.0">

   <IASFarm Name="Farm-1.lbr.abc.com" Host="lbr.abc.com">
      <WebCacheComponent ListenPort="80" AdminPort="4002" InvalidationPort="4001"
InvalidationUsername="invalidator" InvalidationPassword="welcome1" SSLEnabled="false"/>
   </IASFarm>

   <IASInstance Name="iAS-1.m1.abc.com" Host="m1.abc.com" Version="9.0.4">
      <OIDComponent AdminPassword="@BVs2KPJEWC5a0l4n8lbTxUY=" PortSSLEnabled="true"
LDAPPort="3060" AdminDN="cn=orcladmin"/>
      <EMComponent ConsoleHTTPPort="1814" SSLEnabled="false"/>
   </IASInstance>

   <PortalInstance DADLocation="/pls/portal" SchemaUsername="portal"
SchemaPassword="@Beyh8p2bOWELQCsA5zRtuYc=" ConnectString="cn=iasdb,cn=oraclecontext">
      <WebCacheDependency ContainerType="IASFarm" Name="Farm-1.lbr.abc.com"/>
      <OIDDependency ContainerType="IASInstance" Name="iAS-1.m1.abc.com"/>
      <EMDependency ContainerType="IASInstance" Name="iAS-1.m1.abc.com"/>
   </PortalInstance>

</IASConfig>
iasconfig.xml configuration file. To do this, navigate to ORACLE_HOME/portal/conf, and run the following command:
ptlconfig -encrypt
ORACLE_HOME/portal/conf, and run the following command:
ptlconfig -dad <portal_dadname> -wc -site
ptlconfig -dad portal -wc -site
ossoreg performs this registration. ossoreg is located on the middle-tier in MID_TIER_ORACLE_HOME/sso/lib.
ossoreg:
ORACLE_HOME=MID_TIER_ORACLE_HOME
LD_LIBRARY_PATH=ORACLE_HOME/lib
ossoreg. The following example illustrates the usage of ossoreg.
MID_TIER_ORACLE_HOME/jdk/bin/java -jar
  MID_TIER_ORACLE_HOME/sso/lib/ossoreg.jar -site_name lbr.abc.com
  -mod_osso_url http://lbr.abc.com -config_mod_osso TRUE
  -oracle_home_path MID_TIER_ORACLE_HOME -u install_user -config_file
  MID_TIER_ORACLE_HOME/Apache/Apache/conf/osso/osso.conf
  -admin_info cn=orcladmin -virtualhost
Refer to the section titled "Registering mod_osso" in Chapter 4 of the Oracle Application Server Single Sign-On Administrator's Guide for more information.
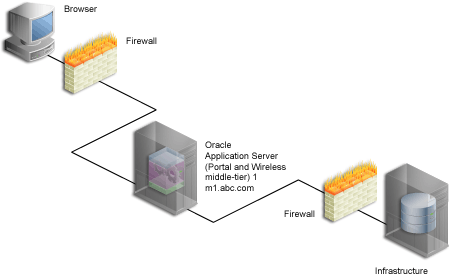
After these steps, your configuration looks like Figure 5-3 with the details described in Table 5-1.
Text description of the illustration cg_topo_load_balancer.gif
Confirm that OracleAS Portal is up and running by performing the following tests in the specified order. If a test fails, address the issues, before proceeding with the next test. To diagnose the OracleAS Web Cache, Oracle HTTP Server, and LBR configuration and logs, refer to the chapter "Managing Diagnostic Log Files" in the Oracle Application Server 10g Administrator's Guide.
http://lbr.abc.com/relnotes.htm
http://lbr.abc.com/pls/portal/htp.p?cbuf=test
The response should be "test". If this succeeds, it means that the Oracle Application Server middle-tier can connect to the OracleAS Metadata Repository. If this fails, scan the Oracle HTTP Server error_log file for details about the request failure, and take appropriate actions.
http://lbr.abc.com/pls/portal. If this does not work, scan the application.log file for the OC4J_Portal instance, and look for errors. The most common reason for this error is because the PPE cannot make loopback connections. For this to work:
Under Monitoring, click Popular Requests. Select Cached from the Filtered Documents drop-down list, and click Update. If you accessed OracleAS Portal, you will see portal content (For example, URLs that contain /pls/portal). If you don't see any portal content, open another browser and login to OracleAS Portal. Return to the Popular Requests page, and click Update, to refresh the page content. This should provide enough content for verification.
Follow these steps to install a new Portal and Wireless middle-tier on M2 (m2.abc.com):
IASCONFIG_LOC environment variable to point to the same location that IASCONFIG_LOC is pointing to on machine m1.abc.com. The iasconfig.xml file allows Portal configuration to be performed from any of the hosts involved in a Web site topology. The environment variable should ideally point to a location that is accessible over a shared file system, so that installations done on different machines can reference and update the same file.
The environment variable should be set in the second middle-tier before starting the installation. To override the default location of the configuration file, you must set the environment variable IASCONFIG_LOC to a directory in which the file is stored, for example:
set IASCONFIG_LOC=/usr/local/ias904
|
Note:
By default, |
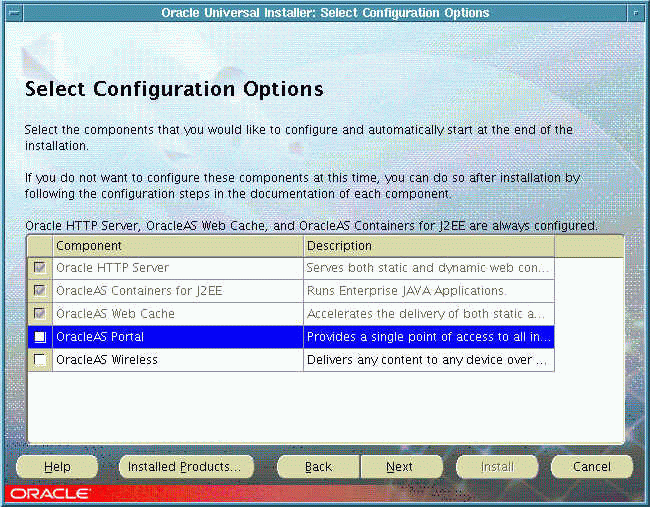
Text description of the illustration cg_advnc_sshot_cfgopts.gif
|
Caution: Selecting OracleAS Portal in the Select Configuration Options screen overwrites your previous configuration entries in OracleAS Portal. For more information, see Section 3.3, "Configuring OracleAS Portal During and After Installation". |
Follow these steps, in the order specified, to configure M2 to run your existing portal:
lbr.abc.com) and LBR port number (80). To do this, perform the following steps, using the Application Server Control on M2:
ORACLE_HOME/Apache/modplsql/conf/dads.conf from M1 to M2.
ORACLE_HOME/Apache/modplsql/conf/cache.conf from M1 to M2.
ORACLE_HOME/j2ee/OC4J_Portal/applications/portal/portal/WEB-INF/web.xml from M1 to M2.
ORACLE_HOME/Apache/Apache/conf/osso/osso.conf from M1 to M2
IASCONFIG_LOC in Section 5.3.4, "Step 4: Install a New Portal and Wireless Middle-Tier (M2)", you must update the iasconfig.xml file on M2, by following the steps described in Section A.1.2, "Updating the Portal Dependency Settings File".
ORACLE_HOME/dcm/bin/dcmctl:
dcmctl updateConfig
ORACLE_HOME/opmn/bin:
opmnctl restartproc type=ohs
m2.abc.com to resolve the LBR hostname to have the correct IP address. You can either rely on DNS resolution for this, or make entries in the /etc/hosts file as follows:
L1.L1.L1.L1 lbr.abc.com
| Property | Value |
|---|---|
|
Host Name |
m2.abc.com |
|
Admin Port |
4002 |
|
Protocol for Admin Port |
HTTP |
|
Cache Name |
m2.abc.com-WebCache |
|
Capacity |
30 |
m2.abc.com in the Cluster Member table.
Refer to the section "Configuring a Cache Cluster" in the "Specialized Configurations" chapter of the Oracle Application Server Web Cache Administrator's Guide for more information.
| Property | Value |
|---|---|
|
Hostname |
m2.abc.com |
|
Port |
7778 |
|
Routing |
ENABLED |
|
Capacity |
100 |
|
Failover Threshold |
5 |
|
Ping URL |
/ |
|
Ping Interval |
10 |
|
Protocol |
HTTP |
m2.abc.com in the Origin Server table.
Refer to the section "Map Sites to Origin Servers" in the Oracle Application Server Web Cache Administrator's Guide for more information.
lbr.abc.com to the two origin servers m1.abc.com, and m2.abc.com, by performing the following steps:
m2.abc.com).
lbr.abc.com in the Site to Server Mappings table.
Refer to the section "Map Sites to Origin Servers" in the Oracle Application Server Web Cache Administrator's Guide for more information.
lbr.abc.com) to accept invalidation requests from the OracleAS Metadata Repository on a separate port (4001 in this example), so that it is forwarded to the OracleAS Web Cache running on machine m1.abc.com on port 4001, and m2.abc.com on port 4001.
lbr.abc.com) to accept requests on Port 80, so that it balances the load between the OracleAS Web Cache running on machine m2.abc.com:7777, and the OracleAS Web Cache running on m1.abc.com:7777.
m2.abc.com. Refer to Step 6 in Section 5.3.2, "Step 2: Configure OracleAS Portal on M1 to Be Accessed Through the LBR" section for more information.
After these steps, your configuration looks like Figure 5-1.
|
Note: For adding more middle-tiers, follow the procedures outlined in the sections Section 5.3.4, "Step 4: Install a New Portal and Wireless Middle-Tier (M2)" and Section 5.3.5, "Step 5: Configure the New Middle-Tier (M2) to Run Your Existing Portal", for each middle-tier. |
To ensure that the Portal Tools (OmniPortlet and OracleAS Web Clipping) providers and Locally Built, as well as Custom built Web providers work properly, in the middle-tier environment, some additional configuration is required.
Perform the following steps for Portal Tools (OmniPortlet and OracleAS Web Clipping) providers to function properly in the multiple middle-tier environment:
DBPreferenceStore). To configure Portal Tools providers to use DBPreferenceStore, perform the following steps:
ORACLE_HOME/j2ee/OC4J_Portal/applications/jpdk/jpdk/doc/dbPreferenceStore. For example:
cd ORACLE_HOME/j2ee/OC4J_Portal/applications/jpdk/jpdk/doc/dbPreferenceStore
sqlplus scott/tiger
jpdk_preference_store2.sql script as follows in SQL*Plus:
@jpdk_preference_store2
data-sources.xml, located in the directory ORACLE_HOME/j2ee/OC4J_Portal/config:
<data-source
   class="com.evermind.sql.DriverManagerDataSource"
   name="omniPortletprefStore"
   location="jdbc/UnPooledConnection"
   xa-location="jdbc/xa/XAConnection"
   ejb-location="jdbc/PooledConnection"
   connection-driver="oracle.jdbc.driver.OracleDriver"
   username="scott"
   password="tiger"
   url="jdbc:oracle:thin:@infra.host.com:1521:orcl"
   inactivity-timeout="30"
/>
provider.xml located in the directory ORACLE_HOME/j2ee/OC4_Portal/applications/portalTools/omniPortlet/WEB-INF/providers/omniPortlet. Edit the preferenceStore tag as shown in bold:
<provider class="oracle.webdb.reformlet.ReformletProvider">
   <vaultId>0</vaultId>
   <session>true</session>
   <preferenceStore
class="oracle.portal.provider.v2.preference.DBPreferenceStore">
      <name>omniPortletprefStore</name>
      <connection>jdbc/PooledConnection</connection>
   </preferenceStore>
More information on configuring the database preference store can be found in the PDK article titled "Installing the DBPreferenceStore Sample", located at http://portalstudio.oracle.com/pls/ops/docs/FOLDER/COMMUNITY/PDK/jpdk/v2/doc/dbPreferenceStore/installing.db.preference.store.v2.html, on Portal Studio at http://portalstudio.oracle.com.
http://m1.abc.com:7777/portalTools/omniPortlet/providers/omniPortlet
http://m1.abc.com:7777/portalTools/webClipping/providers/webClipping
Refer to Section I.1, "Configuring the Web Clipping Repository", and Section I.2, "Configuring HTTP or HTTPS Proxy Settings" for more information.
ORACLE_HOME/j2ee/OC4J_Portal/applications/portalTools/omniPortlet/WEB-INF/providers/omniPortlet/provider.xml from M1 to M2.
ORACLE_HOME/j2ee/OC4J_Portal/applications/portalTools/webClipping/WEB-INF/providers/webClipping/provider.xml from M1 to M2.
ORACLE_HOME/j2ee/OC4J_Portal/config/data-sources.xml from M1 to M2.
http://m1.abc.com:7777/ to http://lbr.abc.com/.
http://m1.abc.com:7777/ to http://lbr.abc.com/.
http://lbr.abc.com:80/portalTools/omniPortlet/providers/omniPortlet
http://lbr.abc.com:80/portalTools/webClipping/providers/webClipping
If you want to use the OracleAS Web Clipping provider, or the Web Page Data Source for OmniPortlet, you must also enable session binding in OracleAS Web Cache, as described in Step 7: Enable Session Binding on OracleAS Web Cache.
Note:
Locally Built providers are providers that are defined within an instance of OracleAS Portal. Perform the following steps to create a Locally Built Web Provider that functions properly in the multiple middle-tier environment:
http://lbr.abc.com/pls/portal.
http://m1.abc.com:7777/jpdk/servlet/soaprouter/.
provider.xml file for each new provider.
ORACLE_HOME/j2ee/OC4J_Portal/applications/portalTools/providerBuilder/WEB-INF/providers/<providerName> directory from M1 to M2.
ORACLE_HOME/j2ee/OC4J_Portal/applications/portalTools/providerBuilder/WEB-INF/deployment/<providerName>.properties file from M1 to M2.
ORACLE_HOME/j2ee/OC4J_Portal/applications/portalTools/providerBuilder/WEB-INF/deployment_providerui/provideruiacls.xml file from M1 to M2.
<providerMap> in ORACLE_HOME/j2ee/OC4J_Portal/applications/portalTools/providerBuilder/WEB-INF/deployment_providerui/providerstore.xml from M1 to M2 and change the <warDir> element with the appropriate value for the ORACLE_HOME for M2 (shown in bold):
<providerMap name="MyProvider" baseLanguage="en">
    <displayName language="en" translation="myprovider"></displayName>
    <timeout>20</timeout>
    <timeoutMessage language="en" translation="Timed Out"></timeoutMessage>
    <loginFrequency>Never</loginFrequency>
    <httpURL>http://lbr.abc.com:80/portalTools/builder/providers/MYPROVIDER</httpURL>
    <cookieDomain>abc.com</cookieDomain>
    <serviceId>MYPROVIDER</serviceId>
    <requireSessionData>false</requireSessionData>
    <httpAppType>Portal</httpAppType>
    <warDir>ORACLE_HOME/j2ee/OC4J_
Portal/applications/portalTools/providerBuilder/WEB-INF</warDir>
    <warFile>providerBuilder</warFile>
</providerMap>
http://m1.abc.com:7777/ to http://lbr.abc.com/.
http://lbr.abc.com:80/portalTools/builder/providers/<providerName>.
http://lbr.abc.com:80/jpdk/servlet/soaprouter/.
A custom built provider is any web provider that is not seeded by the OracleAS Portal installation, or created using OracleAS Portal. To configure the custom built provider, you must deploy it on the first middle-tier, and register it to OracleAS Portal, using the M1 URL (http://m1.abc.com:7777/<webApp>/providers/<providerName>. To configure it to work in the multiple middle-tier environment, you must perform the following steps:
More information on configuring the database preference store can be found in the PDK article titled "Installing the DBPreferenceStore Sample", located at http://portalstudio.oracle.com/pls/ops/docs/FOLDER/COMMUNITY/PDK/jpdk/v2/doc/dbPreferenceStore/installing.db.preference.store.v2.html, on Portal Studio at http://portalstudio.oracle.com.
ORACLE_HOME/j2ee/OC4J_Portal/applications/<webApp>/WEB-INF/providers/<providerName>/provider.xml from M1 to M2.
http://m1.abc.com:7777/ to http://lbr.abc/
http://lbr.abc.com:80/<webApp>/providers/<providerName>
The Session Binding feature in OracleAS Web Cache is used to bind user sessions to a given origin server to maintain state for a period of time. Although almost all components running in a default OracleAS Portal middle-tier are stateless, session binding is required for two reasons:
To make OracleAS Web Cache bind the portal user session to the OracleAS Portal middle-tier, perform the following steps:
lbr.abc.com:80) in the table, and then click Edit Selected.
lbr.abc.com:80.
To verify that your complete configuration is working as expected, perform the following steps:
http://lbr.abc.com/pls/portal.
Under Monitoring, click Popular Requests. Select Cached from the Filtered Documents drop-down list, and click Update. If you accessed OracleAS Portal, you will see portal content (For example, URLs that contain /pls/portal).
Perform some simple page edits in OracleAS Portal, like adding a portlet to a page and make sure that the new content shows up. If the new content does not display properly, or if you see errors, OracleAS Web Cache invalidation is misconfigured.
The Oracle HTTP Server (OHS) supports the configuration of virtual hosts. Virtual hosts allow a single machine to appear as any number of different sites. You can, for example, configure a machine to represent both www.abc.com, as well as www.xyz.com. Another example would be configuring a machine to represent both my.oracle.com, as well as oraclepartnernetwork.oracle.com. To configure virtual hosts with Oracle Application Server Portal, you must set this up on the Oracle HTTP Server. Additional Oracle Application Server Web Cache and Oracle Application Server Single Sign-On configuration is also required.
|
Note: If your intent is simply to change the hostname of your middle-tier, refer to the chapter titled "Changing Network Configurations" in the Oracle Application Server 10g Administrator's Guide. |
Let's assume that your server name is www.abc.com, and you connect to OracleAS Portal at http://www.abc.com:7779/pls/portal. The IP address of the machine that the middle-tier is installed on is 196.12.67.8.
You want to access OracleAS Portal at http://www.abc.com:7779/pls/portal, using the real servername, as well as http://www.xyz.com:7779, using a virtual hostname, where both URLs resolve to the same IP address.
In this example, port 7779 is the OracleAS Web Cache listening port, and port 7778 is the OHS listening port.
Let's also assume that the OracleAS Single Sign-On is installed on a different machine with the IP address 123.45.67.8, and accessed at the URL http://www.login.com:7777/pls/orasso.
|
Notes:
|
Figure 5-5 illustrates the previously described configuration. OracleAS Web Cache and the Oracle Application Server are shown as residing on the same middle-tier machine, although they can exist on different machines.
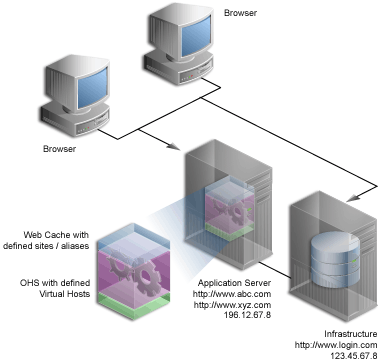
Text description of the illustration cg_advnc_topo_virtual_hosts.gif
To configure the virtual host, perform the following steps in the specified order:
You must create virtual hosts entries in the httpd.conf file for the virtual host name www.xyz.com, as well as for the real server name www.abc.com. To define the virtual hosts, use Oracle Enterprise Manager Application Server Control to perform the following steps:
Once you have finished this step, do the following:
To create the virtual host for www.xyz.com:
Typically the Application Server Control is located at http://www.xyz.com:1812. Refer to Chapter 7, "Monitoring and Administering OracleAS Portal" for more information about using the Application Server Control.
Table 5-2 Virtual Host Information
www.xyz.com
7778 in our example, from the port dropdown list.
www.xyz.com, is listed in the table.
Port and the Rewrite directives in the VirtualHost container, as follows (shown in bold text):
NameVirtualHost *:7778

<VirtualHost *:7778>
     ServerName www.xyz.com
     Port 7779
     ServerAdmin you@your.address
     RewriteEngine On
     RewriteOptions inherit
</VirtualHost>
To create the virtual host for www.abc.com:
www.abc.com
After configuring virtual hosts for www.abc.com and www.xyz.com, take a look at your httpd.conf file, using Application Server Control, as follows:
Your httpd.conf file should have the following new section:
NameVirtualHost *:7778

<VirtualHost *:7778>
   ServerName www.xyz.com
   Port 7779
   ServerAdmin you@your.address
   RewriteEngine On
   RewriteOptions inherit
</VirtualHost>

<VirtualHost *:7778>
   ServerName www.abc.com
   Port 7779
   ServerAdmin you@your.address
   RewriteEngine On
   RewriteOptions inherit
</VirtualHost>
Entries for the virtual hosts can vary depending on the existing content of the httpd.conf file, but you must have virtual host entries for both www.abc.com and www.xyz.com.
Verify that both the servername, and the virtual host are working, by accessing these URLs:
The site www.abc.com is already defined in OracleAS Web Cache. Additionally, you must create a site alias in OracleAS Web Cache, to make the multiple virtual hosts transparent to the OracleAS Metadata Repository. Note that www.abc.com must be set up as a site, while www.xyz.com must be defined as a site alias. This way, invalidation messages sent to OracleAS Web Cache invalidate content that is cached for both sites.
|
See Also:
Oracle Application Server Web Cache Administrator's Guide for information about setting up a site alias. |
For Single Sign-On in the Oracle Application Server Single Sign-On to work properly, it must always be referenced by any partner application with the same hostname in the URL. This is because cookies are sent back only to the host that generated them. So, in the preceding example, the OracleAS Single Sign-On must always be referenced as http://www.login.com. Therefore, you must register www.abc.com, and www.xyz.com as partner applications. To do this:
www.abc.com, by running OracleAS Portal Configuration Assistant (OPCA) with -mode MIDTIER and -type SSO, as follows:
ptlasst.csh -mode MIDTIER -type SSO -host www.abc.com -port 7779 -sdad portal
www.xyz.com, by running OPCA in the SSO type of the MIDTIER mode:
ptlasst.csh -mode MIDTIER -type SSO -host www.xyz.com -port 7779 -sdad portal
www.abc.com. The script ossoreg performs this registration. ossoreg is located on the middle-tier in MID_TIER_ORACLE_HOME/sso/lib.
ossoreg:
ORACLE_HOME=MID_TIER_ORACLE_HOME
LD_LIBRARY_PATH=ORACLE_HOME/lib
ossoreg. The following example illustrates the usage of ossoreg.
MID_TIER_ORACLE_HOME/jdk/bin/java -jar
  MID_TIER_ORACLE_HOME/sso/lib/ossoreg.jar -site_name www.abc.com
  -mod_osso_url http://www.abc.com:7779 -config_mod_osso TRUE
  -oracle_home_path MID_TIER_ORACLE_HOME -u install_user -config_file
  MID_TIER_ORACLE_HOME/Apache/Apache/conf/osso/osso.conf
  -admin_info cn=orcladmin
www.xyz.com, using the virtual host mode of ossoreg, as shown in the following example.
MID_TIER_ORACLE_HOME/jdk/bin/java -jar
MID_TIER_ORACLE_HOME/sso/lib/ossoreg.jar -site_name www.xyz.com
-mod_osso_url http://www.xyz.com:7779 -config_mod_osso TRUE    -oracle_home_
path
MID_TIER_ORACLE_HOME -u install_user -config_file
MID_TIER_ORACLE_HOME/Apache/Apache/conf/osso/osso_xyz.conf    -admin_info
cn=orcladmin -virtualhost
Note that the -config_file parameter refers to the file osso_xyz.conf.
www.xyz.com as follows (changes shown in bold).
<VirtualHost *:7778>
   ServerName www.xyz.com
   Port 7779
   ServerAdmin you@your.address
   RewriteEngine On
   RewriteOptions inherit
   OssoConfigFile MID_TIER_ORACLE_HOME/Apache/Apache/conf/osso/osso_xyz.conf
   OssoIpCheck off
</VirtualHost>
Refer to the section titled "Registering mod_osso" in Chapter 4 of the Oracle Application Server Single Sign-On Administrator's Guide for more information.
To verify that the virtual hosts are set up correctly, connect to OracleAS Portal using either of the following URLs:
You should get a login screen at http://www.login.com on the first login and must be able to log in successfully. A subsequent login from the other virtual host should result in a successful single sign-on without a prompt for login credentials.
You can configure OracleAS Portal to use proxy servers to connect to providers and Web sites outside of your firewall.
|
Notes:
|
To specify a proxy server:
myproxy.mycompany.com. Do not prefix http:// to the proxy server name.
You can now use this proxy server for connections between the portal and Web providers. You can also use this proxy for other connections, for example, to connect to the URLs specified for URL items.

You'll find additional information about how to set up proxy servers in the paper "A Primer on Proxy Servers," on Portal Center, http://portalcenter.oracle.com. Click the Search icon in the upper right corner of any Portal Center page.
A reverse proxy server is a host process that is used as part of a firewall architecture to isolate the internal hosts from the externally accessible host(s). It does this by providing a proxy through which external requests must pass to access internal services. Typically, a proxy server takes the form of a dual-homed host. This means that it is a host with two network interface cards. One interface connects to the external network, and the other interface connects to the internal network, or demilitarized zone (DMZ) of the firewall.
Figure 5-6 shows an architecture in which the browser accesses the server through the hostname that is published by the proxy server. The proxy server then forwards the request to the actual host within the firewall.
For this example, we will assume that you have properly configured the OracleAS Single Sign-On server to work with the reverse proxy server.
|
See Also:
The chapter "Deploying Oracle Application Server Single Sign-On with a Proxy Server" in the Oracle Application Server Single Sign-On Administrator's Guide. |
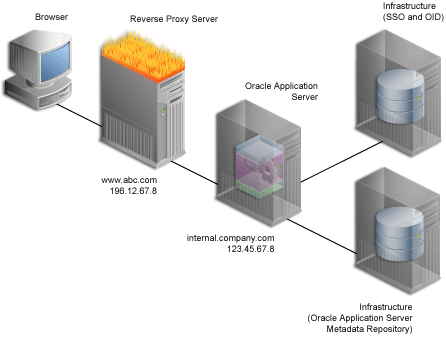
Text description of the illustration cg_topo_example_proxy.gif
For this example, let's assume the following:
Complete these steps to configure OracleAS Portal for the architecture shown in Figure 5-6 in the order specified:
On the middle-tier, set the ServerName directive to point to the server name of the reverse proxy, so that self-referential URLs rendered on OracleAS Portal pages are valid for the browser. To do this, perform the following steps:
To improve performance, and to ensure that seeded providers work correctly, the local HOSTS file must be used to resolve domain names that are not normally visible to the internal network. For more information about this loopback connection, refer to Section 1.2.2.2, "How Does Communication Flow in OracleAS Portal?".
For example, the Oracle Application Server host for internal.company.com makes requests to itself, but the URLs that it is requesting are referring to www.abc.com. You must create host entries in the local HOSTS file on that machine, allowing it to resolve this name within the firewall. The hosts entry for this example should include the following lines:
# This is a sample HOSTS file used by Microsoft TCP/IP
# for Windows NT/2000.
127.0.0.1    localhost
123.45.67.8  www.abc.com
If you do not provide these entries in the local HOSTS file, then you need to set the Oracle Application Server host to recognize a proxy server that would take the request out to the Internet and back in through the reverse proxy (www.abc.com), or configure the reverse proxy server's internal interface to respond to www.abc.com.
Typically, the hostname and port number, by which OracleAS Portal is addressed, uses the OracleAS Web Cache hostname and port number. This is because, in a simple configuration, browser requests go directly to OracleAS Web Cache. However, in a configuration that has a reverse proxy server front-ending OracleAS Web Cache, the hostname and port number defined should reflect that of the reverse proxy server.
In this configuration, you want OracleAS Web Cache invalidation messages to be sent directly to the OracleAS Web Cache host, as opposed to the reverse proxy server. In the scenario where your published hostname is different from the hostname used for OracleAS Web Cache invalidation, you cannot use the Portal Web Cache Settings page in the Oracle Enterprise Manager Application Server Control, or the Portal Dependency Settings file, to establish these settings.
To configure this appropriately, take the following steps:
ptlasst) with -mode MIDTIER and -type OHS, as follows:
ptlasst.csh -i typical -mode MIDTIER -type OHS -sdad portal -host
www.abc.com -chost internal.company.com -port 80 -cport_i 4001 -cport_a 4000
ossoreg performs this registration. ossoreg is located on the middle-tier in MID_TIER_ORACLE_HOME/sso/lib.
ossoreg:
ORACLE_HOME=MID_TIER_ORACLE_HOME
LD_LIBRARY_PATH=ORACLE_HOME/lib
ossoreg:
MID_TIER_ORACLE_HOME/jdk/bin/java -jar
  MID_TIER_ORACLE_HOME/sso/lib/ossoreg.jar -site_name www.abc.com
  -mod_osso_url http://www.abc.com -config_mod_osso TRUE
  -oracle_home_path MID_TIER_ORACLE_HOME -u install_user -config_file
  MID_TIER_ORACLE_HOME/Apache/Apache/conf/osso/osso.conf
  -admin_info cn=orcladmin
Refer to the section titled "Registering mod_osso" in Chapter 4 of the Oracle Application Server Single Sign-On Administrator's Guide for more information.
ptlconfig (typically located in the directory MID_TIER_ORACLE_HOME/portal/conf) as shown in the following example:
ptlconfig -dad portal -em
|
See Also:
|
To configure the seeded providers (WebClipping and OmniPortlet), and locally hosted Web providers, you must take the following steps:
PORTAL).
WEBCLIPPING in the Name field.
http://www.abc.com:80/portalTools/webClipping/providers/webClipping
to:
http://www.abc.com:7777/portalTools/webClipping/providers/webClipping
When you register locally hosted Web Providers (such as the JPDK Sample provider), you need to register them using HTTP as the protocol, www.abc.com as the hostname, and 7777 as the port number. This restriction only applies to locally hosted Web Providers (that is, Web Providers running on the same middle-tier as OracleAS Portal).
For example, to register the JPDK Sample provider, the URL is:
http://www.abc.com:7777/jpdk/providers/sample
Register the www.abc.com domain name on a domain name server on the Internet, with IP address 196.12.67.8.
You can now access OracleAS Portal at http://www.abc.com/pls/portal.
Oracle Application Server Web Cache offers caching, page assembly, and compression features. OracleAS Web Cache accelerates the delivery of both static and dynamic Web content, and provides load balancing and failover features for Oracle Application Server.
This section discusses how to configure OracleAS Portal to work with OracleAS Web Cache.
This section contains the following topics:
OracleAS Web Cache Manager is a graphical user interface tool that combines configuration and monitoring options to provide an integrated environment for configuring and managing OracleAS Web Cache and the Web sites for which it caches content.
You can access OracleAS Web Cache Manager in different ways:
After entering the OracleAS Web Cache administrator username and password (typically the ias_admin password), you will be able to use OracleAS Web Cache Manager, as shown in the Figure 5-7.
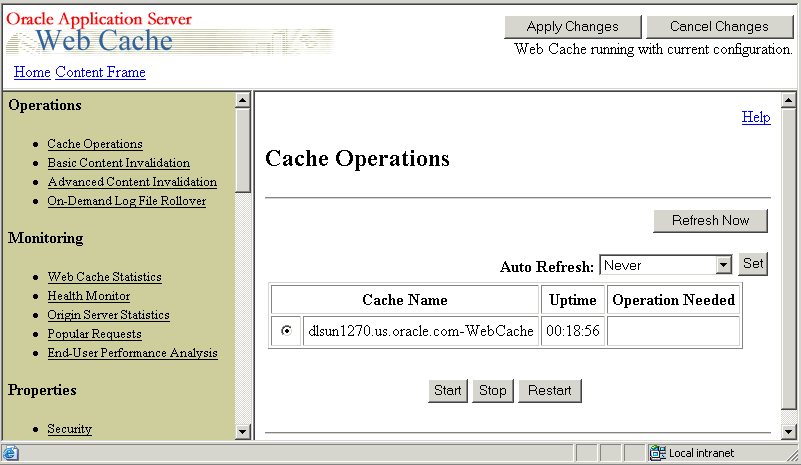
For more information on the usage of the OracleAS Web Cache Administration Manager, refer to the Oracle Application Server Web Cache Administrator's Guide.
You must use the Oracle Enterprise Manager Application Server Control to configure OracleAS Web Cache settings that OracleAS Portal uses, such as the hostname, and the invalidation port number. These settings can be configured on the Portal Web Cache Settings page.
Using Application Server Control, you can specify the OracleAS Web Cache settings that OracleAS Portal should use. Setting the OracleAS Web Cache properties on this page will automatically result in the Portal Dependency Settings file located on this middle-tier being updated, and the ptlconfig script being executed.
For a detailed description of how to access, and use the Application Server Control, and specifically the Portal Web Cache Settings page, refer to Section 7.2.3, "Portal Web Cache Settings Page".
From the OracleAS Portal user interface, you can perform various other OracleAS Web Cache related configuration tasks. The entire OracleAS Web Cache can be cleared, or it can be cleared for each user.
You may want to clear the cache if a user's group membership has changed, in order to remove the cache entries for that user, so that he or she has new privileges. Similarly, if you change a user or group's privileges on an object, you can clear the cache entries for that object.
To clear the entire cache, or to clear the cache for a particular user, you must be the portal administrator. To clear the cache for a particular portal object, you must have at least Manage privileges on the object.
It is also possible to configure OracleAS Portal's OracleAS Web Cache settings, using the Cache tab on the Portal Global Settings page. However, this is not the recommended approach. You must use Oracle Enterprise Manager Application Server Control to change these settings, as this will update the iasconfig.xml file.
If you have used the Portal Global Settings page to change any of the OracleAS Web Cache settings, you must take the following manual steps to update the iasconfig.xml file:
ORACLE_HOME/portal/conf/iasconfig.xml.
WebCacheComponent element for the portal instance you want to update and modify the properties of the WebCacheComponent as required.
ORACLE_HOME/portal/conf/ptlconfig -dad <dad> -wc
The following sections describe the actions that can be performed using OracleAS Portal in more detail:
You can clear the entire Web Cache by performing the following steps:
You can clear the cache for a particular user by performing the following steps:
With invalidation-based caching, a cache entry is purged when the portal or a provider sends a message informing OracleAS Web Cache that the object has changed (for example, when an item is edited). However you can also set an expiry time for cache entries. A cache entry that reaches this time limit is purged, even if OracleAS Web Cache has not received an invalidation message for it.
To set the expiry time for invalidation-based cache entries:
You can clear cache entries for page groups, pages, page templates, portlets in the Portlet Repository, Portal database providers, and Portal database provider components, by performing the following steps:
Sometimes, the cache invalidation queue can grow excessively large as a result of user actions. For example, repeated granting of security privileges on a page to a group with a large number of members will place one soft invalidation in the queue for every user for every grant.
Some soft invalidations may not be necessary, but OracleAS Portal may not be able to determine this. For example, if a group's privileges on a page are upgraded from View to Fully Customize, and no member of the group has viewed the page yet, then no invalidation is necessary. However, Portal does not have a record of who has viewed the page. Therefore, it proceeds with the soft invalidation configured to use the security change.
The Portal administrator can check the number of soft invalidations in the queue by executing the following query in SQL*PLUS as the Portal schema owner:
select count(1) from wwutl_cache_inval_msg$ where process_type=2;
The Portal administrator can check the total number of invalidations, hard or soft, in the queue by executing the following query in SQL*PLUS as the Portal schema owner:
select count(1) from wwutl_cache_inval_msg$;
The number of rows in the table wwutl_cache_inval_msg$ that can be considered excessive depends, to some extent, on the speed of the infrastructure running the database. Typically, 50000 messages will slow down the soft invalidation job, and sending 50000 invalidation messages to OracleAS Web Cache will introduce a network load, as OracleAS Portal communicates with the OracleAS Web Cache invalidation port.
If the soft invalidations are found to be unnecessary, the Portal administrator can perform the following query in SQL*PLUS as the Portal schema owner:
delete from wwutl_cache_inval_msg$ where process_type=2;
This removes soft invalidations from the queue.
If the soft invalidations are necessary but there is an excessively large number, the Portal administrator can clear the cache invalidation queue using the following command:
truncate table wwutl_cache_inval_msg$;
The Portal administrator should then clear the entire cache through the Portal UI as described in Section 5.7.3.1, "Clearing the Entire Web Cache".
Log files for OracleAS Web Cache are typically stored in ORACLE_HOME/webcache/logs on UNIX and ORACLE_HOME\webcache\logs on Windows.
There are two log files:
You can configure OracleAS Portal to work with OracleAS Web Cache in a variety of ways, and some scripts are supplied to facilitate this. These scripts are covered in more detail in Section C.1, "OracleAS Web Cache Configuration Scripts".
The scripts covered in Appendix C, "Using OracleAS Portal Installation and Configuration Scripts" are:
cachset.sql, which enables you to turn the use of OracleAS Web Cache on or off. Information on how to disable OracleAS Web Cache completely is covered as well.
cachjsub.sql, which enables you to manage the invalidation message processing job.
Oracle Application Server 10g enables you to change the Infrastructure services (either Oracle Identity Management or OracleAS Metadata Repository) that a middle-tier uses. You can use this feature, for example, to move middle-tiers (and their applications) from stage to production. If you are changing the OracleAS Metadata Repository that your OracleAS Portal uses, then you will also need to move application-specific data stored in the stage OracleAS Metadata Repository to an OracleAS Metadata Repository in the production environment. Changing the Infrastructure services is convenient, if you need additional computers for the production environment. In a single step, you add a computer that already has a middle-tier and deployed applications. For instructions on how to change the Infrastructure Services used by a middle-tier instance, refer to the Oracle Application Server 10g Administrator's Guide.
If Oracle Application Server Wireless is configured with OracleAS Portal during the middle-tier installation, the middle-tier installation registers the Portal on the OracleAS Wireless service. In case of multiple middle-tier installs, the last configured OracleAS Wireless service URL is stored in the OracleAS Portal instance. You can change this to your choice of OracleAS Wireless service by running the portalRegistrar.sh script in the Oracle Application Server middle-tier selected for the OracleAS Wireless service:
On UNIX:
ORACLE_HOME/wireless/bin/internal/portalRegistrar.sh
On Windows:
ORACLE_HOME/wireless/bin/internal/portalRegistrar.bat
Specify the following arguments when running the portalRegistrar script:
Refer to the chapter "Managing Administrative Passwords" in the Oracle Application Server 10g Administrator's Guide for information about changing the OracleAS Portal schema password.
|
|
 Copyright © 2002, 2003 Oracle Corporation. All Rights Reserved. |
|