 Understanding Profile Management
This chapter provides an overview of profile management, lists common elements, and discusses how to:
Configure Manage Profiles.
Define education-related information.
Define instance qualifiers.
Set up profile identity and association options.
Set up profile types.
Create profile group types and profile groups.
Set up to use XML Publisher reports and profiles.
Understanding Profile ManagementOrganizations typically use two types of profile:
Non-person profiles
These describe the competencies, qualifications, and responsibilities of a certain job code, position, job family, or salary grade, or other entities in the system.
Person profiles
These describe people's skills, competencies, accomplishments, and performance. Manage Profiles enables you to create profiles for employees, contingent workers, and persons of interest.
With the Manage Profiles business process, the content catalog provides the foundation for creating all profiles. This diagram shows how profiles are constructed by selecting from the content types and content items that are defined in the content catalog:
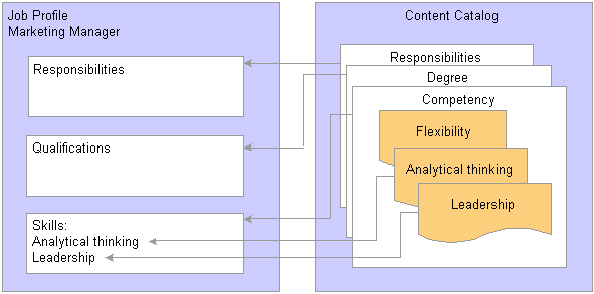
Relationship Between Profiles and the Content Catalog
In the same way that you configure the content catalog to suit your organization, you define a set of profiles that are configured to your requirements. When employees, managers, and administrators create profiles they select the profile type that they want to use.
The profile type controls the following aspects of the new profile:
The type of entities to which users can link the profile.
The content of the profile.
Profile security (who can update the profile).
Whether approval is required for changes to the profile.
Profiles fall into two categories:
Non-person profiles (also known as job profiles).
These are profiles that are created for a business entity, such as a position or a job code.
Person profiles.
A person profile is created for a specific person ID.
When you define a profile type, you specify the type of entities that the user can select when creating a profile. For example, suppose that you create a profile type and specify that it can be linked to job codes and salary grades. When users create a profile based on that profile type, they can only select job codes, salary grades, or both job codes and salary grades for the new profile. A profile type cannot be linked to both business entities and people.
The entities to which you can link a profile type are known as profile identity options. Use the Profile Identities Options page to maintain the list of profile identity options available.
In addition to profile identities, you can also link a profile type to entities outside the Manage Profiles business process. These entities are known as profile association options. ePerformance templates are linked to profile types in this way. The Profile Association Options page defines all the entity types that can be associated to profile types.
Profile Content
This diagram shows how the content of profile types (and profiles created from those profile types) is divided into tabs and content sections:
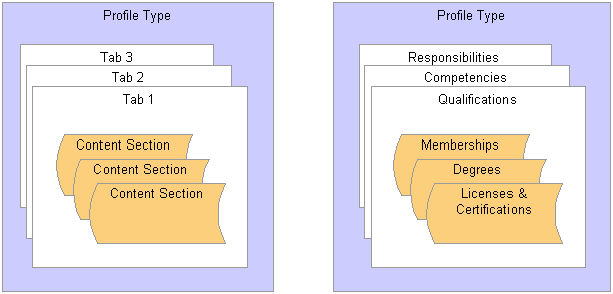
Profile Type Content Structure
When you set up a profile type you define the name of each tab and the order in which they are displayed in the profile. You add one or more content types to each tab to create content sections. For example, the previous diagram shows a tab labelled Qualifications that has three content sections for three different content types: Memberships, Degrees, Licenses & Certifications. When users create a profile using this profile type, they can only add content items of the type DEG (Degrees) to the Degrees content section. You define the order in which the content sections are listed within the tab.
When you add a content type to a tab, the properties and property attributes defined for the content type are copied to the content section. However, you can also add other properties to the content section or modify the attributes of the properties inherited from the content type definition.
Note. The profile type definition does not include content items. The purpose of the profile type is to provide the structure for the new profile and not the detailed content. Users add content items when they create a profile.
Profile Security
When you set up a content section, you specify the roles that can view that section of the profile. This enables you to display or hide sections to different types of users. There is an additional check box that enables you to control which roles can update the items in the section. There are three roles available:
Administrator
The administrator is any user who has access to the Profile Management menu in Workforce Development.
Manager
Managers are users that can access the self-service transactions for managing profiles, using the Manager Self Service menu.
Employee
Employees use employee self service to access the profile management self-service transactions.
The manager and employee self service transactions are delivered in PeopleSoft Enterprise eDevelopment.
Approvals processing is an optional aspect of profile management. If you want to use approval workflow to control changes to profiles, you:
Set up approval processing using the standard HRMS approvals workflow engine.
Associate the approvals definition with the profile type.
On the Profile Type —Attributes page, you define one approvals workflow transaction and approval definition for the profile type.
Specify whether identities require approval (non-person profile types only).
You can specify that approvals workflow is triggered when users add or change the profile identities associated with a non-person profile. To do this, select the Approval Req'd for Identities check box on the Profile Type — Identities page. This applies to non-person profile types only. The check box is not available when you are working with person profile types.
Specify which content sections require approval.
Each content section within a profile type has an Approval Required check box that controls whether changes to that content section require approval. However, approvals is only triggered if you have specified the approval at the profile level. If you have set up approval processing for a content section when users add items to a profile, delete existing items, or modify existing items, this initiates the approvals process.
(Optional) Add properties to content sections to track workflow status.
We recommend you add the workflow status property (JPM_WF_STATUS) to content sections that require approval to enable users to view the status of profile items as they are processed by the approvals workflow engine. Other useful properties for tracking approval are the last updated date and time property (LASTUPDDTTM), and the last updated user ID property (LASTUPDOPRID).
See Setting Up and Working with Approvals.
See Defining Content Sections.
 Setting Up Manage Profiles
This diagram illustrates the steps for setting up profile management:

Setting up profile management
To set up profile management you define the following:
(Optional) Instance qualifiers.
Typically instance qualifiers are used to identify who updated the profile or the type of evaluation. You can also use instance qualifiers to restrict the profile item rows that are visible to employees and managers using self-service transactions.
Profile Identity Options.
(Optional) Profile Association Options.
Note. You do not need to define profile association options for the Manage Profiles business process. However, if you have installed ePerformance and you want to use profile content to create performance or development documents, you must define profile association options for ePerformance.
Profile Types.
(Optional) Profile Group Types and Profile Groups.
Profile group types and profile groups enable you to categorize profile types. You can use profile groups as search criteria in the search and compare profiles feature to filter the search results.
Note. Before you can use Manage Profiles, you must also set up the installation settings on the Profile Management Installation page. This is described in the next section.
See Also
Searching and Comparing Profiles
Common Elements Used in This Chapter
|
Sys Data (system data) |
This check box appears on setup pages for instance qualifiers, profile identities, profile associations, and profile types. It is system-maintained and indicates if the data is delivered as system data. When this check box is selected, the row of data is display-only. |
Configuring Manage Profiles
This section discusses how to configure Manage Profiles installation.
Page Used to Configure Manage Profiles
|
Page Name |
Object Name |
Navigation |
Usage |
|
JPM_INSTALLATION |
Set Up HRMS, Install, Product and Country Specific, Profile Management Installatn, Profile Management Installation |
Define installation settings for the Manage Profiles business process. This includes setting up the profile ID length and the last numbers used for profile ID and approval transaction. You complete this page once during implementation only. |
Configuring Manage Profiles InstallationAccess the Profile Management Installation page.
|
Profile ID Length |
Enter the number of characters in the profile ID. The maximum profile ID length is defined in Application Designer and the system displays an error message if you enter a length that exceeds this maximum. |
|
Last Profile ID Used |
To let the system assign numbers for profile IDs, enter the last number that you used. The system automatically increases the number in this field each time that it assigns a new profile ID. You can manually assign profile IDs to non-person profiles when you create the profile. Note. To avoid maintaining two different sets of numbers, either always assign profile IDs manually or always let the system do it. |
|
Last Item Key ID Used |
Displays the last number used to identify items on profiles. The system automatically assigns an item key ID to each content item added to a profile. The field is set to 1 at installation and the system automatically increases the number in the field each time you add content items to a profile. Note. The item key ID is not visible to users when setting up or using profiles. |
|
Last Approval Transaction Used |
Displays the last approval transaction number. The system automatically increases the number in the field each time that an approval transaction for Manage Profiles is generated. |
|
Supervisor Navigation Method |
Select the method that is used by the Build Manager List process to determine supervisor relationships. Select from these options: 2 — Supervisor Id, 3– Department Manager Id, 4–Reports to Position, 5– Position/Supervisor Id, or 6–Position/Dept Manager. |
|
Days of Approval History |
Enter the number of days of approval history that is available from the Person or Non-person Profile pages. Links on the profile pages indicate how many profile items have been approved or denied approval over a period that is determined by the setting of Days of Approval History field. When users view a profile, the system checks the approval history for the period between the system date (current date) and the system date minus the number of days you specify in this field. For example, if you enter 31 days in this field and the system date is August 2, the system checks for profile items that have been approved or denied in the period July 2 to August 2. |
Employee Photos on Profile
|
Display on Administrator Pages |
Select this check box to display employee photos on the person profile pages that are used by adminstrators. These are the pages accessed from the Workforce Development, Profile Management menu. |
|
Display on Self-Service Pages |
Select this check box to display employee photos on the self-service person profile pages that are accessed from these menus: Self Service, Learning and Development Manager Self Service, Learning and Development |
See Also
Defining Education-Related InformationThis section provides an overview of education-related information and discusses how to:
Track schools.
(JPN) Define faculty information.
Understanding Education-Related InformationTo set up information about educational establishments and areas of study use the School Types (SCHOOL_TYPE_TABLE), Schools (SCHOOL_TABLE), Majors (MAJOR_TABLE), and Faculty Table JPN (FACULTY_TABLE_JPN) components.
If you want to include school type, school, major, or faculty codes in profiles, add the appropriate property to content sections in your profile types. These are the properties that are associated with the education tables:
SCHOOL_TYPE
SCHOOL_CODE
MAJOR_CODE
FACULTY_CODE
SUBFACULTY_CODE
The delivered PERSON profile type is configured to enable you to record employees' education information. The Education tab in this profile type has content sections for School Education, Degrees and Areas of Study that use the information in the education tables.
See Also
Pages Used to Define School Information
|
Page Name |
Object Name |
Navigation |
Usage |
|
SCHOOL_TYPE_TBL |
Set Up HRMS, Common Definitions, School Information, School Types, School Type Table |
Set up codes for the types of schools that employees might have attended, for example, high schools, universities, or professional schools. |
|
|
SCHOOL_TABLE |
Set Up HRMS, Common Definitions, School Information, Schools, School Table |
Define codes for specific schools. The school codes that you enter here are also available for tracking similar information either in Employee Data or in Training pages. |
|
|
MAJOR_TABLE |
Set Up HRMS, Common Definitions, School Information, Majors, Major Table |
Define codes for areas of study most commonly associated with school degrees or certificates. |
|
|
FACULTY_TABLE_JPN |
Set Up HRMS, Common Definitions, School Information, Faculty Table JPN, Faculty Table JPN |
(JPN). Define faculties and associate sub-faculties and a major category with them. |
Tracking SchoolsAccess the School Table page.
|
Country |
Select the country code for the school. The Country codes are stored in the Country Table. Depending on the country that you select, the system displays an associated field (State, Province, or County) for defining the area of the country in which the school is located. |
|
Public, Private |
Select to indicate whether the school is a public school or privately-funded. |
(AUS) Australia
|
Institute Type |
Select an institute type for an Australian school. |
(JPN) Defining Faculty InformationAccess the Faculty Table JPN page.
|
Major Category |
Select a major category value. The value that you select here is the default major category wherever you select this faculty on a profile. You can also override the default. |
|
Sub-Faculty Code |
Enter a code for the sub-faculty. You can enter multiple sub-faculties. Only sub-faculties that you enter for this faculty can be selected wherever you select the faculty on a profile. |
Defining Instance Qualifiers
This section provides an overview of instance qualifiers and discusses how to set up instance qualifiers.
Understanding Instance QualifiersInstance qualifiers are an optional element of profile types, used to identify individual instances (rows) of a profile item.
Use the Instance Qualifiers component (JPM_JP_INST_QUAL) to define your instance qualifier sets. Define instance qualifiers in one of two ways:
Entering the value of each instance qualifier.
When you define instance qualifiers in this way you can also specify those that employees and managers can view using self-service. This is useful if, for example, you don't want employees to view ratings given by peers, or you want to prevent employees and managers from viewing evaluations made by an executive committee.
By selecting a record in the database.
For example, if you specify the PERSON_NAME record, the person ID is the instance qualifier.
Once you have set up instance qualifier sets you link them to content sections in the profile type. When users add a content item or update an item in a section that includes instance qualifiers, they select the instance qualifier that is inserted in that row. You can link a content section with up to two instance qualifier sets.
Note. The instance qualifier properties must be included in the content section definition in order for users to be able to select an instance qualifier when they add or update profile items.
These are the properties for instance qualifiers:
JPM_CAT_ITEM_QUAL (instance qualifier 1).
The instance qualifier 1 field can only be associated with instance qualifier sets where you define each value.
JPM_CAT_ITEM_QUAL2 (instance qualifier 2).
The instance qualifier 2 field can only be associated with instance qualifier sets defined by a record.
The delivered PERSON profile type includes two content sections, Competencies and NVQs, that are configured to use instance qualifiers. This table lists the instance qualifier fields, the field name, and the instance qualifier sets for the Competencies section:
|
Field |
Field Label |
Instance Qualifier Set |
|
JPM_CAT_ITEM_QUAL |
Evaluation Type |
EVAL_TYPE |
|
JPM_CAT_ITEM_QUAL2 |
Reviewer ID |
REVIEWER_ID |
This lists the instance qualifier fields, the field name, and the instance qualifier sets for the NVQ section:
|
Field |
Field Label |
Instance Qualifier Set |
|
JPM_CAT_ITEM_QUAL |
Review Type |
REVIEW_TYPE |
|
JPM_CAT_ITEM_QUAL2 |
Reviewer ID |
NVQ_REVIEWER |
Example: Using Instance Qualifiers
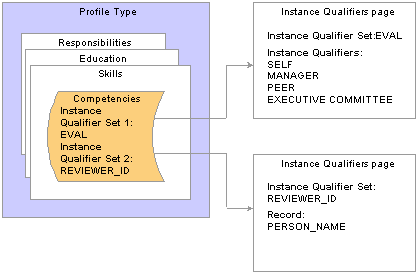
This diagram illustrates how a section within a profile can be linked to a set of instance qualifiers:

Example Instance Qualifiers
In this example, the tab called Skills contains a content section for the COMPETENCY content type, and this section is linked to a set of instance qualifiers called EVAL.
Suppose that an employee creates a profile, and he or she adds the competencies Abstract Thinking and Analytical Thinking to the profile, and enters a rating, the system creates two profile items with the following information:
|
Profile Item |
Effective Date |
Rating |
Instance Qualifier |
|
Abstract Thinking |
April 16, 2006 |
3 (Good) |
SELF |
|
Analytical Thinking |
April 16, 2006 |
5 (Expert) |
SELF |
If the manager reviews the employee's profile and adds a rating for the competencies, the profile now contains these rows for the profile items:
|
Profile Item |
Effective Date |
Rating |
Instance Qualifier |
|
Abstract Thinking |
April 16, 2006 |
3 (Good) |
SELF |
|
Abstract Thinking |
April 16, 2006 |
4 (Very Good) |
MANAGER |
|
Analytical Thinking |
April 16, 2006 |
5 (Expert) |
SELF |
|
Analytical Thinking |
April 16, 2006 |
4 (Very Good) |
MANAGER |
Example: Using Two Instance Qualifier Sets
You can link a content section with up to two instance qualifier sets. Using the previous example, suppose that the Competencies section is linked to the EVAL instance qualifier set and a second instance qualifier set that is linked to the PERSON_NAME record, as illustrated in this diagram:
Example Using Two Instance Qualifier Sets
Using two qualifier sets you can uniquely identify rows that have the same instance qualifier 1. For example, if a person is evaluated by a committee you can use the instance qualifiers to record the ratings given by each member of the committee. This table shows the rows created for each committee member's evaluation of the same profile item:
|
Profile Item |
Effective Date |
Rating |
Instance Qualifier 1 |
Instance Qualifier 2 |
|
Abstract Thinking |
May 14, 2006 |
3 (Good) |
EXECUTIVE COMMITTEE |
KU0045 |
|
Abstract Thinking |
May 14, 2006 |
5 (Expert) |
EXECUTIVE COMMITTEE |
KU0016 |
|
Abstract Thinking |
May 14, 2006 |
4 (Very Good) |
EXECUTIVE COMMITTEE |
KU0119 |
Understanding Instance Qualifier Integration
Applications that publish data to Manage Profiles can use instance qualifiers. In ePerformance, when you define a document template, you can specify the instance qualifier to use for each role that participates in a performance or development document. When users complete the document, the system updates the person profile data in Manage Profile using the instance qualifier specified.
In PeopleSoft Enterprise Learning Management, you can also specify the instance qualifier that the system uses when publishing profile data to PeopleSoft Enterprise HRMS. When learners complete learning objectives that came from HRMS, the system marks the objective as Met and publishes profile data to HRMS, using the specified instance qualifier value.
See Also
PeopleSoft Enterprise Learning Management 9.0 PeopleBook
Page Used to Define Instance Qualifiers
|
Page Name |
Object Name |
Navigation |
Usage |
|
JPM_JP_INST_QUAL |
Set Up HRMS, Product Related, Profile Management, Profiles, Instance Qualifiers, Instance Qualifiers |
Define instance qualifiers for a content type, and define which instance qualifiers employees and managers can view. |
Setting Up Instance QualifiersAccess the Instance Qualifiers page.
|
Prompt Definition |
Select Use Prompt Record to use a record in the database as the instance qualifiers. For example, you might use the PERSON_NAME record as the instance qualifier. The system makes the Record Name field available and hides the Instance Qualifiers scroll area. When you define a content section in a profile type, instance qualifiers that use a prompt record can be associated with the Instance Qualifier 2 field only. You can't specify instance qualifiers that use prompt record in the Instance Qualifier 1 field. Select Create Set of Qualifiers to create a new set of instance qualifiers in the Instance Qualifiers scroll area. Instance qualifiers of this type can be associated with the Instance Qualifier 1 field on the Content Section page; they can't be specified in the Instance Qualifier 2 field. |
|
Record Name |
Select the record that contains the instance qualifiers. This field is available only if you select Use Prompt Record. |
|
Priority |
Enter a number that indicates the priority of the instance qualifier. The priority increases as the number decreases, so that the instance qualifier with the lowest number is considered the highest priority. The priority value determines the order in which instance qualifiers are displayed. This field is also used by the Maintain Profile Indexes process (JPM_BLD_INDX) that builds the Verity indexes used by the search and compare profiles feature. The process uses the priority value to determine which profile item row is included in the index. The process includes the row that has the instance qualifier with the highest priority. |
|
Instance Qualifier |
Enter the instance qualifier code and enter a description in the Description field. |
|
Emp View (employee view) |
Select this check box to enable employees to view rows in a profile that are assigned the selected instance qualifier. |
|
Mgr View (manager view) |
Select this check box to enable managers to view rows in a profile that are assigned the selected instance qualifier. |
|
Emp Default (employee default) |
Select this check box to specify the instance qualifier that is automatically used in the employee self-service transactions. If you select a check box in this column, when employees add or update rows in self-service, the system inserts the selected instance qualifier and employees cannot change the instance qualifier. |
|
Mgr Default (manager default) |
Select this check box to specify the instance qualifier that is automatically used in the manager self-service transactions. If you select a check box in this column, when managers add or update rows in self-service, the system inserts the selected instance qualifier and managers cannot change the instance qualifier. |
|
Searchable |
Select this check box if you want profile items with the selected instance qualifier to be included in the Verity indexes. The Maintain Profile Indexes process (JPM_BLD_INDX) uses this field to determine which profile item rows are included in the Verity indexes that are used by the Search and Compare Profiles feature. If the Searchable check box is not selected, any profile item rows that are assigned the selected instance qualifier are always excluded from the Verity index. |
Setting up Profile Identity and Association OptionsTo set up profile identity options and profile association options for your organization, use the Profile Identity Options component (JPM_RLAT_SETUP) and the Profile Association Options component (JPM_RLAT_ASC_SETUP). This section discusses how to:
Define profile identity options.
Enable profile association options.
Common Elements Used in This Section
|
Identity Option |
Enter the name of the entity to which you can link a profile. For the delivered identity and association options, this field is display-only. Identity options are entities within the Profile Management business process, such as job code or position, whereas association options are entities external to the Profile Management business process. One association option is delivered that enables you to associate a profile type to an ePerformance template. |
|
Enabled |
Select this check box to allow profile types to be linked to the entity specified in the Identity Option field. If this check box is cleared, you can't set up a profile type for this entity. For example, if you clear the check box for the Job Sub Function option, you can't define a profile type using the job sub function identity option. |
|
Record Name |
Select the record that defines the entity specified in the Identity Option field. This field is display-only for identity options that are delivered as system data (Sys Data check box is selected). |
|
Key 1 Field Name |
Displays the key field for the record selected in Record Name. |
|
Key 2 Field Name, Key 3 Field Name, Key 4 Field Name |
Displays the additional key fields for the record. These fields are hidden if the record has one key field only. |
|
SetID |
Indicates if SetID is a key field for the selected record. The system automatically selects this check box based on the record definition and makes the field display-only. |
|
Eff Date (effective date) |
Indicates if the effective date field is a key field for the selected record. The system automatically selects this check box based on the record definition and makes the field display-only. |
Pages Used to Define Profile Identity and Association Options
|
Page Name |
Object Name |
Navigation |
Usage |
|
JPM_RLAT_SETUP |
Set Up HRMS, Product Related, Profile Management, Profiles, Profile Identity Options |
Define the entities to which you can link profile types. Entities include job codes, job functions, job families, people, and salary grades. The entities enabled on this page determine which options are available on the Identities page of the Profile Type component. For example, if you enable Job Codes you can set up a profile type that is linked to job code. A set of default profile identity options is delivered but you can delete options and add to the list according to your requirements. |
|
|
JPM_RLAT_SETUP |
Set Up HRMS, Product Related, Profile Management, Profiles, Profile Association Options |
Define the entities external to the Manage Profiles business process to which you can link profile types. One association option is delivered that enables you to link a profile type to ePerformance templates. You can add other associations according to your requirements. |
Defining Profile Identity OptionsAccess the Profile Identity Options page.
|
Add Profile Identity Option |
Click this link to add a new profile identity option. |
Configuration
Access the Configuration tab.
|
Sequence |
Enter the number that determines the order in which non-person profiles related to a person's job are listed. The system uses the sequence value as follows:
|
See Common Elements Used in This Section.
Enabling Profile AssociationsAccess the Profile Association Options page.
|
Add Profile Association Option |
Click this link to add a new profile association option. |
See Common Elements Used in This Section.
Setting Up Profile TypesUse the Profile Types component (JPM_JP_TYPES) to set up profile types. This section discusses how to:
Set up profile type attributes.
Define profile type identities.
Define profile type content.
Select content types.
Define content sections.
Set up profile type associations.
Pages Used to Set Up Profile Types
|
Page Name |
Object Name |
Navigation |
Usage |
|
JPM_JP_TYPE_ATTRIB |
Set Up HRMS, Product Related, Profile Management, Profiles, Profile Types, Attributes |
Define basic details of the profile type. If the profile type is associated with approvals workflow, specify the transaction and the approval definition on this page. |
|
|
JPM_JP_TYPE_IDENT |
Set Up HRMS, Product Related, Profile Management, Profiles, Profile Types, Identities |
Select the identity options to which the profile type is linked. Identity options are entities such as a job code, position number, or person. When users create profiles based on a profile type, they can only create profiles for the entities that are defined on this page. Active profile types must be have at least one identity option. Define the identity options available on the Profile Identity Options page. |
|
|
JPM_JP_TYPE_CONT |
Set Up HRMS, Product Related, Profile Management, Profiles, Profile Types, Content |
Define the content of the profile type. The content of a profile is divided into tabs and each tab comprises one or more sections. Use the Content page to set up the tabs in the profile, and add content types to each tab. |
|
|
JPM_JP_ADD_CNT_SEC |
|
Lists the content types available to add to the profile type. Select the content type you want to add and the system displays the Content Section page. |
|
|
JPM_JP_CONTENT_SEC |
|
Define the properties (fields) that appear in a content section and the attributes of those properties. You also use this page to define the users that can access the content section when creating or updating profiles. |
|
|
JPM_JP_TYPE_ASSOC |
Set Up HRMS, Product Related, Profile Management, Profiles, Profile Types, Associations |
Select the associations to which the profile type is linked. Associations are entities external to the Profile Management business process. Define the association options available on the Profile Association Options page. |
Setting Up Profile Type AttributesAccess the Profile Types — Attributes page.
|
Summary |
Enter a brief description of the profile type. |
|
Transaction Name |
Select the approvals workflow transaction associated with the profile type. You must complete this field if any of the content sections in the profile type has the Approval Required check box selected or the Approval Req'd for Identities check box on the Profile Type — Identities page is selected. |
|
Definition ID |
Select the approvals definition for the profile type. If you leave this field blank, the system uses the default approval definition ID for the approval process ID specified in the Transaction Name field. If multiple approval definition IDs exist, the approval framework will decide which approval definition ID to use, based on the criteria and priority configured on the Approval Process Definition component. For the definition IDs used for Manage Profiles approvals processing, the default definition has a priority of 1 and the non-default definitions have a priority of 9. |
|
Profile Type Usage |
Displays the usage value: Person or Non-Person. The usage is determined by the Profile Identity Options selected on the Identities page. If the profile type is linked to a record that has EMPLID as a key field, the Profile Type Usage field is Person. Otherwise, the usage is Non-Person. |
Defining Profile Type IdentitiesAccess the Profile Types — Identities page.
|
Approval Req'd for Identities (approval required for identities) |
Select this check box if approval is required for changes to the profile identities associated with profiles of this profile type. This check box is enabled when you select a non-person profile identity option. |
|
Profile Identity Option |
Select one or more objects to which the profile type can be linked. The objects available are determined by the profile identity options enabled on the Profile Identity Options page. Profile types must be linked to either person or non-person identity options. You cannot add both person and non-person identity options to a profile type. The system validates that there is only one active profile per identity within a given profile type. |
|
End Profile |
Select this check box if the profiles linked to the object specified in the Profile Identity Option field are end profiles. An end profile is a profile that is displayed in employee and manager self-service, and is used in search, match and browse. |
|
Template |
Select this check box if the profiles linked to the object specified in the Profile Identity Option field are template profiles. A template profile is a profile that is used to build other profiles. |
|
Add Profile Identity |
Click to add another profile identity option to the page. |
Defining Profile Type ContentAccess the Profile Types — Content page.
Use this page to define the content of a profile type. The content is divided into tabs that appear as links on the page as shown in the following example:
In this example, there are five tabs and the Competencies tab is the one currently selected. Click the tab name link to move to that tab.
The order in which the tabs are displayed is determined by the Tab Order field. Within each tab, you specify the content types in the Content Sections scroll area.
|
Reorder Content |
Click this link if you have changed the Tab Order or the section Order field. The system refreshes the page to show the new ordering of tabs or content sections. |
|
Add Tab |
Click this button to add a new tab to the profile type. |
|
Delete Tab |
Click this button to delete the selected tab. |
|
Tab Name |
Enter a name for the tab. When users create a profile using this profile type, the tab name appears as a link in the profile. Therefore it is important to use meaningful names and not leave the default name of Tab 1, Tab 2, and so on. |
|
Tab Order |
Enter a value to specify the order in which the tab is displayed. |
|
View All Sections |
Click this link to display the sections for all the tabs in the profile type. The system updates the Content Section group box to list the sections in all tabs, and hides the Tab Name and Tab Order fields. |
Content Sections
This scroll area lists the sections in the selected tab. If you click the View All Sections link, the scroll area lists the sections for all the tabs in the profile type.
|
Section Name |
Click the section name to view and update details of the section or sub-section. The system displays the Content Section page. |
|
Parent Section Name |
Displays the name of the parent section. This field is only populated for sub-sections. |
|
Required |
Select this check box if the section is a required section of the profile. When users create a profile, the system uses this check box to validate that required sections have at least one profile item. |
|
Move to Tab |
If you want to move a section to a different tab, select the tab from the list and click the Reorder Content link. |
|
Order |
Enter a value to specify the order in which the sections are displayed within the tab in the profile. |
|
Add Content Section |
Click this link to add a new section to the Content Sections scroll area. The system displays the Add Content Section page that lists all the content types available. Content types are defined using the Content Types component. |
|
Add Sub-Section |
Select the section that you want to create a sub-section for, and click this link. Use sub-sections to add content types that are related to the content type of an existing section. Relationships between content types are defined on the Relationship Rules page in the Content Types component See Defining Content Type Relationship Rules. For example, if you add a Competencies section to a tab, you can add the Element or Sub Competencies content type as sub-sections because these content types are related to the competencies type. When you click this link the system displays the Add Content Section page, which lists the content types that are defined as any of the following:
|
Selecting Content TypesAccess the Add Content Section page.
This page lists the content types that you can add to the profile type. Those content types that are already included in the profile type are shown in normal text and do not have a link.
If you are adding a sub-section, the system displays the content types that have a subordinate relationship with the content type of the parent section. See the previous section for details.
Click the link for the content type that you want to add, or click the Return to Previous Page link to cancel the addition.
Defining Content SectionsAccess the Content Section page.
|
Instance Qualifier Set 1 |
(Optional). Select the instance qualifier set that you want to use with this section. You can only select instance qualifiers that are associated with the content type of the section and are defined as sets of values. You cannot select instance qualifier sets that are based on prompt records. Define instance qualifiers using the Instance Qualifiers page. |
|
Instance Qualifier Set 2 |
(Optional). If you want to use two different instance qualifier sets with the section, select the second instance qualifier set in this field. You can only select instance qualifiers that are based on prompt records. |
|
Add/Delete Unrelated Items |
Select this check box to enable users to add related items to profiles, even if there isn't a a relationship defined at the content item level. This check box appears if the content section you are defining is related to an existing content section. For example, if you create a content section for competencies and then add a sub-section for sub-competencies, this check box is displayed for the sub-competencies content section. In this example, if you select the check box, users could add any sub-competency to the profile. However, if the check box is not selected, users can only add a sub-competency if it is related to a competency on the profile. Relationships between content items are defined on the Content Items — Relationship page. |
|
Approval Required |
Select this check box if approval is required to add, remove, or update profile items. |
Content Properties
If you are setting up a content section, this group box lists the properties defined for the content type in the content catalog. You can add other properties as required.
Note. If the content type is a free form content type, only one property, a description field, JPM_ADHOC_DESCR, is included. You need to add all other properties that are required.
|
Default Display Order |
Click this link to list the properties in the order that they will appear in the profile. The ordering of properties is defined by the system. |
|
Refresh Properties |
Click this link to update the list of properties based on the current content type definition. The system compares the content type definition with the properties that have a property source Catalog, and updates the list of properties and the property attributes accordingly. This enables you to synchronize the content section with the content type definition in the content catalog. When you create content sections for a profile type, the system uses the content type definitions that are current on the date that you add the content types. If you later add or delete properties, or change the property attributes of those content types, the content sections in the profile type are not automatically updated to match this revised definition. The Refresh Properties link enables you to update the content section as required. |
|
Field Name |
Displays the name of the field if the property is part of the content type definition. If you are adding a new property, select the field name from the available options. |
|
Label Text |
Displays the label specified for the field if the property is part of the content type definition. If you are adding a new property, enter the text that you want to appear for this field on the profile pages. Note. We strongly recommend that choose a meaningful label for the property so that users clearly understand what kind of information to enter in the field when they create profiles. |
|
Source |
Displays the source of the property: Catalog: If the property is included in the content catalog definition of the content type. Profile: If you added the property to the content section from this page. |
|
Add Property |
Click this link to add a property to the section. |
Property Attributes
Access the Property Attributes tab.
|
Required |
Select to make a property required when creating a profile using this profile type. If the check box is selected, users must complete the field when they set up a profile. If the property source is Catalog, the setting of this check box is inherited from the content type definition and you cannot change it. |
|
Display |
Select whether the property should be available for entry (Editable), unavailable for entry (Display), or hidden (Hidden) on the profile pages. When you select Display or Hidden, the system populates the property with the value you enter in the Default Value field. If you select Editable, the system populates the default value at the profile, but users can override that value. |
|
Max Len (maximum length) |
This field applies to character properties only. If the property source is Catalog, the system displays the field length defined in the content catalog. If you added the property to the profile type, enter the field length of this property. |
|
Minimum, Maximum |
These fields apply to numeric properties only. Displays the minimum and maximum values for numeric properties defined in the content catalog. If you added the property to the profile type, enter the minimum and maximum values. |
|
Default |
Displays the default value defined in the content catalog. If you added the property to the profile type, enter the default value. A default value must be provided if the field is defined as Display and the Required check box is selected. |
|
Detail |
Select this check box if you want the field to appear on the details page for the content section. |
|
Summary |
Select this check box to display the field on the summary page when creating or viewing a profile. Fields that are marked as summary automatically appear on the details page. See Managing Profiles. |
|
Searchable |
Select this check box if you want to include the property in the search index that is used by the search and compare profiles feature. The check box is display-only if the property is not searchable. Note. The item ID (JPM_CAT_ITEM_ID) must be searchable if you make other properties in the content section searchable. |
Security
The Security group box lists the roles that can access the content section when creating a profile.
Note. If you don't select a role, users can't create profiles using this profile type.
|
Role |
Select the role that you want to access the content section. There are three roles available: Administrator: Administrators create profiles using the options in Workforce Development, Profile Management menu. Employee: Employees create their own profiles using the options available in Self Service, Learning and Development. Manager: Managers use the manager self-service transactions available in Manager Self Service, Learning and Development. |
|
Allow Update |
Select this check box to enable users with the specified role to update the content section within a profile. If this check box is left clear, users cannot add items to the content section in the profile. |
|
Add Role |
Click this link to add another role to the list of roles that have access to the profile type. |
Setting Up Profile Type AssociationsAccess the Profile Types — Associations page.
|
Profile Association Option |
Select the object you want to link to the profile type. The objects available are determined by the profile association options enabled on the Profile Association Options page. The system allows multiple active profiles per association within a given profile type. |
|
Add Profile Association |
Click this link to add another association to the profile type. |
Creating Profile Group Types and Profile GroupsUse the Profile Group Types (JPM_JP_GTYPE_GRP) and Profile Groups (JPM_JP_GROUPS) components to set up profile groups. This section discusses how to:
Create profile group types.
Create profile groups.
Pages Used to Create Profile Group Types and Groups
|
Page Name |
Object Name |
Navigation |
Usage |
|
JPM_JP_GTYPE_GRP |
Set Up HRMS, Product Related, Profile Management, Profiles, Profile Group Types |
Set up profile group types. |
|
|
JPM_JP_GROUPS |
Set Up HRMS, Product Related, Profile Management, Profiles, Profile Groups |
Set up profile groups. |
Creating Profile Group TypesAccess the Profile Group Types page.
|
Include in Search |
Select this check box to include all profile groups within this profile group type in the search index. |
|
Profile Type |
Select the profile type to add to the profile group type. Set up profile types using the Profile Types component. |
|
Add Profile Type |
Click this link to add another profile type to the profile group type. |
Creating Profile GroupsAccess the Profile Groups page.
|
Profile ID |
Select the profile that you want to add to the profile group. The system displays the profile description. |
|
Add Profile to Group |
Click this link to add another profile to the group. |
Setting Up to Use XML Publisher Reports and ProfilesThis section provides an overview of XML Publisher reports and templates, lists prerequisites, and discusses how to:
View delivered report templates.
Modify an existing template.
Understanding XML Publisher Reports and TemplatesManage Profiles uses the PeopleTools XML Publisher (XMLP) to generate the Content Catalog Listing report as well as the online profiles and profile reports for person and non-person profiles.
This table lists the delivered report definitions and data sources for the related RTF templates:
|
Report Name |
Description |
Data Source Type |
Data Source ID |
|
JPM_CATI_RPT |
Content Items Reports |
PS Query |
JPM_CONTENT_ITEMS |
|
JPM_JPNP_RPT |
Non Person Profile Batch |
XMLDoc |
JPM_PROFILE |
|
JPM_JPPP_RPT |
Person Profile Batch |
XMLDoc |
JPM_PROFILE |
|
JPM_NP_PROF |
Non Person Profile Online |
XMLDoc |
JPM_PROFILE |
|
JPM_PP_PROF |
Person Profile Online |
XMLDoc |
JPM_PROFILE |
This table describes each of the delivered data sources:
|
Data Source ID |
Description |
|
JPM_CONTENT_ITEMS |
PS Query that is used only for content items reports. |
|
JPM_PROFILE |
XML document structured by row sets. All profile reports use the same data structure. All data elements are included in the data structure and are available for both person and non-person profile report templates. |
To format the reports, we deliver three template files that specify the content and layout:
One template file for the Content Items reports.
One template file for both the online and batch Person Profile reports.
One template file for both the online and batch Non-Person Profile reports.
You can modify the delivered template files to address your specific reporting requirements. After modifying each template, you must upload it to the corresponding report definition. You can modify one instance of each of the profile reports and attach that same updated template file to both of the corresponding report definitions.
See Viewing Delivered Report Templates.
See Modifying an Existing Template.
Profile Report Nodes
This table describes the report nodes for profile reports:
|
Node |
Data Elements Summary |
|
JPM_PROFILE |
High level data elements related to the profile. |
|
JPM_IDENTITY_WK |
Profile identities and associations. |
|
JPM_JP_SECTION |
Sections defined in the profile type. |
|
JPM_JP_CRITM_VW |
Profile content items in the sections in the profile. All properties are included whether the content type uses them or not. |
|
JPM_CATITMAXD_VW |
Definitions of the content items in the content catalog. All properties are included whether the content type uses them or not. |
|
RUN_PARAMETERS |
Criteria used to generate the report. |
See Also
Enterprise PeopleTools PeopleBook: XML Publisher for PeopleSoft Enterprise
Running Content Catalog and Profile Reports
Setting Up the Content Catalog
Prerequisites
To use XML Publisher reports, you must configure PeopleSoft Integration Broker and PeopleSoft Process Scheduler to implement PeopleSoft Report Manager.
See Also
Enterprise PeopleTools PeopleBook: PeopleSoft Integration Broker
Enterprise PeopleTools PeopleBook: PeopleSoft Process Scheduler
Enterprise PeopleTools PeopleBook: XML Publisher for PeopleSoft Enterprise
Pages Used to View and Modify XML Publisher Reports and Templates
|
Page Name |
Object Name |
Navigation |
Usage |
|
PSXPRPTDEFN |
ReportingTools, XML Publisher, Report Definition, Definition |
View the report properties and download or view the data schema and data source. |
|
|
PSXPRPTTMPL |
ReportingTools, XML Publisher, Report Definition, Template |
View or update the existing template. |
|
|
PSXPSETUPDWNLD |
ReportingTools, XML Publisher, Setup, Design Helper |
Download plug-ins to facilitate template design and modification. |
See Also
Enterprise PeopleTools PeopleBook: XML Publisher for PeopleSoft Enterprise, Using XML Publisher,” Creating Report Definitions
Viewing Delivered Report Templates
Viewing the Existing Template
|
Download |
Click to open the RTF template in a new window or save it to a location of your choice. |
|
Preview |
Click to view an example of the report using sample data registered with the data source. |
Note. The person profile online and batch reports share the same person profile template file. Similarly, the non-person batch and online reports share the non-person profile template file.
Modifying an Existing TemplateThe existing templates contain two sections at the end to print out the ID and description of any additional items for content types that you added after the template was created. If you want to display more specific information about your new items, you must create an additional section in the template and define the data that you want to display.
The reports group and display content items in order of profile tab number and profile section sequence number based on the profile type definition that you set up for online display. Regardless of where you place a new section in the template, the report sorting order governs the order of display in the report. To change the report display order, you must edit the sorting. To sort new sections properly, you must also add within the correct loops in the report’s driving logic.
Note. Become familiar with XML Publisher before modifying either of the delivered templates.
Setting Up to Modify a Template
To prepare to modify an existing template:
Access the Design Helper page and download the plug-in design helper for Microsoft Word to facilitate template modifications.
Access the Definition page for the appropriate report definition and click the links to download the data schema and sample data files.
Click Download on the Template page and row for the existing RTF template that you want to edit.
Creating a New Section in a Template
To create a new section:
Copy an entire section defined by <?when: JPM_JP_SECTION.JPM_CAT_TYPE=…..end when?> and paste it into the template.
Modify the conditional statement to identify the item that you want to add.
Insert fields into the table to identify the data that you want to display on the report.
Save the revised template any file name and the .rtf file extension (*.rtf).
Uploading the Revised Template
To upload the revised template:
1. Add a new effective dated row in the Template Files scroll area on the Template page.
Update these options:
|
Effective Date |
Enter the date that the system should begin to print and display reports and profiles with this template. |
|
Status |
Select the Active status for the new template. |
Click Upload and select the revised template file.
Repeat the last two steps to provide the new template to both the online and the batch report definitions.
See Also
Enterprise PeopleTools PeopleBook: XML Publisher for PeopleSoft Enterprise, “Setting Up XML Publisher,” Working with Template Design Helpers
Enterprise PeopleTools PeopleBook: XML Publisher for PeopleSoft Enterprise, “Appendix B: Creating Report Templates”