BEA Logo BEA WebLogic Java Adapter for Mainframe 5.0

  BEA Home  |  Events  |  Solutions  |  Partners  |  Products  |  Services  |  Download  |  Developer Center  |  WebSUPPORT


   WebLogic Java Adapter for Mainframe Documentation   |   Workflow Processing Guide   |   Previous Topic   |   Next Topic   |   Contents   |   Index

Using Mainframe Applications with Workflows


This section provides information on the following subjects:


Before You Begin

To be able to use mainframe applications with workflows, be sure that you have:


Using WebLogic JAM with Workflow Processing

The WebLogic JAM Plug-in is a component that allows BEA WebLogic Integration to interact with mainframe applications using the WebLogic JAM Gateway. It runs with WebLogic Integration in the WebLogic Server environment.

Use the following steps for workflow processing with WebLogic JAM:

Step 1: Set Up the WebLogic JAM Plug-in Components

To use WebLogic JAM to access mainframe applications during workflow processing, you must set up the WebLogic JAM Plug-in components by completing the following tasks.

  1. Add the entries shown below to the "WLI" application definition in the WebLogic Server configuration file (config.xml). See Listing3-1 for an example of the "WLI" application definition section.
    <EJBComponent Name="jampi.jar" 
    Targets="myserver" URI="jampi.jar"DeploymentOrder="21"/>
    <WebAppComponent Name="com.bea.jam.JamPlugin"
    Targets="myserver" URI="jampi.war"DeploymentOrder="22"/>

    The WebLogic Server configuration file (config.xml) is located at:

    <BEA_HOME>/<WLI_HOME>/config/<domain.name>

    Where <WLI_HOME> is where WebLogic Integration is installed (usually wlintegration2.1) and domain.name is the domain from which WebLogic Integration is started. For example:

    C:/BEA/wlintegration2.1/config/bpmdomain

    Warning: Copy the config.xml file and store it in an alternate location as a backup in case the config.xml file you are working with is corrupted during setup.

  2. Review your server configuration in the config.xml file. If the server name is not myserver, the Targets entry needs to be modified with the name of your server.

    Note: The config.xml file can control the order in which the .jar files are deployed. The EJBComponent and WebAppComponent fields include a DeploymentOrder attribute, which indicates the order in which a .jar file is deployed with respect to the other .jar files. The WebLogic JAM Plug-in components should have the highest DeploymentOrder values so that they will be deployed last.

Listing3-1 shows an example of the WebLogic Integration section of the WebLogic Server configuration file (config.xml).

Listing 3-1 Example WebLogic Integration Configuration Section of the WebLogic Server config.xml

<Application Name="WLI" Path="c:\bea\wlintegration2.1\lib">
<EJBComponent Name="repository-ejb.jar" Targets="myserver"
URI="repository-ejb.jar" DeploymentOrder="0"/>
<EJBComponent Name="wlpi-ejb.jar" Targets="myserver" URI="wlpi-ejb.jar" DeploymentOrder="1"/>
<EJBComponent Name="wlpi-master-ejb.jar" Targets="myserver"
URI="wlpi-master-ejb.jar" DeploymentOrder="2"/>
<EJBComponent Name="wlpi-mdb-ejb.jar" Targets="myserver"
URI="wlpi-mbd-ejb.jar" DeploymentOrder="3"/>
<EJBComponent Name="pobean.jar" Targets+"myserver"
URI="pobean.jar DeploymentOrder="4"/>
<EJBComponent Name="jampi.jar: Targets="myserver"
URI="jampi.jar" DeploumentOrder="5"/>
<WebAppComponent Name="com.bea.jam.JamPlugin"
Targets="myserver" URI="jampi.war" DeploymentOrder="6"/>
</Application>

Step 2: Set Up Data Translation

To ensure that workflows operate properly, you must set up your system to enable the different software applications to interact. In order for WebLogic Integration to convert XML data to the binary format expected by your mainframe program, a description of the binary format must be created and stored in your WebLogic Integration repository.

The data integration design-time component of WebLogic Integration (Format Builder) can be used to create this description. Format Builder imports the COBOL copybook for your mainframe application, and automatically creates a description that details the layout of the COBOL copybook. Using this description, WebLogic Integration converts instances of this layout to and from XML.

To set up your system for the required data translation, complete the following steps:

  1. Obtain the COBOL copybook(s) or C header file(s) used by your mainframe application. For more information about obtaining the COBOL copybook, refer to the BEA WebLogic Java Adapter for Mainframe Programming Guide.

  2. Import the copybooks(s) or C header file(s) into the WebLogic Integration repository using the following steps:

    1. Choose Start—>Programs—>BEA WebLogic E-Business Platform—>WebLogic Integration 2.1—>Format Builder to launch the WebLogic Integration Format Builder.

    2. Choose Repository—>Login. The WebLogic Integration Repository Login dialog box displays (see Figure3-1).

      Figure 3-1 WebLogic Integration Repository Login


    3. Enter your user name and password. If your server is different than the default, enter your server address.

    4. Choose Tools—>Import—>COBOL Copybook Importer (if you are working with a copybook) or C Struct Importer (if you are working with a C Struct). The appropriate dialog box displays (Figure3-2 shows the COBOL Copybook Importer dialog box. Figure3-3 shows the C Struct Importer dialog box.)

      Figure 3-2 WebLogic Integration COBOL Copybook Importer Dialog Box


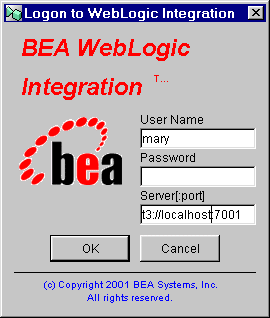
      Figure 3-3 WebLogic Integration C Struct Importer Dialog Box.


    5. Fill in the fields in the dialog box as appropriate for your environment.

    6. After your file has been imported, choose Repository—>Store As. The Store Document dialog box displays (see Figure3-4).

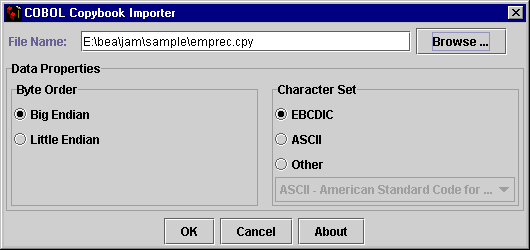
      Figure 3-4 WebLogic Integration Store Document Dialog Box


    7. Enter your name for this document in the Name field. This name is the SCHEMA name you will use to modify the Gateway configuration file. Enter appropriate information in the Description and Notes fields, as needed.

    8. Click Store to save the document in the WebLogic Integration Repository.

    9. Choose Tools—>Test. The Format Tester opens ( see Figure3-5).

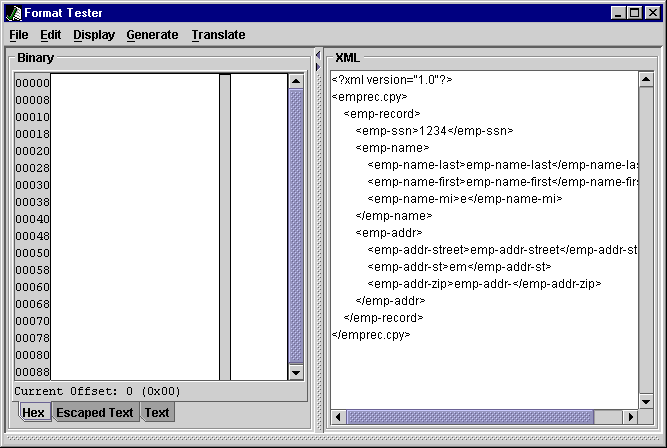
      Figure 3-5 Format Tester


    10. Choose Generate—>XML to display a sample of the XML you will use during the creation of your workflow.

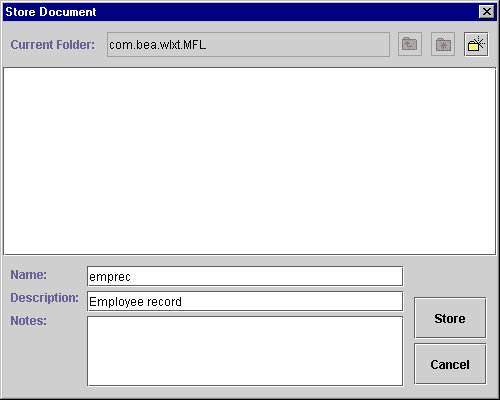
Step 3: Set Up the Workflow to Interact With the Mainframe

Determine how your workflow will use mainframe services. You have the following choices:


Requesting Mainframe Services from a Workflow

To request mainframe services from a workflow in WebLogic Integration, you must:

Configuring Mainframe Services

To access mainframe applications from a WebLogic Integration workflow, remote services must be specified. Remote services are configured using the WebLogic Administration Console.

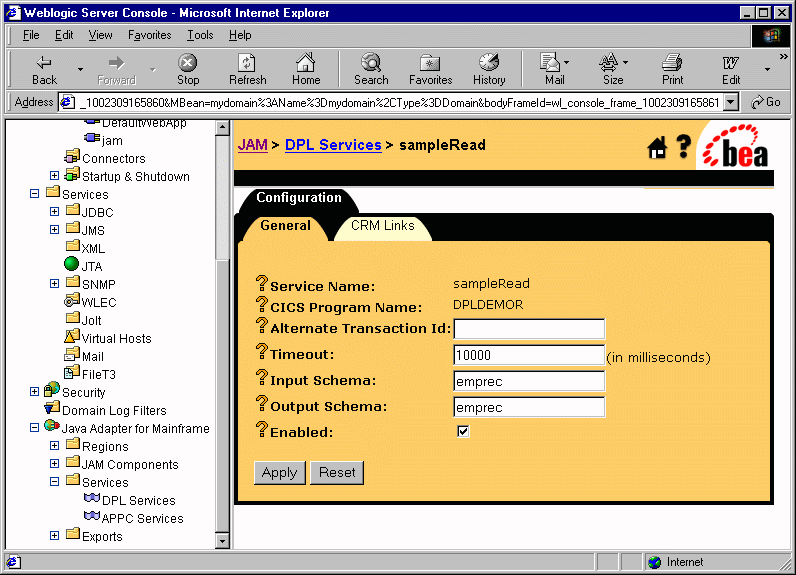
Figure 3-6 Configuring Remote Services


The Input Schema and Output Schema fields should specify data translation schemas used by the service in the following way:

For specific information about configuring the WebLogic JAM Gateway, refer to the BEA WebLogic Java Adapter for Mainframe Configuration and Administration Guide.

Using Mainframe Actions in Workflows

You can design and edit Mainframe Actions used by WebLogic Integration workflows in the following ways:

Adding Mainframe Actions

Mainframe actions can be added during design time from the WebLogic Integration Studio. The following steps allow you to add a mainframe action:

  1. Open an existing or new workflow template definition to which you want to add a mainframe action.

  2. From the workflow template definition, double-click the Task node to which you want to add a mainframe action. The Task Properties dialog box displays as shown in Figure3-7.

    Figure 3-7 Task Properties


  3. In the Task Properties dialog box shown in Figure3-7, select the appropriate Actions tab to designate when the mainframe action will be executed.

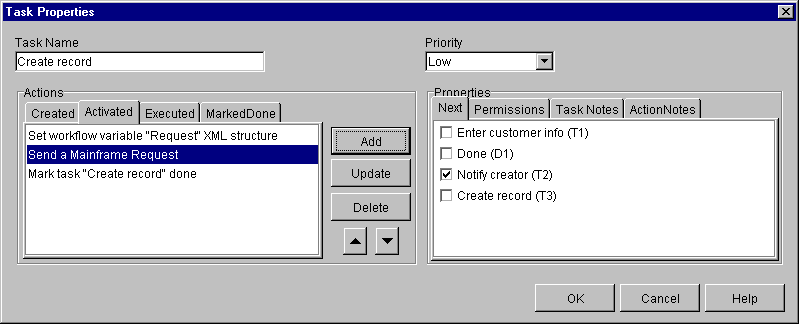
    Determine when the action is executed by selecting the appropriate tab defined in Table 3-1.

    See Using the Studio in the WebLogic Integration 2.1 documentation for more information about the execution of workflows.

    4. Click Add to display the Add Action dialog box shown in Figure3-8.

    Figure 3-8 Adding Mainframe Actions


    5. Double-click the Mainframe Actions folder to expand it. Select Send a mainframe request, and click OK to display the Mainframe Action dialog box.

    6. Enter data in the fields as shown in Figure3-9. A description of the input fields for this dialog box is shown in Table 3-2.

    Figure 3-9 Mainframe Actions Dialog Box


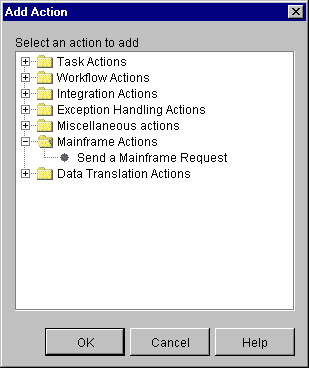
    Table 3-2 lists the fields used for adding and updating mainframe actions when using WebLogic JAM with a WebLogic Integration workflow.

    Table 3-2 Mainframe Action Definitions

    Field

    Description

    Mainframe Action Definition

    Service Name

    Select the name of a remote service from the drop-down list or enter the name of a new service. This drop-down list displays all the remote services defined in the WebLogic JAM configuration. If you enter the name of a new service, you must be sure to add the service to the WebLogic JAM configuration before you can run the workflow.

    Input Schema

    Displays the input schema name that corresponds to the Service Name you selected. The schema specified by this field must be created using Format Builder prior to executing this workflow. You may also manually enter a new schema name, but you must define the schema with Format Builder before you can run the workflow. Schemas must be in the repository.

    Output Schema

    Displays the output schema name that corresponds to the Service Name you selected. The schema specified by this field must be created using Format Builder prior to executing this workflow. You may also manually enter a new schema name, but you must define the schema with Format Builder before you can run the workflow. Schemas must be in the repository.

    Input Variable

    Select an input variable from the drop-down list or manually enter a new variable. This variable contains the XML document that is converted to binary format using the Input Schema and then sent to WebLogic JAM. The variable must be of type "String" or "XML." If you enter a variable name that does not currently exist, you will be asked if you want to create it.

    Output Variable

    Select an output variable from the drop-down list or manually enter a new variable. This variable is the destination for response data from the mainframe that has been received by the WebLogic JAM Gateway and translated into XML using the output schema. The variable must be of type "String" or "XML." If you enter a variable name that does not currently exist, you will be asked if you want to create it.

    Notes

    Enter your own custom notes about the mainframe action.

    Mainframe Action Buttons

    OK

    Saves your mainframe action definition information and closes the Mainframe Action dialog. If any fields are blank, an error message displays and you will be returned to the Mainframe Action dialog. If either variable name specifies a variable that does not exist, a message displays allowing you to add the variable.

    Cancel

    Closes the Mainframe Action dialog without saving any mainframe action definition information that you entered.


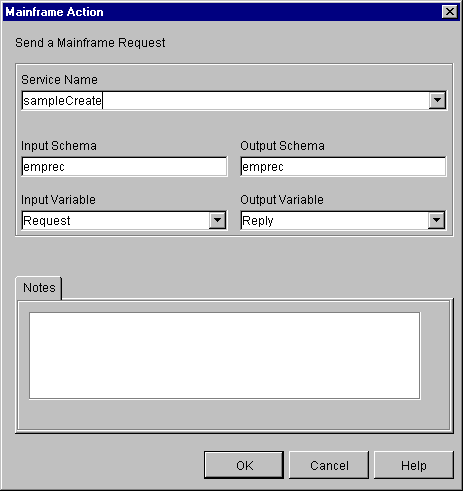
      7. Click OK. The action is added to the Task Properties dialog box and will be implemented when the workflow is executed.

    Updating Mainframe Actions

    Mainframe actions can be updated during design time or runtime from the WebLogic Integration Studio. The following steps allow you to update a mainframe action:

    1. Open an existing workflow template definition that you want to update.

    2. From the workflow template definition, double-click the Task node you want to update. The Task Properties dialog box displays.

    3. In the Task Properties dialog box shown in Figure3-7, select the Actions tab that contains the mainframe action to be executed. The Actions are defined in Table 3-1.

    4. Select the Mainframe Action to be updated from the Actions tab.

    5. Click Update to display the Update Action dialog box.

    6. Modify the fields in the dialog box as needed. Refer to Table 3-1 for the definitions of the Mainframe Action Fields.

    7. Click OK to save the changes.

    Deleting a Mainframe Action

    To delete a mainframe action:

    1. Open the existing WebLogic Integration workflow template definition.

    2. From the workflow diagram, double-click the Task node for which you want to delete a mainframe action. The Task Properties dialog box displays.

    3. In the Task Properties dialog box shown in Figure3-7, select the Actions tab that contains the mainframe action to be executed. The Actions are defined in Table 3-1.

    4. Select the desired action in the Actions section of the Task Properties dialog box, and click the Delete button.

    5. A confirmation dialog box displays to prevent accidental deletions. Click Yes to confirm the deletion or No to cancel the deletion.

      When an action is deleted, all references to the action are removed. The action is removed from all instances of the workflow, including those currently running.

    Changing the Sequence of Mainframe Actions

    The sequence of mainframe actions can be changed during design time or run time.

    To change the sequence of actions:

    1. From your workflow diagram, double-click the Task node for which you want to change the sequence of a mainframe action. The Task Properties dialog box displays.

    2. In the Task Properties dialog box shown in Figure3-7, select the Actions tab that contains the mainframe action to be executed. The Actions are defined in Table 3-1.

    3. Press the up or down arrow button to move the action's position up or down in the list.

    4. Click on OK to save the change to the workflow template definition.


    Initiating Workflows from the Mainframe

    By working with WebLogic JAM and WebLogic Integration, workflows can be initiated from mainframe applications. To initiate workflows from the mainframe, you must:

    Example of Initiating a Workflow from the Mainframe

    In the following example, a new employee record is created on the mainframe. It is sent to the workflow process to be added the employee database.

    The screen data is validated and moved into the employee record copybook. This copybook corresponds to the copybook used to generate the MFL in Step 2 of the Using WebLogic JAM with Workflow Processing section.

    The COBOL CICS program in Listing3-2 illustrates how a workflow may be initiated. The CICS link sends the employee record to the workflow. The SYSID directs the LINK to the correct remote environment, and the PROGRAM name corresponds to the service name of a WebLogic Integration event entry in the WebLogic JAM configuration.

    Listing 3-2 Example of Initiating a Workflow From the Mainframe

    Modify the WebLogic JAM Configuration

    The WebLogic JAM configuration file must have a WebLogic Integration event for each service to be requested by the mainframe program. This definition must specify a schema that was created when you set up data translation.

    Figure 3-10 Event Console


    For specific information about configuring the WebLogic JAM Gateway, refer to the BEA WebLogic Java Adapter for Mainframe Configuration and Administration Guide.

    Edit the Workflow Start Node

    For a mainframe event or action to initiate a workflow, it must be included in the Start Node of a WebLogic Integration workflow. To edit the workflow Start Node to initiate the workflow, complete the following steps.

    1. Double click on the Start Node you want to edit.

    2. In the Start Properties dialog box, shown in Figure3-11, select Event as the start method for the workflow.

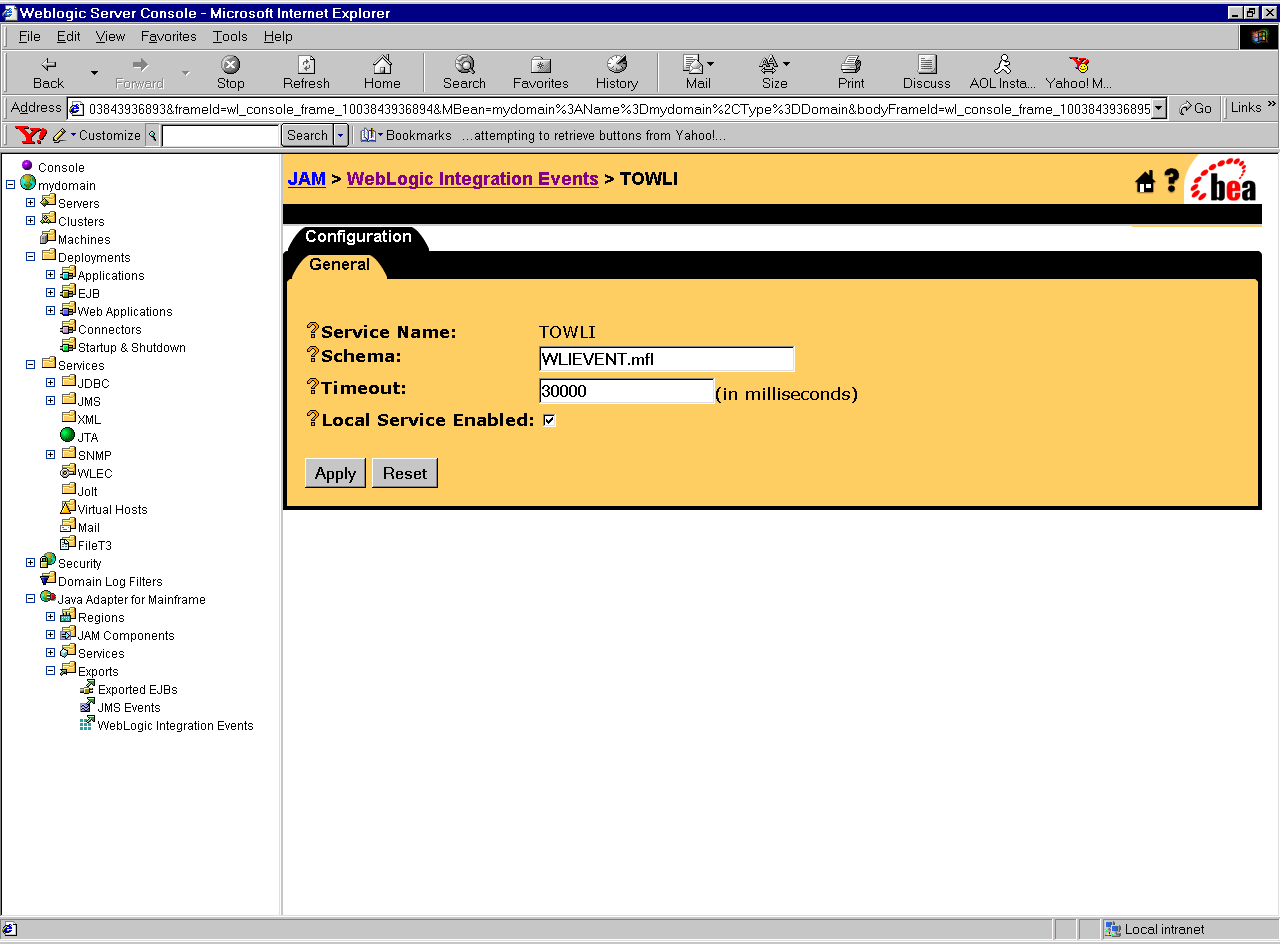
      Figure 3-11 Start Node


    3. In the Document/Type field, enter the root element name of the XML document. To obtain this name, view the XML document structure in the WebLogic Integration Format Builder.

    4. To define the variable, select the variable tab and click Add.

    5. In the Workflow Variable Assignment dialog box, shown in Figure3-12, enter the name you want to assign to the variable. You may want to use an XPath function to select fields from the XML. For more information about XPath functions, refer to Using the Studio in the WebLogic Integration 2.1 documentation.

      Figure 3-12 Workflow Variable Assignment Dialog Box


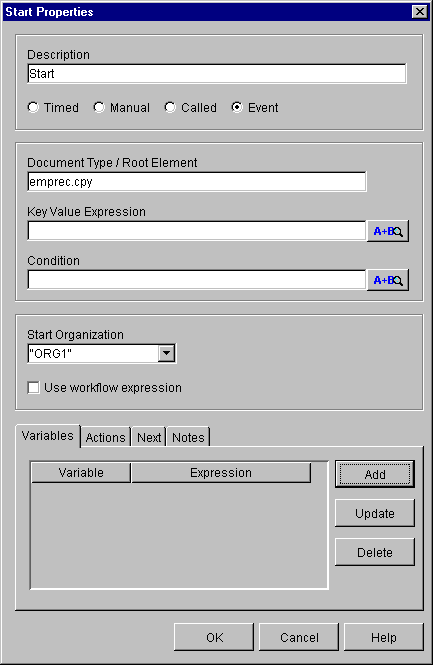
    The workflow will be started automatically when data is received from the mainframe.


    back to top previous page next page