

|
|
|
|
|
|
Setting Up Oracle for New Installations
To use an Oracle database with an installation of Campaign Manager for WebLogic, WebLogic Commerce Server, and WebLogic Personalization Server, complete the following tasks:
Step 1: Create Tablespaces for Oracle
Step 2: Install the Oracle Client Software
Step 3: Create Oracle User Accounts
Step 4: Create the Schema for Oracle
Step 6: Configure Properties Files and Environment Variables for Oracle
Step 7: Load Additional Sample Data
Step 1: Create Tablespaces for Oracle
To separate its data from the Oracle data dictionary and from data that other applications use, Campaign Manager for WebLogic, WebLogic Commerce Server, and WebLogic Personalization Server uses the following tablespaces:
For optimal performance, we recommend that you reduce I/O contentions by placing each tablespace on its own physical disk drive.
Creating WLCS_DATA and WLCS_INDEX
Note: In this document, WL_COMMERCE_HOME refers to the directory into which you installed WebLogic Commerce Server and/or WebLogic Personalization Server.
Creating WLCS_EVENT_DATA
Creating the WLCS_EVENT_DATA tablespace is necessary only if you are using the Behavior Tracking feature.
In a text editor, open create_event_tablespaces.sql and modify the pathname for the EVT_DATA_PATHNAME variable to match your own directory path structure.
Step 2: Install the Oracle Client Software
On the Campaign Manager for WebLogic, WebLogic Commerce Server, and WebLogic Personalization Server host, use the Oracle installation program to install Oracle client software.
For information on the Oracle release that Campaign Manager for WebLogic, WebLogic Commerce Server, and WebLogic Personalization Server supports for your platform type, refer to Supported Platforms in the Installation Guide.
During the installation process, use the Oracle Net8 Assistant application to set up a new TNS service. The Net8 Assistant prompts you for the name or IP address of the computer that hosts the Oracle server software, the port number Oracle is listening on (usually 1521), and the SID name for the database. Test the connection with the database username and password that your database administrator assigned to you.
If you are using the WebLogic jDriver to connect to the Oracle database, refer to "Installing and Using WebLogic jDriver for Oracle" on the WebLogic documentation site for information on setting up the appropriate jDriver.
Step 3: Create Oracle User Accounts
To simplify administration, we recommend that you create a user account exclusively for the Campaign Manager for WebLogic, WebLogic Commerce Server, and WebLogic Personalization Server schema. The servers include a script that creates a user account named WEBLOGIC and specifies a default tablespace for the account. Although you can modify the script to change the account name, we recommend that you do not; several other scripts assume that the account is named WEBLOGIC. If you change the account name, you must review each script for the use of the WEBLOGIC account name and modify it.
To create a user account:
Step 4: Create the Schema for Oracle
Campaign Manager for WebLogic, WebLogic Commerce Server, and WebLogic Personalization Server include a script, create_all.sql, that calls a series of other scripts to create the WebLogic Commerce Server and WebLogic Personalization Server schema and install sample data. You can modify the script to create the database without loading sample data.
This step includes the following tasks:
Note: If you use the Event and Behavior Tracking Service, you must use a separate set of scripts to create the Event and Behavior Tracking schema objects. For more information, refer to "Scripts" under "Persisting Behavior Tracking Data" in the Guide to Events and Behavior Tracking.
Prevent Sample Data from Loading (optional)
By default, create_all.sql calls other scripts to load sample catalog, customer, and user data. The sample Web applications use this data to demonstrate Campaign Manager for WebLogic, WebLogic Commerce Server, and WebLogic Personalization Server features.
If you do not want to use this sample data, you can create the database without inserting sample data by modifying create_all.sql as described in this section.
To prevent sample data from loading, do the following:
Note: The sample Web applications do not function properly without this sample data. For example, the example portal Web application adds new users to the AcmeUsers group. If you do not load sample data, then the AcmeUsers group does not exist and the example portal fails to create new users. Do not follow this procedure if you are setting up an environment in which you want to run the sample Web applications.
Listing 1-1 Deactivated Insert Statements
...
-- SET HEADING OFF
-- select '************** insert_wlps_sample_data.sql' from dual;
-- SET HEADING ON
-- @insert_wlps_sample_data.sql
SET HEADING OFF
select '************** insert_wlcs.sql' from dual;
SET HEADING ON
@insert_wlcs.sql
-- SET HEADING OFF
-- select '************** insert_wlcs_sample_data.sql' from dual;
-- SET HEADING ON
-- @insert_wlcs_sample_data.sql
-- SET HEADING OFF
-- select '************** insert_wlcs_sample_catalog.sql' from dual;
-- SET HEADING ON
-- @insert_wlcs_sample_catalog.sql
-- SET HEADING OFF
-- select '************** insert_wlcs_sample_customer.sql' from dual;
-- SET HEADING ON
-- @insert_wlcs_sample_customer.sql
Run create_all.sql
To create the WebLogic Commerce Server and WebLogic Personalization Server schema, do the following:
For a description of the tables, indexes, and constraints, see the following topics:
Step 5: Rebuild Indexes
The create_all.sql places the Campaign Manager for WebLogic, WebLogic Commerce Server, and WebLogic Personalization Server index in the default tablespace (WLCS_DATA). To locate and rebuild the index; in the WLCS_INDEX tablespace, do the following:
Step 6: Configure Properties Files and Environment Variables for Oracle
To configure properties files and environment variables for Oracle, complete the following tasks:
Set Up the JDBC Connection Pool
To set up the JDBC connection pool for Oracle, do the following:
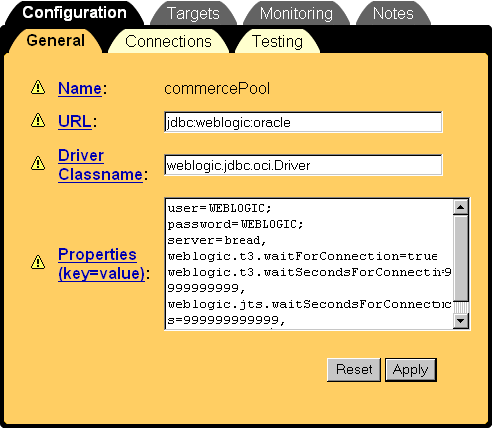
The right pane of the Administration Console displays the commercePool properties.
Figure 1-1 Click commercePool
where @ORACLE_USER@ is the name of the Oracle user account, Figure 1-2 General Pool Properties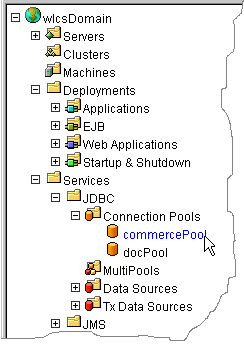
jdbc:weblogic:oracle
weblogic.jdbc.oci.Driver
user=@ORACLE_USER@
password=@ORACLE_PASSWORD@
server=@ORACLE_NET_SERVICE_NAME@
weblogic.t3.waitForConnection=true
weblogic.t3.waitSecondsForConnection=999999999999
weblogic.jts.waitSecondsForConnectionSecs=999999999999
verbose=false
@ORACLE_PASSWORD@ is the user account's password, and
@ORACLE_NET_SERVICE_NAME@ is the name of the Oracle net service.
You must restart the server to deploy the modifications. However, we recommend that you complete the remaining procedures in this topic before you restart the server.
Edit the weblogiccommerce.properties File
If you are using the RDBMS security realm, you must change the RDBMSRealm settings in the weblogiccommerce.properties file to match the database type that stores the user information. If you are using LDAP or some other security realm, you can ignore these settings.
For information on the Oracle release that Campaign Manager for WebLogic, WebLogic Commerce Server, and WebLogic Personalization Server supports for your platform type, refer to Supported Platforms in the Installation Guide.
For example, Listing 1-2 shows a weblogiccommerce.properties file that specifies the WebLogic jDriver.
To change these settings, you must do all of the following:
Also verify that the connection pool properties in the WebLogic Server Administration Console specify the same database type as these settings for the RDBMS realm. For more information, refer to Set Up the JDBC Connection Pool.
Listing 1-2 Settings for the RDBMS Realm
# RDBMS Realm
#------Oracle thin Driver---------#
#commerce.usermgmt.RDBMSRealm.driver=oracle.jdbc.driver.OracleDriver
#commerce.usermgmt.RDBMSRealm.dbUrl=jdbc:oracle:thin:ENTERPRISE:1205:COMMERCE
#commerce.usermgmt.RDBMSRealm.dbUser=@ORACLE_USER@
#commerce.usermgmt.RDBMSRealm.dbPassword=@ORACLE_PASSWORD@
#------WebLogic jDriver for Oracle 8.1.5---------#
commerce.usermgmt.RDBMSRealm.driver=weblogic.jdbc.oci.Driver
commerce.usermgmt.RDBMSRealm.dbUrl=jdbc:weblogic:oracle
commerce.usermgmt.RDBMSRealm.dbServer=bread
commerce.usermgmt.RDBMSRealm.dbUser=WEBLOGIC
commerce.usermgmt.RDBMSRealm.dbPassword=WEBLOGIC
#--------------Cloudscape------------------#
#commerce.usermgmt.RDBMSRealm.driver=COM.cloudscape.core.JDBCDriver
#commerce.usermgmt.RDBMSRealm.dbUrl=jdbc:cloudscape:Commerce;create=true;autocommit=false
#commerce.usermgmt.RDBMSRealm.dbUser=none
#commerce.usermgmt.RDBMSRealm.dbPassword=none
Update Environment Variables for the Server
To update environment variables, do the following:
A subsequent section describes in detail each of the remaining steps.
Set @ORACLE_HOME@
After opening set-environment, find the line WLCS_ORACLE_HOME=@ORACLE_HOME@ and substitute @ORACLE_HOME@ with the absolute pathnames of the directory in which you installed the Oracle client software.
For example, Listing 1-3 shows a Windows environment in which the Oracle client software is installed in D:\oracle.
Listing 1-3 Set @ORACLE_HOME@
SET WL_COMMERCE_HOME=D:\WebLogicCommerce3.5
SET JDK_HOME=D:\jdk1.3
SET WLCS_ORACLE_HOME=D:\oracle
SET WEBLOGIC_HOME=D:\weblogic
REM -- Add WebLogic, CyberCash, and Taxware bin directories to the path --
SET PATH=%PATH%;%WEBLOGIC_HOME%\bin;%WL_COMMERCE_HOME%\eval\win32\CyberCash\bin;
%WL_COMMERCE_HOME%\eval\win32\Taxware\bin
The WLCS_ORACLE_HOME variable adds Oracle-client Java classes and libraries to the Java classpath and to the system path.
Specify the Database
Under the section titled
-------- Specify which database to use --------,
activate the line that sets the DATABASE variable to the database type that you are using and deactivate any other line. For example, Listing 1-4 shows a Windows environment that uses the WebLogic jDriver.
Listing 1-4 Specify the Database
REM ----------- Specify which database to use -----------
REM SET DATABASE=CLOUDSCAPE
REM DATABASE=ORACLE
SET DATABASE=ORACLE_OCI_815
if %DATABASE% EQU CLOUDSCAPE GOTO CLOUDSCAPE
if %DATABASE% EQU ORACLE GOTO ORACLE
if %DATABASE% EQU ORACLE_OCI_815 GOTO ORACLE_OCI_815
:CLOUDSCAPE
REM ----------- CLOUDSCAPE classes -----------
SET DB_CLASSPATH=%WEBLOGIC_HOME%\eval\cloudscape\lib\cloudscape.jar;%WEBLOGIC_HOME%\eval\cloudscape\lib\tools.jar;%WEBLOGIC_HOME%\eval\cloudscape\lib\client.jar
GOTO continue
Set Variables for Oracle Drivers
In set-environment, under the :ORACLE_OCI_815 section, verify that the PATH variable correctly identifies the location of the WebLogic jDriver and Oracle client libraries.
The following example from a Windows installation adds the WebLogic jDriver and Oracle client libraries to the system path:
:ORACLE_OCI_815
REM ----------- WLS ORACLE 815 classes -----------
SET DB_CLASSPATH=%BEA_HOME%
SET PATH=%PATH%;%WEBLOGIC_HOME%\bin\oci816_8;%WLCS_ORACLE_HOME%\bin
Step 7: Load Additional Sample Data
You can load additional sample data that demonstrates ad placeholders and features that are available only with Campaign Manager for WebLogic. If you do not use Campaign Manager for WebLogic, you can prevent campaign-specific data from loading by modifying the loadSampleData script.
This section describes the following tasks:
Modifying loadSampleData
The loadSampleData script is located at the following pathname:
WL_COMMERCE_HOME\bin\platform-type\loadSampleData.bat (Windows)
WL_COMMERCE_HOME/bin/platform-type/loadSampleData.sh (UNIX)
Note: The remainder of this section uses Windows syntax and filenames.
It calls the following scripts to load data for features that are available in Campaign Manager for WebLogic, WebLogic Commerce Server, and WebLogic Personalization Server:
It calls the following scripts to load data for features that are available only in Campaign Manager for WebLogic (if you do not use Campaign Manager for WebLogic, you can remove or deactivate the lines that call these scripts):
Running loadSampleData
To load additional sample data, do the following:

|

|

|
|
|
|
Copyright © 2001 BEA Systems, Inc. All rights reserved.
|