| Download Docs | Site Map | Glossary | |
|
|
|||
| bea.com | products | dev2dev | support | askBEA |
|
|
|
||||||||
| e-docs > WebLogic Platform > WebLogic Integration > BPM Topics > Programming BPM Plug-Ins > Introduction to BPM Plug-In Development |
|
Programming BPM Plug-Ins
|
Introduction to BPM Plug-In Development
Note: WebLogic Integration supports a plug-in framework that is available for extending BPM functionality. This plug-in framework should only be used for extending the native functionality of the BPM. This plug-in framework should not be used to integrate the BPM with external applications or systems; for this either use EJBs (called from the BPM as business operations) or Application Integration (AI) adapters.
This section provides an introduction to business process management (BPM) plug-ins and their development. It includes the following topics:
What Is a Plug-In?
A plug-in consists of a set of run-time loadable Java classes that extends the business process management (BPM) features and functionality of WebLogic Integration.
Using plug-ins, you can modify the design or run-time behavior of the following BPM workflow components:
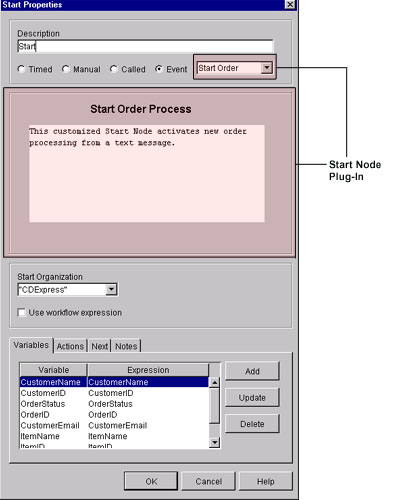
For example, you may want to trigger the execution of a business process by sending an e-mail message or other nonXML event, rather than by using any of the standard Start node trigger methods available to you with the WebLogic Integration Studio. You can accomplish this by designing a plug-in that extends the behavior of the Start node to include support for this new nonXML trigger.
The following figure provides an example of a plug-in that modifies the design and run-time behavior of a Start node. It illustrates the plug-in-defined areas of the Start Properties dialog box.
Figure 1-1 Plug-In Example: Start Node
Note: For more information about the Start node plug-in illustrated in the previous figure, see BPM Plug-In Sample.
How BPM Supports Plug-In Development
In addition to the standard framework for designing, executing, and monitoring business processes, WebLogic Integration supports a plug-in framework for BPM functionality, enabling you to create plug-ins that customize the existing software, and achieve powerful and seamless integration with other products and technologies.
The following figure illustrates the BPM plug-in framework within the overall BPM architecture.
Figure 1-2 BPM Plug-In Framework
Note the following in this figure:
To make the plug-in available to BPM users, you simply deploy the plug-in as a session EJB on WebLogic Server. No additional installation is required on the WebLogic Integration process engine or BPM client.
The plug-in must be deployed as part of the WLI application by editing the config.xml file. For more information about deploying a plug-in, see Deploying the Plug-In.
The following sections describe these two components.
For additional information about the role of the process engine, see "WebLogic Integration Process Engine" in Business Process Management API Development in Programming BPM Client Applications.
Plug-In Manager
The Plug-in Manager is a dedicated part of the WebLogic Integration process engine that supports the configuration, design, and run-time management of plug-ins, as shown in the following figure.
Figure 1-3 Plug-In Manager
The Plug-in Manager oversees the loaded plug-ins and their interactions with the WebLogic Integration process engine and BPM clients, and routes all plug-in related requests. For example, a subset of the configuration and design responsibilities of the Plug-in Manager includes: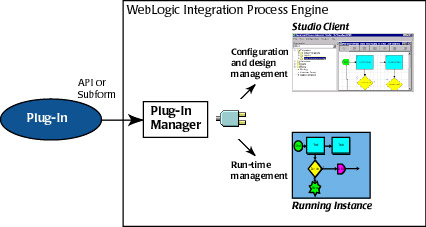
For example, a subset of the run-time responsibilities of the Plug-in Manager includes:
When designing plug-ins, you access the management features of the Plug-in Manager using the following session EJBs:
These EJBs are part of the plug-in API described in the next section.
Plug-In API
The BPM API provides support for configuration, design, and run-time interactions between the process engine and a deployed plug-in.
The plug-in API consists of two session EJBs, a set of run-time management classes, and one package, as described in the following table.
Note: For a complete description of the BPM API, see Programming BPM Client Applications or the BEA WebLogic Integration Javadoc.
How BPM Discovers a Deployed Plug-In
To make the plug-in available to BPM users, you simply package and deploy it as a session EJB on WebLogic Server.
If no additional installation is required on the process engine or BPM client, how does BPM discover a deployed plug-in and its implementation details? The plug-in is responsible for providing the functionality that enables BPM to:
Detecting the Plug-In
At startup, the process engine detects the plug-in via JNDI based on the plug-in's com.bea.wlpi.server.plugin.PluginHome home interface. All plug-in beans must use the PluginHome as their home interface.
For more information about the PluginHome interface, see Plug-In Home Interface.
Managing Lifecycle Tasks
Once the plug-in is detected, the Plug-in Manager performs the following tasks:
You can subsequently set the configuration information using the setConfiguration() method, as described in Managing Plug-Ins.
The Plug-in Manager ensures that all dependencies are loaded before loading the plug-in.
The plug-in is available only after it is loaded. When the plug-in is loaded, the Plug-in Manager calls the getPluginCapabilitiesInfo() method to get detailed plug-in information, and the plug-in can register for notification messages, as described in Using Plug-In Notifications. At this time, all plug-in classes become visible to the BPM client.
The plug-in can be deinitialized only once during its lifecycle.
Each of the lifecycle methods listed in the previous list are remote interface methods that must be implemented by the plug-in bean. For more information, see Plug-In Remote Interface.
Accessing the Plug-In Implementation
The plug-in must implement the following classes for each component to define its functionality to the design client:
Because no additional installation is required on the BPM design client (for example, the Studio), the design client has no knowledge of the concrete classes that the plug-in defines. It is the responsibility of the plug-in to implement a public constructor that requires no arguments to support remote class loading on the design client.
Remote class loading on the design client proceeds as follows:
For example, in the figure Plug-In Example: Start Node, when a user selects the Start Order event as the Start node trigger, the Plug-in Manager loads the plug-in panel class, StartNodePanel, and it is instantiated by the Studio client using the no-argument constructor. The Studio client subsequently displays the plug-in GUI component in the Start Properties dialog box.
Executing the Plug-In at Run Time (Context Passing)
To define plug-in execution characteristics, you must implement a run-time interface for the plug-in component. At run time, the plug-in communicates with the process engine and client using a process called context passing: the Plug-in Manager obtains an instance of the plug-in component run-time interface and passes the context to it.
Each context interface provides restricted access to the Plug-in Manager, enabling the plug-in to execute and manage its own application logic, and introduce the plug-in instance data into the BPM run-time environment.
For more information about implementing the run-time interface, see Executing the Plug-In. For more information about implementing context interfaces, see Using Plug-In Run-Time Contexts.
BPM Plug-In Development Tasks
To develop a BPM plug-in, you need to first create a session EJB that defines the required plug-in classes and interfaces, and then package and deploy the session EJB on WebLogic Server.
The following steps outline the BPM plug-in development tasks in more detail.
Note: In addition to accomplishing the steps outlined below, you should also review the plug-in development fundamentals described in Plug-In Development Fundamentals.
Step 1:
Identify design-time and run-time customization requirements.
Keep in mind that you can modify the design and run-time behavior of the following workflow components using plug-ins:
The plug-in sample provides a set of plug-in classes that represent common plug-in scenarios. For more information, see BPM Plug-In Sample.
Step 2:
Define the plug-in session EJB:
ejbActivate()
ejbPassivate()
ejbRemove()
setSessionContext(SessionContext ctx)
This step is described in detail in Defining the Plug-In Session EJB.
Step 3:
Define the plug-in component:
This step is described in detail in Defining Plug-In Components.
Step 4:
Set up notification management.
This step is described in detail in Using Plug-In Notifications.
Step 5:
Implement and register an event handler to process incoming plug-in events.
This step is described in detail in Processing Plug-In Events.
Step 6:
Manage the plug-in, customizing the plug-in configuration requirements, if desired.
This step is described in detail in Managing Plug-Ins.
Step 7:
Develop context-sensitive online help for the plug-in.
This step is described in detail in Defining Plug-In Online Help.
Step 8:
Package all plug-in Java classes in EJB JAR and WAR files, and deploy the plug-in.
This step is described in detail in Deploying the Plug-In.
BPM Plug-In Sample
The BPM plug-in sample provides a set of plug-in classes that represent common plug-in scenarios, and is provided with the software. The sample includes two workflow templates, Plug-in Order Processing and Plug-in Order Fulfillment, which are stored in the SAMPLES_HOME/integration/samples/bpm_api/plugin/sample_plug_in.jar file.
Note: The plug-in sample is loosely based on a generic Web-based sales order scenario that is described in detail in Introduction to WebLogic Integration and the Example Workflows in Learning to Use BPM with WebLogic Integration.
The following figure shows the plug-in sample workflow templates and identifies the plug-ins that have been added.
Figure 1-4 Plug-In Sample Workflow Templates
The previous example illustrates the following: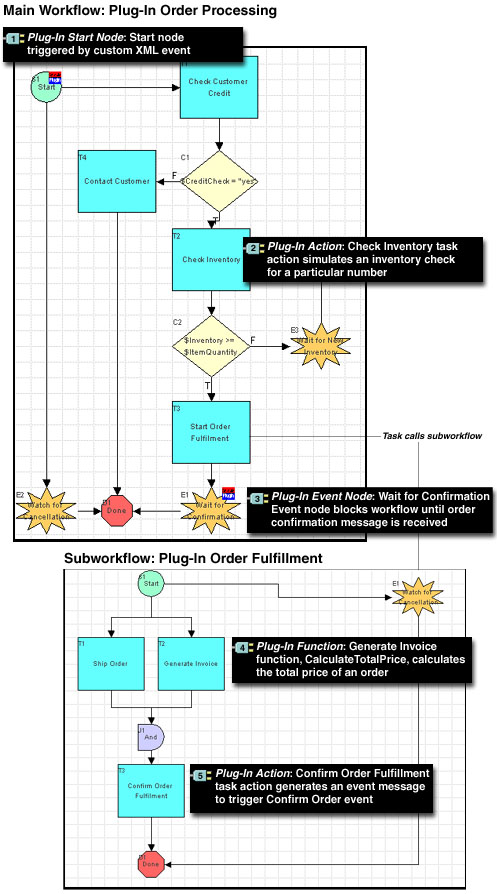
Note: The Order Processing Trigger workflow template provided as part of the generic example (described in Learning to Use BPM with WebLogic Integration) is not used by the plug-in. Instead, the Plug-in Order Processing workflow template is triggered via a plug-in-defined XML event.
Excerpts from the plug-in sample are included throughout this document. For complete information about the BPM plug-in sample and its directory structure, and instructions for importing and running the sample, see BPM Plug-In Sample. For more information on the generic Web-based sales order scenario, see Learning to Use BPM with WebLogic Integration.
Note: In the previous figure, the following custom icon is shown in the upper-right corner of the Start and Event nodes to indicate that they contain customized plug-in properties.

Icons such as this are displayed when the Studio interface view is enabled. For information about how to enable the interface view, see Using the Studio Interface in Using the WebLogic Integration Studio.
To specify a custom plug-in icon when creating a remote plug-in object interface, see the create() method description in Plug-In Home Interface.

|

|

|