

|
|
|
|
|
|
Installing Service Pack 2
Note: Installation of WebLogic Portal 4.0 with Service Pack 2 with Rolling Patch 1 is required to run WebLogic Server 6.1 with Service Pack 3. WebLogic Portal 3.5 Service Pack 2 with Rolling Patch 1 is supported for Win32, Solaris or HP-UX. 6.1 SP3 only.
This chapter explains how to install WebLogic Portal 4.0 Service Pack 2 on supported systems.
Warning: Before you install any part of Service Pack 2, see ALERT: Migrating Your Enterprise and Web Applications from WebLogic Portal 4.0 GA and Service Pack 1 to Service Pack 2.
Service Pack 2 consists of two installers:
The installation instructions tell where to download these installers.
This section includes the following information:
ALERT: Migrating Your Enterprise and Web Applications from WebLogic Portal 4.0 GA and Service Pack 1 to Service Pack 2
Before you install WebLogic Portal 4.0 with Service Pack 2, note that several resource files (.jar, .jsp, .class files) have been added or modified for Enterprise and Web applications from previous versions of WebLogic Portal 4.0 to WebLogic Portal with Service Pack 2. Failure to complete the migration steps listed in this section will prevent your Enterprise or Web applications from running with Service Pack 2. It is imperative that you complete the following migration steps:
For example, if you needed to back up the enterprise application called portal, you would need to back up all resource files, directories, and Web applications under the following path:
PORTAL_HOME/applications/portal
All Web applications like stockportal, reside under the Enterprise application, along with all their resource files, as shown in the following path:
PORTAL_HOME/applications/portal/stockportal
Installing Service Pack 2 of the WebLogic Portal 4.0 Server
To install Service Pack 2 of the WebLogic Portal 4.0 server, follow the instructions for your platform in the following sections.
Warning: Before you install any part of Service Pack 2, see ALERT: Migrating Your Enterprise and Web Applications from WebLogic Portal 4.0 GA and Service Pack 1 to Service Pack 2.
The following installation instructions tell you which Service Pack 2 installers to download and where to get them.
Windows - Installing Service Pack 2 of the WebLogic Portal 4.0 Server
Warning: Before you install any part of Service Pack 2, see ALERT: Migrating Your Enterprise and Web Applications from WebLogic Portal 4.0 GA and Service Pack 1 to Service Pack 2.
For installation of Service Pack 2 of the WebLogic Portal 4.0 server on supported Windows systems, you can choose between running a full installation or an upgrade installation of Service Pack 2:
This type of installation is for new product installations. It is not recommended that you overwrite an existing installation with this installer.
This type of installation is recommended for existing installations.
Full Installation of the Server on Windows
For more information on the server installation process, see The Installation Procedure on Windows.
Upgrade Installation of the Server on Windows
WebLogic Portal 4.0 Service Pack 2 includes modifications to default Webflow namespace files. Because the upgrade installer does not replace these modified Webflow namespaces in the server database, you must re-synchronize your E-Business Control Center data to put the modified Webflow namespaces in the server database after you install Service Pack 2 of the server and the E-Business Control Center.
Warning: Because the upgrade installation of Service Pack 2 involves re-synchronization of data from the E-Business Control Center to the server, it is important to fully test your applications prior to putting them back into production.
Note: When you run the upgrade installation, the installer automatically backs up files that it replaces in the following directory:
PORTAL_HOME\servicepacks\sp2\backup
Solaris - Installing Service Pack 2 of the WebLogic Portal 4.0 Server
Warning: Before you install any part of Service Pack 2, see ALERT: Migrating Your Enterprise and Web Applications from WebLogic Portal 4.0 GA and Service Pack 1 to Service Pack 2.
For installation of Service Pack 2 of the WebLogic Portal 4.0 server on supported Solaris systems, you can choose between running a full installation or an upgrade installation of Service Pack 2:
This type of installation is for new product installations. It is not recommended that you overwrite an existing installation with this installer.
This type of installation is recommended for existing installations.
Full Installation of the Server on Solaris
You can also run Service Pack 2 installation on Solaris in console mode. For more information on the server installation process and installing in console mode, see The Installation Procedure on UNIX.
Upgrade Installation of the Server on Solaris
WebLogic Portal 4.0 Service Pack 2 includes modifications to default Webflow namespace files. Because the upgrade installer does not replace these modified Webflow namespaces in the server database, you must re-synchronize your E-Business Control Center data to put the modified Webflow namespaces in the server database after you install Service Pack 2 of the server and the E-Business Control Center.
Warning: Because the upgrade installation of Service Pack 2 involves re-synchronization of data from the E-Business Control Center to the server, it is important to fully test your applications prior to putting them back into production.
Note: When you run the upgrade installation, the installer automatically backs up files that it replaces in the following directory:
PORTAL_HOME/servicepacks/sp2/backup
You can also run Service Pack 2 upgrade installation on Solaris in console mode. For more information on the server installation process, see Console Version of the Installer.
UNIX - Installing Service Pack 2 of the WebLogic Portal 4.0 Server
Warning: Before you install any part of Service Pack 2, see ALERT: Migrating Your Enterprise and Web Applications from WebLogic Portal 4.0 GA and Service Pack 1 to Service Pack 2.
Full Installation
$ set PATH=<BEA_HOME>/jdk131/bin:$PATH
$ export PATH
where <BEA_HOME> is the home directory of your BEA installation.
Upgrade Installation of the Server on UNIX
WebLogic Portal 4.0 Service Pack 2 includes modifications to default Webflow namespace files. Because the upgrade installer does not replace these modified Webflow namespaces in the server database, you must re-synchronize your E-Business Control Center data to put the modified Webflow namespaces in the server database after you install Service Pack 2 of the server and the E-Business Control Center.
Warning: Because the upgrade installation of Service Pack 2 involves re-synchronization of data from the E-Business Control Center to the server, it is important to fully test your applications prior to putting them back into production.
Note: When you run the upgrade installation, the installer automatically backs up files that it replaces in the following directory:
PORTAL_HOME/servicepacks/sp2/backup
You can also run Service Pack 2 upgrade installation on Solaris in console mode. For more information on the server installation process, see Console Version of the Installer.
Installing Service Pack 2 of the E-Business Control Center
The following installation instructions tell you which Service Pack 2 installers to download and where to get them.
Warning: Before you install any part of Service Pack 2, see ALERT: Migrating Your Enterprise and Web Applications from WebLogic Portal 4.0 GA and Service Pack 1 to Service Pack 2.
If you are migrating from an earlier version of the E-Business Control Center and WebLogic Portal 4.0, see one of the following sections before proceeding:
If you are not migrating from a previous version, see "Installing Service Pack 2" on page 4 - 14.
Migrating From WebLogic Portal 4.0 with Service Pack 1 to Service Pack 2
The installation for WebLogic Portal 4.0 with Service Pack 2 will replace your Service Pack 1 webflow files and delete any customizations that you've made to those files.
See Table 4-1 for a list of the webflow files replaced during Service Pack 2 installation.
To save your customizations to Service Pack 1:
Migrating From WebLogic Portal 4.0 GA to Service Pack 2
If you installed the upgrade version of Service Pack 2 of the WebLogic Portal server (as opposed to the full installer). The upgrade installers are described in Installing Service Pack 2 of the WebLogic Portal 4.0 Server.
Figure 4-2 Synchronization settings
Warning: When you synchronize, make sure that all necessary application data files are loaded in the E-Business Control Center, especially if you have stored your data files in a content management or version control system. If any necessary files are not loaded in the E-Business Control Center, the synchronization process will treat them as deleted files and remove them from the server.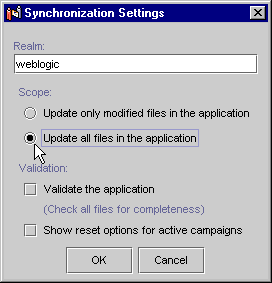
To see which data files need to be loaded in the E-Business Control Center, look in the PORTAL_HOME\applications\<application_name>-project folder on the server to see the currently synchronized application files.
Table 4-1 shows the Webflow namespace files that are replaced by the Service Pack 2 installation directly from the original WebLogic Portal 4.0 GA. These files appear in the E-Business Control Center Explorer window for each given application.
Note: This table does not apply to migration from Service Pack 1 to Service Pack 2.
The Webflow namespace files that were replaced by the E-Business Control Center Service Pack 2 installer are moved into the following backup folders on the client systems:
EBCC_HOME\servicepacks\sp2\backup\applications\portal\
application-sync\webapps\stockportal
EBCC_HOME\servicepacks\sp2\backup\applications\wlcsApp\
application-sync\webapps\tools
EBCC_HOME\servicepacks\sp2\backup\applications\wlcsApp\
application-sync\webapps\wlcs
Reapplying Modifications to Webflow Namespace Files That Were Replaced
If you have made modifications to any of the default Webflow namespaces that were replaced by the upgrade installation, we recommend reapplying those modifications to the newly installed webflow namespace files using the following method:
Installing Service Pack 2
Warning: Before you install any part of Service Pack 2, see ALERT: Migrating Your Enterprise and Web Applications from WebLogic Portal 4.0 GA and Service Pack 1 to Service Pack 2.
For installation of Service Pack 2 of the E-Business Control Center on supported systems, you can run a full installation or an upgrade installation of Service Pack 2:
This type of installation is for new product installations. It is not recommended that you overwrite an existing installation with this installer.
This type of installation is recommended for existing installations.
To install the E-Business Control Center:
Solaris Full Installer - ebcc400_with_sp2_sol.bin
Windows Full Installer - ebcc400_with_sp2_win.exe
Solaris Upgrade Installer - ebcc400sp2_sol.bin
Windows Upgrade Installer - ebcc400sp2_win.exe
Updating the License File
You must update the product license file. See the following sections for information on updating your license:
Next Steps
After you complete the product's server installation and you update the license file:
If you need to uninstall the server software, see the following section.
Uninstalling Service Pack 2
The following sections tell you how to uninstall Service Pack 2 of the WebLogic Portal server and the E-Business Control Center.
Uninstalling Service Pack 2 of the WebLogic Portal Server
To uninstall your particular version of WebLogic Portal 4.0 server with Service Pack 2, follow the instructions in the appropriate section below.
Windows Upgrade Uninstall
You can also run the following uninstall program: PORTAL_HOME\uninstaller_servicepack\uninstall_wlportal40sp2.exe
The Service Pack 2 files are removed and replaced with the original files.
If your E-Business Control Center installations are full installations of E-Business Control Center with Service Pack 2 (rather than upgrade installations), completely uninstall the E-Business Control Center and reinstall the general release version of the E-Business Control Center from the BEA Support download site. After reinstallation, re-synchronize your E-Business Control Center data to the server.
Warning: When you synchronize, make sure that all necessary application data files are loaded in the E-Business Control Center, especially if you have stored your data files in a content management or version control system. If any necessary files are not loaded in the E-Business Control Center, the synchronization process will treat them as deleted files and remove them from the server.
To see which data files need to be loaded in the E-Business Control Center, look in the PORTAL_HOME\applications\<application_name>-project folder on the server to see the currently synchronized application files.
Windows Full Installation Uninstall
You can also run the following uninstall program: PORTAL_HOME\uninstaller\uninstall.exe
The entire WebLogic Portal 4.0 is uninstalled.
Solaris Upgrade Uninstall
The Service Pack 2 files are removed and replaced with the original files.
If your E-Business Control Center installations are full installations of E-Business Control Center with Service Pack 2 (rather than upgrade installations), completely uninstall the E-Business Control Center and reinstall the general release version of the E-Business Control Center from the BEA Support download site. After reinstallation, re-synchronize your E-Business Control Center data to the server.
Warning: When you synchronize, make sure that all necessary application data files are loaded in the E-Business Control Center, especially if you have stored your data files in a content management or version control system. If any necessary files are not loaded in the E-Business Control Center, the synchronization process will treat them as deleted files and remove them from the server.
To see which data files need to be loaded in the E-Business Control Center, look in the PORTAL_HOME/applications/<application_name>-project folder on the server to see the currently synchronized application files.
Solaris Full Installation Uninstall
The entire WebLogic Portal 4.0 server is uninstalled.
Uninstalling Service Pack 2 of the E-Business Control Center
Choose Start
You can also run the following program: EBCC_HOME\uninstaller_servicepack\uninstall_ebcc40sp2.exe
Warning: Your version of the E-Business Control Center must exactly match the version of the WebLogic Portal 4.0 server to which you will synchronize data. So if you uninstall the E-Business Control Center with Service Pack 2 upgrade, you will get errors trying to synchronize data to a server running WebLogic Portal 4.0 with Service Pack 2.
Choose Start
You can also run the following program: EBCC_HOME\uninstaller\uninstall.exe

|

|

|
|
|
|
Copyright © 2001 BEA Systems, Inc. All rights reserved.
|