

|

|
|
|
|
Overview of Webflow
Webflow is a mechanism designed to help you build Web applications that maintain the much-desired separation between presentation logic and underlying business processes. Because the Webflow's centralized XML configuration files specify the order in which pages are displayed to your Web site's visitors, use of the Webflow mechanism may reduce the amount of work necessary to create and modify the flow of your Web site. At appropriate times during a visitor's interaction, the Webflow may also invoke predefined, specialized components to validate data or to execute back-end business processes. Therefore, using the modular architecture Webflow provides may also make it faster and easier for your development team to complete modifications that require back-end programming.
This topic provides you with preliminary information about the architecture of the Webflow mechanism and describes some benefits of using Webflow in your applications. The relevant Webflow configuration files and their locations are introduced, along with a description of how you might go about modifying these files to meet your organizational requirements. For developers who may have worked with Webflow before, this topic includes a brief explanation of what has changed for this release and indicates where to look for migration information. In addition, this topic includes some instructions to get you started using Webflow.
This topic includes the following sections:
Introduction to Webflow
This section describes the Webflow architecture from a number of different viewpoints, then highlights some important benefits of using Webflow in your applications.
High-Level Architecture
This section provides a high-level description of the Webflow architecture as well as a simplified explanation of how the Webflow mechanism works. It also explains how you might understand Webflow as a state machine and as an enabler of the Model-View-Controller (MVC) design pattern.
Webflow Architecture
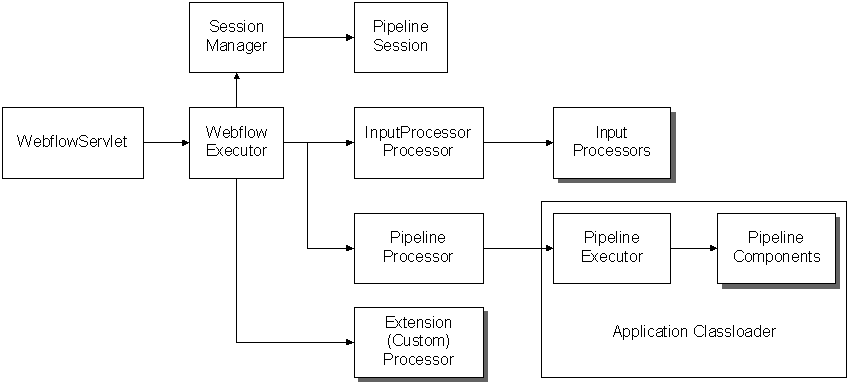
Figure 1-1 illustrates the basic architecture of the Webflow mechanism.
Figure 1-1 Webflow High-Level Architecture
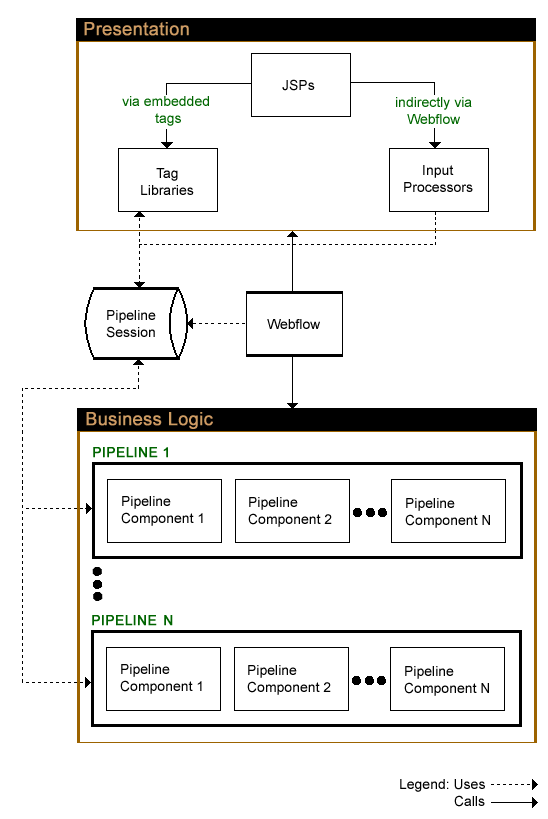
The WebflowServlet is a servlet that receives all requests from a client and delegates to the Webflow Executor. You will register the WebflowServlet by defining it in your application's WEB-INF/web.xml deployment descriptor prior to using Webflow, as described in Getting Started with Webflow. The Webflow Executor determines the Webflow execution order, executes all nodes that handle back-end processing, and then returns the final presentation node to the WebflowServlet. The WebflowServlet will then forward the client to that presentation node. Note: More information about the Webflow execution order is included in Webflow Execution Order. The Session Manager provides session and lifecycle management for the Pipeline Session. For more information about the Pipeline Session, see The Pipeline Session and Pipeline Session Internals. The Input Processor processor is a type of processor that delegates to user-defined classes that implement the InputProcessor interface. These Input Processor classes perform specific tasks, such as validating form data. Similarly, the Pipeline Processor is a type of processor that delegates to the Pipeline Executor. The Pipeline Executor is a stateless session Enterprise JavaBean (EJB) that executes Pipeline Components, which execute the business logic associated with the application. The Pipeline Executor also handles transaction management and exception branch management within the Pipeline. The Extension (Custom) Processor processors shown in Figure 1-1 represent those processors your development team may code to extend the out-of-the-box Webflow mechanism. For more information about creating a custom processor, see Extending Webflow by Creating Extension Presentation and Processor Nodes. Note: The Webflow architecture used by portals is slightly different from that shown in Figure 1-1. It also includes a PortalServlet and Application Processor Executor, which are described in Customizing Portals in the Getting Started with Portals and Portlets documentation. The Internals of the Webflow Mechanism Figure 1-2 provides an example of how control typically flows from presentation and processor nodes (such as JSPs and Pipelines) when applications utilize the Webflow mechanism. Notice that the Pipeline Components containing pieces of business logic have no knowledge of HTML or any other presentation technology. Instead, the Pipeline Session maintains conversational state in the system. Similarly, the Webflow governs the flow of control. Note: For more information about the Pipeline Session, see The Pipeline Session and Pipeline Session Internals. Figure 1-2 Flow of Control Using Webflow
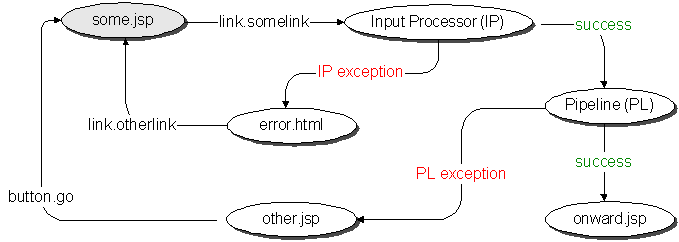
Understanding Webflow as a State Machine As shown in Figure 1-3, Webflow can be thought of as a state machine. A Webflow begins at a node that handles presentation, such as a JavaServer Page (JSP). When a visitor interacts with a Web site that uses Webflow, their interaction causes information about the origin of the interaction and the event to be sent to the Webflow. Based on this information, the Webflow mechanism makes a decision about the next node it should transition to. If the Webflow decides to invoke a type of processor node (that is, an Input Processor or Pipeline) as a destination, the Webflow may temporarily store state information. This state information is stored only until the Webflow returns to another presentation node. Using Figure 1-3 as an example, a visitor may be viewing a page called some.jsp that exists in your Web application. The visitor then clicks a link called somelink, which is available to them on some.jsp. In this case, the origin of the interaction is the current page (some.jsp) and the event is clicking on the link named somelink. Based on this information, the Webflow may decide to transition to an Input Processor. When invoked by the Webflow, this Input Processor may access and temporarily store information in a centralized location called a Pipeline Session. If the Input Processor throws an exception and transitions to the error.html page, that state information is no longer available. Figure 1-3 Webflow as a State Machine
Notes: For more information about the different kinds of Webflow components (presentation and processor nodes, events, and so on), see Webflow Components and Concepts. For more information about the Pipeline Session, see The Pipeline Session and Pipeline Session Internals. Webflow and the MVC Design Pattern Webflow also enables the Model-View-Controller (MVC) design pattern, a useful methodology for developers looking to reuse Java code and decrease the amount of time required to develop Web applications. Processor nodes (such as Input Processors and Pipelines) represent the Model, or classes dealing with the underlying data structures necessary for a fully functional application. Presentation nodes (such as JavaServer Pages) represent the View, or classes that are concerned with the application's interface. The Controller, represented as the WebflowServlet servlet, facilitates communication between the Model and the View. Notes: For more information about presentation and processor nodes, see Presentation and Processor Nodes. For more information about the WebflowServlet servlet, see Setting Up Your Web Application's web.xml File. The Relationship Between Webflows and Applications As in the previous release, Webflow is scoped to a Web application, and you can only have one Webflow per Web application. The Webflow for a Web application is configured in the application's WEB-INF/web.xml deployment descriptor, as described in Setting Up Your Web Application's web.xml File. However, this release of Webflow does provide you with more flexibility. Much like you can have multiple enterprise applications per instance of the WebLogic Server, you can now have multiple Webflows per enterprise application. Pipelines are scoped to an enterprise application, meaning that multiple Webflows (or Web applications) may all invoke the same Pipeline. In addition, you can now divide an individual Web application's Webflow into more manageable subflows, called namespaces. For more information about namespaces, see Namespaces. Benefits of the Webflow Mechanism Based on the information you have about Webflow, you may already see that using Webflow in your Web applications will be advantageous to your development processes. The following are just some of the benefits you will realize while using the Webflow mechanism:
The Webflow Configuration Files
This section introduces the Webflow configuration files you will be working with for your applications, and includes a brief description of the information they contain. For those who have utilized previous releases of Webflow, this section also describes some important changes. The locations of the Webflow configuration files are provided, and methods for modifying these files are discussed.
What Files Will I Be Working With?
Recall that there is a one-to-one association between a Webflow and a Web application. However, because a Webflow contains configuration information for an entire Web application and because the main goal of Webflow is to preserve the separation between presentation and business logic, there are typically several configuration files per Webflow. All Webflow configuration files contain XML elements, which must conform to a XML Schema Definition (XSD) included in the product.
The primary files used for Webflow are <namespace>.wf and <namespace>.pln files. As suggested by the <namespace> portion of the filename, a Webflow is typically modularized into several namespaces. The <namespace>.wf and <namespace>.pln files are scoped to a Web application and enterprise application, respectively. The minimum number of Webflow files you can have for a Web application is one, but there is no limit to the maximum number of Webflow configuration files.
Notes: For more information the association between Webflows and applications, see The Relationship Between Webflows and Applications For more information about using namespaces within a Webflow, see Namespaces
As indicated by their extensions, a <namespace>.wf configuration file contains the primary information for a Webflow namespace, including the transitions between presentation and processor nodes. A <namespace>.pln file contains definitions for the Pipeline Components that may be invoked within a Pipeline in the namespace. Although some Webflow components are defined within different files (according to <namespace>), the flow of control passes seamlessly between them.
How Are These Files Different from the Webflow and Pipeline Properties Files?
If you have used previous releases of Webflow, the first change you will notice is that the webflow.properties and pipeline.properties files have been replaced with one or more <namespace>.wf and <namespace>.pln files. This new implementation uses the data synchronization model to make new or modified Webflows available to one or more applications, and to work with your organization's existing Content Management Systems. Instead of containing name-value pairs, the configuration files now contain XML elements, which must conform to a XML Schema Definition (XSD) included in the product.
You need to migrate your files to the new format in order to use the Webflow and Pipeline Editors included in the E-Business Control Center (EBCC). For more information about migrating your existing Webflows, see Migrating An Existing Webflow, or view the same topic from within the EBCC's online help. You should also refer to the Migration Guide.
Lastly, it is important that you continue reading this documentation to learn about other significant changes and improvements in the Webflow implementation.
Location of Webflow Configuration Files in the Directory Structure
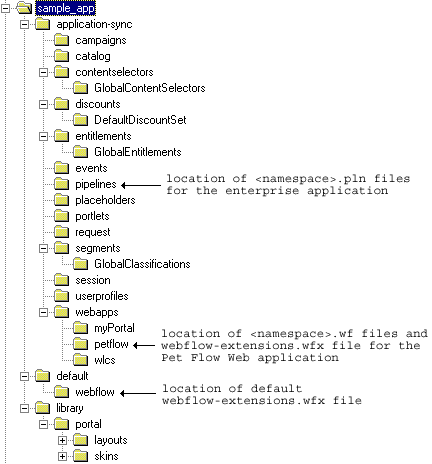
Figure 1-4 illustrates where in the directory structure the Webflow and Pipeline configuration files reside. Note that there may be multiple <namespace>.pln files per enterprise application, but that <namespace>.wf files (and the webflow-extensions.wfx file used to register extension (custom) Webflow components for your Web application) exist in each individual Web application's directory.
Note: For more information about managing the <namespace>.wf, <namespace>.pln, and webflow-extensions.wfx files, see Webflow and Pipeline Files in Your Content Management System.
Figure 1-4 Webflow Configuration Files in a Sample Directory Structure
When you create a new Webflow or Pipeline for your application using the Webflow or Pipeline Editors, one or more <namespace>.wf and <namespace>.pln Webflow configuration files are automatically generated and appropriately placed in the directory structure. (For information on using the Webflow and Pipeline Editors, see Using the Webflow and Pipeline Editors.) The webflow-extensions.wfx file initially exists in the sample_app enterprise application's default/webflow directory. When you create a new Web application using the E-Business Control Center (EBCC), this webflow-extensions.wfx file is copied over to your Web application's directory. You can hand-edit any webflow-extensions.wfx file to include new Webflow components, but modifications made to the webflow-extensions.wfx file in the sample_app enterprise application's default/webflow directory will affect all subsequent Web applications you create. Notes: For more information about how the webflow-extensions.wfx file is copied when you create a new Web application, see Creating an Application Structure for E-Business Control Center Data and Creating a Web Application Folder in the Guide to Using the E-Business Control Center documentation. Instructions for modifying the webflow-extensions.wfx file to register extension (custom) Webflow nodes are located in Making Your Extension Presentation and Processor Nodes Available in the Webflow and Pipeline Editors. Creating and Modifying Webflow Files This section includes important information about who should create and modify Webflow files for your organization's applications, and explains the method for performing these tasks. Who Should Create and Modify the Webflow Files? It is expected that HTML/JSP developers or Java/EJB developers will be responsible for modifying the Webflow configuration files, and that only Java/EJB developers will customize or extend the Webflow mechanism. For more information about these roles, see the "Development Roles" section in the Documentation Roadmap for WebLogic Portal topic of the Strategies for Developing E-Business Web Sites documentation. How Do I Create and Modify Webflow Files? BEA strongly recommends that you utilize the Webflow and Pipeline Editors, accessible from the E-Business Control Center (EBCC), to edit your Webflow and Pipeline files. These graphical tools provide you with the ability to visualize your Webflows in smaller modules, and the Webflow Editor contains a built-in validation feature that works behind the scenes to ensure that your Webflows are valid. For information about using the Webflow and Pipeline Editors, see Using the Webflow and Pipeline Editors. Or, select the "Using the Webflow and Pipeline Editors" topic from the EBCC online help. Note: If you have used Webflow and Pipeline Editors from a previous release, you first need to migrate your Webflow and Pipeline files. For more information see How Are These Files Different from the Webflow and Pipeline Properties Files? and the Migration Guide.
Getting Started with Webflow
In order to take advantage of Webflow in your applications, there are a few activities you must perform. This section provides you with the step-by-step instructions that will help you get started with Webflow. Namely:
Note: Some of these instructions involve working with your Web application's web.xml deployment descriptor. More information about this file can be found in the Deployment Guide.
Before you begin, however, you should have a high-level understanding of how the URL a visitor to your Web site enters in a browser eventually invokes the Webflow mechanism.
Understanding How Webflow Is Invoked from a URL
This section explains what typically happens when a visitor to your Webflow-enhanced Web site enters the URL http://localhost:7001/mywebapp in their Web browser.
In the preceding URL, localhost is a reference to the domain name of the server. The listen port of 7001 is defined in the <domain_name>/config.xml file. This can be any available port, and may be omitted if the application is running on port 80. If you are using a proxy to front-end your Webflow, you may also need to set the HTTP_PORT and HTTPS_PORT context parameters in the web.xml file to the ports on the proxy. Lastly, mywebapp is the URI for the Web application, defined in the META-INF/application.xml file. This can be omitted if the Web application is designated as the default Web application. More information about these settings can be found in the Deployment Guide.
Given this information, the Webflow sequence is as follows:
Since a namespace is not supplied via a query string, the WebflowServlet looks for the context parameter P13N_DEFAULT_NAMESPACE in the WEB-INF/web.xml file. This is the namespace the WebflowServlet will use. Typically, the default namespace is defined as main.
Note: Specifying a namespace with a query string would look like: <jsp:forward page="/application?namespace=order"/>. If a namespace is specified, it will be used instead of the default namespace.
<begin-origin>
<destination namespace="main" node-name="welcome" node-type="jsp"/>
</begin-origin>
<presentation-origin node-name="welcome" node-type="jsp">
<node-processor-info page-relative-path="/browse" page-name="welcome.jsp"/>
</presentation-origin>
The welcome node has a page relative path of /browse and a page name of welcome.jsp. Therefore, Webflow forwards the visitor's request to /browse/welcome.jsp. This file needs to be located in the Web application's document root.
Setting Up Your Web Application's web.xml File
In order to set up the Webflow mechanism for use in your Web applications, you will first need to specify certain context parameters, register the WebflowServlet servlet, and define your welcome file in your application's WEB-INF/web.xml deployment descriptor file. This section describes the set up activities you will need to complete in the web.xml file.
Specifying Webflow Context Parameters
To make use of Webflow, you may need to specify values for five context parameters in the application's web.xml deployment descriptor file. These context parameters are:
The default namespace for the application, which Webflow will use when a namespace is not specified in the URL. This context parameter is required.
Note: Portals must have the P13N_DEFAULT_NAMESPACE context parameter set in a specific manner. Please see Customizing Portals in the Getting Started with Portals and Portlets documentation for more information.
The application URL for the Webflow. This context parameter is required, and if not specified, will default to /application.
The prefix inserted into the URL by the createWebflowURL() method or JSP tags. (For more information about the createWebflowURL() method, see Using Webflow Components in Your Web Pages, or the Javadoc.) If not specified, a prefix is not added to the URL. You may want to specify a prefix when Apache or some other proxy is fronting Webflow. This context parameter is optional.
The URL root used by the createStaticResourceURL() method to build URLs to static resources that exist on a proxy server. The createStaticResourceURL() method is an alternative to using the <webflow:createResourceURL> JSP tag, and is described in the Javadoc.
This context parameter is optional. If the P13N_STATIC_ROOT context parameter is commented out or left null, then the <webflow:createResourceURL> tag and the createWebflowURL() method will use the current domain name and port. If at a later time you want to house your GIF images to another server, just edit the P13N_STATIC_ROOT context parameter.
If this context parameter is set, the <webflow:createWebflowURL>, <webflow:form>, and <webflow:validatedForm> JSP tags will use this domain (IP address) as opposed to the current domain name. You may want to do this when Webflow is being fronted by a proxy and that proxy exists on another machine. You can also specify a "domainName" property in the above named JSP tags to override the value of the P13N_URL_DOMAIN context parameter on a link-by-link basis. This context parameter is optional.
All of these context parameters are defined within <context-param> elements in your application's WEB-INF/web.xml file, as shown in Listing 1-1.
Listing 1-1 Sample Context Parameters for Webflow in web.xml
<context-param>
   <param-name>P13N_DEFAULT_NAMESPACE</param-name>
   <param-value>main</param-value>
</context-param>
<context-param>
   <param-name>P13N_APPLICATION_URL</param-name>
   <param-value>/application</param-value>
</context-param>
<context-param>
   <param-name>P13N_URL_PREFIX</param-name>
   <param-value>/weblogic</param-value>
</context-param>
<context-param>
   <param-name>P13N_STATIC_ROOT</param-name>
   <param-value>http://localhost:7003/petflow</param-value> </context-param>
<context-param>
   <param-name>P13N_URL_DOMAIN</param-name>
   <param-value>192.168.32.19</param-value>
</context-param>
Registering the WebflowServlet Servlet
Listing 1-2 illustrates the elements you will need to add to your application's WEB-INF/web.xml file to register the WebflowServlet servlet. The <servlet> element defines the servlet's name and indicates its class name. The <servlet-mapping> element associates the WebflowServlet servlet with a URL pattern of /application/*.
Note: The P13N_APPLICATION_URL context parameter must also be set to the value shown in the <url-pattern> element to enable automatic URL generation in JavaServer Pages (JSPs). For more information, see Specifying Webflow Context Parameters.
Listing 1-2 Registering the Webflow Servlet in web.xml
<!-- Defines the Webflow servlet -->
<servlet>
   <servlet-name>webflow</servlet-name>
   <servlet-class>com.bea.p13n.appflow.webflow.servlets.internal.
    WebflowServlet</servlet-class>
</servlet>
<servlet-mapping>
   <servlet-name>webflow</servlet-name>
   <url-pattern>/application/*</url-pattern>
</servlet-mapping>
Note: Portal applications must also register the PortalServlet in the WEB-INF/web.xml file. Please see Customizing Portals in the Getting Started with Portals and Portlets documentation for more information.
Defining Your Web Application's Welcome File
After you have registered the WebflowServlet servlet, you need to verify that you have defined a welcome file. Per the Java Servlet 2.2 specification, the welcome file is the first file displayed when a Web application is invoked. Listing 1-3 illustrates how to define a welcome file in your web.xml file.
Listing 1-3 Defining the Welcome File in web.xml
<welcome-file-list>
   <welcome-file>index.jsp</welcome-file>
</welcome-file-list>
The welcome file you list in the web.xml deployment descriptor must reside in the root directory of your Web application. This welcome file is the entry point from the Web application into the Webflow mechanism, and should contain the following code:
<jsp:forward page="/application?namespace=namespace_name">
where application is the name of your application (which matches that specified in the P13N_APPLICATION_URL context parameter) and namespace_name is the name of the initial namespace for your Web application. Specifying a namespace name is optional. If the namespace name is omitted, the namespace used will be that specified in the P13N_DEFAULT_NAMESPACE context parameter.
Note: For more information about the P13N_APPLICATION_URL and P13N_DEFAULT_NAMESPACE context parameters, see Specifying Webflow Context Parameters.
Configuring Your Web Application to Use Webflow
The welcome file specified in your WEB-INF/web.xml file (in this case, index.jsp) forwards Web site visitors to another page. Therefore, you need to specify the page visitors get forwarded to by creating a <namespace>.wf file (for this example, main.wf) in the E-Business Control Center (EBCC) Webflow Editor.
Note: For more information about creating a new <namespace>.wf file via the Webflow Editor, see Creating Webflow/Pipeline Files in the Guide to Using the E-Business Control Center documentation.
The main.wf file should contain a begin origin Webflow component, followed by a presentation node corresponding to the page specified by the begin origin. For this example, assume that the page has a name of helloworld and a node type of jsp. The XML code generated by the Webflow Editor when you save the main.wf file will be similar to that shown in Listing 1-4.
Listing 1-4 Example main.wf File
<?xml version="1.0" encoding="UTF-8"?>
<webflow-configuration
 xmlns="http://www.bea.com/servers/p13n/xsd/webflow/2.0"
 xmlns:xsi="http://www.w3.org/2000/10/XMLSchema-instance"
 xsi:schemaLocation="http://www.bea.com/servers/p13n/xsd/webflow/
 2.0 webflow.xsd">
<namespace>main</namespace>
   <begin-origin>
	<destination namespace="main" node-name="helloworld"
	 node-type="jsp"/>
   </begin-origin>
   <presentation-origin node-name="helloworld" node-type="jsp">
	<node-processor-info page-name="helloworld.jsp"/>
   </presentation-origin>
...
</webflow-configuration>
Note: For instructions on creating Webflow components, see Using the Webflow and Pipeline Editors.
Next Steps
Subsequent topics in this Guide to Managing Presentation and Business Logic: Using Webflow and Pipeline documentation provide detailed information about Webflow. Depending on your goals, you may want to review the following:
There are also several documents that address topics related to Webflow that may be of interest, including:

|

|

|
|
|
|
Copyright © 2001 BEA Systems, Inc. All rights reserved.
|