BEA Logo BEA WebLogic Portal Release 4.0

  BEA Home  |  Events  |  Solutions  |  Partners  |  Products  |  Services  |  Download  |  Developer Center  |  WebSUPPORT


   WebLogic Portal Documentation   |   Integration Example   |   Previous Topic   |   Next Topic   |   Contents   |   Index

WebLogic Portal Interoperability Sample


This topic provides instructions for setting up an example of interoperability between BEA WebLogic Portal 4.0 and BEA WebLogic Integration 2.1 that uses asynchronous communication. As previously mentioned, included with WebLogic Portal is a sample Pipeline Component (ConvertOrderRepPC). This Pipeline component converts a purchase order generated by the commerce sample application in WebLogic Portal to an Extensible Markup Language (XML) representation and places the order representation on a Java Message Service (JMS) queue (eventQueue) in WebLogic Integration. The WebLogic Integration sample picks up the message and uses it in business processes. In the following sections, you will create a Pipeline that contains the sample Pipeline Component, and then add the completed Pipeline to a Webflow:


About the Order Representation Example

The sample Pipeline Component ConvertOrderRepPC is already built. To use it, you first create a new Pipeline that contains ConvertOrderRepPC and then put the new Pipeline in a Webflow. After you complete this process and when you complete an order using the commerce sample application, the order representation is placed on WebLogic Integration's eventQueue.

The following sections contain the information you need to complete this process.

Use the Webflow and Pipeline Editor For Editing Pipeline Components and Webflows

To create a new Pipeline and add the Pipeline to your Order Webflow, you should use the Webflow and Pipeline Editors in the E-Business Control Center. These editors are the preferred editing method for the Webflow and Pipeline XML configuration files.

Caution: If you create invalid entries outside of the Editors by hand-editing the XML configuration files in a text editor, the behavior of the Editor may be unpredictable.

Both the E-Business Control Center online help and "Customizing and Extending Webflow" in the Guide to Managing Presentation and Business Logic: Using Webflow and Pipeline contain general information on using the E-Business Control Center and adding Pipeline Components.

Editor Tools Needed

To use the Webflow/Pipeline Editor, you should to be familiar with its tools and component representations. Table 2-1 provides information about the tools and component representations in used for creating the sample Pipeline and adding it to a Webflow. For more information about using the Webflow/Pipeline Editor, see "Using the Webflow and Pipeline Editors" in the Guide to Managing Presentation and Business Logic: Using Webflow and Pipeline.

Table 2-1 Pipeline Editor Tools and Elements

Representation

Webflow Component

Description


Delete Button

Deletes the selected Webflow component.


Pipeline Component
Editor Button

Opens the Pipeline Component Editor for specifying the parameters of a Pipeline Component.


Pipeline Node Tool

Adds a new Pipeline Node to the Editor canvas.


Selection Tool

Selects and moves Pipeline Components, event transitions, and exception transitions.


Event Tool

Adds an event transition between two nodes.


Exception Tool

Adds an exception transition between two nodes, or a self-referring exception transition.


Root Node Tool

Designate one of the Pipeline Components already on the Editor canvas as the Root Node for the current Pipeline.


Presentation Node

Represents a page displayed to visitors interacting with your Web application.


Pipeline Node

A processor Webflow component that encapsulates business logic for a Web application.


Abort Exception Node

Represents the place where a Pipeline's exceptions connect to, because their destinations actually exist outside the Pipeline Editor (in the Webflow Editor).


Pipeline Component Node

A specialized Webflow component that performs tasks related to the application's underlying business logic. Pipeline Components exist within Pipelines, and may be implemented as Java objects or stateless session EJBs.


Connection Port

A small graphical device on a node edge that represents where an event or exception is connected to that node.


Creating a New Pipeline and Adding it to a Webflow

This section contains step-by-step instructions for creating the sendOrderToWLI Pipeline and adding it to the sampleapp_order Webflow using the E-Business Control Center. The following list shows the major steps needed to complete this task:

Step 1: Create a New Pipeline Component

Step 2: Adding the New Pipeline Component to the Webflow

Step 3: Synchronize the Webflow to the Application

Step 1: Create a New Pipeline Component

This section contains the steps needed to create the Pipeline Component used by the Webflow.

Note: Before you can use the E-Business Control Center, you must start the E-Business Control Center. For more information on starting the E-Business Control Center, see "Starting the E-Business Control Center" in the Guide to Using the E-Business Control Center.

  1. Open the wlcsApp application, as follows:

    1. In the main toolbar of the E-Business Control Center, click the Open folder icon.

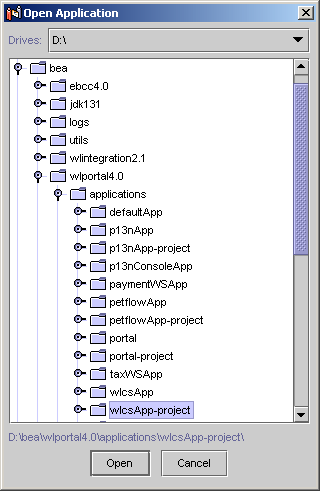
    2. In the Open Application dialog box, navigate to the wlcsApp folder (BEA_HOME ->wlportal4.0 ->applications ->wlcsAPP-Project) as shown in Figure 2-1.

      Figure 2-1 Open Application Window


    3. Select the wlcsApp-project folder, and then click the Open button.

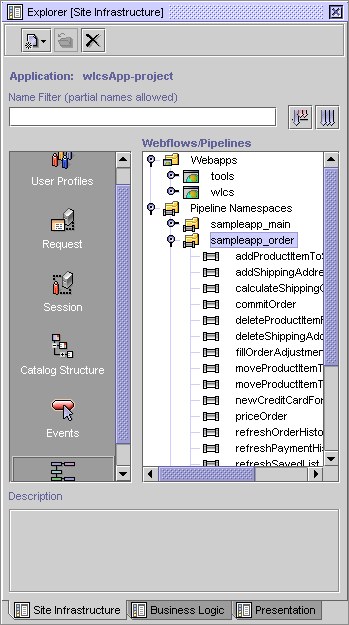
  2. In the Explorer window, click the Site Infrastructure tab, as shown in Figure 2-2

    Figure 2-2 Explorer Window: Webflows/Pipelines

    .
     

  3. In the left pane, click Webflow/Pipelines. A list of Webflows and Pipelines appears.

  4. In the Webflows/Pipelines list, open the Pipeline Namespaces folder.

  5. Open the sampleapp_order namespace.

  6. Click the New button, and then select Webflow/Pipeline. The New Webflow/Pipeline window opens, as shown in Figure 2-3.

    Figure 2-3 New Webflow/Pipeline Window


  7. Create the new Pipeline as follows:

    1. Select the New Pipeline radio button.

    2. In the Namespace list box, select sampleapp_order.

    3. In the Pipeline Name field, enter "sendOrderToWLI".

    4. Click the OK button. The Editor appears, as shown in Figure 2-4.

      Figure 2-4 Editor [Pipeline: sendOrderToWLI]


  8. Create the ConvertOrderRepPC Pipeline Component as follows:

    1. Move the Abort Exception Node down near the bottom of the canvas.

    2. Click the Pipeline Component Node tool. Cross-hairs appear in the Webflow Editor Canvas.

    3. Place the cross-hairs to the place above the Abort Exception Node where you want to place the new Pipeline Component, and then click. The new Pipeline Component Node is inserted on the Editor canvas in that location.

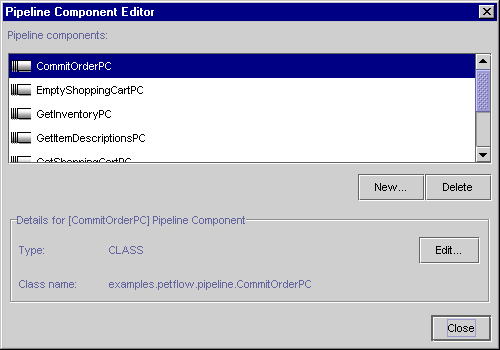
    4. Click the Pipeline Component Editor button. The Pipeline Component Editor window opens, as shown in Figure 2-5.

      Figure 2-5 Pipeline Component Editor


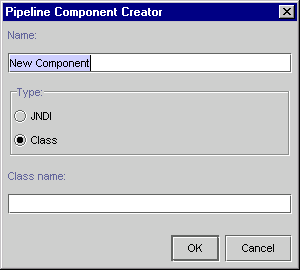
    5. In the Pipeline Component Editor window, click the New button. The Pipeline Component Creator window opens, as shown in Figure 2-6.

      Figure 2-6 Pipeline Component Creator


    6. In the Name field, enter "ConvertOrderRepPC".

    7. Select Class as the Type.

    8. Enter the following in the Class name field:

      examples.wlcs.sampleapp.order.pipeline.ConvertOrderRepPC

    9. Click the OK button. The Pipeline Component Creator window closes.

    10. In the Pipeline Component Editor window, click the Close button.

    11. In the Properties Editor, select ConvertOrderRepPC from the pop-up list, as shown in Figure 2-7. The Pipeline Component Node changes from Pipeline Component to ConvertOrderRepPC.

      Figure 2-7 Properties Editor—Component Selection


  9. Connect the ConvertOrderRepPC node to the Abort Exception node, as follows:

    1. Click the Exception tool.

    2. Position the transition by moving the mouse to bottom edge of the CovertOrderRepPC node. A solid orange square indicates an acceptable connection location, and the cursor changes to indicate a transition addition.

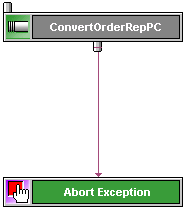
    3. Hold, and drag the mouse to the Abort Exception node. Release the mouse to connect the transition to the Abort Exception node (Figure 2-8).

      Figure 2-8 ConvertOrderRepPC - Abort Exception Connection


    4. Select the Exception event. The event line turns orange.

    5. In the Properties Editor, select the second column (Figure 2-9), and enter the package name to the exception class, as follows:

      com.bea.p13n.appflow.exception.PipelineException

      Figure 2-9 Properties Editor—Exception Value


  10. Make the ConvertOrderRepPC node a Root Node, as follows:

    1. Click the Root Node Tool.

    2. Move the arrow over the ConvertOrderRepPC node. It changes to a green rectangle.

    3. Click the green rectangle on the ConvertOrderRepPC node. The node is marked with a green stripe to the right of the name, as shown in Figure 2-10.

      Figure 2-10 ConvertOrderRepPC—Completed


  11. To save the new Pipeline, select File -> Save from the E-Business Control Center Main toolbar.

Step 2: Adding the New Pipeline Component to the Webflow

This section contains step-by-step instructions for using the Webflow Editor in the E-Business Control Center to add the sendOrderToWLI Pipeline to the sampleapp_order Webflow.

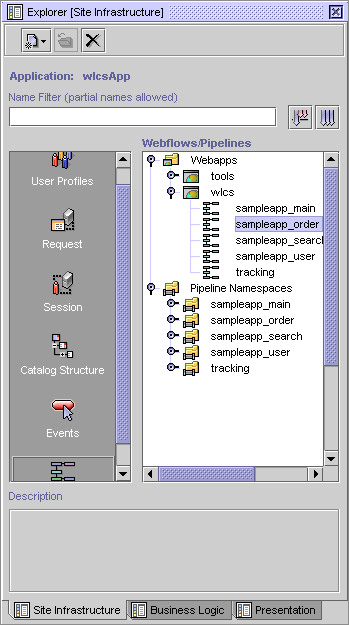
  1. In the right pane of the Explorer, open the wlcs Webflow, and then double-click sampleapp_order, as shown in Figure 2-11.

    Figure 2-11 Explorer Window: Webflows/Pipelines

    .
     

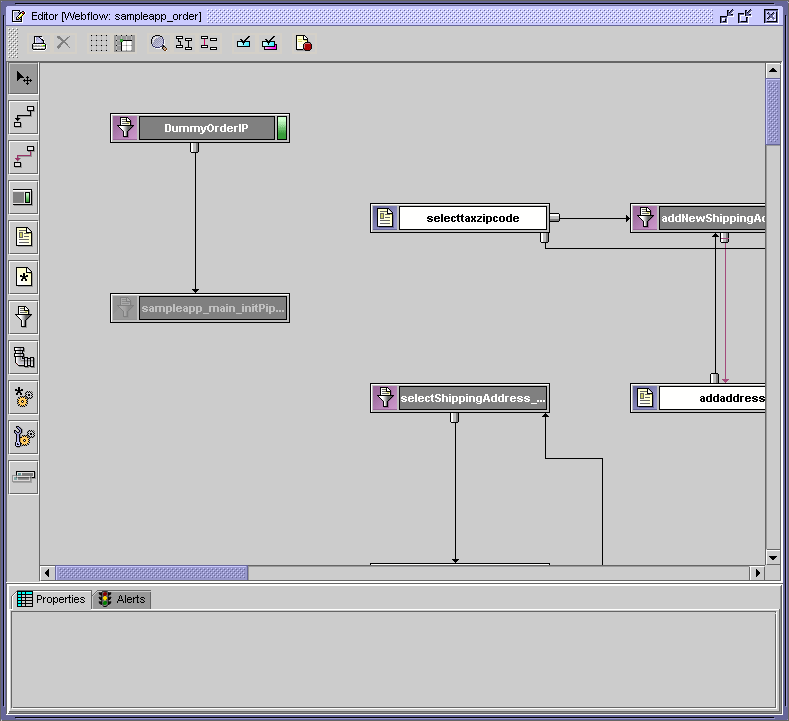
    The Webflow editor opens as shown in Figure 2-12.

    Figure 2-12 Editor [Webflow: sample_order]—Top


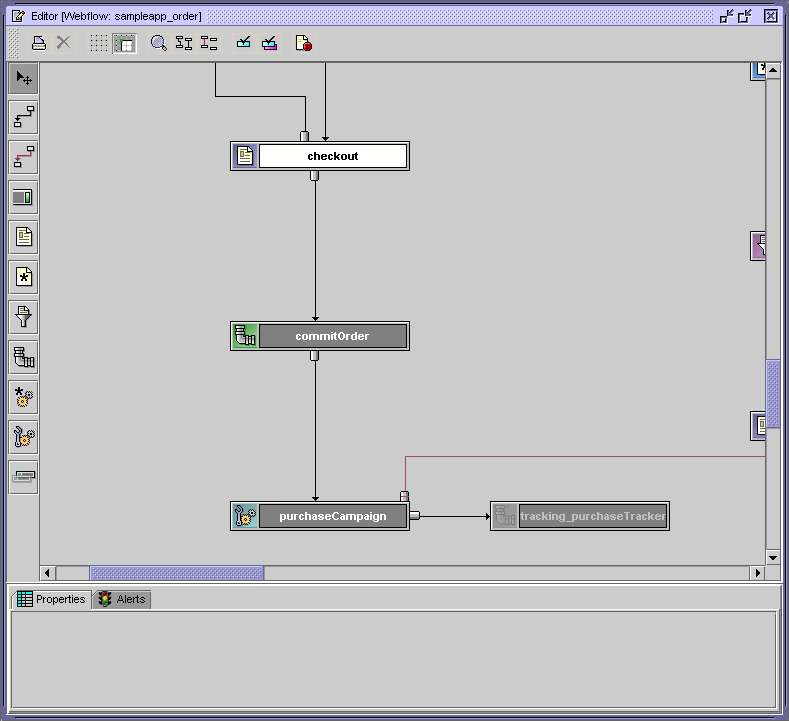
  2. Scroll down to near the bottom left of the canvas, as shown in Figure 2-13.

    Figure 2-13 Editor [Webflow: sample-order]—Bottom


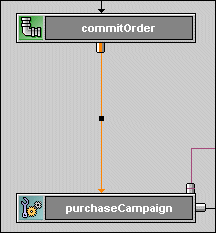
  3. Select the event between the CommitOrder and purchaseCampaign nodes, as shown in Figure 2-14, and then click the Delete button.

    Figure 2-14 Event Selection


  4. Add the sendOrderToWLI Pipeline to the Webflow, as follows:

    1. Click the Pipeline Node tool. Cross-hairs appear in the Webflow Editor Canvas.

    2. Place the cross-hairs between commitOrder and tracking_purchaseTracker nodes, and then click. The new Pipeline Node is inserted on the Editor canvas in that location.

    3. In the Properties Editor, select the second column of the pipeline-name* row, and then select sendOrderToWLI from the pop-up list, as shown in Figure 2-15.

      Figure 2-15 Properties Editor—Component Selection


  5. Connect the sendOrderToWLI Pipeline node to the other Pipeline nodes, as follows:

    1. With the Event tool connect the commitOrder node to the sendOrderToWLI node, click the Event you just created, and then in the Properties Editor -> Properties tab, change the name of the event to "success" and then press Enter.

    2. With the Event tool, from the right Connection Port on the top of the sendOrderToWLI node, connect the sendOrderToWLI node to the tracking_purchaseTracker node.

    3. Click the Event you just created, then in the Properties Editor -> Properties tab, change the name of the event to "success" (if necessary), and then press Enter.

    4. Using the Exception tool, from the left Connection Port on the top of the sendOrderToWLI node, connect the sendOrderToWLI node to the sampleapp_main_error Presentation Node, which is located near the middle right of the Webflow.

    5. Click the Exception you just created, then in the Properties Editor -> Properties tab, change the name of the exception to "com.bea.p13n.applfow.exception.PipelineException" if necessary, and then press Enter.

    6. Using the Exception tool, make a second connection from the sendOrderToWLI node to the sampleapp_main_error Presentation Node.

    7. Click the Exception you just created, then in the Properties Editor -> Properties tab, change the name of the exception to "java.rmi.RemoteException" and then press Enter.

      Figure 2-16 shows the Webflow Editor canvas after this process is completed. The nodes have been moved to make the drawing easier to see.

      Figure 2-16 Event Transitions


Note: You can move the Connection Ports, add elbows, and route the transitions. For more information, see "Using the Webflow and Pipeline Editors" in the Guide to Managing Presentation and Business Logic: Using Webflow and Pipeline.

  1. To save the changes, select File -> Save from the E-Business Control Center Main toolbar.

Step 3: Synchronize the Webflow to the Application

The Webflow and Pipeline Component that you just added must be synchronized to the wlcs application in order for the Example to work.

Warning: All application data is synchronized at once. If you and other developers concurrently synchronize data to a single enterprise application, it is possible to overwrite each others' work or create sets of changes that are incompatible and difficult to debug. To prevent this possibility, synchronize to separate instances of your application. For more information on how to set up your development environment, see "Milestone 4: Set Up a Development Site" in the Strategies for Developing E-Business Web Sites documentation.

To synchronize the new Pipeline Component and the modified Webflow, take the following steps:

  1. Start WebLogic Portal.

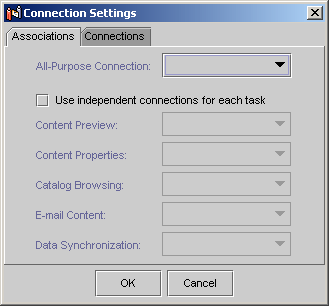
  2. After WebLogic Portal starts, in the E-Business Control Center, go to Tools -> Connection Settings. The connections Settings dialog box appears, as shown in Figure 2-17.

    Figure 2-17 Connections Settings


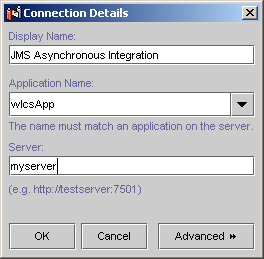
  3. In the Connection Settings dialog box, click the Connections tab, and then select New. The Connection Details dialog box appears, as shown in Figure 2-18.

    Figure 2-18 Connection Details


  4. In the Display Name field enter any name you want, select wlcsApp from the Application Name drop list, enter the name of your server, and then click the OK button. The Connection Details dialog box closes.

  5. In the Connection Setting dialog box, click the OK button. The dialog box closes.

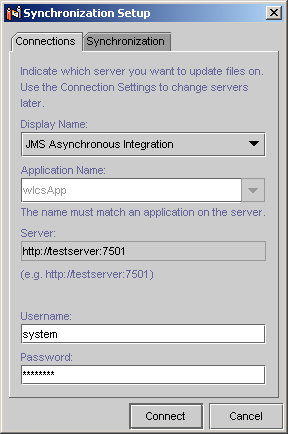
  6. In the E-Business Control Center, click the Synchronize button. The Synchronize Setup dialog box appears, as shown in Figure 2-19.

    Figure 2-19 Synchronization Setup


  7. From the Display Name drop list, select the name you created in the Connection Details dialog box, enter your Username and Password for WebLogic Portal, and then click Connect. The Checking for Incomplete Files dialog box appears.

  8. In the Checking for Incomplete Files dialog box, click the Continue button, even if incomplete documents exist. The Synchronizing dialog box appears.

  9. After synchronizing finishes, click the Close button.

This completes the synchronization procedure. How to set up the WebLogic Integration part of the Example and verifying successful execution of the purchase order is described in WebLogic Integration Interoperability Sample.


back to top previous page next page