|
|
|
|
|
|
Developing an E-Business Web Site
WebLogic Portal is designed to enable quick, efficient development cycles. Using its services, your development team can take advantage of the scalability and reliabilty of the J2EE platform without having to write large amounts of Java code.
To enable you to develop, launch, and maintain e-business Web sites, WebLogic Portal provides the following resources (see Figure 1-1):
As Figure 1-1 illustrates, the Web application that you develop is one module in a larger enterprise application. With this modular approach, your development efforts focus on implementing your business model, and BEA provides the remaining infrastructure and tools for deploying and managing your Web application.
Figure 1-1 Your Web Application in Context
To develop your Web application efficiently, you can arrange iterative development cycles with multiple development roles. Some of these cycles can be completed concurrently. This document recommends a general workflow for developing your Web application and suggests roles for your development team. The recommendations are based on dependencies (that is, some tasks must be completed before others can begin) and on the experience of WebLogic Portal developers. The following milestones indicate major groupings of tasks and suggests checkpoints for testing your progress: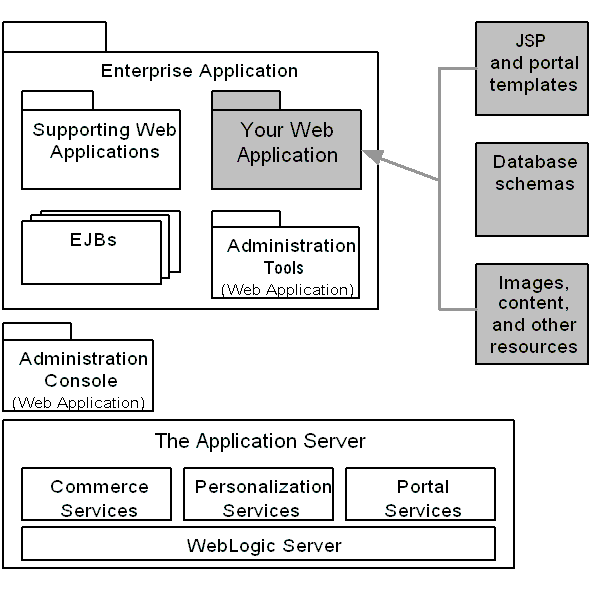
Milestone 1: Analyze Business Needs and Design a Prototype
The key to a successful e-business is understanding your business needs and transferring them into a model that a Web site can support. Start your project by thoroughly analyzing your business needs, creating a storyboard or usability walkthrough that represents your business model, and comparing the model to the services that WebLogic Portal provides.
Go through these steps iteratively and increase the amount of detail in each iteration. When you have achieved a level of detail that includes specific pages, or portals and portlets, design a prototype of your Web site. (See Figure 1-2.)
Figure 1-2 Process for Designing a Prototype
This milestone includes the following tasks: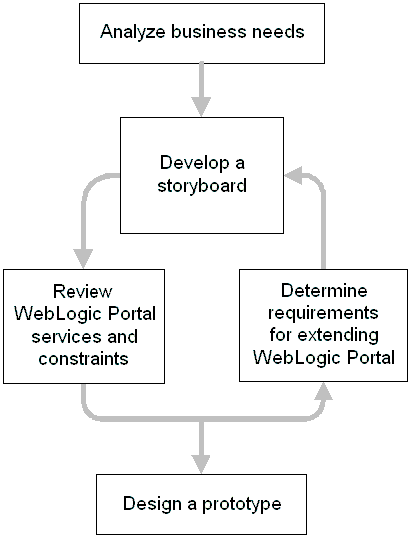
Develop a Storyboard
To visualize how you and your customer conduct business on your site, develop storyboards and use cases.
Your storyboard should provide the following information:
Review WebLogic Portal Services and Constraints
WebLogic Portal provides several sample enterprise applications, each of which features a specific set of WebLogic Portal services. In addition to demonstrating key product features, the sample applications provide a starting point (reference) for your own development. Depending on your business needs, you can adopt the basic structure of one of the sample applications. Then, as your needs change, you can make more significant modifications and use APIs to extend the functionality.
To view the reference applications, install WebLogic Portal on a computer that all team members can access via HTTP. Then do the following:
When WebLogic Portal starts successfully, it displays messages that are similar to the following examples:
<Oct 15, 2001 9:20:13 AM MDT> <Notice> <Management> <Application Poller not started for production server.>
<Oct 15, 2001 9:21:49 AM MDT> <Notice> <WebLogicServer> <ListenThread listening on port 7501>
<Oct 15, 2001 9:21:49 AM MDT> <Notice> <WebLogicServer>
<SSLListenThread listening on port 7502>
<Oct 15, 2001 9:21:51 AM MDT> <Notice> <WebLogicServer> <Started WebLogic Admin Server "portalServer" for domain "portalDomain" running in Production Mode>
Open a Web browser and enter one of the following URLs, where IP-address is the IP address for the computer that is running the WebLogic Portal instance:
For more information about the reference applications, refer to the following:
Determine Extension Requirements
Because each e-business Web site presents a unique set of requirements and constraints, you can extend or replace most of the services that WebLogic Portal provides.
For information on a few of the features that are commonly extended, refer to the following:
Design a Prototype
After you review the sample enterprise applications, design an outline (prototype) of your e-business Web site. Your design should include the following information:
Milestone 2: Create a Base Configuration
After designing a prototype, install WebLogic Portal on a separate machine. Then use the files in this installation to complete the following tasks:
Create a Rudimentary Web Application
To start your development process, create a Web application that is based on your prototype design. The application should include the following components:
The Web application does not need to function at this point in the development cycle. For information on creating a Web application, refer to "Assembling Your Web Application" in the Deployment Guide.
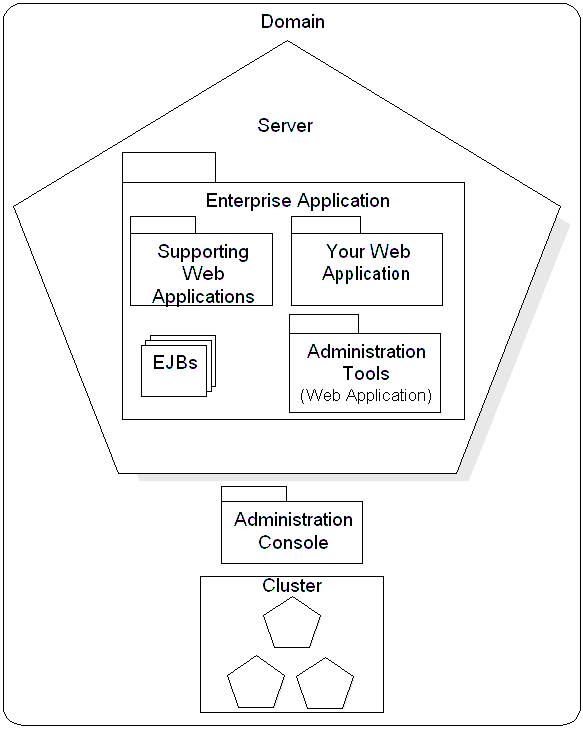
Set Up Infrastructure and Tools to Support Your Web Application
Next, you must set up an environment that provides the infrastructure and tools for deploying and managing your Web application. The environment contains the following components (see Figure 1-3):
Figure 1-3 Infrastructure for Your Web Application
For more information, refer to the following:
Set Up the Database Repository and Load Sample Data
WebLogic Portal uses a database to store your business data such as customer IDs and profiles, catalog items, and payment and order histories.
The reference enterprise applications provide a Cloudscape RDBMS that is loaded with sample data. This database is for demonstration purposes only. For your development and production environments, set up an RDBMS type that is listed in the "Supported Platforms" section of the Installation Guide.
To set up your RDBMS, WebLogic Portal provides scripts that create schemas and other data structures. It also provides scripts that can load the sample data into your database. We recommend that you load the sample data and use it to verify that the system functions properly.
For information on setting up the database repository and loading sample data, refer to the Deployment Guide.
Set Up Developer Security
When you install WebLogic Portal, it provides a set of default user IDs and passwords that provide access and modification permissions for your application's resources. Depending on your security needs in the development environment, you can set up additional user IDs and passwords. Different types of resources require different permissions schemes:
Add the new user profiles to the SystemAdministrator group. Any user profile in the SystemAdministrator group can use all the features available in the WebLogic Portal Administration Tools. In other words, authenticated users are "superusers;" the application permits them to make all possible modifications and there are no restrictions based on the user's organizational role. For information on starting and logging in to the WebLogic Portal Administration Tools, refer to "WebLogic Portal Administration Tools" in the WebLogic Portal Architectural Overview.
Note: When you start WebLogic Server, it always refers to the user IDs and passwords that are in the fileRealm security realm. After the server starts, it retrieves its configuration and uses the wlcsRealm security realm for all subsequent requests for authentication.
For more information, refer to the following:
Verify the Configuration
To verify that your domain and enterprise application are configured properly, start the server and address any error messages that WebLogic Portal displays. For information on debugging your domain, refer to the Deployment Guide and the WebLogic Server Administration Guide.
Milestone 3: Place Files Under Source Control
After you create a base configuration, we recommend that you place it under source control.
This section contains the following subsections:
Files for the Domain and Server
To control your domain and server configurations, place the files that are listed in Table 1-1 under source control.
Files for the Enterprise Application and Web Application
To control the sources for your enterprise application, place all files in the applications/yourApplication directory tree under source control with the following exception:
Any directories under applications/yourApplication/WEB-INF with names that start with _tmp_war contain compiled versions of your Web applications. WebLogic Portal generates these directories when you start a server. You do not need to place these generated directories under source control.
If you created a skeletal enterprise application as described in Milestone 2: Create a Base Configuration, this directory tree contains a deployment descriptor and the beginnings of your Web application. These components will change frequently during development.
The directory tree also contains EJBs and helper Web applications. While we recommend that you do not modify these modules, they are an integral part of your enterprise application and merit inclusion in a source control system. For example, different enterprise applications that you create might require different sets of EJBs. In addition, new releases of WebLogic Portal might include new or modified EJBs and Web applications. If this occurs, you can use your source control system to keep track of which version EJB belongs in a specific enterprise application.
Data from the E-Business Control Center
The E-Business Control Center creates and maintains such data as customer types (customer segments), promotional campaigns, portal and portlet data, and logic for displaying personalized ads. The E-Business Control Center organizes its data in a directory tree of XML files. (See Figure 1-4.)
Figure 1-4 Data from the E-Business Control Center
Each installation of the E-Business Control Center creates and maintains its own directory tree on the local host. Because this data defines the behavior of your Web application, it is essential that you place this directory under source control. For more information about the files and file types that the E-Business Control Center creates, refer to "Synchronizing Application Data" in the Deployment Guide. Other Files and Directories The PORTAL_HOME/db directory contains scripts that you use to create the WebLogic Portal database schema for your development and production database. In most cases you need to modify these files to support your specific environments. To keep track of your modifications, and to maintain separate sets of these scripts, place all of the files in this directory under source control with the following exceptions: WebLogic Portal generates log files to contain messages from the various server instances. While it is not necessary to place log files under source control, we recommend that you make sure the log files are backed up or otherwise safeguarded. You determine where log files are located when you create a domain and server configuration. For More Information Refer to the following topics: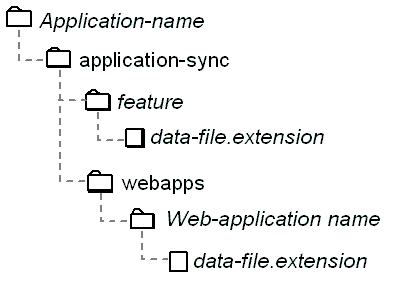
The PORTAL_HOME/db/cloudscape and PORTAL_HOME/db/data directories contain data for the sample Cloudscape database. Placing these directories under source control is optional, depending on how heavily you rely on the sample database in your development environment.
Milestone 4: Set Up a Development Site
When multiple developers work concurrently on a single set of source files and business documents, they can overwrite each others' work or create sets of changes that are incompatible and difficult to debug.
To facilitate concurrent development, we recommend the following model:
This section provides an example in which an Application Assembler sets up a site for developing an enterprise application named Bank. The Bank enterprise application includes a Web application named Invest, which provides customers the ability to manage their investments online. A Business Engineer (BE) named Pat creates campaigns and customer segments for the enterprise application while a developer named Mauricio creates Webflows for the Invest Web application. To prevent the introduction of incompatible changes and to facilitate debugging, each developer works with a separate E-Business Control Center and separate instance of the enterprise application.
This section contains the following subsections:
Setting Up the Development Site (Example)
Figure 1-5 Two Instances of Bank Enterprise Application
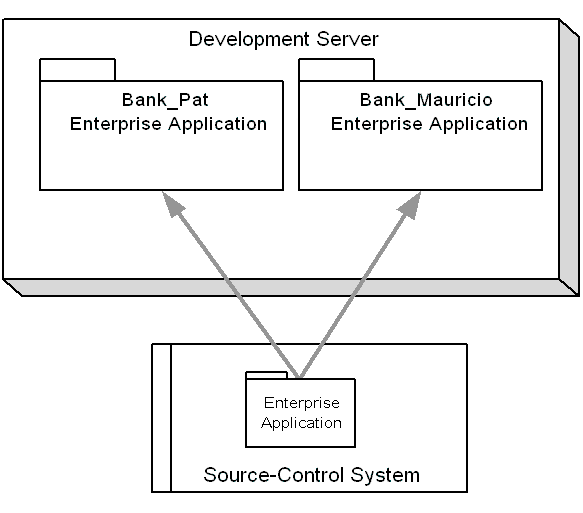
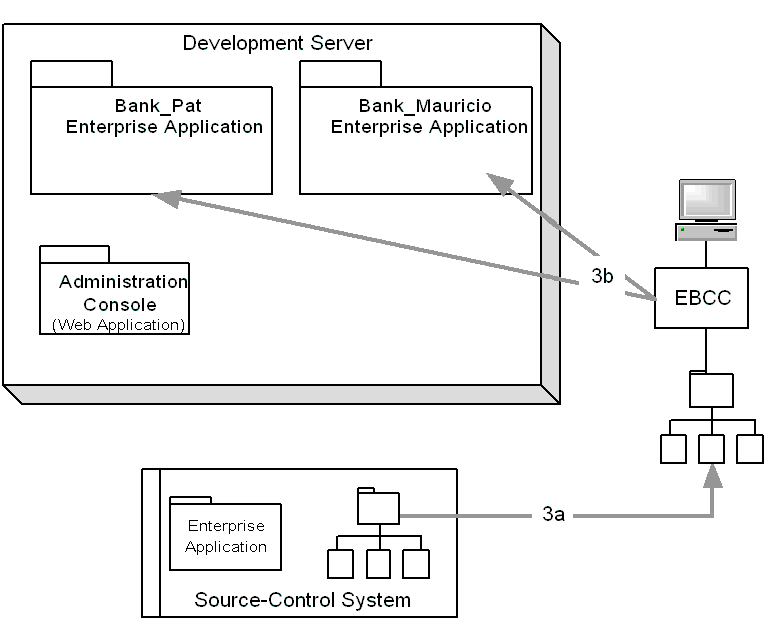
Figure 1-6 Deploy Application Data
Concurrent Development (Example)
After a System Administrator sets up the development environment, Pat and Mauricio begin working concurrently on the Bank application.
Note that each developer starts with the same data that the Application Assembler used to synchronize the enterprise applications.
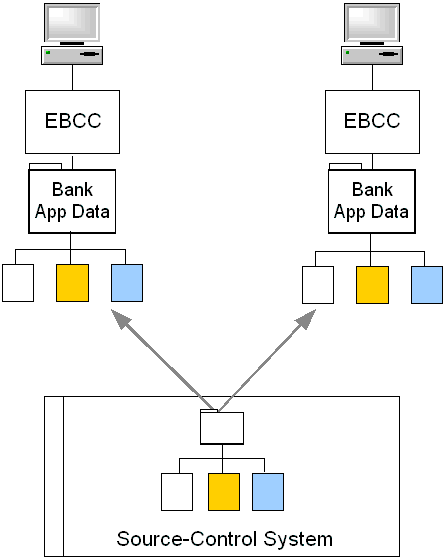
Figure 1-7 Update and Check Out Source Files
Figure 1-8 Deploy Modifications to Web Applications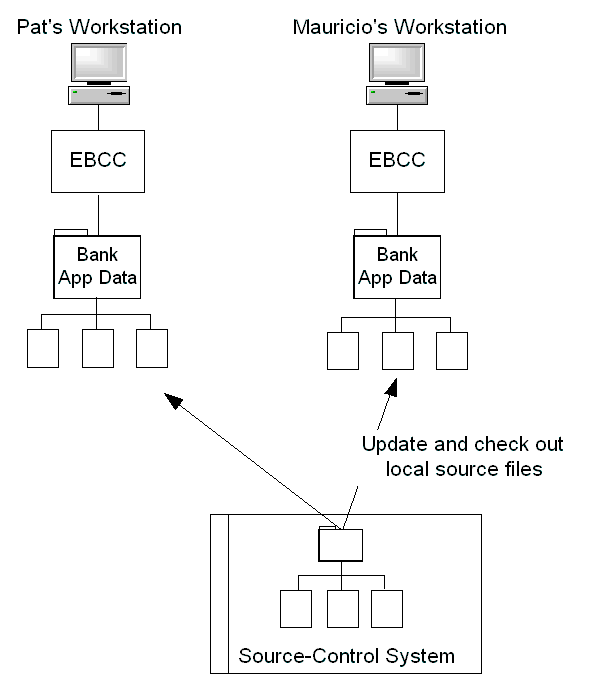
Figure 1-9 Check In Modified Files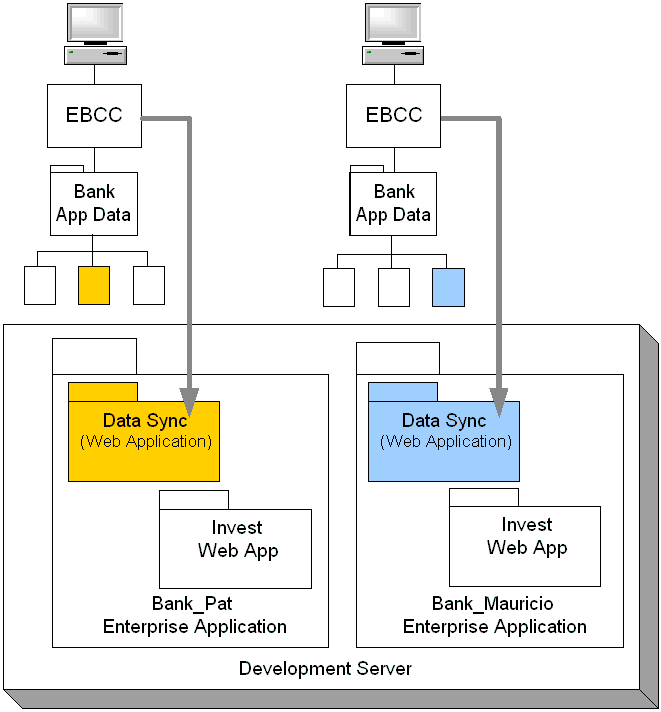
For example, Pat sets up a placeholder that Maceo, another BA, uses in a campaign. Pat creates the placeholder and checks it in to the source control system. Then Maceo updates his workstation and uses Pat's placeholder in his campaign. (See Figure 1-10.) Figure 1-10 Update Workstations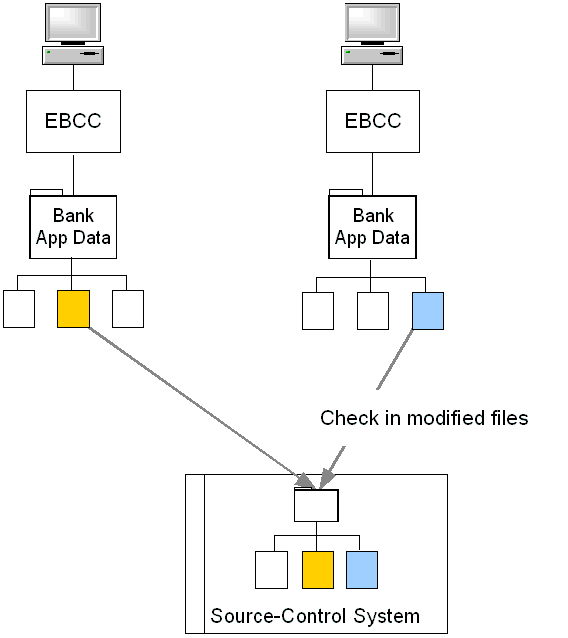
For more information, refer to the following:
Milestone 5: Set Up Basic Services
WebLogic Portal provides a collection of services with specialized functions. You can limit your development efforts to only the services that you need to support your business model. This milestone sets up the basic services upon which most other services depend. It includes the following tasks:
Design the Presentation for Your Site
A Web designer or usability engineer uses a library of components from the E-Business Control Center to design portals and portlets for your Web application.
The library includes design elements (such as graphics, skins, and layouts) and a set of functional portlets. Designers can modify the default components in the library or add their own design elements and portal definitions.
For more information, see Getting Started with Portals and Portlets.
Design the Data Flow for Your Site
Designing the data flow consists of two phases:
Figure 1-11 WebFlow Editor in the E-Business Control Center
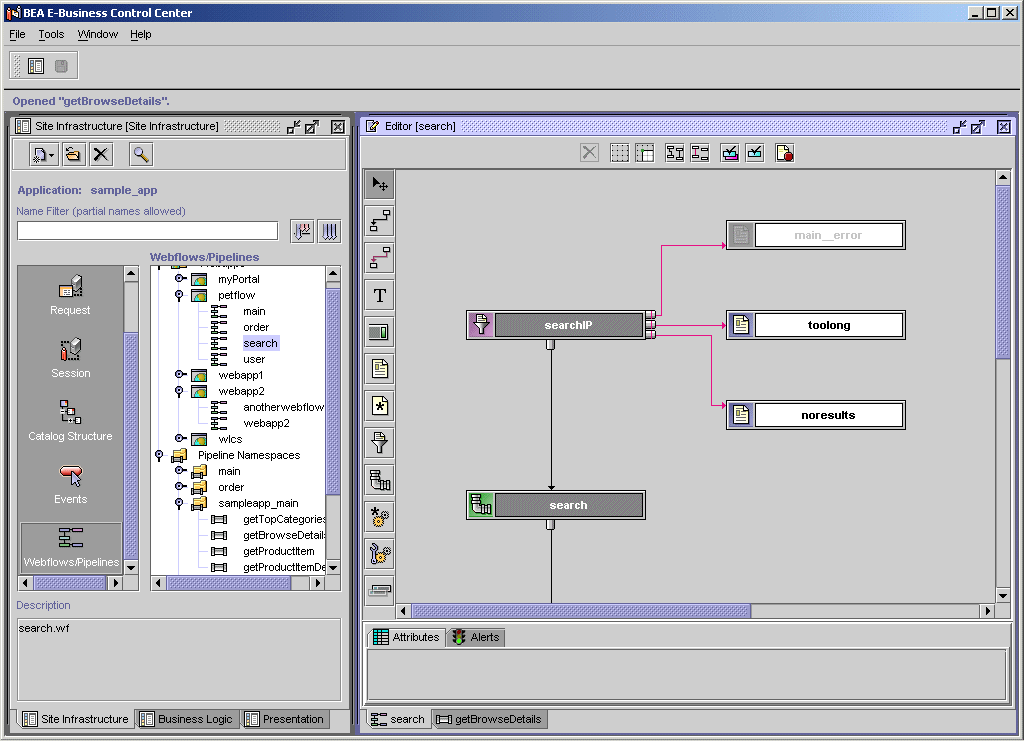
To set up Webflows, analyze your business use cases and determine how you want customers and data to flow through your site. For example, after customers place an item in the shopping cart, determine whether you want them to go to the product catalog or to the checkout page.
When designing the Webflow, make sure that you consider which pages are available to anonymous customers and which pages require customers to log in to your site. Balance the need for securing data with the need to make your site easy to navigate and perform quickly.
For information on designing Webflow and Pipelines, refer to the Guide to Managing Presentation and Business Logic: Using Webflow and Pipeline
.Set Up Customer Profiles
If you want to store secured data, such as shipping addresses and credit card information, or provide access to sensitive business data, you must set up customer profiles.
A customer profile is a schema that organizes the data that you collect and store about a customer. WebLogic Portal uses customer profiles to do the following:
At a minimum, a customer profile must contain a user ID and password and it must belong to a group profile. You use group profiles to specify access privileges for a collection of customers. For example, you can place your retail customers in one group and your wholesale customers in another group. You can give each group access to different sets of resources on your site. When a customer logs in to your site, WebLogic Portal uses the user ID and password from the customer profile to verify the customer's identity. After WebLogic Portal authenticates the customer, it determines which group profile the customer belongs to.
WebLogic Portal security consists of several layers, including customer and group profiles and J2EE security roles, which enable you to declare a set of pages in your Web application that can be accessed only by customers in specific roles. For more information about WebLogic Portal security, refer to "Security" in the WebLogic Portal Architectural Overview.
In addition to user IDs and passwords, a customer profile can store other information that is pertinent to your business needs. For example, you can store credit card information and billing and shipping addresses. You can also collect and store data that you use to personalize the information that your customer sees. For example, if you store data about the types of mutual funds in which your customer invests (conservative, moderate, aggressive), you can present content, advertisements, and additional fund recommendations that reflect each customer's preference.
Developing Profiles and Property Sets
To develop customer and group profiles, analyze your business needs and determine which information (properties) you need to store about your customers. Make sure that your profiles contain sufficient properties for you to accurately target campaigns, discounts, and advertisements and other types of content.
Then organize the properties into sets of related information. For example, you could create one property set that stores information about customers' investment preferences and another property set that stores customers' billing and shipping preferences. Property sets modularize the data in your profiles. For any given application, you can use only the property sets that the application requires for its particular business model. All properties in your customer and group profiles must belong to a property set.
To create property sets, use the E-Business Control Center. (See Figure 1-12.)
Figure 1-12 Property Sets in the E-Business Control Center
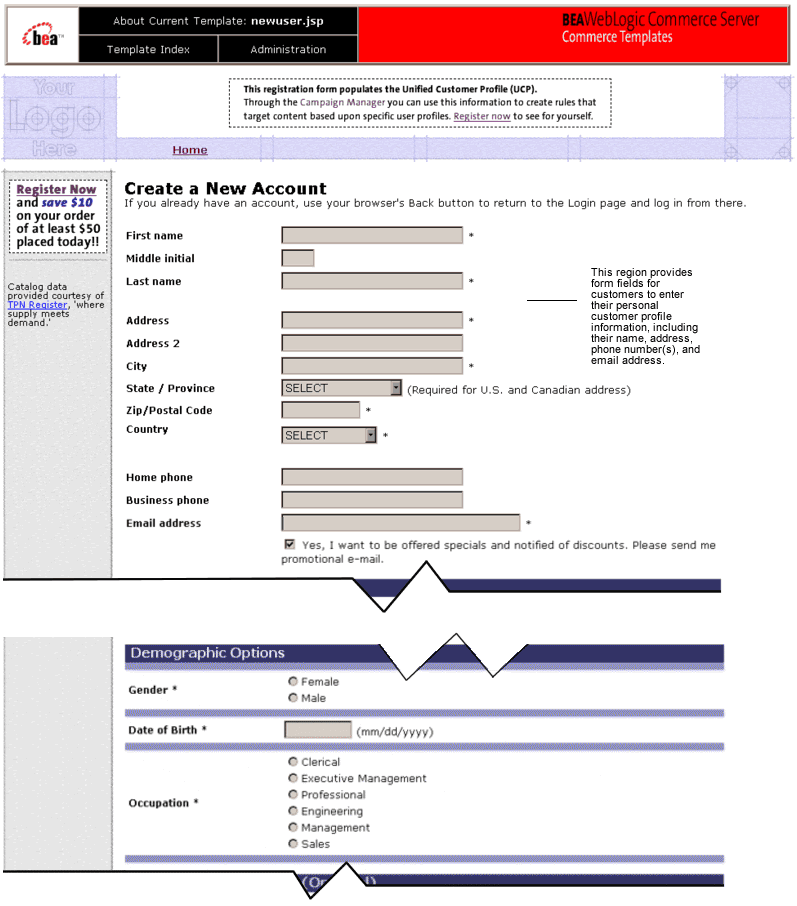
For more information, refer to "Creating and Managing Property Sets" in the Guide to Building Personalized Applications. Adding Customers and Customer Profile Data After you create profiles and property sets, you can do the following to collect data and add organize it according to the profile schema: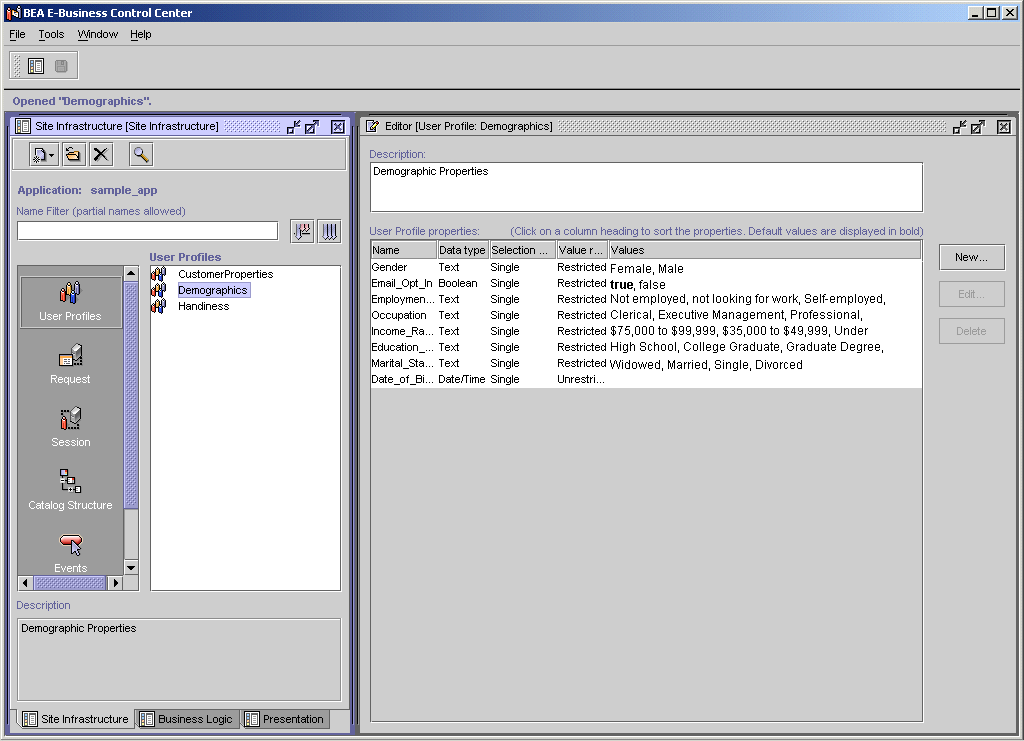
Figure 1-13 newuser.jsp Template
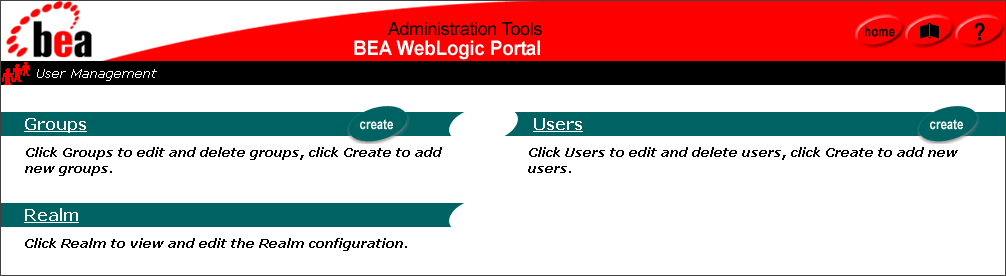
To manage customers and the data in the customer and group profiles, use the WebLogic Portal Administration Tools. Figure 1-14 shows the User Management screen in the WebLogic Portal Administration Tools.
Figure 1-14 WebLogic Portal Administration Tools—User Management Screen
Note: The E-Business Control Center creates the schema for profile data; the WebLogic Portal Administration Tools manages the data that is in the profile. Develop Customer Segments A customer segment is a set of criteria for dynamically grouping customers. You can use data from customer profiles, such as product preferences and age, as well as dynamic properties, such as the number of products a customer has purchased from the site during the current session. Note these important distinctions between customer and group profiles and customer segments:
You create customer segments in the E-Business Control Center. (See Figure 1-15.)
Figure 1-15 Customer Segments Window
Use customer segments in combination with the Event and Behavior Tracking service to trigger actions on your Web site and to keep track of how customer segments react to product offerings on your site. The Event service is a mechanism for notifying other WebLogic Portal services when something has happened on your Web site. It keeps track of such things as when a customer begins a session and when a customer clicks on an ad banner. Events provide a detailed and comprehensive view of the entire customer life cycle across your e-business site. The Event service passes messages to the Behavior Tracking service, which records the event data to the RDBMS repository. This information can then be used by data-mining systems to analyze the behavior of your Web site visitors. For more information, refer to the following: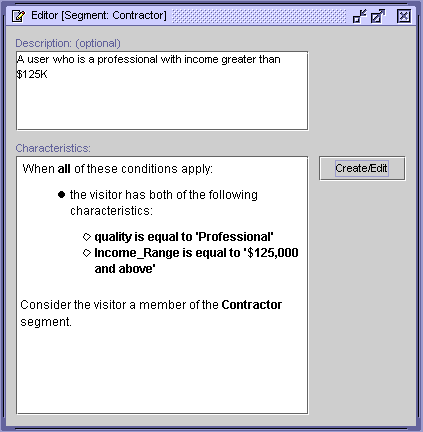
Set Up the Product Catalog
All commerce features rely on the product catalog. It organizes the products that you offer and provides descriptions and pricing information. The WebLogic Portal catalog provides tables that are located in the server's RDBMS repository. The tables and schema determine which categories are in the catalog's hierarchical organization and which information the catalog stores about your products. WebLogic Portal also provides sample data that you can use while developing your catalog and the JSPs that display its data to your customers.
To determine whether you need to customize the catalog, take the product tours and read the Guide to Building a Product Catalog. For information about customizing the catalog, refer to "Using the API to Extend the Product Catalog" in the Guide to Building a Product Catalog.
You can use the WebLogic Portal Administration Tools to add product categories and items to the catalog. Figure 1-16 shows an administration screen that a BE uses to edit the values for an existing item.
Figure 1-16 Sample Administration Screen
If you plan to add a large number of product categories and items to the catalog, use the DBLoader program. For more information, refer to the Guide to Building a Product Catalog. Set Up a Content Management System While you can use JSPs to present some information to your customers, to take advantage of all of WebLogic Portal features you must store the bulk of your site's content as documents in a content management system. Within the content management system, you use metadata (attributes) to describe each document. Then, to retrieve and display documents, developers use JSP tags that query the metadata. Before you set up a content management system, analyze the types of documents that your site displays and develop a schema for consistently describing them. Using a well-defined schema will help your developers create precise queries to retrieve the appropriate set of documents for a given context. For example, you can use a query in a JSP tag to find and display documents about sailing along the Maine coast. Depending on the data that you collect about your customers, you could create a query for one group of customers that finds documents about racing; for another group of customers you could create a query for documents about cruising. For sites with limited content personalization needs, WebLogic Portal includes a command-line utility called the BulkLoader. The BulkLoader can parse a directory of HTML files and store their URL address and metadata attributes in the WebLogic Portal RDBMS repository. If your site contains larger amounts of content and you want more control over the publishing and tagging of content, WebLogic Portal provides integrations with third-party content management systems. For more information about using content management systems to retrieve documents, refer to "Creating and Managing Content" in the Guide to Building Personalized Applications.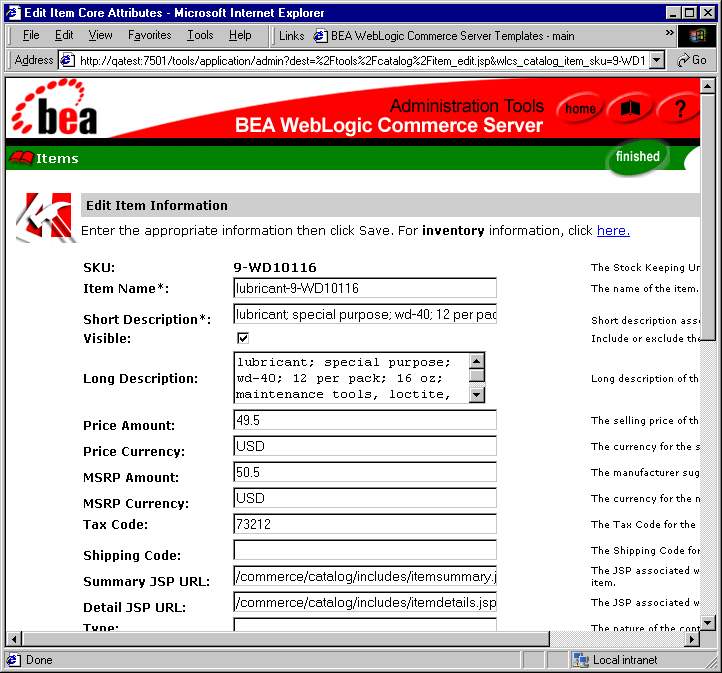
Milestone 6: Set Up Personalization, Commerce, and Campaign Services
After you set up basic services, you can complete any of the following tasks, depending on your business needs:
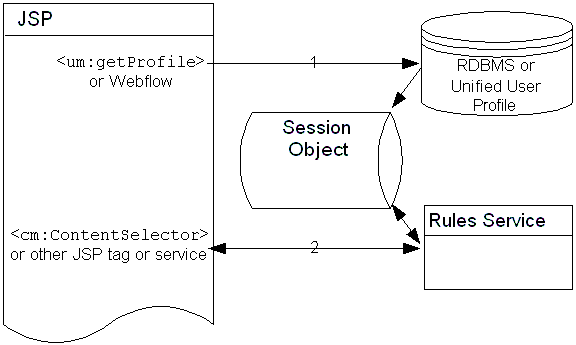
Add JSP Tags for Retrieving Personalized Content
WebLogic Portal provides several JSP tags that select and display content that is tailored to a customer. Before you can use these tags on a given JSP, you must retrieve the customer's profile data and place it in the customer's session object. Once the data is in the session object, other tags and services can use the Rules service to determine whether the customer is in a specific segment.
For example (see Figure 1-17):
Figure 1-17 Place Customer Profile in the Session
Once you place profile data in the session, you can use several methods to retrieve documents from the content management system. Table 1-2 lists some of the methods.
For more information, refer to the following topics in the Guide to Building Personalized Applications:
Set Up the Payment, Order, and Shipping Services
The Payment, Order, and Shipping services provide default implementations for the most common e-business order-related functions:
To set up these services, use the JSP, Webflow, and Pipeline templates from the reference e-commerce enterprise application.
For more information, refer to the Guide to Managing Purchases and Processing Orders.
Set Up Campaigns
You can use your WebLogic Portal Web site to run promotional campaigns. Campaigns use customer segments and real-time events to generate e-mail, ad, and discount actions that create personalized messages usually designed to motivate specific behavior. Most campaigns conceived in your organization will be developed within the context of a strategic marketing objective. For example, you may want to run campaigns aimed at increasing your average order size by employing cross-sell or up-sell tactics.
To create and deploy a campaign, a Business Engineer adds tags to JSPs, loads ads and other documents into the content management system, and sets up the Mail Service for campaigns.
Then BAs use the E-Business Control Center to complete the following tasks:
For more information, refer to the following:
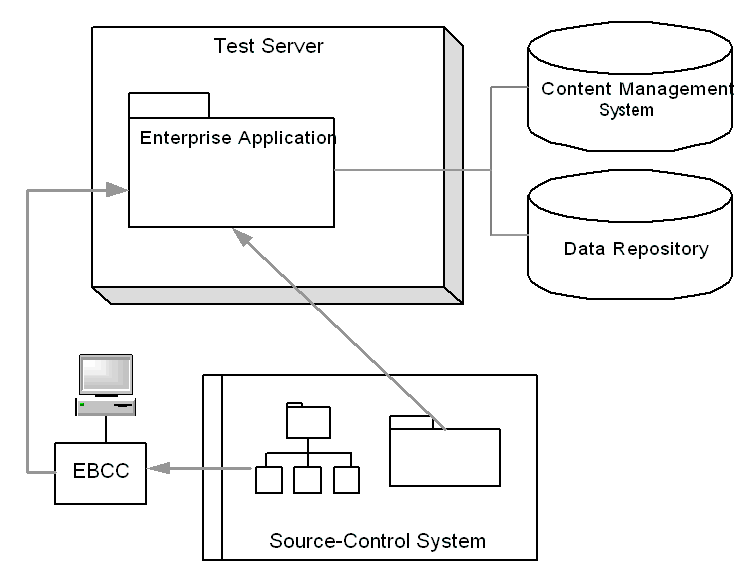
Milestone 7: Deploy in a Test Environment
After your developers complete significant development tasks, deploy their modifications onto a testing server and implement system tests. To set up a testing environment, do the following (see Figure 1-18):
Figure 1-18 Set Up Test Environment
Milestone 8: Tune Performance for a Production Environment
Most development environments trade Web site performance for development conveniences. For example, time-to-live intervals are biased towards showing modifications immediately, which can adversely affect performance but is desirable for developers.
When you have completed a development iteration, refer to the Performance Tuning Guide and "Configuring the Rules Framework" under "Introducing the Rules Manager" in the Guide to Building Personalized Applications for information on tuning your server and application for production-level performance.
Consider running performance tests periodically to identify potential bottlenecks as soon as possible.
Set Up a Clustered Environment
A WebLogic cluster is a group of WebLogic servers that work together to provide a powerful and reliable Web application platform. A cluster appears to its clients as a single server but it is, in fact, a group of servers acting as one. It provides two key benefits that are not provided by a single server: scalability and availability.
If you plan to set up a clustered production environment, we recommend that you test your application in a single-server environment first. Verify that the application functions properly in the less complex environment before testing the application on a cluster.
For information on setting up a cluster, refer to "Deploying Clusters" in the Deployment Guide and "Configuring WebLogic Servers and Clusters" in the WebLogic Server Administration Guide.
Milestone 9: Deploy in a Production Environment
When you are ready to make your application available to customers, consider compressing it into an EAR (Enterprise Application aRchive) file before you deploy it onto your production servers. Archiving your application simplifies administration, especially in a clustered environment. Instead of keeping track of the hundreds of files that make up your application, you need to manage only a single EAR file.
Note that you cannot incrementally update an EAR file. That is, you cannot insert a modified JSP into a deployed EAR file. Instead, you must re-archive the application and redeploy the EAR file.
For information on archiving an enterprise application, refer to "Assembling and Deploying Enterprise Applications" in the Deployment Guide.

|

|

|
|
|
|
Copyright © 2001 BEA Systems, Inc. All rights reserved.
|