12 Oracle Solaris Zones
Oracle Solaris Zones, previously known as Solaris Containers, are an integral part of the Oracle Solaris 10 operating system (OS). Zones isolate software applications and services using flexible software-defined boundaries. You can use zones to create private execution environments within a single instance of the Oracle Solaris 10 OS. Each environment has its own identity that is separate from the underlying hardware. Each environment behaves independently as if running on its own system, making consolidation simple, safe, and secure.
You build Oracle Solaris Zones by using the following technologies:
-
Solaris Resource Manager
-
Solaris Zones partitioning technology
About Oracle Solaris Zones
A zone is a virtualized operating system environment created within a single instance of the Solaris OS. Within a zone, the operating system is represented to the applications as virtual operating system environments that are isolated and secure. The applications run in different zones with complete isolation, while the underlying operating system resources are centrally managed and administered. This section describes the varieties of zones.
Global and Non-Global Zones
The Oracle Solaris 10 operating system supports two types of zones:
-
The global zone is the default operating system and has control over all the processes. A global zone always exists even when no other zones are configured.
-
Non-global zones, or simply zones , are configured inside the global zone. Zones are isolated from the physical hardware by the virtual platform layer. A zone cannot detect the existence of any other zones.
Each Oracle Solaris 10 system contains a global zone. The global zone is both the default zone for the system and the zone used for system-wide administrative control. All processes run in the global zone if no non-global zones are created.
-
Booting the global zone is equivalent to booting the system hardware.
-
Each zone, including the global zone, is assigned a zone name. The global zone always has the name "global".
-
Each zone is assigned a unique numeric identifier. The global zone always has the identifier ID 0.
-
Each zone has a path to its root directory that is relative to the global zone's root directory.
-
The global zone is the only zone from which a non-global zone can be configured and installed.
You can think of a zone as a box with flexible, software-defined walls. One or more applications can run in this box without interacting with the rest of the system. Because zones isolate software applications or services, applications that are running in the same instance of the Oracle Solaris OS can are managed independently of each other. For example, different versions of the same application can be run in separate zones.
Enterprise Manager Ops Center provides complete solution for managing your virtualized environment. Use Enterprise Manager Ops Center to do the following:
-
Create zones
-
Discover and manage existing zones
-
Manage zones such as booting, rebooting, shutting down, cloning, migrating and deleting zones.
-
Manage zone file systems, storage, networks and per-zone resource utilization.
Types of Non-Global Zones
You can create various types of non-global zones for different purposes.
By File Systems
Use the global zone to create the following types of non-global zones:
-
Sparse Root Zone – Contains a read/write copy of a portion of the file system that exists on the global zone. Other file systems are mounted read-only from the global zone as loop-back virtual file systems. When a sparse root zone is created, the global administrator selects which file systems to share with the sparse root zone in addition to the default read-only file systems:
/usr,/lib,/sbin, and/platform. All packages that are installed on the global zone are available to the sparse root zone; a package database is created and all files in the mounted file system are shared with the zone. -
Whole Root Zone – Contains a read/write copy of the entire file system that exists on the global zone. When a whole root zone is created, all packages that are installed on the global zone are available to the whole root zone; a package database is created and all files are copied onto the whole root zone for the dedicated and independent use of the zone.
-
Branded Zone – Supports different versions of Solaris OS for running applications. For example, you can install Solaris 8 or 9 in a branded zone.
Greenfield and Brownfield Zones
Zones that are created using Enterprise Manager Ops Center are referred to as greenfield zones and represented with the icon in the user interface. Zones that are were created using command line interface (CLI) are referred to as brownfield zones and represented with the icon in the user interface. For greenfield zones, the Enterprise Manager Ops Center has full access to the zone configuration data and provides complete management of the zone. For brownfield zones, Enterprise Manager Ops Center cannot detect the zone configuration and provides less support than the greenfield zones. The actions that are not available to brownfield zones are:
-
Edit zone configuration
-
Add file system
-
Add storage
-
Connect to networks
-
Migrate a zone
Depending on the requirement to manage a brownfield zone's file system, storage, networks or to migrate the zone, you can convert it to greenfield zone. You can use one of the following options to convert a brownfield zone:
-
Adopt zone
-
Clone zone
Limitations of Enterprise Manager Ops Center's Zone Management
-
Zones created by Enterprise Manager Ops Center must be administered only by Enterprise Manager Ops Center. You must not make changes or perform zone tasks using other utilities such as CLI. If you mix the management tools, Enterprise Manager Ops Center suspends the management of the zones.
-
If you use Live Upgrade to update the OS in a zone, you cannot use Enterprise Manager Ops Center to manage the zone. ABE is not supported for zones that were created using Enterprise Manager Ops Center. Live Upgrade operations are available only for global zone as a whole and not for individual zones. When you migrate a zone, ABE is not supported. If you have ABEs for zones, it is recommended to be removed before migration.
-
Zone management tasks such as Add File Systems, Add Storage, Connect Network and Edit Zone Configuration are enabled only if the zone is in the shut down state. However, the Migrate Zone and Clone Zone actions are enabled even when the zone is running.
Managing and Monitoring Global Zones
When you select a global zone in the Assets tree, Enterprise Manager Ops Center displays a set of tabs in the center pane:
-
Dashboard
-
Name
-
Description
-
Status
-
Server name
-
Running Time
-
Operating System
-
OS Health
-
Total CPU Threads
-
Tags
-
Membership Graph
-
Problem Status
-
Compliance reports
-
-
Summary
-
Name
-
Description
-
Status
-
Server name
-
Running Time
-
Operating System
-
Name service
-
Total CPU threads
-
Total CPU and memory utilization
-
Non-global zones and its status
-
-
Libraries
The Libraries tab lists all the storage and software libraries associated with the global zone. It also displays the local devices that are attached to the global zone. You can select the associated library and see the contents of the library and the non-global zones that are associated with it. You have the option to associate a library or to disassociate alibrary from the global zone.
-
Utilization
The Utilization tab displays charts for CPU, memory, swap, IO, and file system utilization. Kernal statistics such as memory allocation, paging, IPC, and CPU details are also displayed. The the top ten processes for CPU and memory usage are also included.
-
Networks
The Network tab lists all the networks that are assigned to the global zone. You have the option to assign more networks, unassign a network, and modify the physical connectivity of a network. The IPMP groups and link aggregation are also defined in this tab. For each assigned network, you can view the additional connectivity information and the zones that are using this network.
-
Problems
The Problems tab shows the unresolved problems that are reported for the global zone and a graphical representation of the problem composition. You can also view the corresponding alerts for each problem reported. See Problem Management.
-
Monitoring
The Monitoring tab shows the rules and values that are set for zone activity.
See Monitoring Profiles and Rulesfor detailed information about setting monitoring actions.
-
Charts
The Charts tab displays the CPU, memory and network utilization of the global zone. The data is collected in five-minute intervals and is displayed graphically. The utilization data is provided for different time intervals. See About Charts for more information about reading charts. The utilization data can be viewed in the following ways:
-
Total – Aggregated utilization data for all the zone including the global zone.
-
Kernal – Utilization data for the kernal process only.
-
Global – Utilization data for the global zone only.
The following utilization data are displayed:
-
CPU utilization – You can display the shared CPU utilization for each zone in the global zone.
-
Network utilization – The chart displays the total utilization for the all the zones including the global zone. Network usage is not available for each zone.
-
Memory utilization – The memory utilization is the physical, virtual, and locked memory in use by each zone.
-
File System Utilization – . The file system lists the root file system and other file systems corresponding to the zone paths in the global zone. You can select a file system and display the utilization rate for a historical period.
-
-
Terminal
The Terminal tab give you access to the console for a zone. Click the Enable the Console Connection icon to invoke the zlogin to the zone. Log into the zone using the zone user name and password. The zone console exists until you log out of Enterprise Manager Ops Center, click the Disable the Console Connection icon, or the global zone is shut down. You can click the Undock the Console icon to undock the console session from the Enterprise Manager Ops Center, making it available separately for your use.
-
Job
The Jobs tab lists the current and completed jobs for the global zone. See Job Management for more information about managing jobs.
-
Configuration
The Configuration tab lists the access points for the global zone. Access points are the resources associated with the operating system and are created as a result of discovery or when the agent starts up. This tab lists the Proxy Controller that connects the global zone to the Enterprise Controller. It also shows the status of the connection and the protocol used for the connection. You have option to unmanage or delete the discovered resources.
Managing and Monitoring Non-Global Zones
When you select a non-global zone in the Assets tree, Enterprise Manager Ops Center provides the following tabs in the center pane :
-
Dashboard
-
Name
-
Description
-
Status
-
Running Time
-
Operating System
-
OS Health
-
Host name
-
Total CPU Threads
-
Tags
-
Membership Graph
-
Problem Status
-
Compliance reports
-
-
Summary
-
Zone name and its state
-
Type of zone and the zone path
-
Hostname
-
Zone library and storage size
-
CPU model and utilization
-
File systems allocated to the zone
-
Storage size and usage
-
Hourly utilization chart of CPU and memory resources
-
-
Console
The Console tab gives you access to the console of a zons. Click the Enable the Console Connection icon to invoke the zlogin to the zone. Log into the zone using the zone username and password. The zone console exists until you log out of Enterprise Manager Ops Center, click the Disable the Console Connection icon, or the global zone is shut down. You can click the Undock the Console icon to undock the console session from the Enterprise Manager Ops Center, making it available separately for your use.
-
Utilization
The Utilization tab displays charts for CPU, memory, swap, IO, and file system utilization. Kernal statistics such as memory allocation, paging, IPC, and CPU details are also displayed. The the top ten processes for CPU and memory usage are also included.
-
Networks
For a greenfield zone, the Network tab lists all the networks that are assigned to the zone. You have the option to connect a network to a zone in the shutdown state and disconnect networks from a zone. The associated IPMP groups are also listed for the zone. This information is not available for brownfield zones.
-
Storage
For a greenfield zone, the Storage tab lists the root file system, the default file system of the zone. It also lists other file systems that were added to the zone. You cannot edit the read and write access to the root file system.
The Storage tab also displays the virtual disks that make up the zpool, which is created when you create a zone. The zpool consists of the virtual disks and LUNs used for storage. File systems are implemented as ZFS file systems and mapped to the storage.
From the Storage tab, you can add a file system to the zone and change an existing file system, delete a file system from the zone, and add more storage to a zone.
This information is not available for a brownfield zone.
-
Problems
The Problems tab lists out the unresolved problems that are reported for the zones and a graphical representation of the problem composition. You can also view the corresponding alerts for each problem reported. See Problem Management for more detailed information.
-
Monitoring
The Monitoring tab shows the rules and values that are set for zone activity.
See Monitoring Profiles and Rules for detailed information about setting monitoring actions.
-
Charts
The Charts tab displays the CPU, memory and network utilization of the global zone. The data is collected in five-minute intervals and is displayed graphically. The utilization data is provided for different time intervals. See About Charts for more information about reading charts. For a zone, the following utilization data are displayed:
-
CPU utilization – You can display the CPU utilization for the zone. The per-zone utilization data is collected by the extended accounting in the global zone.
-
Network utilization – The chart displays the total utilization for the all the zones including the global zone. Network usage is not available for each zone.
-
Memory utilization – The memory utilization is the physical, virtual, and locked memory in use by each zone.
-
File System Utilization – Whenever you create a zone, a zpool is created with the zone guest image name. The file system lists the root file system and other file systems that are added to the zone. You can select a file system and display the utilization rate for a historical period. The OS Details page lists all the file systems and the current utilization rate.
-
-
Job
The Jobs tab lists the current and completed jobs for the zone. See Job Management about managing jobs.
-
Configuration
The Configuration tab displays the information about the zone's configuration, depending on whether the zone is a greenfield zone or a brownfield zone.
For greenfield zones, the Configuration tab shows the CPU, memory caps, shared memory, scheduler and semaphore IDs.
For brownfield zones, the Configuration tab shows the the access points for the zone. Access points are the resources associated with the operating system and are created as a result of discovery or when the agent starts up. This tab lists the Proxy Controller that connects the non-global zone to the Enterprise Controller. It also shows the status of the connection and the protocol used for the connection. You have option to unmanage or delete the discovered resources.
Adopting a Zone
To convert a brownfield zone to a greenfield zone, adopt the brownfield zone. When you adopt a zone, you get access to the zone configuration data and greater ability to manage and monitor the zone. When you adopt a zone, you enable the following actions for the zone: Add Storage, Add File Systems, Migrate Zone, Replicate Zone, and Connect Networks to the zone.
During the adoption process, the zone is shutdown and then rebooted after adoption. A new zpool is created for the zone and the existing file system is copied to the zpool. You cannot add or delete a file system during the adoption process.
Note:
You cannot change the zone name.-
Verify that the zone is a brownfield zone.
-
Verify that the zone is in the managed state.
-
Verify that the zone is running.
-
Select the brownfield zone in the Navigation pane.
-
Click Adopt Zone in the Actions pane. A warning message is displayed.
-
Click OK to continue and to start the Adopt Zone wizard.
-
Select a local library or a NAS library to save the zone's metadata. The metadata is the zone's configuration, the virtual image. If you want to allow the zone to be migrated, choose a NAS library. Click Next.
-
(Optional) You can modify the zone descriptions and tags. Click Next.
-
Modify the Reserved and Quota size of the existing file system. Click Next.
-
Click the Add icon to associate a storage library with the zone.
-
Select a library from the list of libraries that are associated with the global zone. This library will store the data from the zone's operation. You can select the following types of library from the list. If you have the option to change the size, provide sufficient storage space to accommodate any new file systems added to the zone. Allocate 20% more than the required storage space for a good performance.
-
Local Library – It is the global zone's local storage disks. Select a local library and provide the virtual disk size. However, if you choose a local library for zone storage, the zone cannot be migrated.
-
Local Device – These are disks that are connected to the system that is running the global zone. Select a disk from the list. The size of the disks cannot be changed.
-
NAS Storage – Select a NAS Storage library from the list. Define the size of the virtual disk. You can modify the disk name.
-
Fibre Channel – Select a Fibre Channel library from the list. The LUNs for that library are listed under the Virtual Disk Name. Select a LUN from the list. You cannot modify the LUN size or create a new virtual disk image. The total size of the selected libraries are displayed as Currently Accumulated Storage in GB.
Click Next.
-
-
Review the summary of the attributes you chose and click Finish to adopt the zone.
When the adopt zone job completes, the following changes occur:
-
The brown icon of the zone changes to green.
-
The agent is installed on the zone and the zone will be in a managed state.
-
The actions for the zone such as Add Storage, Add File System, Replicate Zone and Connect Network are enabled in the actions pane. The Migrate Zone option is enabled only if the zone metadata and added storage are on the shared storage.
Editing Zone Configuration
Note:
You can edit the configuration of the non-global zone only if it has been created using Enterprise Manager Ops Center.You can modify the configuration of a zone to change the CPU or memory resources, scheduler, and the identity of the zone. When you modify the CPU and memory configuration, you must reboot the zone for the changes to take effect.
You can modify the following properties of a zone:
-
CPU Model – The CPU model can be shared or dedicated. For a shared CPU, you can modify the number of CPU shares allocated to the zone. For a dedicated CPU, you can edit the minimum and maximum dedicated CPU numbers. You can also set the relative importance of the zone compared to other zones when contending for CPUs.
-
Memory Caps – You can specify caps on various aspects of memory used by the zone. You can modify the caps set for physical, swap, and locked memory.
-
Scheduler – For shared CPU model, the scheduler is assigned to Fair Share Scheduler (FSS). For a dedicated CPU model, you can set the following scheduler attributes:
-
Fair Share Scheduler (FSS)
-
Fixed Priority (FX)
-
Interactive (IA)
-
Real-time (RT)
-
Timer Sharing (TS)
-
-
LightWeight Processes (LWP) – You can set the maximum number of LWPs simultaneously available to a zone.
-
Message IDs – Set the maximum number of message queue IDs.
-
Semaphore IDs – Set the maximum number of semaphore IDs.
-
Shared Memory IDs – Set the maximum number of shared memory IDs.
-
Shared Memory – Set the maximum amount of shared memory.
-
-
Select the zone from the Assets section in the Navigation pane.
-
Click Shutdown Zone from the Actions pane. Shutdown Zone window is displayed.
-
Click Shutdown Zone to shut down the zone immediately.
-
Select the zone in the Assets section of the Navigation pane. The Dashboard of the zone is displayed in the center pane.
-
Select the Configuration tab in the center pane. The current configuration of the zone is displayed.
-
Click Edit Configuration in the Actions pane. The Edit Zone Configuration window is displayed. Edit the following zone attributs, as required:
-
CPU Model
-
Scheduler
-
Memory Caps
-
LightWeight Processes
-
Message IDs
-
Semaphore IDs
-
Shared Memory IDs
-
Shared Memory
-
-
Click the Save icon in the center pane to save the changes.
-
Select the zone in the Assets tree, then click Boot Zone in the Actions pane or click the Boot Zone icon in the Zones pane.
-
Click Boot Now or click Boot Later.
You can modify the zone description and tags.
-
Select the zone from the Assets section in the Navigation pane.
-
Click Shutdown Zone from the Actions pane. Shutdown Zone window is displayed.
-
Click Shutdown Zone to shut down the zone immediately.
-
Select the zone in the Assets section of the Navigation pane. The Dashboard of the zone is displayed in the center pane.
-
Select Edit Attributes in the Actions pane. The following zone attributes can be modified:
-
Description
-
Tags
-
-
Click the Save icon in the center pane to save the changes.
-
Select the zone in the Assets tree, then click Boot Zone in the Actions pane or click the Boot Zone icon in the Zones pane.
-
Click Boot Now or click Boot Later.
Adding Storage to Zones
You can add storage only to greenfield zones. The storage is added to the zpool that is created for the zone. You cannot delete storage from the zpool.
-
Select the zone from the Assets section in the Navigation pane.
-
Click Shutdown Zone from the Actions pane. Shutdown Zone window is displayed.
-
Click Shutdown Zone to shut down the zone immediately.
-
Select the zone from the Assets section in the Navigation pane.
-
Click Add Storage in the Actions pane. As an alternative, select the Storage tab and click the Add Storage to Zone icon under Zpool and Storage. The Add Storage to the Zone window is displayed.
-
Click the Add icon.
-
Select a library from the list. The library can be a local storage, NAS, local device, or Fibre Channel library.
-
For a local and NAS library, enter a virtual disk name and specify the size of the disk. For a Fibre Channel library, select a LUN from the list. For local device library, select a disk from the Virtual Disk Name list. You cannot specify the size of the disk or the LUNs. The Additional Storage Specified shows the new total storage space..
-
Click Add Storage to add the specified storage to the zone.
-
Select the zone in the Assets tree, then click Boot Zone in the Actions pane or click the Boot Zone icon in the Zones pane.
-
Click Boot Now or click Boot Later.
Adding File Systems to Zones
You can add file systems only to greenfield zones.
To Add a File System to a Zone
-
Select the zone from the Assets section in the Navigation pane.
-
Click Shutdown Zone from the Actions pane. Shutdown Zone window is displayed.
-
Click Shutdown Zone to shut down the zone immediately.
-
Select the zone in the Assets tree.
-
Click Add File Systems from the Actions pane. The Add File Systems window is displayed.
-
Click the Add icon .
-
Enter the Reserved and Quota size for the new file system.
-
Click Add File Systems.
-
Select the zone in the Assets tree, then click Boot Zone in the Actions pane or click the Boot Zone icon in the Zones pane.
-
Click Boot Now or click Boot Later.
Adding Libraries to the Global Zone
You can associate one or more libraries with a global zone. The libraries are available to all non-global zones in the hierarchy of the global zone.
To Associate a Library With the Global Zone
-
Select the global zone from the Assets section of the Navigation pane. The Dashboard of the global zone is displayed.
-
Click Associate Libraries in the Actions pane. The Associate Library window lists the libraries that are not associated with the global zone.
-
Select one or more libraries.
-
Click Associate Libraries. A job is submitted to associate the libraries with the global zone.
Disassociating Libraries From Global Zone
When you disassociate a library from global zone:
-
The libraries are disassociated from the global zone.
-
The libraries are not available to new zones.
-
The libraries remain associated to existing non-global zones in that global zone.
To Disassociate Libraries From Global Zone
-
Select the global zone from the Assets section in the Navigation pane. The Dashboard of the selected global zone is displayed in the center pane.
-
Select Libraries tab from the center pane. The associated libraries with the global zone are listed.
-
Select a library from the list. The Disassociate Library icon is enabled.
-
Click the Disassociate Library icon. The Disassociate Library window is displayed.
-
Click Disassociate Library to confirm unmounting the library.
Using Networks With Zones
This section describes how to connect, modify, and disconnect networks from zones.You can create networks associated with an IPMP group.
See Managed Networks for more information about IPMP and Link Aggregation.
Modifying the Network Interface of a Global Zone
You can change the permanent IP address or change the allocation method.
Note:
If the network interface is an IPMP group, you cannot modify the network interface.-
Select the global zone from the Assets section of the Navigation pane. The Dashboard of the global zone is displayed
-
Select the Networks tab in the center pane. The Networks tab lists the networks that are assigned to the global zone.
-
Select the network that you want to modify.
-
Click the Modify Physical Connectivity icon. The Change VirtualHost Network/NIC Connection window is displayed.
-
If the network interface has a static IP address, you can change the permanent IP address or you can change the Address Allocation method to Use Ext. DHCP
-
Click Submit to save the changes.
Assigning Networks to a Global Zone
In Enterprise Manager Ops Center, networks are managed objects. You can identify and assign one or more networks to the global zone. These networks can then be used by the global zone's non-global zones.
When you assign a network to a global zone, you must define the mode of the network, either Shared IP or Exclusive IP:
-
In Shared IP mode, the network interface is used by more than one zone. You define the network interface when you you assign the global zone to the network.
-
In Exclusive IP mode, the network interface is dedicated to the zone. An exclusive network must be declared for the global zone when you assign network to the global zone. Then you configure the IP configuration for the non-global zone.
A network that is assigned as shared on a global zone can be assigned as exclusive on another global zone. For a global zone, a network has only one mode. For non-global zones, a network that is used in a shared mode for one zone cannot be used in exclusive mode for another zone.
To Assign a Network to a Global Zone
-
Select a global zone from the Assets section in the Navigation pane.
-
Select Assign Network in the Actions pane. The Assign Networks to Global Zone wizard is displayed.
-
Select the network that you want to associate with the global zone from the list of networks that are not assigned to the global zone. To assign more networks to the global zone, click the Add icon.
-
For each selected network , specify the IP mode, either Shared or Exclusive. Click Next.
-
In the Specify Networks Interfaces step, select a NIC. If the NIC is a member of an IPMP group, you can select the group.
-
Select the address allocation method. If you selected an IPMP group, address allocation is not required.
-
Use Static IP – Enter the IP address of the global zone.
-
Assigned by External DHCP – The global zone uses a DHCP server external to Enterprise Manager Ops Center to acquire an IP address.
Click Next to go to Step 12.
-
-
Click Connect Network in the Actions pane or select the Networks tab in the center pane and click the Connect Network icon. The Connect Networks to Zone window is displayed.
-
Select the networks that you want to connect to the zone. All networks assigned to the global zone with the same IP mode and not yet connected to the zone are listed.
-
Click the Add icon. You can assign an exclusive IP zone multiple times to a network. You can then create an IPMP group inside the exclusive IP zone.
-
Specify the network interface of the selected networks.
-
Click Connect Networks.
-
Click Finish to submit the job that assigns the network to the global zone..
Removing a Network From a Global Zone
When you unbind a network from a global zone, the global zone's non-global zones are also disconnected from the network.
To Unbind a Network From a Global Zone
-
Select the global zone from the Assets tree in the Navigation pane. The Dashboard of the global zone is displayed.
-
Select the Networks tab in the center pane. The networks that are assigned to the global zone are listed.
-
Select the network that you want to disconnect. The Unbind Network icon is enabled. You can unbind only one network at a time.
-
Click the Unbind Network icon. The Unbind Network from Global Zone window displays the list of zones from which the network will be removed.
-
Click Disconnect Zones.. A job is submitted to remove the network from the global zone.
Using Networks With Non-Global Zones
-
To assign a network to a non-global zone, verify that the zone is a greenfield zone. You can disconnect the networks of brownfield zones and greenfield zones.
-
Shut down the non-global zone using the Shutdown Zone action.
To Connect a Network to a Non-Global Zone
-
Select the zone in the Assets section of the Navigation pane.
-
Click Connect Network in the Actions pane. As an alternative, select the Networks tab in the center pane and click the Connect Network icon. The Connect Networks to Zone window is displayed.
-
Select the network that you want to connect to the non-global zone. The list of networks includes all networks assigned to the global zone that have the same IP mode (Shared IP or Exclusive IP) and that are not yet connected to the non-global zone. Click the Add icon to add more networks.
-
Specify the network interface for the selected networks. You can assign an exclusive IP network multiple times to the same zone and then create an IPMP group the network.
-
Click Connect Networks to submit the job to assign the networks to the zone.
To Disconnect a Network From a Non-Global Zone
-
Select the zone in the Assets section of the Navigation pane.
-
Select the Networks tab in the center pane. The networks that are assigned to the zone are listed.
-
Select the network that you want to disconnect from the zone. The Disconnect Zone Network option is enabled.
-
Click the Disconnect Zone Network icon. A job is initiated to disconnect the network from the zone.
Managing Zones
From within Enterprise Manager Ops Center, you can boot, reboot, shut down, halt, clone, attach a console to, and delete greenfield and brownfield zones.
Booting a Zone
Booting a zone places the zone in the running state, using the current configuration. The Boot Zone option is enabled only when the zone is in the ready or installed state, but not in the running state.
If you have the autoboot properties were set when the non-global zone was created, the zone boots whenever the global zone boots.
Ensure that the zone is in the Ready state or Installed state.
-
Select the zone from the Assets section of the Navigation pane. The Dashboard page of the zone is displayed.
-
Click Boot Zone in the Actions pane. The boot zone job is submitted.
An alternative procedure also boots the zone:
-
Select the global zone from the Assets section of the Navigation pane.
-
Select the Summary tab.
-
Select the non-global zone from the Zones section.
-
Click the Boot Zone icon. The boot zone job is submitted.
Rebooting a Zone
You can reboot a zone that is in the running state. This type of reboot shuts the zone down and then boots it. This is different from the zoneadm reboot command in which the zone is first halted and then booted.
-
Select a zone from the Asset section in the Navigation pane. The Dashboard page of the selected asset is displayed in the center pane.
-
Click Reboot Zone in the Actions pane.
-
Click the Reboot button to confirm the action. The reboot job is initiated.
An alternative procedure also reboots the zone:
-
Select the global zone from the Assets section of the Navigation pane.
-
Select the Summary tab.
-
Select the non-global zone from the Zones section.
-
Click the Reboot icon. The boot zone job is submitted.
Attaching to the Zone Console
You enable the console connection and then connect to the console. The default connection time is 120 minutes.
-
Select the zone from the Assets section in the Navigation pane. The Dashboard of the selected zone is displayed.
-
Select the Console tab in the center pane.
-
Click the Enable the Console Connection icon. A job is initiated to enable the console connection.
-
Click the Connect to the Console icon. The connection is established and the console appears on the UI.
-
Enter the zone user name and password to log into the zone.
-
(Optional) Click the Undock the Console icon to make the console available separately from the UI.
-
(Optional) Click the Set Console Connection Timeout icon to set the number of minutes for the connection. When the time expires, you must enable the console connection again.
Note:
If the zone is not in view in the Assets tree, the zone is automatically logged out. To continue, connect to the zone console again.Disabling the Zone Console Connection
If the zone is not in view in the Assets tree, the zone is automatically logged out but the connection exists until the connection time expires or you disable the connection.
To Disable a Zone Console Connection
-
Select the zone from the Assets tree in the Navigation pane. The Dashboard of the zone is displayed.
-
Select the Console tab of the zone in the center pane. The zone console that is enabled is displayed.
-
Click Disable the Console Connection to disable the zone console.
Shutting Down a Zone
Shut a zone down in a graceful manner so that it is in a state that can be restarted.
-
Select the Zone from the Assets section in the Navigation pane. The Dashboard page of the selected zone is displayed in the center pane.
-
Click Shutdown Zone from the Actions pane. Shutdown Zone window is displayed.
-
Click the Shutdown Zone button to confirm the shut down action.
An alternative procedure also shuts down the zone:
-
Select the global zone from the Assets section of the Navigation pane.
-
Select the Summary tab.
-
Select the non-global zone from the Zones section.
-
Click the Shutdown icon. The shutdown job is submitted.
The zone is in the Installed state.
Halting a Zone
When you halt a zone, it removes both the application environment and the virtual platform for a zone. Halting a zone changes the zone'state to the Installed state. All processes are killed, devices are unconfigured, network interfaces are unplumbed, file systems are unmounted, and the kernel data structures are destroyed.
-
Select a zone from the Assets section in the Navigation pane.
-
Click Halt Zone in the Actions pane. The Halt Zone window is displayed.
-
Click the Halt Zone button to confirm the halt zone action.
An alternative procedure also halts the zone:
-
Select the global zone from the Assets section of the Navigation pane.
-
Select the Summary tab.
-
Select the non-global zone from the Zones section.
-
Click the Halt Zone icon. The halt zone job is submitted.
Deleting a Zone
When you delete a running zone, the zone is halted, uninstalled, then deleted from the global zone. The following changes are also made:
-
Zone root file system is deleted.
-
Other file systems that were added to the zone are deleted.
-
Zone metadata is deleted from the storage library.
-
The zpool for the zone is deleted and the storage made available.
-
Any exclusive IPs that were assigned to the zone are available for re-use
-
Select a zone from the Assets section in the Navigation pane.
-
Select Delete Zone from the Actions pane. The Delete Zone window is displayed.
-
Click Delete Zone to confirm whether you want to delete the zone. The zone is deleted and removed from the Assets tree.
Creating Zones Using Enterprise Manager Ops Center
When you use Enterprise Manager Ops Center to create a zone, the zone is displayed in the Assets tree with a green badge and it is managed by Enterprise Manager Ops Center. You are able to change and edit the zone's configuration.
Note:
If you create or migrate a zone using Enterprise Manager Ops Center, you cannot use Solaris Live Upgrade and an alternate boot environment (ABE) to update the zone.Before You Begin
Before you create a non-global zone, determine the requirements for the new zone.
Requirements for a Whole Root Zone
A whole root zone contains a read/write copy of the global zone's file system and has the following requirements:
-
Minimum size of the file system is 5 GB.
-
Minimum size of the virtual disk for the storage library is 6 GB.
Requirements for a Sparse Root Zone
A sparse root zone contains a read/write copy of a portion of the global zone's file system and shares the global zone's /usr, /lib, /sbin, and /platform directories in read-only mode. A sparse root zone has the following requirements:
-
Minimum size of the file system is 1 GB.
-
Minimum size of the virtual disk for the storage library is 1 GB.
Requirements for a Branded Zone
A branded zone emulates the user environment of earlier versions of the Solaris operating system. For example, you can create a branded zone to run Solaris 8 applications on your Solaris 10 system . Use the following procedure to prepare to create a branded zone:
-
Download the images for the operating system, as shown in Table 12-1
-
Import the images into one of the software libraries associated with the global zone.
During the process of creating a branded zone, you will install the images in the global zone. For instructions, see the README files in the Solaris 8 or 9 Containers bundle.
Table 12-1 Packages for Branded Zones
| Global Zone OS | Branded Non-Global Zone |
|---|---|
|
Oracle Solaris 10 10/08 OS or later: |
For Solaris 8, install SUNWs8brandk from Solaris 8 Containers 1.0.1. For Solaris 9, install SUNWs9brandk from Solaris 9 Containers 1.0.1. |
|
A version of Solaris prior to Solaris 10 10/08 OS: |
For Solaris 8, install SUNWs8brandr and SUNWs8brandu from Solaris 8 Containers 1.0.1. For Solaris 9, install SUNWs9brandr, SUNWs9brandu, and SUNWs9brandk from Solaris 9 Containers 1.0.1. |
Other Attributes of a Zone
-
Zone name – Specify a unique name for the zone. Do not use names that start with "global" or "SUNW."
-
Autoboot – Specify whether the zone boots immediately after you create it and whenever the global zone boots.
-
Shared CPU or Dedicated CPU
-
A zone with a shared CPU gets its CPU resources by the number of shares you allocate to it from the resource pool, which is also used by other zones. The new zone is added to the Fair Share Scheduling automatically. You have the option to set a maximum value for the CPU resources. The CPU cap limits the amount of CPU resources that can be used by one zone. For example, a CPU cap value of 1 means 100% of a CPU.
-
A zone with a dedicated CPU gets exclusive use of the available CPU resources. You specify the minimum and maximum number of CPUs available to the new zone. A temporary resource pool is created and dedicated to the zone.
-
-
Importance – Set the priority of the zone. Assign an importance value for the zone so that when there are not enough CPU resources to satisfy all zones, the zone with the greater importance value receives a larger share of the available CPU resources.
-
Memory Caps – Set the maximum value for physical, swap and lock memory resources.
-
Naming Service – Specify the name service that the zone uses to communicate with network objects. You can select the DNS, NIS, NIS+ or LDAP naming service. To specify the name service, you need the domain name and the IP address of the name server.
-
Shared IP Address or Exclusive IP Address
-
A zone with a shared IP address uses its global zone's IP layer configuration and state. The zone has a logical network interface to the IP address.
-
A zone with an exclusive IP has its own dedicated IP layer configuration and state. The zone has its own set of network interfaces. You must configure the network interfaces using the same network configuration methods applied to all Oracle Solaris 10 OS configurations.
-
To Create a Zone
-
Select the global zone in the Assets section of the Navigation pane. This global zone is the virtual host for the new non-global zone. The Summary page of the global zone is displayed in the center pane.
-
Click Create Zone in the Actions pane. The Create Zone wizard starts.
-
Select the type of zone. Click Next.
To create the branded type of zone, install the OS image:
-
Select the image from the list of images in the software libraries associated with the global zone.
-
Select the Brand Type, either Solaris 8 or 9.
-
Wait for at least 5 minutes for Enterprise Manager Ops Center to install the packages and refresh the list of available brands.
-
(Optional) Specify the HostID if you want to run an application only on a specific host.
-
(Optional) Specify the Machine Type, either Sun4u or Sun4v.
-
-
Select a storage library from the list of libraries that are associated with the global zone to store the zone's image and metadata. Click Next.
-
Specify the CPU type and memory thresholds. The CPU type can be either Shared or Dedicated. Set the memory thresholds and verify that the locked memory threshold value is less than or equal to the physical memory threshold. Click Next.
-
Configure the language, time zone, terminal-type, atnd root password for the zone.
-
For the host name, enter the zone name you specified in Step 4. Provide a domain name for the NFSv4 Domain Name or accept the default value,
dynamic, to allowthe naming service you will specify in Step 14 to determine the NFSv4 domain at run time. Click Next.Note:
The host name of the zone must be resolved by the naming service that you select in Step 14. If it is not, the zone creation job cannot boot the new zone. -
Set the boot properties for the new zone. You can set the properties so that the zone boots after it is created and whenever the global zone boots. Click Next.
-
Configure the file systems for the zone. The new zone has a default root file system which is the zone path. You cannot delete this file system or change its read and write access. You can add more file systems from original zone's list of file systems. Set the size and access to the file system. The Reserved size is the size of the file system that the user can reserve. The Quota size is the maximum size that the file system can utilize. Click Next.
-
Configure the storage for the zone's operations. Select a library and specify the virtual disks for zone storage. The library can be local storage, NAS storage or Fibre Channel storage. If the library is local or NAS storage, specify the virtual disk name and size of the disk. If the library is Fibre Channel, select a LUN from the available list of LUNs in the library. The size of the selected LUN is displayed. You cannot change the size of the LUN.
Note:
If you specify a local storage library, you cannot migrate the zone in the future.Caution:
An Oracle Solaris Zone running with a zonepath on a NFS share is not a supported configuration. If you specify this type of storage, do not use the zone for production or non-experimental workload. -
If the Currently Accumulated Storage value is less than the Recommended Storage Size value, you can add more storage resources to the zone. Click the Add icon to configure more storage resources When the Currently Accumulated Storage size as at least equal to the Recommended Storage size, click Next.
Note:
Provide sufficient storage space to accommodate the file systems added to the zone. Allocate 20% more than the required storage space for good performance.Note:
If you plan to use Alternate Boot Environments with zones, provide sufficient storage space. Specify twice the size of the zone's file system for the root file system of the zone. For example, if the root file system is 8 GB, the virtual disk backing this file system must be 16 GB. -
Assign at least one network to the zone. Select the zone's IP mode, either Shared or Exclusive.
-
For Shared IP networks:
-
Select a network from the list of networks that use the Shared IP mode and are assigned to the global zone.
-
Select a NIC from the list of shared Network Interface Cards (NIC) .
-
Specify the management interface for the N IC. If the network has a defined IP range, the Auto Allocate IP option is displayed with the zone's IP address from the range.If the network does not have a defined IP range, the Use Static IP option is displayed. Type an IP address for the zone in the Zone IP field.
-
-
For Exclusive IP networks
-
Select a network from the list of networks that are assigned to the global zone and are not used by other zones.
-
Select a NIC from the list of the selected network's NICs that are not bound or assigned to other networks.
-
Specify the management interface for the NIC. If the selected network has a defined IP range, the Auto Allocate IP option is displayed in the Management Interface and the zone's IP address is populated with an IP address from the defined range.
If the network does not have a defined IP range, you must either provide the IP address or specify a DHCP server to provide one. To provide an IP address, select the Static IP option and type the IP address in the Zone IP field. To designate a DHCP server, select the Assigned by ext. DHCP option . The Zone IP field contains the Automatically Allocated value.
-
Click Next.
-
-
Specify the naming service for the zone: DNS, NIS, NIS+ or LDAP naming service. You can also choose not to specify a naming service.
-
DNS – Enter the domain name of the DNS server and the IP address of the DNS server You can enter up to three IP addresses in the Name Server field. To specify additional domains to search, enter up to six domain names for the Domain Name Search List. The total length of each entry cannot exceed 250 characters.
-
NIS and NIS+ – Enter the domain name of the NIS or NIS+ server. If you know the NIS server details, choose the Specify an NIS Server option to provide the NIS server host name and its IP address. If you do not have the NIS server information, select the Find an NIS Server option .
-
LDAP – Enter the domain name of the LDAP server. Specify the name of the LDAP Profile. Enter the IP address of the LDAP Profile Server. You can also provide the Proxy Bind Distinguished Name and Password.
-
NONE – Select this option so that no name server is configured.
Click Next.
-
-
Click Finish to start the job for creating a zone.
Creating zones with Enterprise Manager Ops Center results in the following operations which run automatically in the background:
-
The file systems of the zones are implemented as ZFS file systems.
-
A zpool is created for each zone with the name of the zone metadata.
-
The storage that is allocated to the zone is pooled in a zpool and used by all the file systems.
Cloning a Zone
Use this procedure to copy an existing zone so that you can provision a new zone on the same system efficiently. The process of cloning a zone is similar to the process of creating a zone because you can accept each of the original zone's specification or change it before you create the copied zone . You can clone either a greenfield or brownfield zone.
-
Select the zone you want to copy from the Assets section in the Navigation pane.
-
Click Replicate Zone in the Actions pane. The Replicate Zone wizard is displayed.
-
Enter a different zone name and description for the zone.
-
Select a library from the list of libraries that are associated with the global zone to store the cloned zone's image and metadata. Click Next.
-
The CPU shares that are allocated in the original zone are displayed. You can edit the changes for the cloned zone. Click Next.
-
Accept or change the attributes of the original zone: language, timezone, terminal type, host name and root password. Click Next.
-
Set the boot properties for the cloned zone. You can set the properties so that the new zone boots after it is created and whenever the global zone boots. Click Next.
-
Configure the file systems for the cloned zone. The new zone has a default root file system which is the zone path. You cannot delete this file system or change its read and write access. You can add more file systems from original zone's list of file systems. Accept or change the size and access to the file system. The Reserved size is the size of the file system that the user can reserve. The Quota size is the maximum size that the file system can utilize. Click Next.
Note:
Make sure that the cloned zone has the same or more size for its file system than the size of the original zone's file system. If the cloned zone's file system is smaller than the original zone's file system, the clone operation cannot complete and the job fails. Do not modify the root file sytem of the new zone to a size less than the source zone root file system. Do not modify the system file system if it is already defined in the source zone. -
Accept or change the storage library. The library can be either a NAS storage or Fibre Channel library. If the library is NAS storage, specify the virtual disk name and size of the disk. If the library is Fibre Channel, select a LUN from the available list of LUNs in the library. The size of the selected LUN is displayed. You cannot change the size of the LUN.
-
The accumulated size of the storage is displayed as Currently Accumulated Storage. The required storage is displayed as Recommended Storage Size. Click the Add icon to configure more storage resources to the zone if the Currently Accumulated Storage is less than the Recommended Storage Size. When you have defined the Currently Accumulated Storage size as at least equal to the Recommended Storage size, click Next.
-
Assign at least one network to the zone. Select the zone IP type as Shared or Exclusive.
-
For Shared IP networks:
-
Select a network from the list of networks that use the Shared IP mode and are assigned to the global zone.
-
Select a NIC from the list of shared Network Interface Cards (NIC) .
-
Specify the management interface for the N IC. If the network has a defined IP range, the Auto Allocate IP option is displayed with the zone's IP address from the range.If the network does not have a defined IP range, the Use Static IP option is displayed. Type an IP address for the zone in the Zone IP field.
-
-
For Exclusive IP networks
-
Select a network from the list of networks that are assigned to the global zone and are not used by other zones.
-
Select a NIC from the list of the selected network's NICs that are not bound or assigned to other networks.
-
Specify the management interface for the NIC. If the selected network has a defined IP range, the Auto Allocate IP option is displayed in the Management Interface and the zone's IP address is populated with an IP address from the defined range.
If the network does not have a defined IP range, you must either provide the IP address or specify a DHCP server to provide one. To provide an IP address, select the Static IP option and type the IP address in the Zone IP field. To designate a DHCP server, select the Assigned by ext. DHCP option . The Zone IP field contains the Automatically Allocated value.
-
Click Next.
-
-
Click Finish to launch the job for replicating a zone.
When the job successfully completes, the zone is displayed in the Assets section.
Migrating a Non-Global Zone
In Enterprise Manager Ops Center, zone migration is a cold migration because the zone is shut down, all applications are stopped, the migration occurs, and then the zone is restarted. This section describes the procedure for the following types of migration:
-
Migrating an Oracle Solaris system into a new non-global zone. This is referred to as physical to virtual (P2V) conversion. See Migrating a Physical Oracle Solaris System into a Zone
-
Migrating a non-global zone from one global zone to another global zone, when all components are managed by Enterprise Manager Ops Center. See Migrating a Zone to a Different Machine
-
Migrating a non-global zone that has dependencies that are not managed by Enterprise Manager Ops Center. This process uses a script to perform the migration. See Using a Script to Migrate a Zone With Dependencies
You can migrate a greenfield zone. If you want to migrate a brownfield zone that has been adopted to become a greenfield zone, see Using a Script to Migrate a Zone With Dependencies to migrate the additional inherited file systems.
Migrating a Physical Oracle Solaris System into a Zone
A "physical to virtual" (P2V) conversion moves an existing Oracle Solaris system into a new non-global zone on the target system's global zone. Figure 12-1 diagrams the steps for a P2V conversion.
Figure 12-1 Workflow for Migrating an Existing Oracle Solaris System Into a Zone
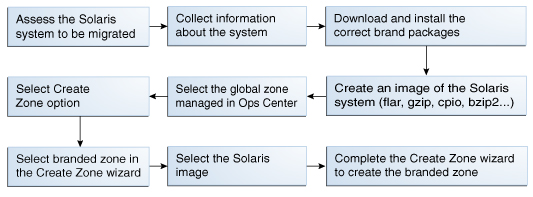
Description of "Figure 12-1 Workflow for Migrating an Existing Oracle Solaris System Into a Zone"
-
Assess the system to be migrated and collect information.
See Addtional Resources for information about collecting information about the source system.
-
The system image to be installed in the non-global zone must not be newer than the target global zones's operating system release or the installation fails.
-
The destination global zone must be running at least Oracle Solaris 10 8/07 OS.
-
The supported branded zones are Solaris 8 and 9. For the branded zones to be supported on the destination global zone, remove the following brand packages from the global zone:
-
SUNWs8brandu
-
SUNWs8brandr
-
SUNWs9brandu
-
SUNWs9brandr
-
See Additional Resources for instructions to download and install the correct brand packages.
To Migrate a Physical Solaris System Into a Zone
-
Create an image of the Oracle Solaris system that you want to migrate.
-
Import the image into Enterprise Manager Ops Center.
See Importing Images to import the image.
-
Select the destination global zone from the Assets section of the Navigation pane.
-
Click Create Zone in the Actions pane. The Create Zone wizard is displayed.
-
Select Branded Zone for the type of the zone.
-
Select the image that you have created in Step 1 from the Images list.
-
(Optional) Specify the HostID if you want to run applications that are associated with a specific host ID.
-
(Optional) Specify the machine type as Sun4U or Sun4V.
-
Complete the Create Zone wizard, according to To Create a Zone.
Migrating a Zone to a Different Machine
In Enterprise Manager Ops Center, you can migrate a non-global zone from its source global zone to a target global zone running on a different machine. When you migrate a zone, perform a trial run before submitting the migration job to verify that the target global zone has the correct configuration to host the non-global zone.
The target global zone must have same or later versions of the following operating system packages and patches that are installed on the non-global zone.
-
Packages that deliver files under an
inherit-pkg-dirresource -
Packages where
SUNW_PKG_ALLZONES=true
Other packages and patches, such as those for third-party products, can be different.
When the target global zone has later versions of the zone-dependent packages or patches, update those packages in the non-global zone before the migration to match the target global zone. If the target global zone supports the update-on-attach capability, it checks the non-global zone for packages that must be updated and only those packages are updated. The rest of the packages, and their associated patches, can vary from zone to zone. The patches that must be backed out of the zone before the update are also listed. If the target global zone does not support backout-on-attach capability, you must remove the patches manually and run the migration job again.
You can change the Name, Description, Tags, and NIC details of the non-global zone but, if you change any other configuration, A warning message indicating that if you change the zone configuration you must execute the sys-unconfigure command on the zone.
After you migrate a zone, you cannot use an alternate boot environment (ABE) to upgrade the zone.
Compatible Global Zones for Migration
When you click the Migrate Zone option in the Actions pane, Enterprise Manager Ops Center checks all global zones for compatibility with the source global zone. If there are compatible global zones, the Migrate Zone wizard is displayed. Otherwise, the following pop-up window is displayed.
Figure 12-2 Message Displayed When No Global Zones are Compatible

Description of "Figure 12-2 Message Displayed When No Global Zones are Compatible"
Figure 12-2 shows the compatible global zones, depending on the operating system release.
| Source Global Zone | Compatible Target Global Zone |
|---|---|
|
Solaris 10 8/07 |
Solaris 10 8/07 Solaris 10 10/08 Solaris 10 5/09 Solaris 10 10/09 |
|
Solaris 10 5/08 |
Solaris 10 5/08 Solaris 10 10/08 Solaris 10 5/09 Solaris 10 10/09 |
|
Solaris 10 10/08 |
Solaris 10 10/08 Solaris 10 5/09 Solaris 10 10/09 |
|
Solaris 10 5/09 |
Solaris 10 5/09 Solaris 10 10/09 |
Verify the following conditions
-
The source and target global zones are compatible.
-
The source and target global zones have access to all the libraries associated with the non-global zone.
-
The non-global zone's metadata is not stored in the source global zone's local library.
-
The non-global zone's data is not stored in the source global zone's local library. The zone must use a network storage library.
-
The non-global zone is in the running state.
-
The source and target global zones and non-global zones were created through Enterprise Manager Ops Center.
-
Select a zone from the Assets section in the Navigation pane.
-
Click Migrate Zone from the Actions pane. A warning message indicating that if you change the zone configuration except for Name, Description, Tags, and NIC details , you must execute the
sys-unconfigurecommand on the zone. Also, if the NIC names are changed for a zone that uses exclusive IP mode, the/etc/hostname.itf and/etc/dhcp.itf file are renamed accordingly. -
Click Continue Migration.. The Migrate Zone wizard is displayed.
-
Select the target global zone from the list of compatible global zones. Each entry includes the number of non-global zones that are already running, total CPUs, and available dedicated CPUs. Click Next.
-
Review the migration test result. Continue the migration based on the following conditions on the target global zone:
-
If the target global zone does not support update-on-attach capability, continue to migrate the zone without updating the zone's patches and packages.
-
If the target global zone supports update-on-attach capability, update the zone's patches and packages to match the destination global zone.
-
-
(Optional) To save the migration test result, click Save Test Result As.
-
(Optional) To change the target global zone, click Select New Destination.
-
Change or accept the new name for the migrated zone. The new name is the current zone name with an integer appended. If the Zone Name is displayed in red, the zone name already exists in the target global zone and you must provide a unique name. Click Next.
-
You must have at least one network interface for the migration to continue. The network interfaces that are not accessible to the target global zone are displayed in yellow. Specify a new network interface for the inaccessible networks or select Do Not Connect to that network.
-
Select the network which is in yellow. The network interface details are displayed under Network Interface.
-
Select a new network interface from the Network list or select Do Not Connect. The selected network can be either shared or dedicated. Enter the required network interface information for the selected network.
Click Next.
-
-
Review the summary of the migration job. If there are no patches and packages to be backed out, continue with the migration. If there are patches or patches that must be removed, a warning is displayed .
-
If the target global zone supports backout-on-attach capability, a warning is displayed that the a list of patches have been removed or downgraded.
-
If the target global zone does not support backout-on-attach, the patches and packages on the zone must be removed or downgraded manually so that the source zone matches the destination global zone. Cancel the migration or select a new target global zone.
-
-
Click Finish to submit the migration job. job.
If the target global zone does not support backout-on-attach capability, you must remove or downgrade the patches and packages manually before you can continue with the migration. Use the New Update OS Job action to back out the patches and packages, using this procedure:
To Back Out Patches and Packages
-
Create an update profile with the list of patches and packages that must be backed out.
-
Select the zone.
-
Create a New Update OS Job with the OS Update Profile.
The OS Update job removes or downgrades the patches and packages of the zone. Now you can repeat the migration job on the zone.
Using a Script to Migrate a Zone With Dependencies
You can migrate zones even if the zone has dependencies that are not managed by Enterprise Manager Ops Center, for example, if the zone uses storage that is not part of the zpool. You can use scripts to extend the zone migration feature to include the migration of the dependencies such as storage or other resources that is not managed by Enterprise Manager Ops Center.
If you have a adopted a brownfield zone with additional inherited file system, you can lose the additional file systems during migration. To avoid this, use this script to migrate the file systems.
You can develop your own scripts to migrate the dependencies and place it on the source and target global zone before migration.
The script for migrating the dependencies is executed in the following way:
-
The migration job checks for a script placed on both the source and target global zones. The migration job is aborted if the script is found only on one of the global zone.
-
The job checks whether the script has zero on exit. A non-zero exit is a failure and the migration job fails.
-
The script is called on the global zone six times when the migration job is executed.
Table 12-3 Script Call to Environmental Variables
| Call to the Script | Environmental Variables |
|---|---|
|
On the source global zone, to verify the script existence and user dependencie |
OEMOC_ZONENAME=source zonename OEMOC_PHASE=VERIFY OEMOC_OPERATION=MIGRATION |
|
On the target global zone, to verify the script existence and user dependencies. |
OEMOC_ZONENAME=destination zonename OEMOC_PHASE=VERIFY OEMOC_OPERATION=MIGRATION |
|
On the source global zone, before the zone is shutdown |
OEMOC_ZONENAME=source zonename OEMOC_PHASE=PREOPERATION_RUNNING OEMOC_OPERATION=MIGRATION |
|
On the source global zone, after the zone is shutdown. |
OEMOC_ZONENAME=source zonename OEMOC_PHASE=PREOPERATION_NOTRUNNING OEMOC_OPERATION=MIGRATION |
|
On the target global zone, before the zone is started. |
OEMOC_ZONENAME=source zonename OEMOC_PHASE=POSTOPERATION_NOTRUNNING OEMOC_OPERATION=MIGRATION |
|
On the target global zone, after the zone is started |
OEMOC_ZONENAME=source zonename OEMOC_PHASE=POSTOPERATION_RUNNING OEMOC_OPERATION=MIGRATION |
During rollback phase, the same sequence is executed in reverse order. The environment variables values change accordingly :
-
PREOPERATION becomes PREROLLBACK
-
POSTOPERATION becomes POSTROLLBACK
Script Requirements
The script must be executable and follow these conventions:
-
Good error checking and clean-up within the script
-
Standard exit code conventions
-
Non-zero exit indicates that an error has occurred
-
Informational messages are in stdout
-
Error messages are in stderr
-
The script must be named as guest-operations and placed in the
/var/opt/sun/oc/publicdirectory on both the source and target global zone.
See the Example 12-1, "Sample Script" for migrating the additional inherited file systems of an adopted zone. The sample script is based on the assumption that /opt/ filesystem is the additional inherited file system. The script re-configures /opt/ filesystem on the target global zone before rebooting the zone. The script re-configures the user inherited file systems during POSTOPERATION_NOTRUNNING phase
#!/bin/sh

do_migration_action() {

 echo "executing migration action for zone ${OEMOC_ZONENAME}"

 if [ ${OEMOC_PHASE} != "POSTOPERATION_NOTRUNNING" ]; then
       exit 0
 fi

 #
 # for migration action, before starting the zone on the target GZ
 # add to /opt inherited filesystem.

 /usr/sbin/zoneadm -z ${OEMOC_ZONENAME} detach >/dev/null 2>&1
 if [ $? -ne 0 ] ;then
       echo "unable to detach ${OEMOC_ZONENAME}"
       exit 1
 fi

 echo "add inherit-pkg-dir" >/tmp/tmp-$$.txt
 echo "set dir=/opt" >>/tmp/tmp-$$.txt
 echo "end" >>/tmp/tmp-$$.txt

 /usr/sbin/zonecfg -z ${OEMOC_ZONENAME} -f /tmp/tmp-$$.txt >/dev/null 2>&1
 if [ $? -ne 0 ] ;then
       echo "unable to add inherit filesystem for ${OEMOC_ZONENAME}"
       exit 1
 fi

 /usr/sbin/zoneadm -z ${OEMOC_ZONENAME} attach -u >/dev/null 2>&1
 if [ $? -ne 0 ] ;then
       echo "unable to attach ${OEMOC_ZONENAME}"
       exit 1
 fi
}

echo ${OEMOC_ZONENAME}
echo ${OEMOC_PHASE}
echo ${OEMOC_OPERATION}

if [ ${OEMOC_OPERATION} = "MIGRATION" ] ;then
       do_migration_action
fi
exit 0
Recovering Zones
If the global zone crashes or must be halted, its non-global zones can be migrated to another global zone. However, this zone recovery procedure is not the same as zone migration because Enterprise Manager Ops Center cannot get access to the information in the global zone and therefore cannot perform any compatibility checks. The procedure to move non-global zones from the source global zone to the target global zone is a forced attachment of the non-global zone.
The zone recovery procedure uses the Command Line Interface for the Enterprise Manager Ops Center..
See the Enterprise Manager Ops Center Administration Guide for instructions on getting access to the CLI and the available CLI commands.
-
Verify that the zone metadata is on the NAS storage library.
-
Verify that both the source and target global zones have the same network connectivity.
-
Verify that the source and the target global zones have the shared storage.
-
Verify that the target global zone has access to he same libraries associated with the non-global zone.
-
Verify that the non-global zone's metadata and operational data is not stored in a local library.
-
Verify that JDK version 6 is used. In the Enterprise Controller command prompt, enter the following command:
export JAVA_HOME=/usr/jdk/latest
-
Connect to the Enterprise Manager Ops Center CLI using the following command:
/opt/SUNWoccli/bin/oc
-
Connect to the local Enterprise Controller.
xvmSh > connect

localhost >
-
Enter the virtualization mode.
localhost > virtualization
localhost [virtualization] >
-
List the available global zones.
localhost [virtualization] >list_hosts

Name                  Type                  Health        Reachable     ObjectName
---------------------------------------------------------------------------------------------------------------------------------------------
gzhost36              zone                  OK            False         com.sun.hss.domain:type=xVMServer,name=NORM-NORM-localhost
gzhost44              zone                  OK            True          com.sun.hss.domain:type=xVMServer,name=NORM-NORM-localhost-4
-
List the zones that are running in the source global zone. For example, if the source global zone is gzhost36, then enter the following command.
Note:
Do not use the user-friendly name of the zone in the commands.localhost [virtualization] >list_hosts -C com.sun.hss.domain:type=xVMServer,name=NORM-NORM-localhost Name Type State Migratable ObjectName ---------------------------------------------------------------------------------------------------------------------------- test ZONE RUNNING True com.sun.hss.domain:type=Server,name=NORM-07e91405-8313-43ec-9671-dc320989866e
-
Select the destination global zone and start the zone on it. For example, if the destination global zone is gzhost44, execute then execute the following command to start the test zone on it.
localhost [virtualization] >startup -Z <source global zone> -D <target global zone>

localhost [virtualization] >startup -Z com.sun.hss.domain:type=Server,name=NORM-07e91405-8313-43ec-9671-dc320989866e -D com.sun.hss.domain:type=xVMServer,name=NORM-NORM-localhost-4

submitted job : <Ecname>-1.17
A job is submitted. You can view the status of the job in the Jobs pane.
After the zone is migrated to the target global zone, the zone is a managed zone of the target global zone. The zone might continue to be displayed under source global zone. This is because the status of the source global zone is not updated. After the source global zone is rebooted, the zone does not appear as one of its managed zones .