| Solstice Enterprise Manager 4.1 Managing Your Network |
Getting Started With Solstice EM
The Solstice Enterprise ManagerTM (Solstice EM) Network Tools window is the launchpad from which you start all Solstice EM management tools for monitoring your network components. By default, Network Tools is displayed when you start Solstice EM.
This chapter comprises the following topics:
- Section 2.2 Setting Up the Solstice EM Environment
- Section 2.3 Starting Solstice EM
- Section 2.4 Starting Individual Tools
- Section 2.5 Reconnecting to the MIS
- Section 2.6 Accessing Online Documentation
- Section 2.7 Adding and Removing Tools
- Section 2.8 Modifying Tool Configurations
2.1 Overview
Network Tools provides access to the Solstice EM tools you will use most often for configuring, updating, and managing your network. You can, however, add and remove other Solstice EM and custom-developed network management tools to meet your specific needs.
By default, the core tools described in the following table can be started from the Network Tools window.
2.1.1 Related Files
- /opt/SUNWconn/em/config/em_panel.cf - Solstice EM configuration file.
- The emenv script - To set all necessary environment variables.
- The em_login daemon - UNIX process for connecting to the MIS servers.
2.1.2 Related Tasks
- Chapter 3 Discovering Network Components"
- Chapter 4 Viewing Network Components"
- Chapter 5 Managing Alarms"
- Chapter 6 Controlling User Access"
- Chapter 7 Automating Nerve Center Requests"
- Chapter 8 Gathering Attribute Data"
- Chapter 9 Viewing Collected Data"
- Chapter 10 Graphing Collected Data"
- Chapter 11 Examining Log Entries"
- Appendix A Integrating Solstice EnterpriseTM SyMON System Monitor With Solstice EM"
- Appendix B Managed Object Definitions"
2.2 Setting Up the Solstice EM Environment
Before starting and using Solstice EM, you may need to set certain environment variables that are used by the system. An easy way to set all the environment variables is to run the emenv script.
You can also start Network Tools and connect to a remote MIS by setting the $EM_SERVER environment variable to the name of the remote host where the MIS is running. Then at the command line, enter the em command with no options.
Note – Environment variables cannot be set from Network Tools. If your third party or custom-developed application requires certain environment variable settings, you can set these from a script and then start Network Tools from that script.
If you will be running any of the Solstice EM executables that reside in the /opt/SUWNconn/em/bin directory individually, you should run the emenv script first.
At a system prompt, execute the following command:
- For C-shell users: source /opt/SUNWconn/em/bin/emenv.csh
- For shell or Korn shell users: . /opt/SUNWconn/em/bin/emenv.sh
2.3 Starting Solstice EM
All Solstice EM tools rely on a connection with the kernel--called the Management Information Server or MIS--for their data. All Solstice EM tools can connect to a MIS on a local or remote machine. When reading the descriptions of the tools in this manual, keep these facts in mind:
- A tool must have a connection to a running MIS.
- A MIS can be on a local or remote machine.
If you invoke an application without the -host option and with the EM_SERVER variable not set, the application attempts to connect to a MIS on the local machine.
Users need a connection access right to connect to a MIS. The connection access rights are stored in the user profiles in the MIS. The MIS checks the user's privileges to determine whether or not to grant or deny the connection. The em_login daemon on the MIS server is the UNIX process that listens to all MIS connection requests for password authentication. The user's password is verified when starting any Solstice EM tool. Users are not prompted to enter their login password under the following conditions:
- The connection is to the local MIS server
- The user is logged in as root
- The user has security trustee status

To Use Solstice EM
Note – Throughout this guide, C-shell syntax is used for specifying the environment variable. Use the syntax appropriate for your shell.
1. Type the following command at a system prompt:
- em [-hostremote_MIS_machine]
- For example: em -host zircon
2. If prompted, type your user name and password.
- The Network Tools window is displayed.
3. Click any tool icon to start the tool and perform any network management operation.
- If Security was enabled either during installation, or when configuring Solstice EM for deployment in your company, and you are not logged in as root, you may have restricted access to some of the tools and managed objects, depending on your access privileges controlling access to the Solstice EM tools.
4. Click File->Exit when you have finished working with Solstice EM.See Also:
- Starting Individual Tools
- System Variables Used by Solstice EM
- Solstice EM Environment Variables
- The Network Tools Window
2.4 Starting Individual Tools
In most cases, you start the Solstice EM tools from the Network Tool window. However, there may be circumstances--such as executing scripts--when you want to start individual Solstice EM tools. The following table lists the executable tools you may want to start individually.
Other Solstice EM executables can be found in the /etc/SUNWconn/em/bin directory.
To Start Individual Tools
1. Execute the following command at a system prompt:
- em [-host remote_MIS_machine] toolexecutable
- where toolexecutable is one of the executables listed in Table 2-1 on page 2-2.
- For example: em -host zircon em_viewer will start Solstice EM, connect to the MIS on the zircon server and start the Network Views tool.
2. If prompted, enter your user name and password.2.5 Reconnecting to the MIS
If Network Tools fails to connect to the MIS, or the connection breaks, the tool icons in the Network Tools window are unavailable.
If you previously established a successful connection under access control, you will not be asked for user ID and password when reconnecting to the MIS.
To Reconnect to the MIS
- In the Network Tools window, click Actions->Reconnect.
See Also: For information about remote MIS connections:
2.6 Accessing Online Documentation
The Solstice EM documentation is available as HTML documents and can be viewed in a browser. The online documentation is shipped on the product CD-ROM and can be found in /opt/SUNWconn/em/docs. Each book has its own subdirectory. Display the index.html file in a browser to gain access to the entire Solstice EM documentation set.
Depending on your Solstice EM installation, the online Solstice EM documentation may or may not be accessible from Network Tools. If the Solstice EM documentation set is not accessible from the Network Tools window, you can add an icon to the Network Tools window and gain access to the documentation set.
To Access Online Documentation
- In the Network Tools window, click Documentation.
- A new instance of your browser starts and opens the Solstice EM documentation page.
To Add Access to Online Documentation
1. In the Network Tools window, click File->Customize to display the Network Tools Customize dialog.2. In Path To Executable, type the path name of your browser.3. In Path To Icon field, type the path name for the icon graphic file.4. In Icon Name, type the string to be used as the icon label.
- For example, EM 3.0 Online\nDocumentation. The "\n" causes a line break so that the entry appears on two lines.
5. Select No to specify the browser is not an Solstice EM tool.6. Click Add.
- The icon you added now appears in the Network Tools window.
7. Click Save.
- Changes are saved in the em_panel.cf configuration file.
8. To start the browser, click the icon you just added.9. Open the /opt/SUNWconn/em/docs/index.html file.2.7 Adding and Removing Tools
Network Tools displays an icon for each tool or custom-developed application accessible from the Network Tools window. You can use the Network Tools Customize dialog to add, modify, or delete icons and tools from Network Tools.
Solstice EM does not check the validity of your entries in the Network Tools Customize dialog. Errors are detected when you attempt to start a tool.
If you are adding custom-developed tools to Network Tools, you must first add the tool under Solstice EM control using the createApplication command of the em_accesscmd utility. See The em_accesscmd Utility for more information about the command.
To Add Tools to the Network Tools Window
1. In the Network Tools window, click File->Customize to display the Network Tools Customize dialog.2. In Number Of Columns, specify the number of icon columns you want displayed in the Network Tools window.3. In Path To Executable, type the path name for the executable.
- For example, $EM_HOME/bin/em/em_viewer -host EM_MIS
4. In Path To Icon field, type the path name for the icon graphic file.
- For example, /opt/SUWNconn/em/glyphs/em_viewer.pm. By default, Solstice EM glyph files are located in /opt/SUNWconn/em/glyphs.
5. In Icon Name, enter the string to be used as the icon label.
- For example, Network Views. To create a multi-line entry, add "\n" where you want the line to break. For example: Network \nViews.
6. Specify (Yes/No) whether the tool is a Solstice EM tool.7. In Solstice EM Tool Name, enter the connection name that the tool uses to connect to the MIS.
- The Solstice EM tool name is often the same as the executable used to run the tool. For example, the Solstice EM tool name for Network Views is em_viewer, which is also the name of the executable. If you do not know a tool's name, use the Security tool to look up the tool names by selecting View->Privilege Components->Applications List.
8. Click Add.
- The icon you added appears in the Network Tools window.
9. Click Save.
- Changes are saved in the .em_panel.cf configuration file. If you are logged in as root, the .em_panel.cf configuration file is put in the root directory "/". In other cases, the configuration file is placed in the user's home directory. The original configuration file is installed as /opt/SUNWconn/em/config/em_panel.cf (without the initial dot.)
To Remove Tools From the Network Tools Window
1. In the Network Tools window, click File->Customize to open the Network Tools Customize dialog.2. In the Applications list box, select the tool to be removed.
- The fields in the Application Information area should now reflect the information for your selection.
3. Click Delete.4. (Optional) Click Save to open a standard Select File dialog.5. Type the path and file name where you want to save the modified configuration.
- The default file is ~/.em_panel.cf.
2.8 Modifying Tool Configurations
From time to time, it may be necessary to change the configuration settings of the tools accessible from the Network Tools window. Tools may be moved to other systems, replaced by other tools, and so on.
To Modify Tool Configurations
1. In the Network Tools window, click File->Customize to display the Network Tools Customize dialog.2. In the Applications list box, select the tool and application name.3. Type your modifications.4. Click Change and then click Save.
- The default configuration file is ~/.em_panel.cf.
5. Click OK.See Also: Network Tools Customize Dialog for more information on the dialog options.
2.9 Reference
Reference information is provided for the following:
2.9.1 Command-Line Options
Reference information is provided for the following:
2.9.1.1 Options for the em Command
The em command invokes the executable script for starting Solstice EM and displaying the Network Tools window. The em command executes the emenv.sh script to set up the correct environment before running the em_panel executable.
TABLE 2-3 Options for the em Command -help Displays a list of the options with descriptions for the em command. -host <hostname> Specifies the name of a remote MIS Server
2.9.1.2 System Variables Used by Solstice EM
The following table describes the system environment variables and how they are used by Solstice EM.
2.9.1.3 Solstice EM Environment Variables
The following table describes the Solstice EM environment variables.
2.9.2 Windows and Dialogs
Reference information is included for:
2.9.2.1 The Network Tools Window
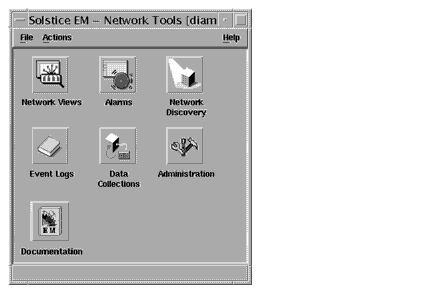
When you invoke Network Tools, the main window displays as shown in FIGURE 2-1. Initially, Network Tools provides access only to the core Solstice EM tools you use for configuring and managing your network components. You can, however, add and remove other Solstice EM and third-party Solstice EM applications to and from Network Tools.
Click any of the Network Tools icons in the window to launch the corresponding Solstice EM tool.
FIGURE 2-1 Network Tools WindowClick Administration to display the Administration window from which you start the Solstice EM administrative tools.
FIGURE 2-2 Administration Window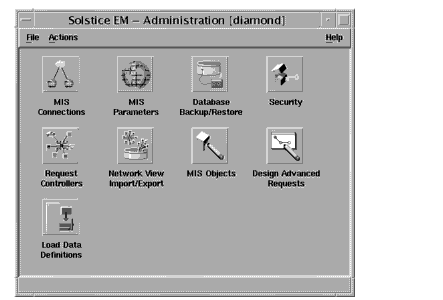
The following table describes the menu bar and menu items on the Network Tools window.
TABLE 2-6 Network Tools Menu File Customize Displays the Network Tools Customize dialog to add and remove tools and application to and from Network Tools. See Network Tools Customize Dialog for more information. Exit Exits the Network tool while keeping the tools and applications that were started from the Network tool running. Actions Reconnect After successfully connecting to the MIS, the menu item is greyed out. The option changes to Reconnect when the connection to the MIS is broken. If Network Tools successfully connected to the MIS, the menu item is greyed out. When reconnecting, you will not be prompted for your user ID and password if Network Tools previously connected successfully under security control. Help Displays the online help.
See Also: For tasks that use the Network Tools window:
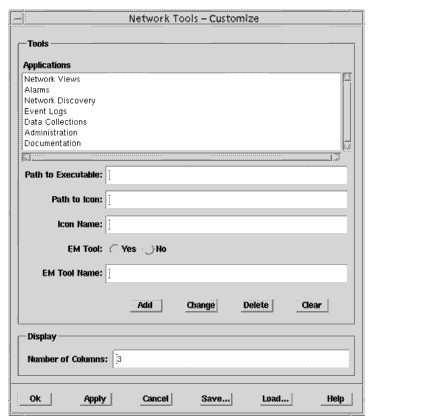
2.9.2.2 Network Tools Customize Dialog
The Network Tools Customize dialog enables you to specify the tools that can be started from the Network Tools window.
Use this dialog to add and remove tools and to specify or update the path and file names for the executables and the graphic files for the icons of Network Tools.
- To display the Network Tools Customize dialog, click File->Customize from the Network Tools window.
FIGURE 2-3 illustrates the Customize dialog and the following table provides more information about configuration options.
FIGURE 2-3 Network Tools Customize Dialog
Settings in this Network Tools Customize dialog are saved to the following configuration files:
- /.em_panel.cf, if you are logged in as root.
- ~/.em_panel.cf in your home directory, if you are logged in as a regular user.
See Also: For tasks that use the Network Tools Customize dialog:
|
Sun Microsystems, Inc. Copyright information. All rights reserved. |
Doc Set | Contents | Previous | Next | Index |