Image Overview
The following two types of images are used in the Control Center.
-
Global images are provided with the N1 Provisioning Server software and include standard operating system images. Global images may also include an application images. Global images are available to all farms in an I-Fabric.
-
Account images are created using the snapshot feature of the Control Center. Account images are customized images that you make available only for a single account.
You create a baseline set of software images initially by using the following methods.
-
Using the Image Wizard as described in Creating and Managing Images Using the Image Wizard in N1 Provisioning Server 3.1, Blades Edition, System Administration Guide.
-
Using the command-line interface. See Creating and Managing Images from the Command Line in N1 Provisioning Server 3.1, Blades Edition, System Administration Guide.
-
Using the Snapshot feature in the Control Center. See Creating an Account Image By Using Snapshot.
After you create these images, use the Account Tools section of the Administration screen to manage them in the Control Center.
The image management features in the Control Center Account Tools include the following options:
-
Image Management—Used as a master list of all images associated with I-Fabrics or with specific accounts.
-
Find an Image—Used to locate specific images.
-
Software Profiles—Used to create a detailed description of operating systems and applications used in global and account images.
Note –
Click Synchronize System, located near the bottom of the Tools Bar, whenever you add or change global software images using the command-line interface to make these images available to the Control Center.
Image Management
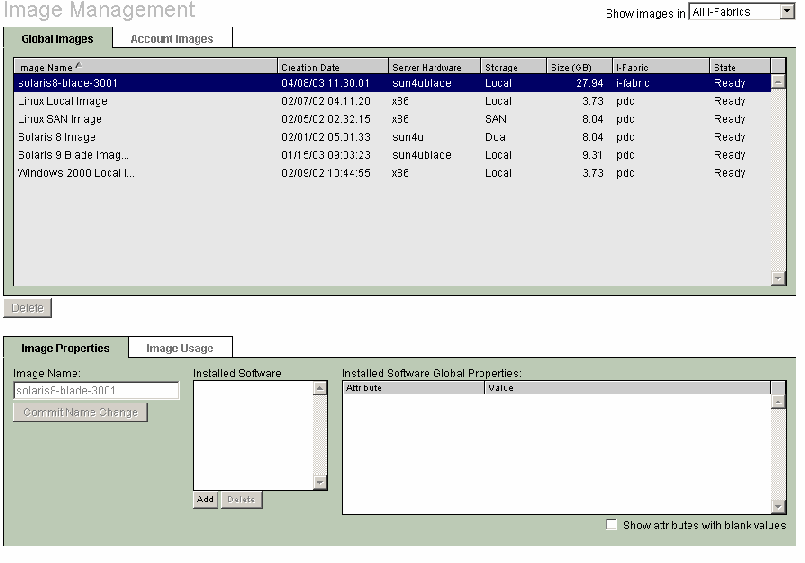
The Image Management option provides you with a list of software images within the I-Fabric to help you keep track of these images on an ongoing basis. Images that you created from the command-line interface or by using the Image Wizard or the Snapshot tool appear in the Image Management screen as shown in Figure 5–1. See Chapter 3, Managing Software Images in N1 Provisioning Server 3.1, Blades Edition, System Administration Guide for information about command-line and Image Wizard procedures. See Creating, Managing, and Using Account Images
Figure 5–1 Image Management Screen

You can filter the list of images by image type by clicking the Global Image Tab or Account Image Tab. You can further filter the list by choosing a specific I-Fabric. You can also change the sort order of images by clicking the column headings.
 How To Change an Account Image Name
Steps
-
Select the name in the Image Name field from the Account Images tab.
-
Enter the new name and click Commit Name Change.
The new image name is displayed in the Image Name field and also appears in server configuration dialogs.
Note –You cannot change the name of a global image.
 How To Add OS or Application Profiles to An
Image
Use Image Properties to associate operating system and application software profiles to images. OS and application software profiles are created in the Software Profiles page. Click Software Profiles on the Tools Bar to access the Software Profiles page.
Steps
-
Create a snapshot image if one does not exist.
-
Click Admin on the navigation bar.
The Administration screen appears.
-
Click Image Management on the tools bar.
-
Select an image name from the list, either from the Global Images tab or the Account Images tab.
-
In the Installed Software section in the Image Properties tab, click Add.
The Select Operating System/Application screen appears.
Note –If the add button is not available, you need to create an application or OS image or account application image through the Software Profiles button in the tools bar.
-
In the Operating Systems tab, select the appropriate operating system from the list and click Add Selected.
-
Click the Applications tab and select the appropriate applications from the list and click Add Selected.
-
Click Close to return to the Image Management screen.
 How To Delete Image Properties
The following procedure shows you how to disassociate an operating system or application software profile from an image.
Steps
 How To Delete an Account
Image
If account images are not in use by any farms, you can delete those images from the Image Management screen.
Steps
-
In the Account Images tab, select an image name.
-
Verify that the image is not in use by using the Farm Usage tab.
-
If the image is not in use, click Delete.
Finding an Image
Because you can manage hundreds of software images, to remember image names or attributes can be difficult. The Find an Image feature enables you to query the database for potential image matches.
 How To Find an Image
Steps
-
Click Admin on the navigation bar.
The Administration screen appears.
-
Click Find an Image.
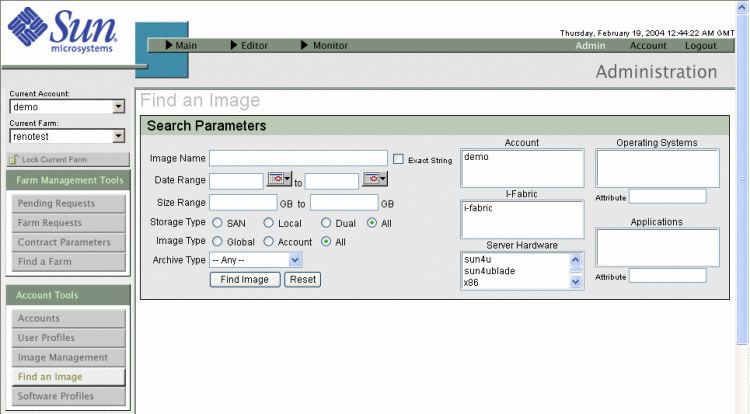
The Find an Image screen appears as shown in Figure 5–2.
Figure 5–2 Find an Image Screen

-
Filter the image list by using the following search parameters:
Parameter
Description
Image Name
Software image with this name. Select Exact String to match the name.
Date Range
Software images that were created within a date range.
Size Range
Software images that were created within a size range in MB.
Storage Type
Software images that were created for SAN, local, dual, or all storage types.
Image Type
Software images that are global, for a specific account, or for images that are both global and accounts.
Archive Type
Any disk image, Flash image, or JumpStart image.
Account
Software images for a specific account.
I-Fabric
Software images for a specific I-Fabric.
Server Hardware
Software images for specific hardware.
Operating System
Software images with this operating system.
Attribute
Filters operating system by attribute.
Applications
Images with this application.
Attribute
Filters applications by attribute.
-
Click Find Image to display the list of images that match your query.
Software Profiles
Depending on your I-Fabric implementation, you might be responsible for creating and managing hundreds of images. Hence, a complete description of each image is useful for you to distinguish one image from another. Software Profiles enables you to create and view a list of all operating systems and applications in use in your I-Fabrics so that you can apply these labels to the description of the image. There are four types of profiles:
-
Global operating systems—available to all accounts in an I-Fabric.
-
Global applications—available to all accounts in an I-Fabric.
-
Account operating systems—available to a specific account in an I-Fabric.
-
Account applications—available to a specific account in an I-Fabric.
 How To Create Global Operating System and
Application Profiles
Steps
-
Log into the Control Center Administration screen.
-
Click Software Profiles on the Tools Bar.
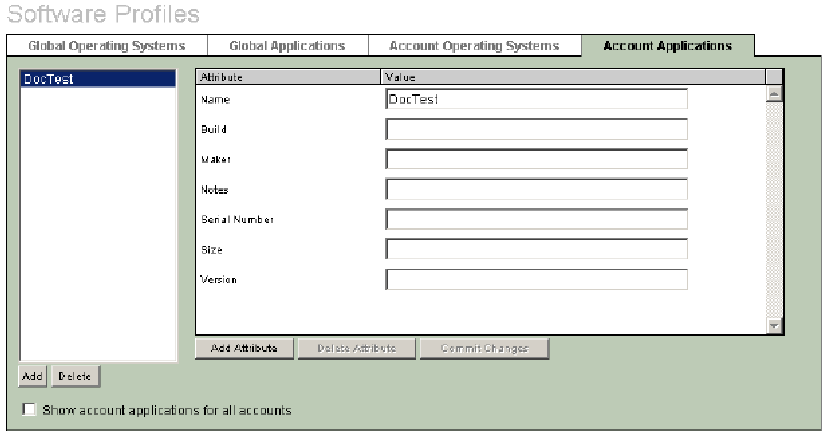
The Software Profiles screen appears as shown in Figure 5–3.
Figure 5–3 Software Profiles Screen

-
In the Global Operating Systems tab, click Add and enter the name of the operating system.
-
Enter a value for each attribute in your list.
Note –Attributes are configurable, so your list might be different than the one shown here.
-
To add an attribute to the list, click Add Attributes and enter the attribute label.
-
To delete an attribute from the list, select the attribute and click Delete Attribute.
Note –The attribute you add or delete applies to all images of the same category. For example, if you add attribute A to global OS OS1, attribute A will appear for global OS OS2.
-
-
Click Commit Changes when you are finished entering attribute information.
-
Continue entering global operating system names and attribute information.
-
Click the Global Applications tab and repeat the process for global software applications.
 How To Create Account Operating System
and Application Profiles
Steps
-
Select the appropriate account from the Current Account drop-down list in the upper right-hand side of the screen.
-
In the Account Operating Systems tab, click Add and enter the name of the operating system.
-
Enter a value for each attribute in your list.
Note –Attributes are configurable, so your list might be different than the one shown here.
-
Click Commit Changes when you are finished entering attribute information.
-
Continue entering account operating system names and attribute information.
-
Click the Account Applications tab and repeat the process for account software applications.
- © 2010, Oracle Corporation and/or its affiliates
