Chapter 5 Image Management
This chapter describes how to manage global and account software images using the Administration screen.
Note –
This chapter assumes that you have already created a baseline set of software images by using the command-line interface or by using the Image Wizard as described in Creating and Managing Images Using the Image Wizard in N1 Provisioning Server 3.1, Blades Edition, System Administration Guide.
This chapter includes the following topics:
Image Overview
The following two types of images are used in the Control Center.
-
Global images are provided with the N1 Provisioning Server software and include standard operating system images. Global images may also include an application images. Global images are available to all farms in an I-Fabric.
-
Account images are created using the snapshot feature of the Control Center. Account images are customized images that you make available only for a single account.
You create a baseline set of software images initially by using the following methods.
-
Using the Image Wizard as described in Creating and Managing Images Using the Image Wizard in N1 Provisioning Server 3.1, Blades Edition, System Administration Guide.
-
Using the command-line interface. See Creating and Managing Images from the Command Line in N1 Provisioning Server 3.1, Blades Edition, System Administration Guide.
-
Using the Snapshot feature in the Control Center. See Creating an Account Image By Using Snapshot.
After you create these images, use the Account Tools section of the Administration screen to manage them in the Control Center.
The image management features in the Control Center Account Tools include the following options:
-
Image Management—Used as a master list of all images associated with I-Fabrics or with specific accounts.
-
Find an Image—Used to locate specific images.
-
Software Profiles—Used to create a detailed description of operating systems and applications used in global and account images.
Note –
Click Synchronize System, located near the bottom of the Tools Bar, whenever you add or change global software images using the command-line interface to make these images available to the Control Center.
Image Management
The Image Management option provides you with a list of software images within the I-Fabric to help you keep track of these images on an ongoing basis. Images that you created from the command-line interface or by using the Image Wizard or the Snapshot tool appear in the Image Management screen as shown in Figure 5–1. See Chapter 3, Managing Software Images in N1 Provisioning Server 3.1, Blades Edition, System Administration Guide for information about command-line and Image Wizard procedures. See Creating, Managing, and Using Account Images
Figure 5–1 Image Management Screen
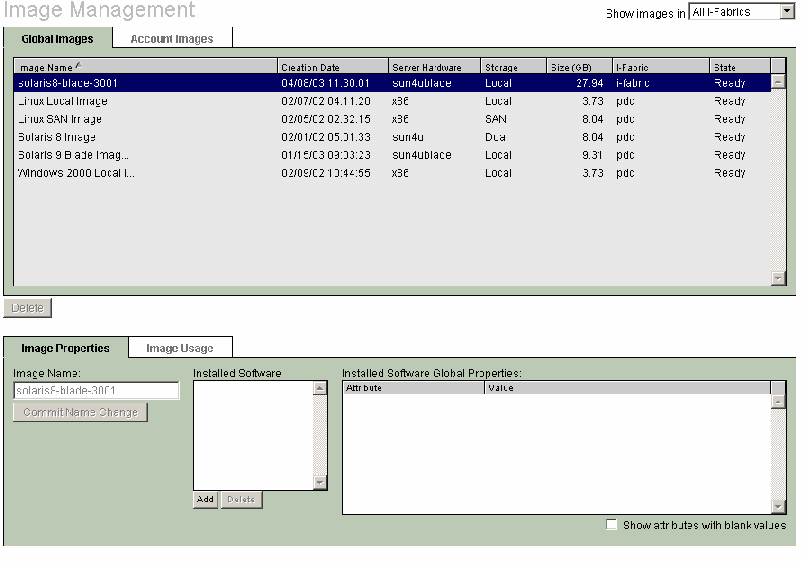
You can filter the list of images by image type by clicking the Global Image Tab or Account Image Tab. You can further filter the list by choosing a specific I-Fabric. You can also change the sort order of images by clicking the column headings.
 How To Change an Account Image Name
Steps
-
Select the name in the Image Name field from the Account Images tab.
-
Enter the new name and click Commit Name Change.
The new image name is displayed in the Image Name field and also appears in server configuration dialogs.
Note –You cannot change the name of a global image.
 How To Add OS or Application Profiles to An
Image
Use Image Properties to associate operating system and application software profiles to images. OS and application software profiles are created in the Software Profiles page. Click Software Profiles on the Tools Bar to access the Software Profiles page.
Steps
-
Create a snapshot image if one does not exist.
-
Click Admin on the navigation bar.
The Administration screen appears.
-
Click Image Management on the tools bar.
-
Select an image name from the list, either from the Global Images tab or the Account Images tab.
-
In the Installed Software section in the Image Properties tab, click Add.
The Select Operating System/Application screen appears.
Note –If the add button is not available, you need to create an application or OS image or account application image through the Software Profiles button in the tools bar.
-
In the Operating Systems tab, select the appropriate operating system from the list and click Add Selected.
-
Click the Applications tab and select the appropriate applications from the list and click Add Selected.
-
Click Close to return to the Image Management screen.
 How To Delete Image Properties
The following procedure shows you how to disassociate an operating system or application software profile from an image.
Steps
 How To Delete an Account
Image
If account images are not in use by any farms, you can delete those images from the Image Management screen.
Steps
-
In the Account Images tab, select an image name.
-
Verify that the image is not in use by using the Farm Usage tab.
-
If the image is not in use, click Delete.
Finding an Image
Because you can manage hundreds of software images, to remember image names or attributes can be difficult. The Find an Image feature enables you to query the database for potential image matches.
 How To Find an Image
Steps
-
Click Admin on the navigation bar.
The Administration screen appears.
-
Click Find an Image.
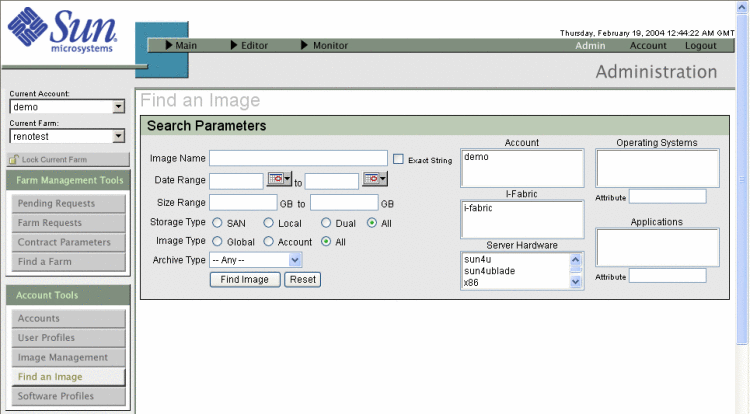
The Find an Image screen appears as shown in Figure 5–2.
Figure 5–2 Find an Image Screen
-
Filter the image list by using the following search parameters:
Parameter
Description
Image Name
Software image with this name. Select Exact String to match the name.
Date Range
Software images that were created within a date range.
Size Range
Software images that were created within a size range in MB.
Storage Type
Software images that were created for SAN, local, dual, or all storage types.
Image Type
Software images that are global, for a specific account, or for images that are both global and accounts.
Archive Type
Any disk image, Flash image, or JumpStart image.
Account
Software images for a specific account.
I-Fabric
Software images for a specific I-Fabric.
Server Hardware
Software images for specific hardware.
Operating System
Software images with this operating system.
Attribute
Filters operating system by attribute.
Applications
Images with this application.
Attribute
Filters applications by attribute.
-
Click Find Image to display the list of images that match your query.
Software Profiles
Depending on your I-Fabric implementation, you might be responsible for creating and managing hundreds of images. Hence, a complete description of each image is useful for you to distinguish one image from another. Software Profiles enables you to create and view a list of all operating systems and applications in use in your I-Fabrics so that you can apply these labels to the description of the image. There are four types of profiles:
-
Global operating systems—available to all accounts in an I-Fabric.
-
Global applications—available to all accounts in an I-Fabric.
-
Account operating systems—available to a specific account in an I-Fabric.
-
Account applications—available to a specific account in an I-Fabric.
 How To Create Global Operating System and
Application Profiles
Steps
-
Log into the Control Center Administration screen.
-
Click Software Profiles on the Tools Bar.
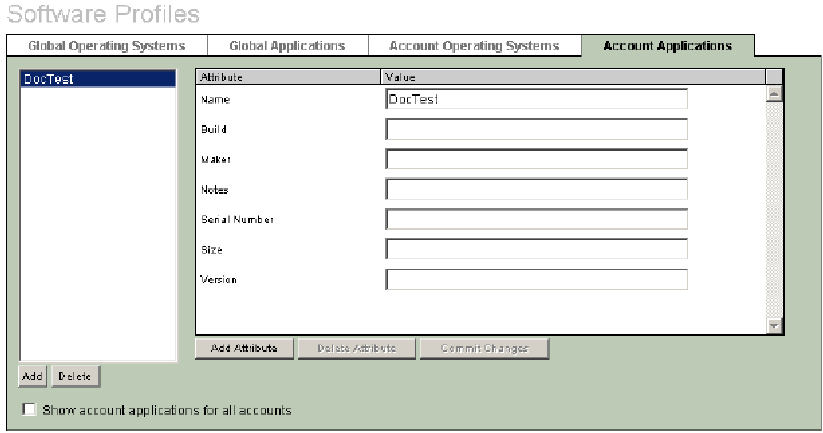
The Software Profiles screen appears as shown in Figure 5–3.
Figure 5–3 Software Profiles Screen
-
In the Global Operating Systems tab, click Add and enter the name of the operating system.
-
Enter a value for each attribute in your list.
Note –Attributes are configurable, so your list might be different than the one shown here.
-
To add an attribute to the list, click Add Attributes and enter the attribute label.
-
To delete an attribute from the list, select the attribute and click Delete Attribute.
Note –The attribute you add or delete applies to all images of the same category. For example, if you add attribute A to global OS OS1, attribute A will appear for global OS OS2.
-
-
Click Commit Changes when you are finished entering attribute information.
-
Continue entering global operating system names and attribute information.
-
Click the Global Applications tab and repeat the process for global software applications.
 How To Create Account Operating System
and Application Profiles
Steps
-
Select the appropriate account from the Current Account drop-down list in the upper right-hand side of the screen.
-
In the Account Operating Systems tab, click Add and enter the name of the operating system.
-
Enter a value for each attribute in your list.
Note –Attributes are configurable, so your list might be different than the one shown here.
-
Click Commit Changes when you are finished entering attribute information.
-
Continue entering account operating system names and attribute information.
-
Click the Account Applications tab and repeat the process for account software applications.
Data and Application Migration
Depending on what software is installed and configured to run at boot in the disk image, you have a number of remote access options for the servers in your farm. Typical options for servers include Telnet, Secure Shell (SSH), file transfer protocol (FTP), and so on. You can use these mechanisms to load data and software remotely. Alternatively, you can load from tapes or DVD-ROMs.
Also, if you have other active farms in the same account from which you would like to migrate data and access information, the snapshot mechanism is an effective way to move software and data from farm to farm.
Following are three example migration methods:
-
CD-ROM or DVD-ROM
Identify the physical server deployed in the farm. Use the command /opt/terraspring/sbin/lr -lv farm_ID to list details of the resources associated with the farm. Load the CD or DVD and migrate the application or data.
Note –To find the farm ID, issue the /opt/terraspring/sbin/fam —l command.
-
Tape Transport
Identify the physical server deployed in the farm using the command /opt/terraspring/sbin/lr -lv farm_id to list details of the resources associated with the farm. Connect a tape drive to the physical server. Extract the data from tapes to the server.
Note –This method is one of the methods to migrate data from tape to an I-Fabric.
-
Network Transport
Use virtual private network (VPN) FTP to migrate user data to the I-Fabric. For VPN, use a transport program such as FTP or WGET to transfer data over the secure, encrypted connection between the user site and the I-Fabric.
Creating, Managing, and Using Account Images
After you migrate your data and applications, you can create master images for each disk in the server through a process called snapshot. The result of the snapshot process is a stable image on disk from which a server can successfully boot and run. The snapshot, or a copy of a server disk in an active farm, is added into an account-level library of images. You can create an account image by using the snapshot mechanism for any combination of software and data present on a server disk.
If you choose, a disk snapshot request can automatically shut down a server to ensure that the resulting image is a stable, production-ready replication of the original image. During the last step of a snapshot request, the server is started up again automatically. Alternatively, you can manually shut down a server to take a snapshot, or take a snapshot without shutting down a server. If you snapshot a local disk, the server is shutdown by the system.
Note –
If you want to issue a farm update request after taking a snapshot, first ensure that the server has successfully restarted before you issue a farm update request. Otherwise, the farm update fails. To ensure that the server has restarted, execute the ping ip_address command.
Account images can be created by using the command-line or by using the Image Wizard. See Chapter 3, Managing Software Images in N1 Provisioning Server 3.1, Blades Edition, System Administration Guide. Account images can also be created by using the snapshot tool in the Control Center. See Snapshot Best Practices.
Another type of image, called a global image, can be used by any farm in any account. However, when you use the snapshot tool to create a software image, the image is the result of a snapshot of a disk in use within a farm and is therefore account specific.
Note –
For more information on managing global images, see Chapter 3, Managing Software Images in N1 Provisioning Server 3.1, Blades Edition, System Administration Guide.
In addition to software images, the Control Center enables you to take a snapshot of the configuration of load balancers. The snapshot is for element failover purposes. The snapshot images cannot be used to copy configurations to other load balancers.
If you choose to allow the software to automatically shut down the server to take a snapshot of an image, change an image, or delete a disk of an Active farm server, the following process occurs:
-
Server is shut down
-
Snapshot image is created
-
Server is started
This process normally takes 25 to 35 minutes for a 750 MB volume for local storage.
The software enables you to decide whether the server should be shutdown during a snapshot. If you choose to let the software perform a shutdown during a snapshot, the server is removed from monitoring and shut down. A snapshot of the specified disk is made, the server is rebooted, and reregistered the server with monitoring.
However, if you do not want to let the software do the shutdown, the software just takes the snapshot of the disk. The software does not perform any steps related to server shutdown.
For a local disk snapshot, you are not provided with any options. The server is always shutdown automatically.
If you shut down the server manually, a failed device request is generated if the server is still being monitored. To avoid this failed request, before the server is shutdown, unregister the server from monitoring and subsequently register the server on the server's command-line interface.
Run the following command on the server to unregister the server from monitoring:
opt/terraspring/sbin/tsprmonitor -stop \ [ Minutes to reboot (default 20 minutes) ] [ -c] |
Running this tool on the server stops monitoring while you shut down the server for the specified amount of time in minutes. The default is 20 minutes. You can run this tool again to extend the time as required. To start the monitoring process again, reboot the server.
The -c option gives you the option to wait for a confirmation that the request to stop monitoring is confirmed. If you use the -c option, tsprmonitor returns with the confirmation that the server is not be monitored. Without the option, you should wait for ten minutes before rebooting the server.
Managing Account Images
The Image Management option in the Account screen provides you with a list of account software images within the I-Fabric to help you keep track of these images on an ongoing basis.
Note –
The Image Management option in the Account screen is very similar to the Image Management option in the Administration screen described in Chapter 4, Managing Software Images.
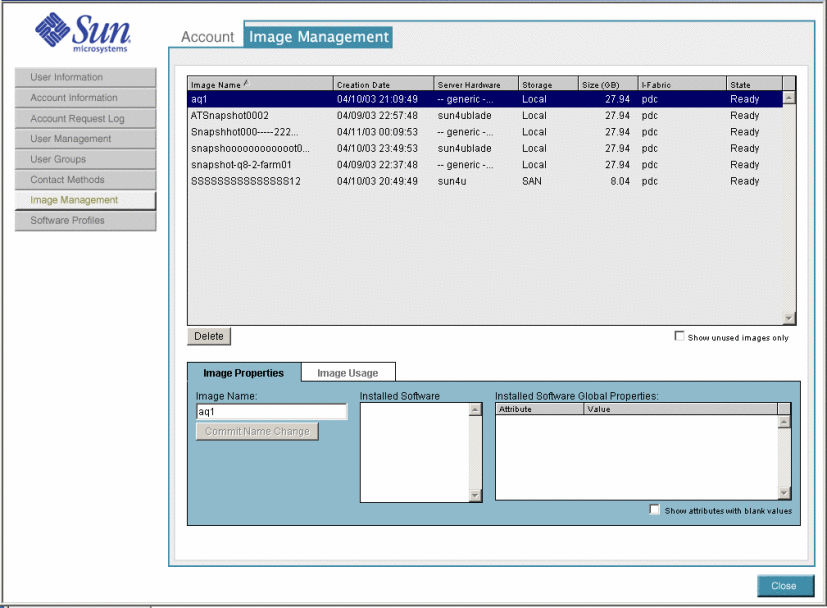
Account images that you created by using the command-line interface or by using the Image Wizard or by using the snapshot feature in the Control Center appear in this screen as shown in Figure 5–4. See Chapter 5, Image Management for information about command-line options and Image Wizard menus.
Snapshot Best Practices
For ease of image management, you can do the following tasks:
-
Create a software profile for software images, and keep the description up to date.
-
Create a staging server for preparing images and taking snapshots. The server can be flexed in or out as required and will go down for snapshot.
-
Use an image naming scheme to keep track of versions of a snapshot.
-
Create images based on the role of the machine, for example, web server, database server, and so on.
-
Remove unused images when possible to free storage space.
 How To Manage Account Images
Steps
-
Click Image Management to view the Account Image Management screen shown in Figure 5–4.
Figure 5–4 Account Image Management Screen
-
Filter the images by clicking the Show unused images only check box.
This option displays software images that are not currently deployed.
The Image List displays the following information about the images: Image Name, Creation Date, Server Hardware, Size (in GB), I-Fabric, and current State.
-
Click a specific software image to display additional information.
-
Click Delete to delete the software image from the account.
-
Click Close to exit.
Managing Account Software Profiles
End users, as well as administrators, can be responsible for managing multiple software images. However, end users do not have access to the Administration screen. Instead, end users use the Software Profiles option from the Account screen to create software profiles.
Note –
The process of creating an account software profile is very similar to creating software profiles by using the Administration screen as described in Software Profiles.
 How To Manage Account Software Profiles
Steps
-
From the Navigation Bar, click Account.
-
Click Software Profile.
The Account Software Profiles screen appears.
-
In the Account Operating System tab, click Add.
-
Type the operating system name in the field provided.
-
For each attribute listed, enter an appropriate value.
-
Click Commit Changes when you have finished entering information.
Note –The list of attributes is configured in the Administration Software Profiles screen. Refer to Software Profiles for information on how to change this list.
-
In the Account Applications tab, click Add.
-
Type the application name in the field provided.
-
For each attribute listed, enter an appropriate value.
-
Click Commit Changes when you have finished entering information.
-
Click Close.
Using an Account Software Image
The account software image can be used to change or update the contents of volumes in active farms.
An image update overwrites the selected disk volumes on all servers in the group. You lose all existing data on these volumes and all servers reboot.
 How To Use an Account Software Image
Steps
-
Select an Active farm, and open the farm in the Editor.
-
Right-click the server on which to deploy a software image and click Configure

-
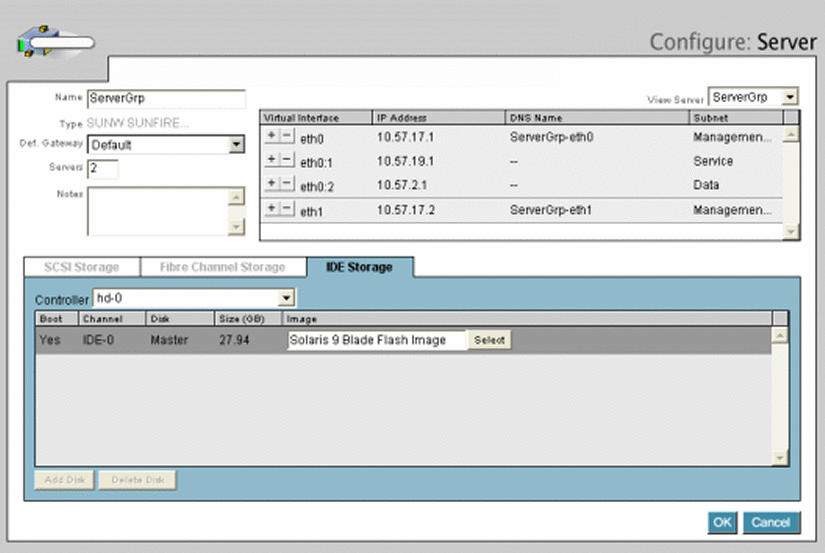
The Configure: Server screen appears.
-
In IDE Storage tab, click Select.
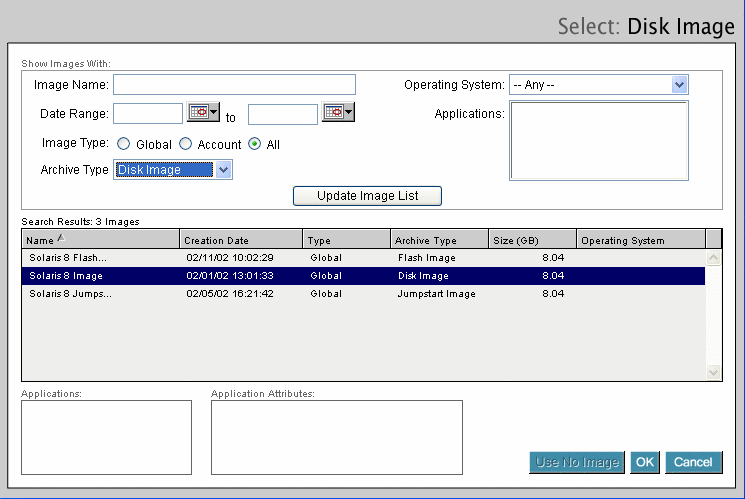
The Select Disk Image screen appears.
-
Filter the image list by using the following fields:
-
Image Name–displays the software image with this name.
-
Date Range–displays software images that were created within the date range.
-
Image Type–displays software images that are global, for a specific account, or for images that are both global and account.
-
Operating System–select an operating system from the drop-down list.
-
Applications–displays specific applications.
-
Archive Type–select Any, Disk, Flash, or JumpStart archive type.
-
-
Click Update Image List to display the list of images that match your query.
-
Select an appropriate software image.
-
Click OK.
When you change the image on a disk, a warning message is displayed to alert you that the server will be shut down or rebooted for your request to complete successfully.
-
Click OK to apply the disk image or Cancel to terminate the process.
-
Click OK to exit the Server configuration screen.
Creating an Account Image By Using Snapshot
There are three different image archive types.
-
A Disk Image is a byte level archive of the contents of a disk.
-
A Flash Image is a file system level archive of contents of a disk as created by Solaris Flash archive mechanism.
-
A JumpStart Image, in contrast with other two archive types (disk image and flash image) cannot be used with the Snapshot option.
Before you begin the snapshot process, build the image to the desired specification.
 How To Create an Account Image By Using Snapshot
Steps
-
Open an active farm in the Editor, and right-click the server and select Snapshot Image.

-
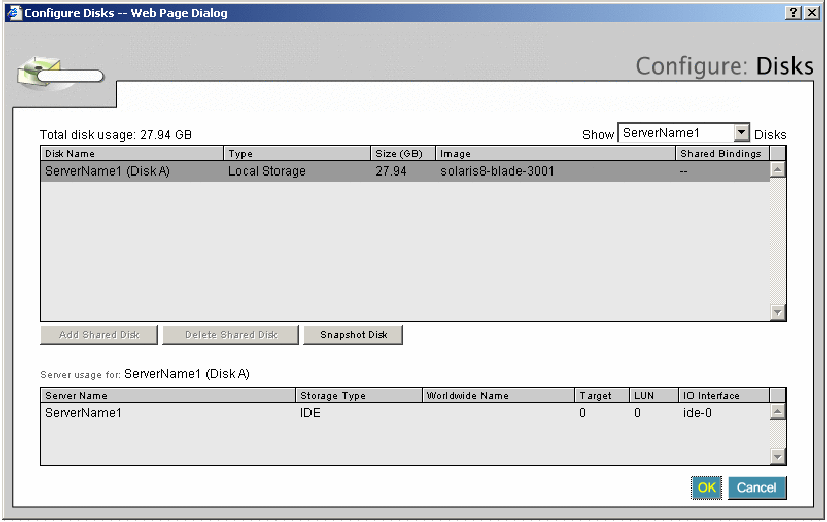
The Configure: Disks dialog appears.
-
In Show, select the server to be used to create the image from the list.
-
Select the disk for which you wish to create a snapshot.
-
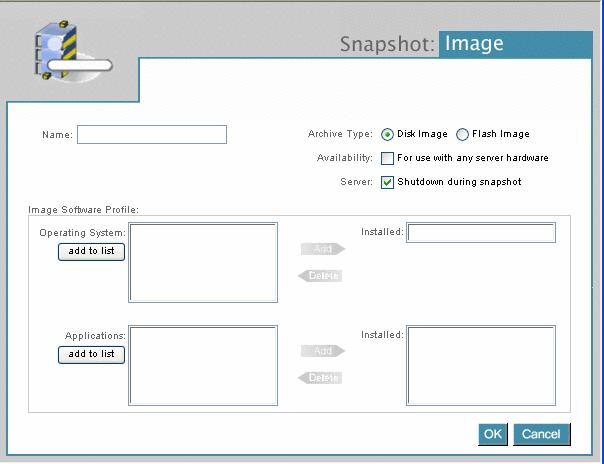
The Snapshot: Image dialog box appears.
-
In Name, enter a unique image name that does not include backslash, apostrophe, double quote, or angle bracket characters.
-
In Archive Type, select the archive radio button to indicate the type of image to snapshot.
-
In Availability, select For Use With Any Server Hardware to indicate that any architecture is allowed at the time of deployment. This might be used with raw disk data that is server independent.
-
In Server, select Shutdown During Snapshot to indicate whether that you want the software to automatically reboot the server.
Note –If you click this option, the software performs a shutdown during a snapshot. The server is removed from monitoring an, shut down. A snapshot of the specified disk is made, the server is rebooted and the server is re-registered with monitoring.
If you do not want to let the software do the shutdown, the software just takes the snapshot of the disk.
-
-
Configure the Image Software Profile to describe the content of the snapshot.
Note –This action is a way to catalog the contents of the image and does not affect the actual data content of the snapshot image.
-
In Operating System, select the operating system name that best describes the OS contained on the image from the list and click the Add arrow to display it in the installed section.
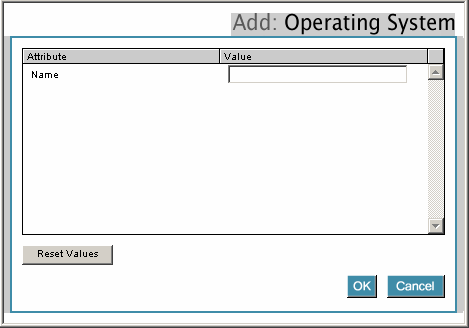
If the appropriate operating system is not included in the list, click the Add to List button to display the Add: Operating System dialog as shown in Figure 5–5.
Figure 5–5 Add: Operating System Screen
-
Click to select an attribute and enter a value that is appropriate for this attribute.
When you have entered all values, click OK to save your changes and close the window. Attributes can be customized, so your list might vary from the one shown in Figure 5–5.
-
In Application List, select the name of the application from the list and click the Add arrow to display the application in the installed section.
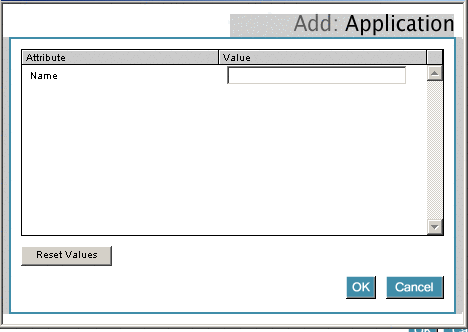
Continue adding applications as necessary to reflect the actual software contained on the image. If the appropriate applications are not included in the list, click the Add to List button to display the Add: Application dialog as shown in Figure 5–6.
Figure 5–6 Add: Application Screen
-
Click to select an attribute and enter the value that is appropriate to this attribute.
When you have entered all values, click OK to save your changes and close the window. Attributes can be customized, so your list might vary from the one shown in Figure 5–6.
-
Click OK to validate the information and submit the request, or click Cancel to abort.
If the software is shutting down your server, a message displays that informs you that the server will be shut down during the snapshot process and prompts whether you want to proceed.
-
Click OK to proceed and create the image.
After the software image is created, the image is available as part of a library of account images that you can deploy on any server in farms within the account.
Note –You might not see the snapshot you just created in the list of images in the server group if the snapshot is still in progress. You can check your request status by following the instructions in the section Viewing Farm Details.
After the software image is created, the image is available to deploy on any server in farms within the account.
Load Balancer Snapshot
The Control Center also allows you to snapshot the configuration of load balancers of Active farms. Taking a snapshot requires user access privileges. Unlike server snapshot (used for copying disk images), the load balancer snapshot mechanism is provided strictly to allow automatic failover of these elements to the previous configuration. Therefore, you cannot copy a load balancer image to another.
Any changes made to the load balancer configuration from the device's command line is not reflected in the Control Center configuration window. However, the snapshot mechanism captures the complete configuration, that is, all of your configurations made through the Control Center and directly through the device's command line.
If the element subsequently fails, the Control Center automatically replaces the element and restores all of your configurations using the snapshot image, which contains changes made through the Control Center and directly through the device's command line. Therefore, you are required to take a snapshot of the element whenever you make changes through the element command line.
 How To Snapshot Load
Balancer
Steps
-
Open an Active farm in the Editor, and right-click a load balancer element.
-
Select Snapshot.
The Snapshot Configuration screen appears.
-
Click Snapshot Now to request the server to snapshot the current load balancer.
 Caution –
 If you make any changes at the element command line after you snapshot an image, you are required to take a snapshot of the element again because it is not reflected in Control Center configuration dialog.
- © 2010, Oracle Corporation and/or its affiliates
