Sun GlassFish ESB Healthcare Pack Installation
This topic provides instructions to help you successfully install the healthcare components of GlassFish ESB using a graphical user interface (GUI). The Healthcare Pack includes the following components:
-
Sun Master Index
-
HL7 Binding Component
-
PIX/PDQ Solution
To access all the GlassFish ESB documentation in PDF and HTML format, go to the GlassFish ESB page on docs.sun.com (http://docs.sun.com/app/docs/prod/gf.entsvc.bus#hic).
What You Need to Know
What You Need to Do
Additional Information
The following provide reference information, plus information and instructions for using the HL7 Binding Component, Sun Master Index, the BPEL Service Engine, and the PIX/PDQ projects. These are the key components of the PIX/PDQ projects.
Installation Overview
The Sun GlassFish ESB Healthcare Pack is installed on top of an existing GlassFish ESB v2.2 environment. The installer automates several configuration tasks for the PIX/PDQ solution, such as creating database tables, creating the connection pools and JDBC resources, defining security, and so on.
The Healthcare Pack Installer allows you to customize your installation. You can install the full healthcare solution, just Sun Master Index, just the HL7 Binding Component (BC), or both Sun Master Index and the HL7 BC. In order to use the PIX/PDQ solution in the healthcare pack, both Sun Master Index and the HL7 BC need to be included in the installation.
Installation Process
When you install the complete Healthcare Pack, the installation wizard performs several tasks automatically, including the following:
-
Creates the databases and users in your MySQL 5.1 environment.
-
Creates the JDBC connection pools and data resources in the GlassFish domain.
-
Creates JMS resources for the Master Index JMS topic.
-
Creates application variables and configurations.
-
Creates user profiles in the GlassFish security file realm for web-based PIX/PDQ applications.
-
Builds and deploys the PIX/PDQ projects.
You can configure the installer not to perform these tasks or to only perform a subset of these tasks. If you opt to have the installer build and deploy the PIX/PDQ projects, several JBI components are started when you start the GlassFish server. These components include the BPEL Service Engine, HL7 Binding Component, HTTP Binding Component, and JMS Binding Component.
Important Installation Notes
By default, the Healthcare Pack Installer checks whether any of the artifacts listed above exists, and makes modifications to the MySQL installation or to the runtime environment based on whether they are found. If the artifacts already exist, the installer updates your environment as follows:
-
If a database schema named midm or arrdb exists in MySQL, it is dropped and replaced.
-
If a database user named mdm or arr exists in MySQL, it is dropped and replaced.
-
If a connection pool named cpPatientXA, cpPatientSequenceXA, or MyArrdbPool exists, the installer will not create the new connections pool nor will it update the existing one. The same goes for their corresponding JDBC resources.
-
If a JMS destination named PatientTopic, tHL7V3, tHL7V2, tSUNXDS, or tXDSMerge exist, the installer will not create the new destination nor will it update the existing one. The same goes for their corresponding JMS resources.
-
If a user named mdm, atna, or pixadmin exist in the GlassFish file realm, the user is updated by the installer.
Before You Install
Before beginning the installation, make sure you have GlassFish ESB already installed and that you know the location and port numbers for the installation. Running the installer creates the Master Index database and Audit database for you in a MySQL environment. This means you need to have MySQL installed and running before performing the installation unless you opt to skip the MySQL configuration.
Software Requirements:
-
GlassFish ESB v2.2
-
JDK 1.6.0_03 or later, but not JDK 1.6.0_13 or 1.6.0_14
-
MySQL Enterprise Server 5.1 with the following configuration
-
Allow remote host access (select Enable Root Access From Remote Machines).
-
Run the following against the root user prior to installation:
grant all privileges on *.* to 'root'@'hostname' with grant option;
-
Copy the MySQL driver file, mysql-connector-java-5.1.7-bin.jar, to glassfish-home/lib, or add the path to the driver to the GlassFish JVM classpath.
-
You should stop NetBeans and any Binding Components running on the domain before running the installer.
Cluster Requirements If you are installing the Platinum Pack into a clustered environment, perform the following steps in the order given before you begin:
-
Shut down all components in the cluster that use the encoder shared library, such as the File BC and FTP BC.
-
Uninstall the encoder library from the cluster.
-
Stop the cluster and the application server.
Installing the Healthcare Pack With Default Configuration (Quick Start)
The following procedure describes how to install Healthcare Pack quickly and with minimal configuration. This type of installation allows you get quickly up and running with the PIX/PDQ projects, and is good for test environments.
Before installing the Healthcare Pack, review the information under Installation Overview, which explains what is installed. When installing the Healthcare Pack on UNIX systems, such as Solaris machines, you need to set the DISPLAY variable to install in GUI mode. For more information, see Installing the Healthcare Pack With Custom Configuration.
 To Perform a Default Installation
Before You Begin
If you are performing a complete installation and you want the installer to create the database automatically, you must have a running installation of MySQL 5.1. To perform the installation with no configuration, the database needs to use port 3306. These instructions also assume that your GlassFish ESB environment is using the default port numbers. If your GlassFish ESB installation is configured with custom port numbers, follow the instructions under Installing the Healthcare Pack With Custom Configuration.
Before you can install any components of this pack, GlassFish ESB v2.2 must be installed.
-
Exit from all programs prior to beginning the installation.
-
Locate the Healthcare Pack Installer file on your installation media.
The file is named healthcarepack-v2.2-installer.jar.
-
To start the installation, either double-click the healthcarepack-v2.2-installer.jar file or run the following command:
java -jar healthcarepack-v2.2-installer.jar
The Healthcare Pack Installer wizard appears.

-
On the installer Welcome window, click Next.
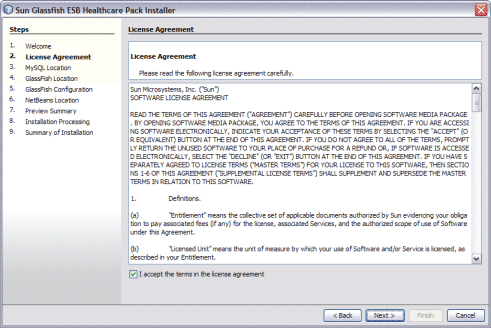
The License Agreement window appears.
-
Accept the License Agreement and then click Next.
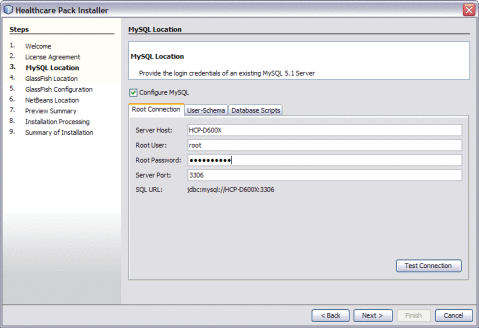
The MySQL Location window appears.
-
On the Root Connection tab of the MySQL Location window, enter the root password. Click Test Connection to verify the values.
Tip –If you do not want to create the MySQL database, deselect Configure MySQL. If you already have an existing MySQL schema named midm or arrdb, they will be overwritten unless you deselect Configure MySQL.
-
Click Next.
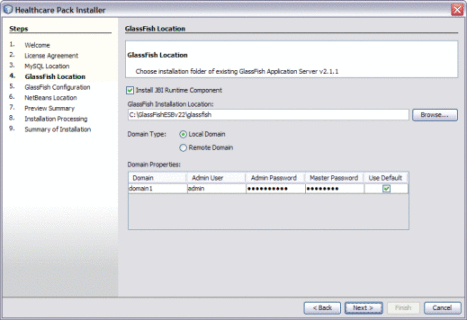
The GlassFish Location window appears.
-
On the GlassFish Location window, accept or modify the default values.
Note –The default admin password is adminadmin and the default master password is changeit. If you need to change the master password, run the following command:
asadmin change-master-password new-password
Substitute the actual password for new-password.
-
Click Next.
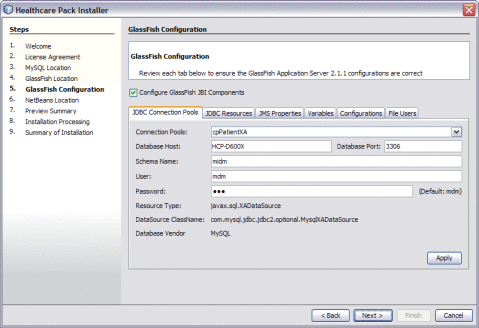
The GlassFish Configuration window appears.
-
Click Next to accept the default values.
The NetBeans Location window appears.
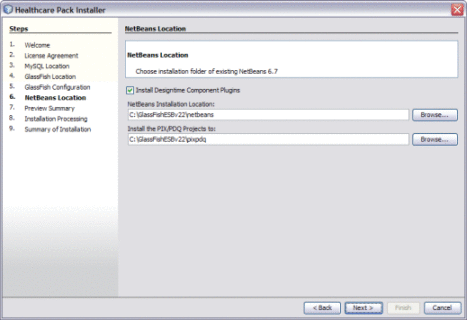
Note –When installing on Mac OS, the path to select is GlassFishESB_Home/netbeans.app/Contents/Resources/netbeans.
-
Accept or modify the default values, and then click Next.
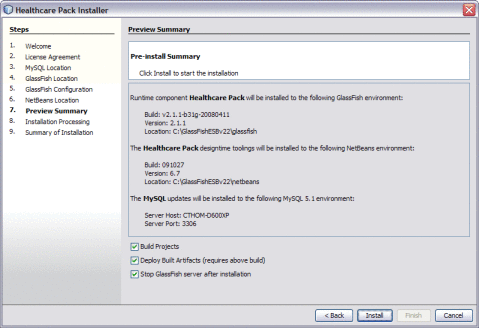
The Preview Summary window appears.
-
Click Install.
Note –Unless you deselect the options at the bottom of the page, the PIX/PDQ projects will all be built and deployed following installation. By default, the GlassFish server is shut down after the installation is complete. If you select Stop GlassFish Server After Installation, be sure to restart the server when the installation is done.
-
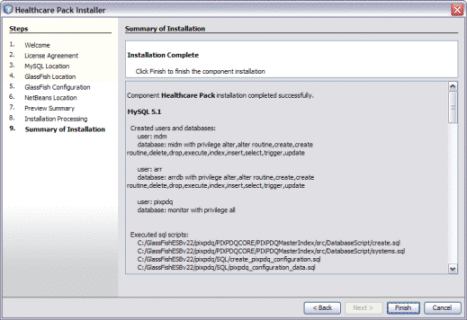
When the installation is complete, click Finish.
Installing the Healthcare Pack With Custom Configuration
The following procedures describe how to install the complete Healthcare Pack with full configuration. This includes configuring the databases and database users, connection pools, JMS topic, application variables and configurations, and security for the PIX/PDQ consoles. Before installing the Healthcare Pack, review the information under Installation Overview, which explains what is installed.
When installing the Healthcare Pack on UNIX systems, such as Solaris machines, you need to set the DISPLAY variable to install in GUI mode. How you do this depends on how you connect to your system.
If you receive the error message “No X11 DISPLAY variable was set, but this program performed an operation which requires it” and you use the SSH command to connect to your system from another UNIX machine, you need to set the DISPLAY variable.
-
C shell with localhost as the host name
setenv DISPLAY localhost:0.0
-
Korn shell with localhost as the host name
DISPLAY localhost:0.0
export DISPLAY
If you use X Windows software, such as Exceed, the DISPLAY variable is set for you automatically. Do not use telnet if you install on a Windows system.
Follow these steps in the order given to perform a custom installation of the Healthcare Pack:
 To Begin the Installation
Before You Begin
If you are performing a complete installation and you want the installer to create the database automatically, you must have a running installation of MySQL 5.1. Before you can install any components of this pack, GlassFish ESB v2.2 must be installed.
-
Exit from all programs prior to beginning the installation.
You can cancel the installation at any time during the process.
-
Locate the Healthcare Pack Installer file on your installation media.
The file is named healthcarepack-v2.2-installer.jar.
-
To start the installation, either double-click the healthcarepack-v2.2-installer.jar file or run the following command from the command line:
java -jar healthcarepack-v2.2-installer.jar
The Healthcare Pack Installer wizard appears.

-
On the installer Welcome window, click Next.
The License Agreement window appears.

-
Accept the License Agreement and then click Next.
-
Continue to To Configure MySQL.
 To Configure MySQL
You can configure the installer to automatically create the database tables for the healthcare projects. You can also configure the user passwords and schema names for the databases, and view the scripts that will be run.
Tip –
If you do not want to create the MySQL database, deselect Configure MySQL. If you already have an existing MySQL schema named midm or arrdb, they will be overwritten unless you deselect Configure MySQL.
-
Complete the steps under To Begin the Installation.
-
On the MySQL Location window, either deselect Configure MySQL, or perform the following steps.
If Configure MySQL is not selected, the required databases for the PIX/PDQ are not automatically created.

-
On the Root Connection tab, verify or update the Server Host, Root User, and Server Port fields, and enter the root password for MySQL.
The default MySQL port number is 3306.
-
Click Test Connection to make sure the information is valid and MySQL is running.
-
Click the User-Schema tab.
The User-Schema page defines one user, mdm, for the Master Index and PIX/PDQ database, and another user, arr, for the Audit database. The default passwords are the same as the user names.

-
Accept the default user passwords and schema for each database, or do any of the following:
-
In the User field, select mdm, and then modify the Password and Schema name for the Master Index and PIX/PDQ database.
-
In the User field, select arr, and then modify the Password and Schema name for the Audit database.
Note –Make a note of any changes you make here, because you will need to update the JDBC connection pool information accordingly.
-
-
To view the database scripts that will be run to create the required databases, do the following:
-
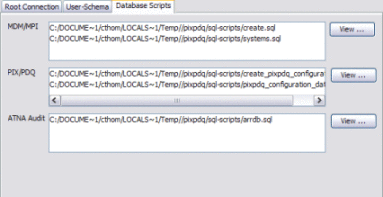
Click the Database Scripts tab.
-
Select a script from any of the three boxes, and then click View next to that box.
The script appears in read-only view.
Note –The MDM/MPI scripts create the core master index tables. The PIX/PDQ scripts create tables specific to the PIX/PDQ solution. The ATNA Audit scripts create the Audit database.
-
-
Click Next.
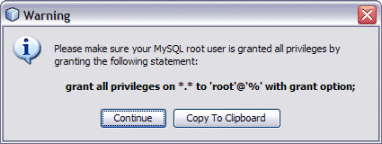
A warning dialog appears to verify that your MySQL root user has the required privileges.
-
Do one of the following:
-
Continue to To Specify the GlassFish Location.
 To Specify the GlassFish Location
This task ensures that the Healthcare Pack is installed to the correct domain.
-
Complete the steps under To Configure MySQL.
-
On the GlassFish Location window, deselect Install JBI Runtime Component if you do not want to install the GlassFish components. Otherwise, perform the following steps.

-
Accept or modify the location for the GlassFish server.
-
Select either Remote Domain or Local Domain, depending on your server configuration.
-
Accept the default connection and login properties for the domain, or update the values if you have customized the administrator login information.
Note –The default admin password is adminadmin and the default master password is changeit. If you need to change the master password, run the following command:
asadmin change-master-password new-password
Substitute the actual password for new-password.
-
Click Next.
-
Continue to To Configure Runtime Components.
 To Configure Runtime Components
The Installer creates several runtime components for you, included connection pools, JDBC and JMS resources, application variables and configurations, and user profiles for console security. The following instructions explain how to configure each of these.
-
Complete the steps under To Specify the GlassFish Location.
-
On the GlassFish Configuration window, deselect Configure GlassFish JBI Components if you do not want the runtime components to be automatically created by the installer. Otherwise, complete the following steps.

-
To configure the automatically created connection pools, do the following:
Note –This step is optional. If you accepted the default values on the MySQL Location window, you should skip this step. Only change the values on this page if you modified the MySQL information or if you are using a different database.
-
Click the JDBC Connections Pools tab.
-
Select any of the predefined connection pools to customize the pool.
-
Modify any of the open fields.
For more information on the predefined connection pools and the fields on this tab, see JDBC Connection Pool Fields.
-
Click Apply.
-
Repeat the above steps to configure a different connection pool.
-
-
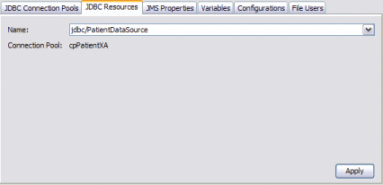
To view the automatically created JDBC resources, click the JDBC Resources tab.
These correspond to the predefined connection pools above and cannot be modified.
-
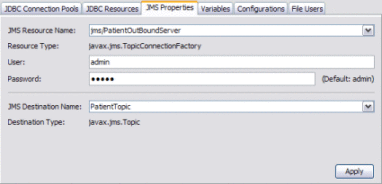
To configure the username and password for the Master Index outbound topic, do the following:
-
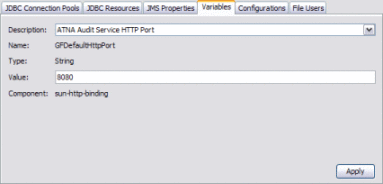
To modify the values for the predefined application variables, do the following:
-
Click the Variables tab.
-
In the Description field, select the variable to modify.
For more information about the predefined variables, see Predefined Application Variables.
-
Modify the Value field and click Apply.
-
Repeat the above steps for each variable to modify.
-
-
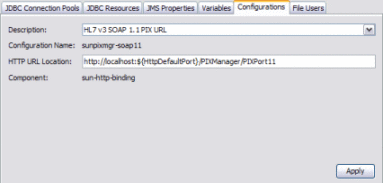
To modify the values for the predefined application configurations, do the following:
-
Click the Configurations tab.
-
In the Description field, select the configuration to modify.
For more information about the predefined configurations, see Predefined Application Configurations.
-
Modify the Value field and click Apply.
-
Repeat the above steps for each configuration to modify.
-
-
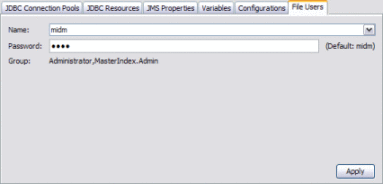
To modify the passwords for the data management and monitoring tools, do the following:
-
Click Next.
-
Continue to To Specify the NetBeans Location.
 To Specify the NetBeans Location
This step ensures that the Healthcare Pack is installed to the correct instance of NetBeans.
-
Complete the steps under To Configure Runtime Components.
-
On the NetBeans Location window, deselect Install JBI Runtime Component if you do not want to install the GlassFish components. Otherwise, perform the following steps.

-
Accept or modify the location for the NetBeans home directory.
Note –When installing on Mac OS, the path to select is GlassFishESB_Home/netbeans.app/Contents/Resources/netbeans.
-
Accept or modify the location where the PIX/PDQ projects will be installed.
-
Click Next.
-
Continue to To Complete the Installation.
 To Complete the Installation
In the final installation step, you can specify whether projects are built and deployed, and whether the GlassFish server is shut down following the installation.
-
Complete the steps under To Specify the NetBeans Location.
-
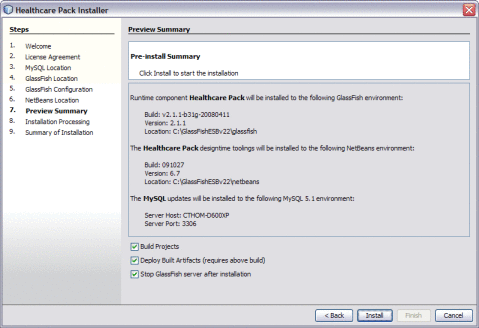
On the Preview Summary review your installation selections. If you have any changes, use the Back button to navigate back through the wizard.
-
If you want the PIX/PDQ projects to be automatically built following installation, select Build Projects.
-
If you want the PIX/PDQ projects to be automatically built and deployed following installation, select both Build Projects and Deploy Built Artifacts.
-
If you do not want the installer to stop the GlassFish server after installation, deselect Stop GlassFish Server After Installation.
Note –If you deselect this option, be sure to restart the server once installation is complete.
-
Click Install.
-
When the installation is complete, the Summary of Installation window appears, and displays a message letting you know whether or not the installation was successful.

Installer Field Descriptions
The following topics describe fields on the GlassFish Configuration window of the Installer:
JDBC Connection Pool Fields
The fields on the JDBC Connection Pool tab of the GlassFish Configuration window configure the connection pools that are automatically created by the installer. If you configured the installer to automatically create the Healthcare Pack databases, the information you specify in the JDBC Connection Pool fields should match the information you specified in To Configure MySQL. If you did not change the fields for the MySQL database, you can accept the default values on this page. If you are not using the installer to create the database and are using a different database instead, the field values on this page should match the information for the database you are using.
Predefined Application Variables
The following table lists and describes the application variables that are predefined for the PIX/PDQ system. The port numbers and variables are based on the default GlassFish ESB port numbers. If you customized your port numbers, you need to modify the corresponding variable values.
|
Variable Name |
Variable Description |
Variable Value |
|---|---|---|
|
GFDefaultHttpPort |
ATNA Audit Service HTTP Port |
The port number your domain is listening on for HTTP requests. The default value is 8080. |
|
jmsURL |
PIX Update Notification JMS URL |
The URL to the Java MQ server you are using. The default value is mq://localhost:7676. |
|
sunpixmgr-v2–url |
HL7 v2 Listening URL |
The URL used to connect to the HL7 v2 external system. The default value is hl7://localhost:3600 |
|
sunpixmgr-application |
PIX Update Sender HL7 v2 Application |
The HL7 v2 sending application. The default value is SUGA. |
|
sunpixmgr-facility |
PIX Update Sender HL7 v2 Facility |
The HL7 v2 sending facility. This value further identifies the sending application. The default value is SUNVAN. |
|
sunpixmgr-device |
PIX Update Sender Hl7 v3 Device |
The HL7 v3 sending device. The default value is 2.1.12^654. |
|
sunpixmgr-organization |
PIX Update Sender HL7 v3 Organization |
The HL7 v3 sending organization. There is no default value since this is not a required property for HL7 v3. |
Predefined Application Configurations
The following table lists and describes the application configurations that are predefined for the PIX/PDQ system. The application configurations are only used with the HL7 v3 projects. If you are using HL7 v2, you do not need to modify these values.
|
Configuration Name |
Configuration Description |
Configuration Value |
|---|---|---|
|
sunpixmgr-soap11 |
HL7 v3 SOAP 1.1 PIX URL |
The default value is http://localhost:${HttpDefaultPort}/ PIXManager/PIXPort11. |
|
sunpdqsup-soap11 |
HL7 v3 SOAP 1.1 PDQ URL |
The default value is http://localhost:${HttpDefaultPort}/ PDQSupplier/PDQPort11. |
|
sunpixmgr-soap12 |
HL7 v3 SOAP 1.2 PIX URL |
The default value is http://localhost:${HttpDefaultPort}/ PIXManager/PIXPort12. |
|
sunpdqsup-soap12 |
HL7 v3 SOAP 1.2 PDQ URL |
The default value is http://localhost:${HttpDefaultPort}/ PDQSupplier/PDQPort12. |
Installing Sun Master Index Only
The following procedure describes how to install just Sun Master Index using the Healthcare Pack Installer. Before installing the Sun Master Index, review the information under Installation Overview, which explains what is installed. Sun Master Index uses a database to store information about patients and to track a patient's history. You do not need to have the database platform installed to install Master Index, but you do need to install the database in order to work with Master Index. Master Index support the following database platforms:
-
MySQL Enterprise Server 5.1
-
Oracle 10g and 11g
-
Microsoft SQL Server 2005 and 2008
Note –
When installing Sun Master Index on UNIX systems, such as Solaris machines, you need to set the DISPLAY variable to install in GUI mode. For more information, see Installing the Healthcare Pack With Custom Configuration.
 To Install Sun Master Index
Before You Begin
Before you can install Master Index, GlassFish ESB v2.2 must be installed.
-
Exit from all programs prior to beginning the installation.
You can cancel the installation at any time during the process.
-
Locate the Healthcare Pack Installer file on your installation media.
The file is named healthcarepack-v2.2-installer.jar.
-
To start the installation, either double-click the healthcarepack-v2.2-installer.jar file or run the following command from the command line:
java -jar healthcarepack-v2.2-installer.jar
The Healthcare Pack Installer wizard appears.

-
On the installer Welcome window, click Customize.
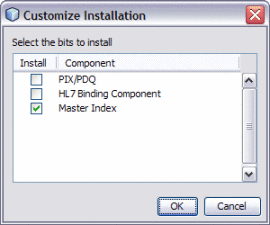
The Customize Installation dialog box appears.
-
Deselect PIX/PDQ and then select Master Index. Click OK.
-
On the installer Welcome window, click Next.
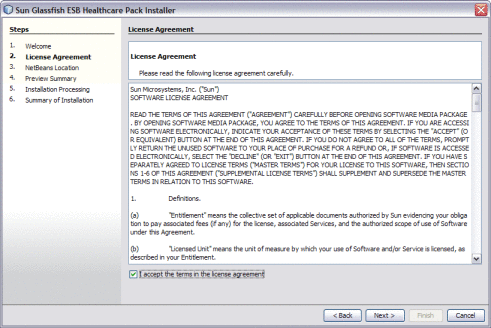
The License Agreement window appears.
-
Accept the License Agreement and then click Next.
The NetBeans Location window appears.

Note –When installing on Mac OS, the path to select is GlassFishESB_Home/netbeans.app/Contents/Resources/netbeans. There are no GlassFish components to install for Master Index, so you do not need to provide the GlassFish server home directory for this installation.
-
Accept or modify the location for the NetBeans home directory, and then click Next.
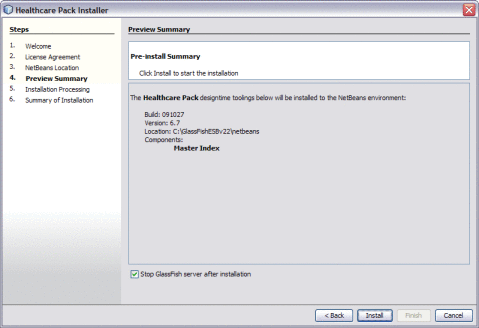
The Preview Summary window appears.
-
Review your installation selections. If you have any changes, use the Back and Next buttons to navigate back through the wizard.
-
If you do not want the installer to stop the GlassFish server after installation, deselect Stop GlassFish Server After Installation.
Note –If you deselect this option, be sure to restart the server once installation is complete.
-
When you are ready, click Install.
-
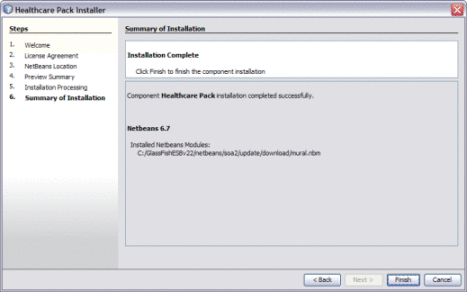
When the installation is complete, the Summary of Installation window appears, and displays a message letting you know whether or not the installation was successful.
Installing the HL7 Binding Component Only
The following procedure describes how to install just the HL7 Binding Component using the Healthcare Pack Installer. Before installing the HL7 BC, review the information under Installing the Healthcare Pack With Custom Configuration, which explains what is installed.
Note –
When installing HL7 on UNIX systems, such as Solaris machines, you need to set the DISPLAY variable to install in GUI mode. For more information, see Installing the Healthcare Pack With Custom Configuration.
 To Install the HL7 Binding Component
Before You Begin
Before you can install the HL7 BC, GlassFish ESB v2.2 must be installed.
-
Exit from all programs prior to beginning the installation.
You can cancel the installation at any time during the process.
-
Locate the Healthcare Pack Installer file on your installation media.
The file is named healthcarepack-v2.2-installer.jar.
-
To start the installation, double–click the healthcarepack-v2.2-installer.jar file or run the following command from a command line:
java -jar healthcarepack-v2.2-installer.jar
The Healthcare Pack Installer wizard appears.

-
On the installer Welcome window, click Customize.
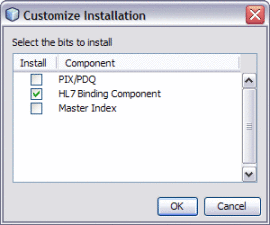
The Customize Installation dialog box appears.
-
Deselect PIX/PDQ and then select HL7 Binding Component. Click OK.
-
On the installer Welcome window, click Next.
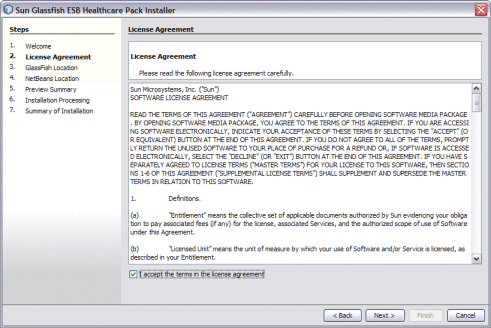
The License Agreement window appears.
-
Accept the License Agreement and then click Next.
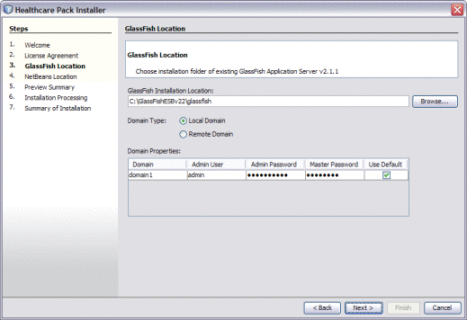
The GlassFish Location window appears.
-
Accept the default values for the following properties, or modify them as needed:
-
The path to the GlassFish server.
-
Whether you are installing to a remote or local domain.
-
The connection and login properties for the administrator user.
Note –The default admin password is adminadmin and the default master password is changeit. If you need to change the master password, run the following command:
asadmin change-master-password new-password
Substitute the actual password for new-password.
-
-
Click Next.
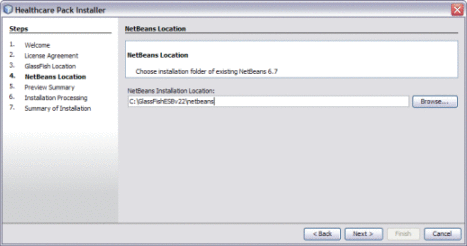
The NetBeans Location window appears.
-
Accept or modify the location for the NetBeans home directory.
Note –When installing on Mac OS, the path to select is GlassFishESB_Home/netbeans.app/Contents/Resources/netbeans.
-
Click Next.
The Preview Summary window appears.

-
Review your installation selections. If you have any changes, use the Back and Next buttons to navigate back through the wizard.
-
If you do not want the installer to stop the GlassFish server after installation, deselect Stop GlassFish Server After Installation.
Note –If you deselect this option, be sure to restart the server once installation is complete.
-
When you are ready, click Install.
The Installation Processing window appears, and displays the progress of the installation.
-
When the installation is complete, the Summary of Installation window appears, and displays a message letting you know whether or not the installation was successful.

Starting GlassFish ESB
To start NetBeans and the GlassFish server after the initial installation, navigate to the GlassFish ESB install directory or to the directory where the component is installed that you want to start. Run the appropriate command as describe in the table below.
|
Component |
From GlassFish ESB Installation Directory |
|---|---|
|
NetBeans IDE |
Windows GUI: Double-click the NetBeans desktop icon, select NetBeans from the Start menu, or run install-directory\start_netbeans.bat. Mac OSX GUI: Select the NetBeans icon in the Dock or double-click NetBeans.app in the GlassFish ESB home directory. UNIX: Run the executable file in install-directory/netbeans/bin. |
|
GlassFish Server |
Windows GUI: Double-click install-directory\start_glassfish_domain_name.bat Mac OSX GUI: Double-click install-directory\start_glassfish_domain_name UNIX: Run asadmin start-domain from install-directory/glassfish/bin Note – You can also start the GlassFish server from the Services tab on the NetBeans IDE. |
- © 2010, Oracle Corporation and/or its affiliates

