When you start Process Builder, you see a window like the one shown in Figure 1.1.
Figure 1.1 Select an Application window
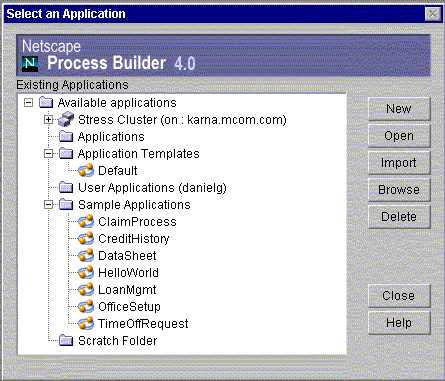
In the left pane, this window lists all clusters, the applications deployed to them, and applications saved locally in the application directories. The applications in the clusters have labels indicating whether they were deployed in the development stage or in the production stage.
Before a cluster appears in this window, the PAE administrator must create it, and you must have edited your preferences.ini file to contain the correct cluster information. For more information on clusters in your environment, contact your administrator. Some of the local folders are also defined in the preferences.ini file.
For more information about the preferences.ini file, see "The preferences.ini File" on page 31.
The following local folders are provided by default:
Applications.
The main folder for storing applications.
Application Templates.
The folder where you store applications that you base other applications on. For example, if your applications share many elements in common, you might want to designate a template application, save it to this folder, and use it as a basis for future applications. A sample template application, Default, is included in this folder as an example.
User Applications.
A folder for applications stored by user. On Unix, this folder is your default user home directory.
Sample Applications.
A folder that contains all the applications shipped as samples with Process Builder. This folder is defined in your preferences.ini file.
Scratch Folder.
A folder for storing temporary, or scratch, versions of your applications. This folder is defined in your preferences.ini file.
The right pane contains the following buttons:
New.
Creates a new application.
Open.
Opens the application selected in the tree.
Import..
Use this button to import an existing application into your Process Builder. The application must be a .zip file, for example, an application zipped and sent via email. The import function unzips the application into the selected folder and opens the application for editing.
Browse.
Navigates through the file system to open applications stored outside your local applications folders. Choose the LDIF file of the application you want to open. (LDIF is a file format for storing directory entries). LDIF files have the same names as the application and the folder the application is stored in.
Delete.
Deletes the selected application. You cannot delete applications that have been deployed. Deployed applications can be deleted only by the administrator.
Cancel.
Closes the window, but leaves Process Builder running.
Sometimes a cluster icon has a red "x" in it, as shown in Figure 1.2:
Figure 1.2 Cluster error
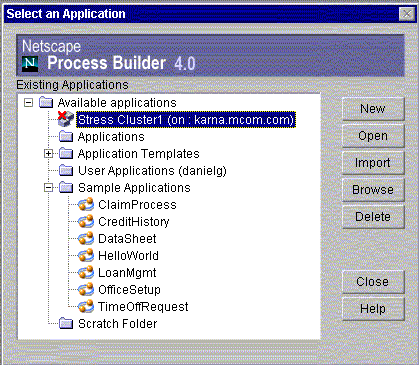
This icon indicates that Process Builder is unable to access a cluster, and appears when Process Builder cannot access the configuration directory. If you see this icon:
Your administrator can also help you solve cluster problems.
Process Builder Applications
Figure 1.3 shows a sample view of Process Builder when you open an existing application (the CreditHistory application in this case).
Figure 1.3 A Process Builder application
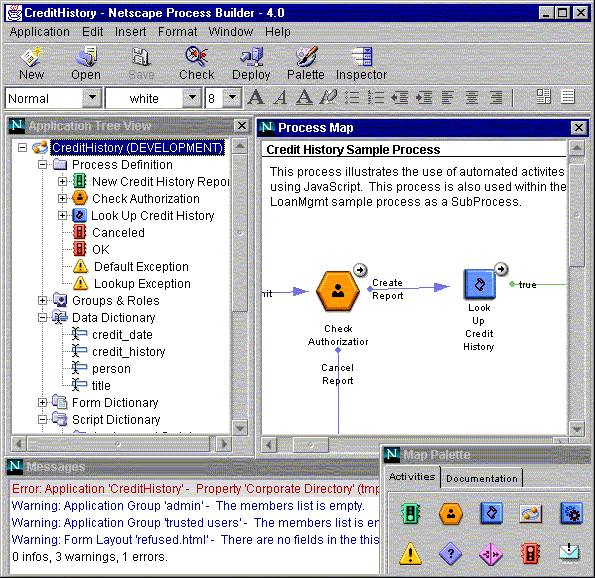
Within each application, Process Builder provides the following views and tools:
You use these views and tools to create and edit applications. In addition, some commands are available by right-clicking on an element in the application tree view or process map.
Application Tree View
The application tree view lists all the elements in an application. Each application has a set of default elements, shown as a set of standard folders and icons. When you create a new application, the element folders are empty or contain defaults. As you construct the process map and insert new data fields, forms, and scripts, the folders fill up with subitems that you can directly access at any time to inspect or customize their properties.
These are the default folders and icons:
Process Definition.
This folder contains all the items in an application. See "Map Palette" on page 39 for more information on these items.
Groups and Roles.
This folder contains the application's groups and user roles. See Chapter 5, "Defining Groups and Roles," for more information.
Data Dictionary.
This folder contains the data fields created for the application. These fields define data that is to be captured when users run the application. See Chapter 6, "Defining Data Fields," for more information.
Form Dictionary.
This folder contains the HTML forms created for the application. Forms define how information is presented to a user. See Chapter 7, "Designing Forms," for more information.
Script Dictionary.
This folder contains the JavaScript scripts available to the application, organized by script type. Scripts are either predefined or created by you. See Chapter 8, "Using Scripts," for more information.
Form Access.
This icon brings up a window which lets you specify which HTML form is displayed for a specific role during each step. You set up access to forms by dragging forms from the application tree view into the window. See Chapter 7, "Designing Forms," for more information.
Content Store.
The content store icon brings up a window where you specify the URL on the Enterprise Server where you store attached files, and also the public user that can access these files. When end users attach files to forms as they complete steps in the process, the files are stored in the content store. See Chapter 6, "Defining Data Fields," for more information.
Process Map
The process map provides a visual representation of an application. It shows the steps needed to complete the process, and how they are connected to each other.
When you create a new application, the Process Map window is blank. If you are revising an existing process, the current version of the process appears in the Process Map window. To design a process in the Process Map, you drag activity icons from the palette and connect them with transitions.
Map Palette
Figure 1.4 shows the Map Palette, also called the palette. When you create a new application or when you open an existing one, the palette is open by default. You can also click the Palette button to open it.
Figure 1.4 The Map Palette
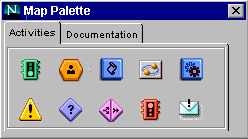
By default, the palette has two tabs: Activities and Documentation. If you use custom activities, you may also have one or more custom tabs on your palette. For more information on adding custom palettes, see "Adding a Custom Palette" on page 95.
Activities Tab
The Activities tab displays icons that you can drag onto the process map to design a process application. Each of the palette items represents a type of step in the process, a notification, or an error response. Table 1.1 shows the icons on the palette and what they represent.
Table 1.1 Icons in the Activities tab
Icon
|
Description
|
|---|
|

|
Entry Point. A point at which a user can initiate a process. An application can have several entry points. For example, if the first few steps create an ID number for the user, a returning user who already has an ID can skip those steps.
|
|

|
User Activity. A step within the process that requires a user to perform a task. Each user activity has an assigned user who performs the task (assignee) and a form the user needs to fill out in Process Express. After you place activities in the process map, you define the sequence in which they are to be executed by connecting them with transition lines.
|
|

|
Automated Activity. An automated step performed through a JavaScript script without user intervention.
|
|

|
Subprocess. A step that calls a process from within another process. The process that calls the subprocess is considered to be the main, or parent process, and the subprocess is considered to be its subordinate or child process. A parent process can have several children processes, each of which is a stand-alone process complete with entry and exit points.
|
|

|
Exception Manager. A step that allows the administrator to intervene manually if errors occur when users run the application.
|
|

|
Decision Point. A conditional step that causes the process to use different steps based on a condition. For example, you might have a decision point that directs the process to different steps depending upon the cost of an item.
|
|

|
Split-Join (parallel processing). A step within the process that branches in two or more branches so that two or more activities can execute in parallel.
|
|

|
Exit Point. A step at which the process ends. An application can have several exit points. For example, in a vacation time off request application, an exit point could be the approved vacation request, and another could be a vacation that was not approved.
|
|

|
Custom Activity. A step at which a PAE application connects to external components or services.
|
|

|
Notification. An email notification that is triggered when a user activity is started. The email can serve many purposes. For example, it can inform the person who started the process or other users of the process's progress.
|
Documentation Tab
Use this tab (shown in Figure 1.5) to drag documentation notes or graphics to the process map.
Figure 1.5 Documentation Tab on the Map Palette
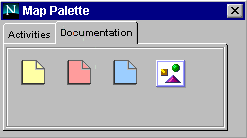
For example, different developers may include notes on a process map coded by color, or the notes could explain features of the process for use when you roll-out the process.
You can also add images to a process map by dragging the image icon to the map and then browsing to the image you want to include.
Messages Window
The Messages window is where error, warning, and information messages are displayed when you check the application syntax using the Check button. The syntax is also checked automatically when you attempt to deploy an application.
The window is blank until the syntax is checked, after that it contains messages, as shown in Figure 1.6.
Figure 1.6 Messages Window
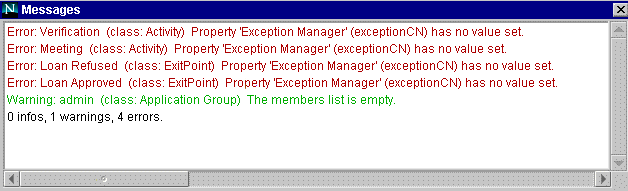
You must fix all errors before you can deploy an application. You can deploy an application that contains warnings, but you may encounter difficulties later when you try to use the application.
The last line of the window summarizes the information found by the syntax check.
If you right-click in the Messages window, a dialog box appears. You can use this dialog box to selectively display different types of messages (for example, errors only or warnings only). You can also clear the Messages window.
Main Toolbar
The main toolbar (see Figure 1.7) contains frequently-used commands.
Figure 1.7 Process Builder main toolbar

The toolbar contains the following buttons:
New.
Launches the New Application dialog box, where you create a new application which is not based on a previous application.
Open.
Opens an existing application.
Save.
Saves the application locally. Use this command to save your work as you are creating or editing an application.
Check.
Checks the application code and displays errors, warnings, and information messages in a separate window. You need to fix all errors in your application before you can deploy it. You can deploy an application for which you receive warnings, but it may lead to problems in the future. The last line of the window gives you a summary of how many of each type of message the check produced.
Deploy.
Deploys the application to a cluster.
Palette.
Displays the palette.
Inspector.
Displays the Inspector window for the selected element. This window allows you to set the properties of any element. You can also double-click the element's name in the application tree view to open the Inspector window. Some elements have evaluation order Inspector windows as well as property Inspector windows. Typically, an evaluation order window allows you to reorder conditions or roles into a specific hierarchy or sequence.
Menu Commands
Several menus provide commands for use as you design a PAE application. The menus are Application, Edit, Insert, Format, Window, and Help.
Application
New.
Creates a new application. If you have an application open, this closes the current application after asking if you want to save it first, and launches a new application with a fresh tree view and an empty process map.
Open.
Takes you to the "Select an Application" dialog box, from which you can open an existing application. If an application is already open, Process Builder closes the application. If the open application has unsaved changes, you are first prompted to save the application.
Import from ZIP.
Imports an existing zipped application. If you have an application open, this closes the current application after asking if you want to save it first. Browse to the zip file and import it into the current Application folder.
Delete.
Takes you to the "Select an Application" dialog box, from which you can delete an application. If an application is already open, Process Builder closes the application. If the open application has unsaved changes, you are first prompted to save the application.
Save.
Saves the currently displayed application to your local machine.
Save As.
Saves the current application with a different name.
Import File.
Brings up a dialog box, from which you can copy a file into the application's directory. Enter the path name of the file to import, or use the Browse button to browse to it. Then specify where you want the file copied. The file is automatically copied to a specific location, depending on the file category you select. (See Table 1.2.) If a subdirectory doesn't exist, it will be created.
Check Errors.
Checks the application code and displays errors, warnings, and information messages in a separate window. You need to fix all errors in your application before you can deploy it. You can deploy an application for which you receive warnings, but it may lead to problems in the future. The last line of the window gives you a summary of how many of each type of message the check produced.
Deploy.
Deploys the application to a cluster.
Save Process Map as JPEG.
Saves the process map as a .jpg file. Use this option when you want to show the whole process map outside of Process Builder. For example, by saving the process map as an image, you can print it or insert it into an HTML document. This option saves the image as application_name.jpg in the folder of the application.
Exit.
Quits Process Builder. If you have unsaved changes in an application, it gives you the option of saving them.
Edit
Cut.
Cuts an HTML layout element from a form, or cuts text from a scipt.
Copy.
Copies an HTML layout element into a form, or copies text into a script.
Paste.
Pastes an HTML layout element into a form, or pastes text into a script.
Delete.
Deletes a single element such as an activity, a data field, or a form from the application tree view. You cannot delete folders from the application tree view, or default item such as predefined scripts and default users and groups. Also, if the application has been deployed in the production stage, you may not be able to delete certain items.
Insert
Group & Role.
Inserts a new group or role.
Data Field.
Inserts a new field.
Form.
Inserts a new HTML form.
Script.
Inserts a new script.
HTML Element.
Inserts the HTML element that you select from the associated submenu. For more information, see "Insert HTML Element" on page 167.
Format
These are standard HTML editing commands. Use them to edit HTML forms in the HTML editor.
Size.
Applies the font size you select to the text.
Style.
Formats text as bold, italic, underline, or strikethrough.
Remove All Styles.
Removes size and style formatting from text.
Heading.
Applies an HTML heading tag to the text.
List.
Applies an HTML list tag to the text. You can choose either a bulleted list or a numbered list.
Align.
Aligns text at the left, right, or center of the page.
Decrease Indent.
Decreases the amount of indenting on the text.
Increase Indent.
Increases the amount of indenting on the text.
Window
Select one of these menu items to display the window, or, if it is already displayed, bring it to the foreground.
Project Window.
Displays the application tree view.
Process Map.
Displays the process map.
Palette Window.
Displays the palette.
Messages Window.
Displays the error and informational messages produced when you check the application syntax using the Check button.
In addition, you can reorganize the windows with either of the following menu items:
Auto Arrange Windows.
Arranges windows to fit side-by-side within the main window. Four windows will be displayed: the application tree view, process map, Messages window, and the palette. The resulting arrangement is not updated when you resize the main Process Builder window.
Always Arrange Windows.
Similar to Auto Arrange Windows, except that the arrangement is always updated. Whenever you resize the main window, the individual component windows are resized to maintain their side-by-side arrangement.
Help
Help contents.
Accesses Process Builder full table of contents. Click a link to go to the topic you are interested in, or use the Index to find a topic. If you click the Contents button within the window, you can access the "Other Documentation" link, which gives you access to the PAE documentation set.
Custom Help.
Displays help you have customized for Process Builder at your site. For example, you might use this feature to add links to your Process Express site or to explain site-specific customizations to Process Builder. To add your own help, edit the file custom_help.html, found in the support/html directory of your PAE installation.
About.
Displays the software version information.
HTML Page Editor Toolbar
The HTML Page Editor toolbar allows you to format the HTML forms that you create. Figure 1.8 shows the HTML Page Editor toolbar.
Figure 1.8 HTML Page Editor toolbar

The drop-down lists and the icons assign HTML formatting to the text you select in your HTML forms. See "Using the HTML Page Editor Toolbar" on page 166 for more information.
