| Skip Navigation Links | |
| Exit Print View | |

|
System Administration Guide: Printing Oracle Solaris 11 Express 11/10 |
| Skip Navigation Links | |
| Exit Print View | |

|
System Administration Guide: Printing Oracle Solaris 11 Express 11/10 |
1. Introduction to Printing in the Oracle Solaris Operating System
2. Planning for Printing (Tasks)
3. Setting Up and Administering Printers by Using CUPS (Tasks)
Implementation of the print-service Command in the Oracle Solaris OS
Service Management Facility Services That Manage CUPS
CUPS and LP SMF Service Equivalents
Where to Find Additional CUPS Documentation
Using the CUPS Web Browser Interface (Overview)
Requirements for Using the CUPS Web Browser Interface
Troubleshooting Issues With CUPS Web Browser Interface Access
Setting Up and Administering Printers by Using the CUPS Web Browser Interface
More About the Administration Tab
How to Add a New Printer by Using the CUPS Web Browser Interface
Using the CUPS Print Manager GUI (system-config-printer)
Getting Started With the CUPS Print Manager GUI
Configuring a CUPS Print Server (Task Map)
CUPS Print Server Configuration
CUPS Local Server Configuration
CUPS Advanced Server Configuration
Configuring CUPS to Administer Remote Print Queues
How to Configure CUPS to Administer Remote Print Queues
Setting Up and Administering Printers by Using the CUPS Print Manager GUI (Task Map)
Configurable Printer Properties
How to Set Up a New Local Printer
How to Modify the Properties of a Configured Printer
How to Rename a Printer or Copy a Printer Configuration
How to Unshare or Share a Printer
How to Disable or Enable a Printer
How to Manage Print Jobs for a Specified Printer
4. Setting Up and Administering Printers by Using Print Manager for LP (Tasks)
5. Setting Up and Administering Printers by Using Oracle Solaris Print Manager (Tasks)
6. Setting Up Printers by Using LP Print Commands (Tasks)
7. Administering Printers by Using LP Print Commands (Tasks)
8. Customizing LP Printing Services and Printers (Tasks)
9. Administering the LP Print Scheduler and Managing Print Requests (Tasks)
10. Administering Printers on a Network (Tasks)
11. Administering Character Sets, Filters, Forms, and Fonts (Tasks)
12. Administering Printers by Using the PPD File Management Utility (Tasks)
13. Printing in the Oracle Solaris Operating System (Reference)
14. Troubleshooting Printing Problems in the Oracle Solaris OS (Tasks)
When you access the CUPS web browser interface at http://localhost:631, you are taken to the Home tab. From this tab, you can access all of the print administration tasks, which are group together by category, as well as the full set of CUPS documentation.
Besides the Home tab, the following tabs are also displayed on the web browser interface's main web page:
Administration – Enables you to access most print administration tasks, including CUPS server configuration
You can directly access the Administration section of the web browser interface by going to http://localhost:631/admin.
Classes – Enables you to search print classes
CUPS provides collections of printers. These collections are called printer classes. Print jobs that are sent to a class are forwarded to the first available printer in that class. Classes can be members of other classes. Therefore, you can define very large, distributed printer classes for high-availability printing.
Documentation – Enables you to access the CUPS documentation, which includes manuals, system administration documentation, FAQs, and online help
Jobs – Enables you to view and manage print jobs for configured printers.
Printers – Enables you to view information about and modify the settings of a specified printer
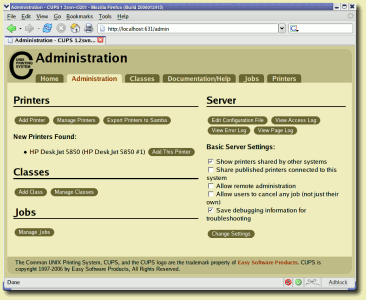
Most printing tasks can be performed from the Administration tab. Note that some tasks can be performed from multiple tabs. Basic server settings can also be changed from the Administration tab. For more information about CUPS server configuration, see the cupsd.conf(5) man page.
The following figure shows the contents of the Administration tab of the CUPS web browser interface.

The following table describes the task categories and individual tasks that can be performed from the Administration tab.
|
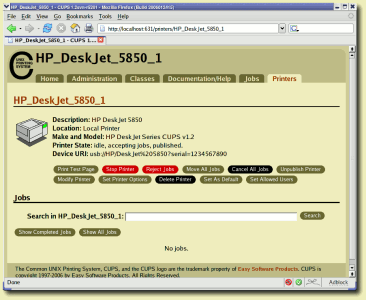
The Printers tab enables you to view and modify information for configured print queues, as illustrated in the following figure.

From the Printers tab, you can also perform the following tasks:
Print a test page
Stop the printer
Reject a print job
Move a print job
Cancel all print jobs
Unpublish the printer
Modify a printer
Set printer options
Delete a printer
Set the printer as the default
Set allowed users for a printer
After the new printer has been added, you are prompted to set the default printer options (paper size, output mode, and so on) for the printer. Make any necessary changes to the printer configuration, then click the Set Default Options button to save your changes.
Some printers also support autoconfiguration. To update these options automatically, click the Query Printer for Default Options button.
After you have added the new printer, you can print to it from any application. To print a test page, select Print Test Page from the Maintenance menu.