Provision an Environment Using Oracle E-Business Suite Cloud Manager
This chapter covers the following topics:
- Overview of Provisioning Environments Using Oracle E-Business Suite Cloud Manager
- Requirements for Provisioning a New Environment
- One-Click Provisioning
- Provision a New Environment without Public Internet Access
- Advanced Provisioning
- Perform Post-Provisioning and Post-Cloning Tasks
Overview of Provisioning Environments Using Oracle E-Business Suite Cloud Manager
You can use Oracle E-Business Suite Cloud Manager to create a new installation (either Vision demo or fresh installation) of Oracle E-Business Suite across Oracle Cloud Infrastructure instances. You can also provision from a backup of your cloud environment. The topology of your Oracle E-Business Suite environment can include both internal and external zones (such as in the case of a DMZ).
Requirements for Provisioning a New Environment
With the automated provisioning options in Oracle E-Business Suite Cloud Manager, you can create a new environment of Oracle E-Business Suite.
For information on options for new environments, see the section on Provisioning Oracle E-Business Suite in My Oracle Support article KA1001, Getting Started with Oracle E-Business Suite on Oracle Cloud Infrastructure.
Cloud Services Minimum Resource Recommendations
To provision a new environment, we recommend that you have cloud service resources that match or exceed those specified in the following table:
| Description | Machine Type | Number of Machines | OCPUs | Memory | Storage | External IPs |
|---|---|---|---|---|---|---|
| Oracle E-Business Suite Cloud Manager | VM | 1 | 1 | 7 GB | 100 GB (block) | 1 |
| A load balancer (You can use your own load balancer or Load Balancer as a Service [LBaaS]) | Not applicable | Not applicable | Not applicable | Not applicable | Not applicable | 1 |
| Application tier | VM | n (where 'n' is the number of application tier nodes in the target environment) | n*m (where 'm' is the number of OCPUs in the shape selected for the application tier; the minimum for 'm' is 1) | Release 12.2 = 14 GB per VM Release 12.1 = 7 GB per VM |
Shared application tier: 170 GB + 40 GB for each additional application tier (block) Non-shared application tier: 170 GB x n (block) Per language: 16 GB (block) |
n |
| Database tier on Oracle Cloud Infrastructure Compute | VM | 1 | 2 | 14 GB | Vision demo: 300 GB Fresh install: 200 GB |
1 |
| Database tier on Base Database Service 1-Node DB System (Single Instance) | VM | 1 | 2 | 14 GB | Vision demo: 256 GB Fresh install: 256 GB Total storage: 712 GB [1] |
1 |
| Database tier on Base Database Service 2-Node DB System (Oracle RAC) | VM | 2 | 2 per VM | 30 GB per VM | Vision demo: 256 GB Fresh install: 256 GB Total storage: 912 GB [1] |
2 |
| Database tier on Exadata Database Service Dedicated (Oracle RAC) [2] | See footnote [2] | See footnote [2] | See footnote [2] | See footnote [2] | See footnote [2] | See footnote [2] |
Footnotes on Table 9-1:
-
The Available Storage Size and Total Storage Size are different. For more information, see About Oracle Base Database Service.
-
For a database tier on Exadata Database Service Dedicated, the minimum requirement is an Exadata X10M, X9M, X8M, X7, or X6 base model with a 2-node Oracle RAC.
One-Click Provisioning
One-Click Provisioning streamlines the process of provisioning a new environment by using preset topology options.
To create a more advanced deployment, instead of using One-Click Provisioning you can follow the steps in the section Advanced Provisioning.
Attributes
You have the option to provision your environment using a demo install image or a fresh install image. Use the demo install image to conduct demonstrations with example data and explore new features. Use the fresh install image to tailor the resulting environment and data to your specific business needs.
The One-Click option relies on the availability of a network profile which uses the same subnet for the application tier and the database tier. This can be the default network profile DEFAULT_PROFILE_ONECLICK (see Create Network Resources For Deploying Oracle E-Business Suite Instances), or another network profile (see Create a Network Profile).
Note the following:
-
"Table 5 - New Environment Options for One-Click Provisioning" in My Oracle Support article KA1001, Getting Started with Oracle E-Business Suite on Oracle Cloud Infrastructure lists Oracle E-Business Suite, Oracle Database, and Enterprise Command Center release versions available with the latest Cloud Manager release.
-
When provisioning, you can choose a predefined tag or specify a new (free-form) tag to identify all resources associated with an environment or group of environments. Refer to Managing Tags and Tag Namespaces for more information.
-
In Oracle E-Business Suite Cloud Manager Release 24.1.1 and later, you can create a backup of an environment provisioned using One-Click Provisioning.
-
The Oracle Assets Command Center dashboard is pre-configured in your environment. You can configure other dashboards as needed.
Your new environment will be created with the application tier and database tier on a single Compute instance using default configuration options. With the demo install image, the Enterprise Command Center Framework tier is included. Your environment has the following characteristics:
-
Oracle E-Business Suite Release: 12.2.x
-
Oracle Database Release: 19.x
-
Enterprise Command Center Framework (for environments provisioned with the demo install image only)
-
Operating system: Oracle Linux 8 (Cloud Manager 23.3.1 and later)
-
Availability domain: The availability domain (AD) will be determined by the Network Profile you select in the interview.
-
Shape: Choose an available shape
-
Storage: Block volume
-
Middleware licensing model: "Bring Your Own License (BYOL)"
-
Web entry type: Application Tier Node
-
Security: Transport Layer Security (TLS) enabled for inbound HTTP traffic
Prerequisites for One-Click Provisioning
- You must have cloud resources that match or exceed the minimum recommendations specified in the section Requirements for Provisioning a New Environment.
- You must have network resources including the subnets needed to support the topology created by One-Click Provisioning. See the section Create Network Resources For Deploying Oracle E-Business Suite Environments.
Provision an Environment using One-Click Provisioning
-
On the Oracle E-Business Suite Cloud Manager Environments page, click Provision Environment and select One-Click.
-
Enter the values for your new environment:
-
Environment Name: Accept the system-generated name or enter a new name for your environment. For example:
usdev1 -
EBS Compartment: Select a compartment.
-
Region: The region selected on the Environments page is shown and is read-only.
-
Network Profile: Select a suitable network profile.
-
Shape: Select an available shape.
-
Database: Vision Demo Install or Fresh Install
-
EBS Version: Select the Oracle E-Business Suite version for your environment.
-
DB Version: Select the database version for your environment.
The available database versions depend on the Oracle E-Business Suite version you selected. See Section 4.2.1, Provisioning Oracle E-Business Suite in My Oracle Support article KA1001, Getting Started with Oracle E-Business Suite on Oracle Cloud Infrastructure.
-
-
Enter a new password for the APPS account. This password will also be used for the APPLSYS and APPS_NE accounts.
-
Enter a new EBS_SYSTEM password. This password must contain alphanumeric characters only. For more information on the Oracle E-Business Suite System Schema and the EBS_SYSTEM password, see My Oracle Support article KB837303, Oracle E-Business Suite Release 12.2 System Schema Migration.
-
Enter a new WebLogic Server password. The password must be at least eight characters, and it must contain at least one alphabetic character plus at least one special character from
! " # $ % & ( ) * + , - . / : ; = < > ? @ ][ ^ _ ` { | } ~or at least one numeric character. -
Optionally enter tagging information in the Tags region.
-
Tag Namespace: Select a predefined tag namespace or select None (add a free-form tag).
-
Tag Key: Enter the name you use to refer to the tag.
-
Value: Enter the value for the tag key.
-
-
Click Submit.
-
You can check the status of the job to provision the environment in the Jobs page.
After the environment is successfully provisioned, perform any necessary post-provisioning steps listed below.
Post-Provisioning Steps for One-Click Provisioning
After the One-Click environment is successfully provisioned, you must follow instructions in Perform Post-Provisioning and Post-Cloning Tasks to enable user access. Specifically, you must follow the instructions in these steps:
In addition, if you chose the Vision Demo Install, you have the option to do the following:
-
Increase Boot Volume Disk Space after One-Click Provisioning (Conditionally Required)
-
Configure Enterprise Command Centers after One-Click Provisioning
Provision a New Environment without Public Internet Access
To provision a new environment which uses an advanced topology when your VCN is not configured for public internet access, follow these high-level steps:
-
Provision the environment of your choice (either a Vision Demo or a Fresh Install) using One-Click Provisioning. See One-Click Provisioning.
-
Back up the environment to object storage. See Create a Backup of a Cloud-Based Oracle E-Business Suite Environment.
-
Provision from that backup using Advanced Provisioning. See Advanced Provisioning.
This capability is provided with Oracle E-Business Suite Cloud Manager 24.1.1 and later.
Advanced Provisioning
With Advanced Provisioning you can configure your own topology for a new environment, instead of using the basic preset topology options in One-Click Provisioning. Environments can be created from customer backups with Advanced Provisioning. These customer backups are located in private object storage buckets and must be created by Cloud Manager from environments that it manages, or from on-premises environments using Oracle E-Business Suite Cloud Backup Module.
Attributes
-
Advanced Provisioning provides the option to deploy and configure a Load Balancer as a Service (LBaaS). You may instead choose not to use a load balancer, or to use an on-premises load balancer. The section Perform Post-Provisioning and Post-Cloning Tasks provides instructions appropriate to each use case.
-
The administrator of your Oracle E-Business Suite Cloud Manager instance defines network profiles, which specify the network resources that you can use to provision Oracle E-Business Suite environments. During Advanced Provisioning, you select the network profile to use for the environment you are creating. For information on how to create default network resources and an associated default network profile
DEFAULT_PROFILE_ADVANCEDdesigned for use in Advanced Provisioning, refer to the following sections:You can also create additional network profiles. Refer to Create a Network Profile
-
Note that a network profile can be defined to use a private subnet for the database, application tier, or Load Balancer as a Service (LBaaS). If you select a network profile that uses a private subnet for any VM, then the corresponding VM will not have a public IP address and no inbound connections to this VM from outside the current VCN will be allowed.
-
Create Security Rules lists the ports that must be open between subnets for your system to function properly.
-
When provisioning a shared application tier file system utilizing the File Storage service (a change introduced in Oracle E-Business Suite Cloud Manager 22.2.1), you must ensure that the APPLLDM variable is set to 'product' so that concurrent manager log files are placed in a corresponding product directory under $APPLCSF. This is necessary to avoid performance issues.
-
If you choose Virtual Machine DB System (Base Database Service 1-Node or 2-Node DB System) for the Cloud database service, then you can choose the shape that determines the resources allocated to the database system. The following standard shapes are supported:
-
VM.Standard.E5.Flex (AMD)
-
VM.Standard.E4.Flex (AMD)
-
VM.Standard.E3.Flex (AMD)
-
VM.Standard3.Flex (Intel)
-
VM.Standard2.x where x is 1, 2, 4, 8, 16 or 24. This is the only shape available for Oracle Database Release 11.2.0.4.
Note: Not all shapes are available in all regions.
-
-
If you choose Virtual Machine DB System (Base Database Service 1-Node or 2-Node DB System) or Exadata Infrastructure (Exadata Database Service Dedicated) for the Cloud database service, then Transparent Data Encryption (TDE) is automatically enabled. Additionally, if you provision an environment from a backup of a TDE-enabled source environment and you choose Compute as the Cloud database service, TDE is also automatically enabled.
-
If you use Advanced Provisioning to provision an environment on Compute that is created from a backup of a non-TDE source environment, then you can optionally choose to enable TDE.
-
In Oracle E-Business Suite Cloud Manager 23.2.1 and later, TDE is done using multiple encryption processes that are run in parallel to reduce the provisioning time.
-
When you provision an environment, the Installation Details page allows you to choose a pre-defined tag, or specify a new (free-form) tag. You can use this tag to identify all resources associated with an environment or group of environments. Refer to Managing Tags and Tag Namespaces for more information.
-
When an environment is provisioned, the deployed database tier node or nodes and application tier node or nodes will be associated with a fault domain. The fault domains can be chosen for you, or you can specify them yourself. Refer to Fault Domains for more information.
-
For Oracle E-Business Suite Cloud Manager 23.3.1 and later, Oracle Linux 7 and Oracle Linux 8 are available in the following scenarios:
-
You can choose either Oracle Linux 7 or Oracle Linux 8 when provisioning your application tier, or when provisioning your database tier on Compute.
-
The database tier and the application tier can be on different operating systems.
-
When you provision an environment from a backup, for either tier you can "upgrade" the operating system from Oracle Linux 7 to Oracle Linux 8; note that you cannot downgrade the operating system from Oracle Linux 8 to Oracle Linux 7.
-
When provisioning your database on a Base Database Service, the operating system version is predetermined by the service and tied to the database release update level. For example, when you choose Oracle Database 19c with a patch update level of 19.21 or later, the operating system will be Oracle Linux 8.
-
For Exadata Database Service Dedicated, the operating system version is predetermined by the service upon creation of the Exadata VM Cluster.
-
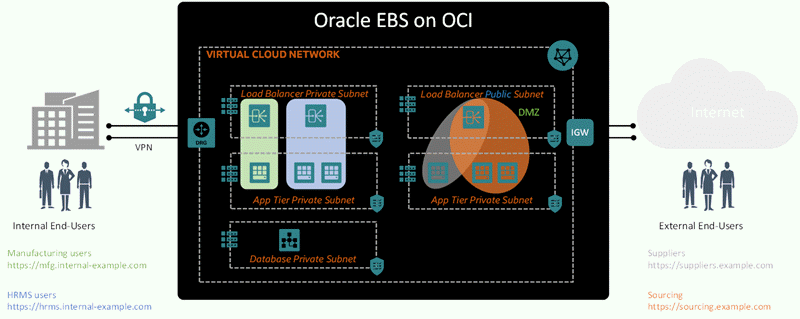
In addition, you can configure multiple zones in your environment. Each zone has its own web entry point and application tier nodes. Each zone can have its own load balancer to manage traffic, or multiple zones of the same type can share a load balancer. One zone is created by default when you provision an environment. For more information on using zones, see: My Oracle Support article KA1036, Oracle E-Business Suite Release 12.2 Configuration in a DMZ.
In the example in the following illustration, internal zones and external zones are configured. Internal users can access the private zones in the virtual cloud network over VPN through the Dynamic Routing Gateway (DRG). Each of the two internal zones includes a load balancer that directs the traffic to a set of application tier nodes. Likewise, external users can access the external zones using different URLs. This example shows that you can share a single load balancer between multiple zones. This load balancer is in a public subnet, allowing external users' requests to be passed into the DMZ by the Internet Gateway (IGW). The database is deployed in a private subnet in this configuration.
Example Virtual Cloud Network with an Internal Zone and External Zone
Note: When an environment is created using Advanced Provisioning, the database user profiles for the APPS, APPLSYS, APPLSYSPUB, EBS_SYSTEM, and APPS_NE users are each set to the EBS_APPS seeded profile.
-
The EBS_APPS profile is created if it is not already present.
-
If the EBS_APPS profile is present, Oracle E-Business Suite Cloud Manager ensures it matches the seeded profile definition.
Prerequisites
- You must have cloud resources that match or exceed the minimum recommendations specified in Requirements for Provisioning a New Environment.
- You must have a network profile that includes network resources to support the topology you plan to use, including the security lists and subnets. If you intend to use the File Storage service (FSS), you must use a network profile that has that service enabled. The administrator of your Oracle E-Business Suite Cloud Manager instance defines network profiles and assigns you the profiles that you can use to provision Oracle E-Business Suite environments.
- If you choose to use tags, you can create defined tags first. Any tag namespace selected must be defined for the compartment in which you are provisioning, as specified in the network profile. Refer to Managing Tags and Tag Namespaces for more information.
- You can optionally choose to use an on-premises load balancer. If you choose to use a load balancer that you deploy on-premises, the network profile must have the application tier security list configured so that it can communicate with the on-premises load balancer.
- Oracle E-Business Suite Cloud Manager uses the File Storage service to create shared application tier file systems. If you plan to provision an environment with a shared file system, you must perform the associated configuration steps before you begin the provisioning process. See Configure Oracle E-Business Suite Cloud Manager to Use Shared File System Service.
- If you plan to provision an environment in a region other than the region where Oracle E-Business Suite Cloud Manager is deployed, you must configure the network in the secondary region and establish connectivity between the two regions before you begin the provisioning process. See Use a Custom Network.
Refer to the following sections:
Enable Cloud Manager Connectivity to Exadata VM Cluster (Conditionally Required)
If you plan to use Oracle E-Business Suite Cloud Manager Advanced Provisioning to provision your database to a pre-existing Exadata Database Service Dedicated instance, you must first ensure that the SSH keys associated with the Oracle E-Business Suite Cloud Manager Virtual Machine (VM) are added to the associated Exadata VM cluster. Follow the instructions below to obtain the Oracle E-Business Suite Cloud Manager VM SSH key and copy it to the Exadata VM cluster. For more information about Oracle E-Business Suite Cloud Manager deployment prerequisites, refer to Deploy Oracle E-Business Suite Cloud Manager on Oracle Cloud Infrastructure.
-
Log in to the Oracle E-Business Suite Cloud Manager VM using the oracle user ID, as shown below:
$ cd ~/.ssh
$ cat id_rsa.pub
-
Copy the contents to the clipboard.
-
Sign in to the Oracle Cloud Infrastructure Console.
-
Using the menu, navigate to Oracle Database, then Oracle Exadata Database Service on Dedicated Infrastructure.
-
Choose the compartment where your infrastructure is located.
-
Under Oracle Exadata Database Service on Dedicated Infrastructure, select Exadata infrastructure, and click on your Exadata infrastructure resource to go to the Exadata Infrastructure Details page.
-
Click on the name of the Exadata VM Cluster.
-
Select Add SSH Keys.
-
Select Paste SSH Keys, and paste the content previously copied into the SSH KEYS field.
-
Click Save Changes.
Access the Advanced Provisioning Feature
Advanced Provisioning can be used to create an environment from a backup of either an on-premises environment or a Cloud environment. Navigate to Advanced Provisioning using one of the following options. Then continue to Enter Installation Details for an Environment.
-
If you are creating an environment from a backup of either an on-premises environment or a Cloud environment: On the main Oracle E-Business Suite Cloud Manager Environments page, click Provision Environment and select Advanced. Select Provision from Object Storage Backup as the installation type. Now continue to Enter Installation Details for an Environment for the next steps.
-
If you are creating an environment from a backup of either an on-premises environment or a Cloud environment: Click the Navigator icon and select Backups. Click Action for a backup and select Provision Environment. Make sure the Installation Type option is defaulted to Provision from Object Storage Backup. Now continue to Enter Installation Details for an Environment for the next steps.
-
If you are creating an environment from a backup of a Cloud environment: On the Environment Details page for the source environment, choose the Backups tab, click Action for a backup and select Provision Environment. Make sure the Installation Type option is defaulted to Provision from Object Storage Backup. Now continue to Enter Installation Details for an Environment for the next steps.
Enter Installation Details for the Environment
Enter details for your new environment:
-
Environment Name: Enter a name for your environment. For example:
usdev1 -
Region: The region selected on the Environments page is shown and is read-only.
-
Network Profile: Select the network profile that contains the network resources you want to use to provision your environment. For example:
DEFAULT_PROFILE_ADVANCEDClick the information icon to view the Network Profile Details. You may wish to capture this information for use later in the interview.
-
-
In the Installation Type region, ensure that the Provision from Object Storage Backup option is selected. Then enter values for the following:
-
Backup Bucket: Select the backup from which you want to provision the environment. If you navigated to Advanced Provisioning from the Backups page or from the Backups region in an environment details page, then the backup you chose there is selected by default.
-
Backup Encryption Password: Enter the encryption password that was specified for the backup when the backup was created.
-
Backup Apps Password: Enter the password for the Oracle E-Business Suite
APPSschema for the source environment. -
Source Wallet Password: (Conditionally Required) If you selected a backup created from a TDE-enabled source environment, enter the source wallet password.
-
New EBS_SYSTEM Password: If Oracle E-Business Suite System Schema Migration has been completed on the source environment, then enter a new EBS_SYSTEM password. This password must contain alphanumeric characters only. For more information on the Oracle E-Business Suite System Schema and the EBS_SYSTEM password, see My Oracle Support article KB837303, Oracle E-Business Suite Release 12.2 System Schema Migration.
-
New WebLogic Server Password: (Conditionally Required) Enter the password that you want to set for the Oracle WebLogic Server administration user on the target environment. This field appears only if you selected a backup created from a source environment on Oracle E-Business Suite Release 12.2. Note that this password should comply with the WebLogic Server Policy that was present on the source instance at the time the backup was taken. If the default policy was set for the source instance, then provide a password complying with the default policy. If a custom policy was set for the source instance, then provide a password complying with the custom policy.
-
-
Optionally select your operating system time zone. This is the operating system time zone for your application and database tier nodes. For more information on time zone support, see: Time Zone Support in Oracle E-Business Suite Cloud Manager.
Oracle E-Business Suite Cloud Manager will validate your selection for the server time zone, unless you check the box Bypass Server Timezone Profile Validation.
Warning: If you choose to override the time zone defined in the backup environment, then the operating system for the new environment will be configured to use the selected time zone. After you provision your environment, and prior to starting any database and application tier services, you must set the
TZenvironment variable to match the Server Timezone profile option. Failure to do so could lead to data corruption. See: Time Zone Support in the Oracle E-Business Suite Setup Guide. -
Optionally enter tagging information in the Tags region.
-
Tag Namespace: Select a predefined tag namespace or select None (add a free-form tag).
-
Tag Key: Enter the name you use to refer to the tag.
-
Value: Enter the value for the tag key.
-
-
Click Next. Oracle E-Business Suite Cloud Manager will validate all passwords. The WebLogic Server password will be validated based on the default/custom policy set on the source instance of the backup.
If there are any validation issues, errors will be displayed. Correct the passwords and click Next to proceed.
Enter Database Information
Select the Cloud Database Service option for your environment, either Compute, Virtual Machine DB System (Base Database Service 1-Node or 2-Node DB System), or Oracle Exadata Database Service (Exadata Database Service Dedicated).
-
If you chose Compute for the Cloud database service, enter the following:
-
DB SID: Enter the database SID. For example:
demodb -
PDB Name: If the database version is 19c, enter the pluggable database (PDB) name.
-
Logical Hostname: Provide the logical hostname that will be used as part of the Oracle E-Business Suite configuration. Note that this is not the physical hostname.
-
Logical Domain: Provide the logical domain that will be used as part of the Oracle E-Business Suite configuration. Note that this is not the physical domain.
-
Operating System Image: Choose whether to deploy the new environment on Oracle Linux 7 or Oracle Linux 8.
If the backup was taken on an instance that is on Oracle Linux 8, then in restoring the backup you can choose only Oracle Linux 8.
-
Operating System Image Build: Select an OS build out of the list of available builds.
-
Shape: Select a shape. You can choose VM.Standard.E4.Flex or VM.Standard3.Flex shape based on the availability in the OCI region. Ensure that you have checked your quota in advance. When choosing a flexible shape option, use the slider to choose the number of OCPUs. Choose a number between 1 and 64.
The amount of memory is determined by the number of OCPUs, and is currently set to 16 GB for each OCPU.
-
Enable TDE: Select this option if you want to enable Transparent Database Encryption (TDE) for a new environment on Compute, or for an environment on Compute that is created from a backup of a non-TDE source environment. If you provision an environment on Compute from a backup of a TDE-enabled source environment, then TDE is automatically enabled. Note that to run a TDE-enabled database on Compute, you must have or acquire the Advanced Security Option (ASO).
-
Admin Password: Enter the admin password for the database. This password is also used for the users SYS, SYSTEM, and EBS_SYSTEM. This password must not contain the username 'SYS'. If TDE is enabled for the environment, then this password is also used as the TDE wallet password. The password must be 9 to 30 characters and contain at least two uppercase, two lowercase, two special, and two numeric characters. The special characters must be underscores (_), number signs (#), or hyphens (-). Re-enter the password in the next field to confirm it.
-
Fault Domain Selection: Select Automatic or Manual. If you choose Manual, you are prompted to select fault domains. Refer to Fault Domains for more information.
-
(Advanced Options) RMAN_CHANNEL_COUNT: Specify the number of Recovery Manager (RMAN) staging channels to allocate for restoring from the backup. The default value used by RMAN is 100% of the number of OCPUs. The minimum value is one channel. The maximum value is 255 irrespective of shape.
-
-
If you chose Virtual Machine DB System for the Cloud database service, enter the following:
-
DB Name: Enter the database name. For example:
vmdb1 -
DB Patch Level: Select a certified database patch level from the options provided, identified by the database version and the release year, month, and day.
-
Shape: Select the shape. Note that for an Oracle RAC environment, you must select a shape that supports it. For example: VM Standard2.2 (2 OCPU, 30GB RAM)
You can choose VM.Standard.E4.Flex or VM.Standard3.Flex based on the availability in the OCI region. With these choices, you can choose the number of OCPUs and the amount of memory. For VM.Standard.E4.Flex, the default number of OCPUs is 4 and the default amount of memory is 64 GB.
-
Node Count: Select 1 for a Base Database Service 1-Node DB System (Single Instance), or select 2 for a Base Database Service 2-Node DB System (Oracle RAC).
-
DB Software Edition: Select the database software edition. If the Node Count is 2, then the only choice is Enterprise Edition Extreme Performance. If the Node Count is 1, then you can choose either Enterprise Edition, Enterprise Edition High Performance, or Enterprise Edition Extreme Performance.
-
Cluster Name: If the Node Count is 2, then this field appears and you can optionally enter a cluster name. For example:
demo-1 -
License Type: Select License Included if you want to obtain a new license or Bring Your Own License (BYOL) if you want to use a license you already own.
-
PDB Name: If the database version is 12.1.0.2 or later, enter the pluggable database (PDB) name. For example:
vmdbpdb -
Admin Password: Enter the admin password for the database. This password is used for the SYS user as well, and must not contain the username 'SYS'. This password is also used as the TDE wallet password. The password must be 9 to 30 characters and contain at least two uppercase, two lowercase, two special, and two numeric characters. The special characters must be underscores (_), number signs (#), or hyphens (-). Re-enter the password in the next field to confirm it.
-
Fault Domain Selection: Select Automatic or Manual. If you choose Manual, you are prompted to select fault domains. Refer to Fault Domains for more information.
-
(Advanced Options) RMAN_CHANNEL_COUNT: Specify the number of Recovery Manager (RMAN) staging channels to allocate for restoring from the backup. The default value used by RMAN is 100% of the number of OCPUs. The minimum value is one channel. The maximum value is 255 irrespective of shape.
-
-
If you selected Oracle Exadata Database Service for the Cloud database service, enter the following:
-
Exadata VM Cluster Name: Select the name of the VM Cluster resource. The VM cluster is a child resource of the infrastructure resource, providing a link between your Exadata cloud infrastructure resource and Oracle Database. For information on using the cluster resource, see: Overview of X8M and X9M Scalable Exadata Infrastructure.
Once you have selected the VM cluster, its corresponding Exadata infrastructure resource is displayed in the Exadata Infrastructure read-only field below.
Note: This field displays only Exadata VM Clusters with a status of ACTIVE. If an action currently being performed on an Exadata VM Cluster causes the cluster to have the status UPDATING, then that cluster will temporarily be omitted from the list of values in this field. For example, if a user is adding SSH keys to an Exadata VM cluster, then it will have a status of UPDATING for a few minutes. Consequently, if you do not see the cluster you want to use, wait for the action being performed on the cluster to complete and then return to this page to select the cluster.
-
DB Name: Enter the database name. For example:
exadb -
PDB Name: If the database version is 12.1.0.2 or later, enter the pluggable database (PDB) name. For example:
exapdb -
DB Patch Level: Select the database patch level, identified by the database version and the release year, month, and day.
-
Admin Password: Enter the admin password for the database. This password is used for the SYS user as well, and must not contain the username 'SYS'. This password is also used as the TDE wallet password. The password must be 9 to 30 characters and contain at least two uppercase, two lowercase, two special, and two numeric characters. The special characters must be underscores (_), number signs (#), or hyphens (-). Re-enter the password in the next field to confirm it.
-
(Advanced Options) RMAN_CHANNEL_COUNT: Specify the number of Recovery Manager (RMAN) staging channels to allocate for restoring from the backup. The default value used by RMAN is 16. The minimum value is one channel. The maximum value is 255 irrespective of shape.
Important: When selecting Exadata Infrastructure during provisioning, ensure that the Exadata cluster has only one SCAN port configured. Configuring multiple SCAN ports may lead to provisioning failures.
-
-
Click Next.
Enter Application Tier Information
Define your zones. For more information on zones, refer to My Oracle Support article KA1036, Oracle E-Business Suite Release 12.2 Configuration in a DMZ.
Note that you can have multiple zones across subnets. You can configure your environment such that your functional redirection per zone is in accordance with functional affinity.
Also, you can have a load balancer shared between multiple zones of the same type. This configuration allows for two separate URLs to resolve to the same IP address and the shared load balancer will target one backend set or another.
Note too that you have flexibility in your configuration. One zone, Zone A, can have one load balancer assigned to it, while another two zones, Zone B and Zone C, can have a second load balancer assigned to them.
You must define your internal (primary) zone first, before optionally defining additional zones.
Enter values for the following properties:
-
Name
-
Type
Note: For the first zone that you define, which is your primary zone, the Type is Internal and is not selectable.
-
-
In the Web Entry Point region, enter values for the following properties:
-
Web Entry Type: Choose one of the following: New Load Balancer (LBaaS), Use OCI Load Balancer to select an existing OCI load balancer, Manually Configured Load Balancer to select a manually deployed existing load balancer, or Application Tier Node to choose the primary application tier as the entry point.
-
Load Balancer Shape: If you chose New Load Balancer as the web entry type, a new flexible shape load balancer will be created. Select the maximum bandwidth for your new load balancer. For example: 100 Mbps. The minimum bandwidth will default to 10 Mbps.
-
OCI Load Balancer: If you chose OCI Load Balancer for the web entry type, select an existing OCI Load Balancer from the dropdown list.
Note: If an existing load balancer is used, then load balancer resources, such as "listener", "backend set", "backend", and "certificate," are created anew during provisioning. Preexisting load balancer resources are not used.
-
Protocol: Select the protocol for access to the environment, either http or https.
-
Hostname: Enter the host name for your web entry point. The web entry host name must be in lowercase. For example:
myhost -
Domain: Enter the domain for your web entry point. The web entry domain name must be in lowercase. For example:
example.com -
Port: Select the port for your web entry point. If there is no load balancer, then the port is automatically populated depending on the protocol: 8000 for http and 4443 for https. Otherwise, select the appropriate port for use with your load balancer, such as 80 for http or 443 for https. Note that to allow access to the Oracle E-Business Suite login URL, your network administrator must define an ingress rule in the load balancer security list. See Create Network Resources For Deploying Oracle E-Business Suite Instances.
-
-
For Storage, choose the File System Type: Non-Shared or Shared.
If you choose Shared, then you are prompted for the File Storage Mount Target. If the File Storage Mount Target for the network profile specified earlier matches any of the Mount Targets in the network compartment created on the Oracle Cloud Infrastructure, then that Mount Target appears in the list.
For a Shared File System Type, you can also specify Mount Options. Default parameters are shown. You can edit these options, but specifying a mount option or parameter that is not supported or recommended for a shared storage file system deployment may result in a provisioning failure. Exercise extreme caution when editing these parameters, as options are not validated in this page.
If you choose Non-Shared, you must specify a value for the Block Volume Storage field for every node in the Application Tier Nodes field.
Important: You must ensure you specify enough storage for your nodes. Refer to Oracle E-Business Suite Installation Guide: Using Rapid Install for guidelines on space usage.
-
In the Logical Host region, enter values for the following properties:
-
Logical Host Option: Choose Automatic or Manual.
-
Logical Hostname Prefix: If you chose Automatic, enter your desired hostname prefix.
You do not need to enter this if you chose Manual for your logical host option, but you will be prompted for the Logical Hostname for your nodes in the Application Tier Nodes region.
-
Logical Domain: Enter the logical domain.
-
-
In the Application Tier Nodes region, click Add Node to enter properties for your primary application tier node, and then for each additional application tier node in your environment.
In the Add Node dialog window, the following properties appear. Enter the value for each property, except in the case where it has been generated for you.
Note that you can define a specific shape for each application tier node.
-
Logical Hostname
-
Logical FQDN
-
Shape: Select a shape that is available in the OCI region. Ensure that you have checked your quota in advance. When choosing a flexible shape, for example, VM.Standard.E4.Flex, use the sliders to choose the number of OCPUs and the amount of memory (GB).
-
Block Volume Storage
Note: If you chose a shared File System Type earlier, the Block Volume Storage value is 0.
-
Fault Domain: Select the fault domain. Refer to Fault Domains for more information.
Click Add Node again to save your choices.
-
-
Click Save Zone to save your zone definition.
-
After you have saved the definition for your primary zone, specify the following for your application tier:
-
Middleware Licensing model
This will be either BYOL or UCM. If you choose BYOL, you are indicating that you have purchased or transferred the perpetual licenses required for customized Oracle E-Business Suite Applications. If you choose UCM, you are adopting the Universal Credits subscription-based model, and paying for usage as you go. Make sure you understand the cost associated with this choice.
-
Operating System Image
Select the OS version. Note that if you have multiple application tier nodes, this selection applies to all nodes since all nodes must be on the same OS version (for example, Oracle Linux 8 or Oracle Linux 7). Also note that, if restoring from an Oracle Linux 8 backup, you cannot choose Oracle Linux 7.
-
If you chose BYOL for the middleware licensing model, select a specific OS build for Operating System Image Build.
The default value is the latest available build.
-
If you chose UCM for the middleware licensing model, select a specific OS version for Operating System Image Version.
The default value is the latest available version.
-
-
Define additional zones using the Add Zone button.
For the additional internal zones, if New Load Balancer (LBaaS) is selected as the Web Entry Type for the first zone, then an extra option Reuse Internal Zone1 Load Balancer is displayed in the Web Entry Type list along with the options New Load Balancer (LBaaS), Use OCI Load Balancer, and Manually Configured Load Balancer.
-
When you are finished adding application tier nodes, scroll to the top of the window and click Save Zone to save your zone definition.
-
When you have completed adding your zones, click Next.
Specify Your Extensibility Options
You can optionally extend the provisioning job to meet your own requirements. By default, Oracle E-Business Suite Cloud Manager follows a standard job definition for provisioning. However, Oracle E-Business Suite Cloud Manager administrators can also create extended job definitions that include additional tasks as part of the provisioning job. In this case you can select the appropriate extended job definition for Oracle E-Business Suite Cloud Manager to follow when provisioning your environment. If you select an extended job definition, you may need to enter values for input parameters required by the additional tasks in that plan.
Additional Information: For more information on using the Extensibility Framework to extend job definitions, see Set Up the Extensibility Framework.
Additionally, whether you are using the standard provisioning job definition or an extended job definition, you can choose to have Oracle E-Business Suite Cloud Manager pause at specified points during the provisioning job. For example, if you want to perform your own validations after a particular phase before allowing Oracle E-Business Suite Cloud Manager to proceed to the next phase, you can add a pause at that point. You can then resume the provisioning job when you are ready to proceed. See Monitor Job Status.
Specify Your Job Definition
-
Optionally select an extended job definition for provisioning your environment in the Job Definition field.
-
In the Task Parameters tab, specify any parameter values required for the additional tasks in the job definition. Some parameters may include default values, which you can override as needed.
Specify Your Job Definition Details
-
Click the Job Definition Details tab. This tab displays a list of the phases in the job definition and the tasks within each phase.
-
To specify that Oracle E-Business Suite Cloud Manager should pause its processing before a particular phase, click the Actions icon next to that phase, and then select Add Pause.
Note: Pauses occur before the phase at which they are defined.
-
Click Next.
Enter SSH Keys
Optionally upload SSH keys for users.
Note: You cannot add keys after the provisioning process is completed.
Note: If you selected Exadata Infrastructure as your Cloud database service, then you can add keys to the application tier only.
-
Click Add Key.
-
Specify the tiers for the SSH key. Choose All Tiers, Application Tier, or Database Tier.
-
Specify the pertinent OS User type. Choose All Users, Operating System Administrator, or Application Administrator.
-
Upload the SSH key file. The file name will default in.
-
The system will validate the SSH key. Click Next to continue.
Review Your Advanced Provisioning Details
-
Review the installation details, including:
-
Installation details, including environment name, installation type, network profile, and operating system time zone.
-
Database details, including database service type, database name, and pluggable database name. For Exadata Database Service Dedicated instances, the cluster name is included. If the database service type is Compute, then the operating system image (OS version) and operating system image build are also listed.
-
Application tier details, including
-
Middleware Licensing Model
-
Operating System Image
-
If the middleware licensing model is BYOL, Operating System Image Build is shown.
-
If the middleware licensing model is UCM, Operating System Image Version is shown.
-
Storage information. For the shared file system type, the mount target and mount options are shown.
-
Web entry details
-
Information on zones
-
-
Job definition details
-
SSH Key information
-
-
To provision your environment, click Submit.
Note: The provisioning flow has a pre-validation phase in which Oracle E-Business Suite Cloud Manager checks that security rules allow communication between itself and the nodes and the infrastructure that will make up the Oracle E-Business Suite environment. If the security rules are not implemented, the flow will stop and the log files will show which rules are missing. In addition, the flow checks for the security rules across regions so that Oracle E-Business Suite Cloud Manager can establish connections with infrastructure provisioned in a remote region. If you have chosen to provision Oracle E-Business Suite in a region other than where Oracle E-Business Suite Cloud Manager is located, it will validate those connections.
-
You can check the status of the job to provision the environment in the Jobs page.
Database Administration Access
When you provision an environment through Advanced Provisioning, you must specify a database admin password as part of the database tier details. You can use this password to log in to the database as the SYS user and perform database administration tasks.
Additionally, if Transparent Data Encryption (TDE) is enabled for an environment created through Advanced Provisioning, then you can also use the same database admin password to access the TDE wallet for the new environment. TDE is enabled for the following types of environments provisioned using Advanced Provisioning:
-
All environments with a database tier on Base Database Service 1-Node or 2-Node DB System or Exadata Database Service Dedicated. Note that even if the source environment for a backup was not TDE-enabled, TDE is still enabled for environments that are created from that backup on Base Database Service 1-Node or 2-Node DB System or Exadata Database Service Dedicated.
-
All environments with a database tier on Compute that are created from a backup of a TDE-enabled source environment.
-
Environments with a database tier on Compute that are created from a backup of a non-TDE source environment, if you select the Enable TDE option during provisioning.
Note: TDE is not enabled for environments created with One-Click Provisioning. Also, TDE is not enabled if you do not select the Enable TDE option when it appears during Advanced Provisioning for environments on Compute.
Perform Post-Provisioning and Post-Cloning Tasks
After you provision or clone an environment, you must perform some tasks to configure access and secure the environment. You may also need to perform other tasks depending on your Oracle E-Business Suite release, Oracle Database release, and the cloud service on which the database tier resides. These tasks apply for new environments created through One-Click Provisioning, for environments created from a backup through Advanced Provisioning, and for environments created through cloning in Oracle E-Business Suite Cloud Manager.
Note: You can optionally use the Extensibility Framework to automate some of these tasks by adding them to custom provisioning and cloning job definitions. See Set Up the Extensibility Framework.
-
Increase Boot Volume Disk Space after One-Click Provisioning (Conditionally Required)
-
Update Web Entry Host and Domain Name (Conditionally Required)
-
Enable TLS for Manually Configured Load Balancer (Conditionally Required)
-
Enable and Set Oracle E-Business Account Passwords (Conditionally Required)
-
Apply Oracle E-Business Suite and Database Patches (Conditionally Required)
-
Configure Enterprise Command Centers after One-Click Provisioning (Conditionally Required)
-
Review Secure Configuration Recommendations for Oracle E-Business Suite (Conditionally Required)
Increase Boot Volume Disk Space after One-Click Provisioning (Conditionally Required)
If you provision an Oracle E-Business Suite Vision Demo Install with One-Click Provisioning and plan to perform lifecycle management activities such as patching your system, you will need to increase the disk space on the boot volume. This is not necessary for a fresh installation.
To resize the disk, you will first need to shut down the application tier processes and database beforehand, and reboot the system afterwards.
We recommend a resize target of approximately 450–500 GB.
Follow these instructions to resize the disk: Oracle Boot Partition Resizing Instructions.
Implement Workaround for Oracle Databases on Exadata Database Service Dedicated (Conditionally Required)
This workaround resolves a known issue that impacts SQL*Net configuration files on secondary nodes. The steps in this section are required only for a provisioned environment with the database on an Exadata Database Service Dedicated instance with Oracle Database Release 12.1.0.2.
-
Identify the private IP address of each secondary Exadata Database Service Dedicated node from the Exadata Database Service Dedicated Console.
-
Perform steps 3-8 for all secondary Exadata Database Service Dedicated nodes.
-
While logged in to the Oracle E-Business Suite Cloud Manager VM as the
oracleuser, usesshto connect to the secondary Exadata Database Service Dedicated node. -
Obtain the ORACLE_HOME details from the
oratabfile:$ cat /etc/oratab
-
Source the environment file:
$ cd <ORACLE_HOME>
$ source <SID>_<HOSTNAME>.env
-
Navigate to the
$ORACLE_HOME/network/admindirectory:$ cd $ORACLE_HOME/network/admin
-
Using a text editor such as vi, edit the
sqlnet.orafile. First, delete all existing lines from thesqlnet.orafile. Then add the following line:IFILE=<ORACLE_HOME>/network/admin/<SID>_<HOSTNAME>/sqlnet.ora
-
Create a
listener.orafile with a text editor such as vi, and add the following line:IFILE=<ORACLE_HOME>/network/admin/<SID>_<HOSTNAME>/listener.ora
Update Profile Options (Conditionally Required)
If you provision an environment as part of a lift and shift process, then profile options, which impact the way your application looks and behaves, are carried over from the on-premises Oracle E-Business Suite environment to Oracle Cloud Infrastructure.
Profile options are handled in various ways by the automated lift and shift process through the Oracle E-Business Suite Cloud Backup Module and Oracle E-Business Suite Cloud Manager.
-
Oracle E-Business Suite Cloud Manager resets the site level and server level values of some instance-specific profile options containing a web entry point to match the Oracle Cloud Infrastructure deployment. For example, the APPS_FRAMEWORK_AGENT profile option value is set to the web entry point that you chose in the Oracle E-Business Suite Cloud Manager Advanced Provisioning UI.
-
Other profile option settings, including those at the user level and responsibility level, are preserved at their original on-premises values. The Oracle E-Business Suite Cloud Backup Module generates a report of the existing user level values for some commonly used profile options containing URLs that you must manually reset. This report is located in the
/u01/install/APPS/apps/appsinfo/appsinfo.txtfile on the target system. The report includes the following profile options: APPS_WEB_AGENT, APPS_SERVLET_AGENT, APPS_JSP_AGENT, APPS_FRAMEWORK_AGENT, ICX_FORMS_LAUNCHER, ICX_DISCOVERER_LAUNCHER, HELP_WEB_AGENT, and ICX_DISCOVERER_VIEWER_LAUNCHER.
Review all the profile options in your newly provisioned environment and modify them as required to reflect your Oracle Cloud Infrastructure configuration.
For more information about the use of profile options in Oracle E-Business Suite, see User Profiles and Profile Options in Oracle Application Object Library, Oracle E-Business Suite Setup Guide.
Update Web Entry Host and Domain Name (Conditionally Required)
When you provision an Oracle E-Business Suite environment with One-Click Provisioning, the environment is automatically configured to use the application tier node as the web entry point, with Transport Layer Security (TLS) enabled for inbound HTTP traffic. The login URL is automatically generated in the format <instance name>.example.com, and the listener for the Oracle HTTP Server for the application tier is associated by default with a self-signed TLS certificate generated by Oracle E-Business Suite Cloud Manager.
With the simplified preset topology used in One-Click Provisioning, you cannot specify a different host and domain for the web entry point during provisioning. However, you can use the steps in this section to update the host and domain for the web entry point after provisioning is complete.
Note that if you plan to replace the self-signed certificate generated by Oracle E-Business Suite Cloud Manager with a certificate issued by a certificate authority (CA), then you must follow the steps in this section to change the domain name before you request the certificate, because you cannot obtain a certificate from a CA for the demonstration example.com domain.
If you provisioned an environment with Advanced Provisioning, you can also optionally use the steps in this section to update the host and domain for the web entry point if you need to change these values from those you initially specified during provisioning.
To update the host and domain, perform the following steps.
-
Using a text editor such as vi, update the following variables in the context file on all application tier nodes.
-
s_webentryhost- Set the value for this variable to the new web entry host you want to use. -
s_webentrydomain- Set the value for this variable to the new web entry domain you want to use. -
s_external_url- Update the value for this variable to use the new web entry host and domain that you specified in thes_webentryhostands_webentrydomainvariables. Do not change any other parts of the URL value. The full new value should be in the following form:[http|https]://<web_entry_host>.<web_entry_domain>:<listener_port> -
s_login_page- Update the value for this variable to use the new web entry host and domain that you specified in thes_webentryhostands_webentrydomainvariables. Do not change any other parts of the URL value. The full new value should be in the following form:[http|https]://<web_entry_host>.<web_entry_domain>:<listener_port>/OA_HTML/AppsLogin
-
-
If you are finished updating the context file, then you should now run AutoConfig on all application tier nodes. See Using AutoConfig Tools for System Configuration, Oracle E-Business Suite Setup Guide.
Note: If you plan to make additional changes in the context file to configure TLS, according to the instructions in later sections in this chapter, then you can defer running AutoConfig until you are instructed to do so in those sections. In this case, you can skip this step and the following step. Instead, proceed to the next task, Upload TLS Certificate.
-
After running AutoConfig, on all application tier nodes, stop and restart all services by running the
adstpall.shscript and theadstrtal.shscript.
Upload TLS Certificate (Conditionally Required)
Perform the steps in this section to upload a certificate if you enabled or plan to enable Transport Layer Security (TLS) for your environment.
TLS is enabled during provisioning if you used One-Click Provisioning, which automatically configures the application tier node as the web entry point with the https protocol, or if you used Advanced Provisioning and you chose either New Load Balancer (LBaaS), Use OCI Load Balancer, or Application Tier Node as the web entry type and you chose the https protocol. In this case Oracle E-Business Suite Cloud Manager configures your environment to encrypt inbound HTTP traffic with TLS. The initial configuration uses a self-signed certificate generated by Oracle E-Business Suite Cloud Manager. It is mandatory that you replace this certificate with a TLS certificate issued by a certificate authority (CA) or your own self-signed certificate generated using the web entry host for your Oracle E-Business Suite instance.
If you did not enable TLS during provisioning, you can enable it manually as a post-provisioning step. TLS is not enabled during provisioning if you used Advanced Provisioning and you chose either New Load Balancer (LBaaS), Use OCI Load Balancer, or Application Tier Node as the web entry type and you chose the http protocol. As a prerequisite for enabling TLS, you must obtain and upload a TLS certificate issued by a certificate authority (CA) or generate and upload your own self-signed certificate using the web entry host for your Oracle E-Business Suite instance.
Additionally, if you are using an on-premises load balancer and you chose Manually Configured Load Balancer as the web entry type, you can enable TLS manually as a post-provisioning step. To do so, you must upload a TLS certificate as required for your load balancer.
New Load Balancer (LBaaS) or Use OCI Load Balancer
If you configured TLS using LBaaS during provisioning or will manually perform this configuration, perform the following steps to upload your certificate.
-
Obtain a TLS certificate valid for the name of the web entry host for your Oracle E-Business Suite instance, or generate a self-signed certificate. The web entry host name is formed by combining the values of the application tier context variables
s_webentryhostands_webentrydomain.Oracle Cloud Infrastructure provides a public IP address but does not provide a public host name, so you should ensure that appropriate DNS entries are present to resolve the web entry host name to the public IP address.
If you changed the web entry host and domain for your environment in the previous section, ensure that you use the new host, domain, and URL when you request or generate a certificate.
-
If you are using a self-signed certificate that you generated yourself, ensure that you import the certificate to the JDK trust stores.
-
For Release 12.2, see Section 5.3: Configure Loopback and Outbound Connections, Step 3, in My Oracle Support article KA1047, Enabling TLS in Oracle E-Business Suite Release 12.2.
-
For Release 12.1, see Section 5.3: Configure Loopback and Outbound Connections, Step 3, in My Oracle Support article KB837684, Enabling TLS in Oracle E-Business Suite Release 12.1.
Note: If your environment was created from a backup, and the backup included an existing wallet in the
$ORACLE_HOME/appsutildirectory, then that wallet is preserved in the newly deployed environment. In this case, perform the following steps to import your self-signed certificate manually in the database tier node. These steps replace Section 5.3.2: Database Tier Setup in My Oracle Support article KA1047, Enabling TLS in Oracle E-Business Suite Release 12.2, or Section 5.3.2: Database Truststore Configuration in My Oracle Support article KB837684, Enabling TLS in Oracle E-Business Suite Release 12.1.-
Copy the required zone certificate from
/var/www/files/<env_name>/CACertificate_<env>_<zone>.crtto thescripts_dirdirectory in the database node. -
Source the database environment file.
-
Navigate to the
$ORACLE_HOME/appsutil/walletdirectory:cd $ORACLE_HOME/appsutil/wallet
-
If you know the password for the existing wallet and you want to add your self-signed certificate to that wallet, use the following command to add the certificate:
 $ORACLE_HOME/bin/orapki wallet add -wallet . -trusted_cert -cert
<CERTIFICATE_FILE_FULL_PATH> -pwd <PASSWORD>
-
If you do not want to use the existing wallet, you can create a new wallet and add the certificate to that wallet instead, using the following steps:
-
Take a backup of the existing wallet.
-
Create a new wallet using the following command:
$ORACLE_HOME/bin/orapki wallet create -wallet . -auto_login_only;
-
Add your self-signed certificate to the new wallet using the following command:
$ORACLE_HOME/bin/orapki wallet add -wallet . -trusted_cert -cert
<CERTIFICATE_FILE_FULL_PATH> -auto_login_only;
-
-
-
Log in to the Oracle Cloud Infrastructure Console. From the navigation menu, select Networking > Load Balancers, and then select the load balancer you want to configure.
-
Add your certificate bundle to the load balancer. See To upload an SSL certificate bundle to your load balancing system in the Oracle Cloud Infrastructure Services documentation.
If you have multiple certificates that form a single certification chain, such as one or more intermediate certificates together with a root certificate, then you must include all relevant certificates in one file before you upload them to the system. See "Uploading Certificate Chains" in the section Working with SSL Certificates in the Oracle Cloud Infrastructure Services documentation.
-
If you chose the https protocol for LBaaS during Advanced Provisioning, and the load balancer listener is using the self-signed certificate generated by Oracle E-Business Suite Cloud Manager, then you should now update the certificate. To do so, on the Load Balancer page, click the Listeners link in the Resources menu. Click the Actions icon (three dots) for your listener, and select Edit from the context menu. In the Edit Listener pop-up, select the certificate bundle that you added in step 4 in the Certificate Name field. Then click Save Changes, and wait for the listener to be updated. See To edit a listener in the Oracle Cloud Infrastructure Services documentation.
Manually Configured Load Balancer
If you are using an on-premises load balancer, follow the instructions from your vendor to create and upload a certificate.
Application Tier Node
If you configured TLS at the application tier layer during provisioning, perform the following steps to upload your certificate. TLS is configured at the application tier layer in the following cases:
-
You used One-Click Provisioning to deploy your environment, which automatically configures the application tier node as the web entry point with the https protocol.
-
You used Advanced Provisioning to deploy your environment and you chose Application Tier Node as the web entry type with the https protocol.
Note: If you plan to configure TLS at the application tier layer manually, you will perform the certificate steps as part of that configuration instead in the task Manually Enable TLS When Using Oracle HTTP Server on the Application Tier Node as the Web Entry Point.
-
Obtain a TLS certificate valid for the name of the web entry host for your Oracle E-Business Suite instance, or generate a self-signed certificate. The web entry host name is formed by combining the values of the application tier context variables
s_webentryhostands_webentrydomain.Oracle Cloud Infrastructure provides a public IP address but does not provide a public host name, so you should ensure that appropriate DNS entries are present to resolve the web entry host name to the public IP address.
If you changed the web entry host and domain for your environment in the previous section, ensure that you use the new host, domain, and URL when you request or generate a certificate. Note that if you deployed your environment with One-Click Provisioning and you plan to request a certificate from a CA, you must ensure that you have changed the domain name from the default
example.comdomain before you request the certificate, because you cannot obtain a certificate from a CA for the demonstrationexample.comdomain. -
If you are using a self-signed certificate that you generated yourself, ensure that you import the certificate to the JDK trust stores.
-
For Release 12.2, see Section 5.3: Configure Loopback and Outbound Connections, Step 3, in My Oracle Support article KA1047, Enabling TLS in Oracle E-Business Suite Release 12.2.
-
For Release 12.1, see Section 5.3: Configure Loopback and Outbound Connections, Step 3, in My Oracle Support article KB837684, Enabling TLS in Oracle E-Business Suite Release 12.1.
Note: If your environment was created from a backup, and the backup included an existing wallet in the
$ORACLE_HOME/appsutildirectory, then that wallet is preserved in the newly deployed environment. In this case, perform the following steps to import your self-signed certificate manually in the database tier node. These steps replace Section 5.3.2: Database Tier Setup in My Oracle Support article KA1047, Enabling TLS in Oracle E-Business Suite Release 12.2, or Section 5.3.2: Database Truststore Configuration in My Oracle Support article KB837684, Enabling TLS in Oracle E-Business Suite Release 12.1.-
Copy the required zone certificate from
/var/www/files/<env_name>/CACertificate_<env>_<zone>.crtto thescripts_dirdirectory in the database node. -
Source the database environment file.
-
Navigate to the
$ORACLE_HOME/appsutil/walletdirectory:cd $ORACLE_HOME/appsutil/wallet
-
If you know the password for the existing wallet and you want to add your self-signed certificate to that wallet, use the following command to add the certificate:
 $ORACLE_HOME/bin/orapki wallet add -wallet . -trusted_cert -cert
<CERTIFICATE_FILE_FULL_PATH> -pwd <PASSWORD>
-
If you do not want to use the existing wallet, you can create a new wallet and add the certificate to that wallet instead, using the following steps:
-
Take a backup of the existing wallet.
-
Create a new wallet using the following command:
$ORACLE_HOME/bin/orapki wallet create -wallet . -auto_login_only;
-
Add your self-signed certificate to the new wallet using the following command:
$ORACLE_HOME/bin/orapki wallet add -wallet . -trusted_cert -cert
<CERTIFICATE_FILE_FULL_PATH> -auto_login_only;
-
-
-
Upload your certificate to replace the initial certificate generated by Oracle E-Business Suite Cloud Manager.
-
For Release 12.2, see Section 8: Renewing Expired Certificates in My Oracle Support article KA1047, Enabling TLS in Oracle E-Business Suite Release 12.2.
-
For Release 12.1, see Section 8: Renew Revoked or Expired Certificates in My Oracle Support article KB837684, Enabling TLS in Oracle E-Business Suite Release 12.1.
-
Manually Enable TLS When Using Load Balancer as a Service (LBaaS) as an Alternate Termination Point (Conditionally Required)
We highly recommend that you configure your environment to encrypt inbound HTTP traffic with Transport Layer Security (TLS). The steps in this section are applicable in either of the following cases:
-
You used Advanced Provisioning to deploy an environment using Load Balancer as a Service (LBaaS) as the web entry point and you did not enable Transport Layer Security (TLS) during provisioning. That is, you chose New Load Balancer (LBaaS) or Use OCI Load Balancer as the web entry type, and you chose the http protocol for the web entry point.
-
You manually configured LBaaS but did not yet configure TLS.
We highly recommend that you perform the steps in this section to offload the encryption to the LBaaS and configure Oracle E-Business Suite to use HTTPS (HTTP over TLS).
Note that the configuration described here terminates TLS at the load balancer; that is, TLS is used only for communication between the client and the load balancer. Communication between the load balancer and the Oracle E-Business Suite instance does not use TLS. See "Terminating SSL at the Load Balancer" in the section Configuring SSL Handling in the Oracle Cloud Infrastructure Services documentation.
If you used Advanced Provisioning and chose to deploy LBaaS with the https protocol, you can also optionally perform the relevant steps in this section to update the port for the load balancer listener if you need to change this value from the port you initially specified during provisioning.
To manually enable TLS in an environment that uses LBaaS as an alternate termination point, perform the following steps:
-
Ensure that you have obtained and uploaded a certificate according to the steps in Upload TLS Certificate.
-
Log in to the Oracle Cloud Infrastructure Console. From the navigation menu, select Networking > Load Balancers, and then select the load balancer you want to configure.
-
On the Load Balancer page, click the Listeners link in the Resources menu. Click the Actions icon (three dots) for your listener, and select Edit from the context menu.
-
Edit the load balancer listener to enable TLS. Enter the port to use for secure communication, such as
443. Then check the Use SSL option and specify the certificate name. See To edit a listener in the Oracle Cloud Infrastructure Services documentation. -
Using a text editor such as vi, verify or update the following variables in the context file on all application tier nodes for your environment.
-
s_webentryurlprotocol- Set the value for this variable tohttps. -
s_url_protocol- Set the value for this variable tohttp. -
s_enable_sslterminator- Remove any value set for this variable; that is, the value should be left blank. -
s_active_webport- Set the value for this variable to the port you specified for the load balancer listener, such as443. -
s_external_url- Update the value for this variable to use thehttpsprotocol and the port you specified for the load balancer listener. The full new value should be in the following form:https ://<web_entry_host>.<web_entry_domain>:<new_load_balancer_listener_port>If you are using the default HTTPS port
443, then you should omit the colon separator and the port from this URL. That is, if you are using port443, then the value should be in the following form:https ://<web_entry_host>.<web_entry_domain> -
s_login_page- Update the value for this variable to use thehttpsprotocol and the port you specified for the load balancer listener. The full new value should be in the following form:https ://<web_entry_host>.<web_entry_domain>:<new_load_balancer_listener_port>/OA_HTML/AppsLoginIf you are using the default HTTPS port
443, then you should omit the colon separator and the port from this URL. That is, if you are using port443, then the value should be in the following form:https ://<web_entry_host>.<web_entry_domain>/OA_HTML/AppsLogin
For more information, see Using Load-Balancers with Oracle E-Business Suite Release 12.2, My Oracle Support article KA1038 or Using Load-Balancers with Oracle E-Business Suite Release 12.0 and 12.1, My Oracle Support article KB812617.
Additionally, ensure you have set other context file variables as needed for using the load balancer as the TLS termination point.
-
For Release 12.2, see the "Changes When Using a TLS Termination Point Other than OHS" table in Section 9: Alternate TLS Termination Point from My Oracle Support article KA1047, Enabling TLS in Oracle E-Business Suite Release 12.2.
-
For Release 12.1, see the "Changes When Using a TLS Termination Point Other than OHS" table in Section 9: Alternate TLS Termination Point from My Oracle Support article KB837684, Enabling TLS in Oracle E-Business Suite Release 12.1.
If you are running Oracle HTTP Server on a privileged port - that is, a port number below 1024 - then you must perform additional configuration steps. See Managing Configuration of Oracle HTTP Server and Web Application Services in Oracle E-Business Suite Release 12.2, My Oracle Support article KA1042. For more information, see Enabling Oracle HTTP Server to Run as Root for Ports Set to Less Than 1024 (UNIX Only), Oracle Fusion Middleware Administrator's Guide and Starting Oracle HTTP Server on a Privileged Port , Oracle Fusion Middleware Administrator's Guide for Oracle HTTP Server.
-
-
Run AutoConfig on all application tier nodes. See Using AutoConfig Tools for System Configuration, Oracle E-Business Suite Setup Guide.
-
On all application tier nodes, stop and restart all services by running the
adstpall.shscript and theadstrtal.shscript. -
If necessary, update the security lists for the load balancer subnets by adding a security rule that allows inbound communication on the port you specified for the load balancer listener, from the clients from which you will access the Oracle E-Business Suite URL. See Working with Security Lists. This step is required only if you updated the port for the load balancer listener; that is, if you chose the http protocol for LBaaS during Advanced Provisioning, or if you chose the https protocol for LBaaS during Advanced Provisioning but used the preceding steps to change the port from the port specified during provisioning.
In the Oracle Cloud Infrastructure Console, open the security list for the load balancer and add a new entry under Allow rules for ingress with the following properties:
-
Source CIDR - The CIDR block for your on-premises network that includes the relevant clients
-
Protocol -
TCP -
Destination Port Range - The port you specified for the load balancer secure communication, such as
443
Repeat these steps for each load balancer subnet.
-
Enable TLS for Manually Configured Load Balancer (Conditionally Required)
The steps in this section are applicable if you used Advanced Provisioning to deploy an environment and chose Manually Configured Load Balancer as the web entry type. These steps apply whether you chose http or https as the protocol for the web entry point.
We highly recommend that you perform the steps in this section to perform the necessary encryption. First, encrypt the traffic between the client and the load balancer. Next, encrypt the traffic between the load balancer and the Oracle HTTP Server. After the encryption setup is complete, configure the Oracle E-Business Suite web entry point.
-
Encrypt the traffic from the client to the load balancer by performing the configuration for an alternate TLS termination point for your Oracle E-Business Suite release.
-
For Oracle E-Business Suite Release 12.2, see My Oracle Support article KA1047, Enabling TLS in Oracle E-Business Suite Release 12.2, Section 9: Alternate TLS Termination Point > Alternate TLS Termination Point other than OHS.
-
For Oracle E-Business Suite Release 12.1, see My Oracle Support article KB837684, Enabling TLS in Oracle E-Business Suite Release 12.1, Section 9: Alternate TLS Termination Point > Alternate TLS Termination Point other than OHS.
-
-
Encrypt the traffic between the load balancer and the Oracle HTTP Server.
-
If you have VPN set up between your on-premises network and Oracle Cloud, then you can optionally set up TLS end-to-end, or you can skip this setup and go to the next step 3.
-
If you do not have VPN set up between your on-premises network and Oracle Cloud, then we highly recommend that you set up TLS end-to-end.
To set up TLS end-to-end, perform the appropriate configuration for your Oracle E-Business Suite release.
-
For Oracle E-Business Suite Release 12.2, see My Oracle Support article KA1047, Enabling TLS in Oracle E-Business Suite Release 12.2, Section 9: Alternate TLS Termination Point > End-to-End TLS.
-
For Oracle E-Business Suite Release 12.1, see My Oracle Support article KB837684, Enabling TLS in Oracle E-Business Suite Release 12.1, Section 9: Alternate TLS Termination Point > End-to-End TLS.
-
-
You can now configure access to the Oracle E-Business Suite web entry point. To do so, perform the steps in Manually Configure Firewall When Using Oracle HTTP Server or an On-Premises Load Balancer as the Web Entry Point.
Manually Enable TLS When Using Oracle HTTP Server on the Application Tier Node as the Web Entry Point (Conditionally Required)
The steps in this section are applicable if you used Advanced Provisioning to deploy an environment using Oracle HTTP Server as the web entry point, without using a load balancer, and you did not enable Transport Layer Security (TLS) during provisioning. That is, you chose Application Tier Node as the web entry type and you chose the http protocol for the web entry point. In this case we highly recommend that you perform the following steps to encrypt the traffic between the client and the Oracle HTTP Server. After the encryption setup is complete, you must configure the Oracle E-Business Suite web entry point.
-
Prepare the environment by applying the prerequisites for your Oracle E-Business Suite release.
-
For Oracle E-Business Suite Release 12.2, see My Oracle Support article KA1047, Enabling TLS in Oracle E-Business Suite Release 12.2, Section 5.1: Apply Required Updates and Patches.
-
For Oracle E-Business Suite Release 12.1, see My Oracle Support article KB837684, Enabling TLS in Oracle E-Business Suite Release 12.1, Section 5.1: Apply Required Updates and Patches.
-
-
Encrypt the traffic from the client to the Oracle HTTP Server by performing the configuration for inbound connections for your Oracle E-Business Suite release.
-
For Oracle E-Business Suite Release 12.2, see My Oracle Support article KA1047, Enabling TLS in Oracle E-Business Suite Release 12.2, Section 5.2: Configure Inbound Connections.
-
For Oracle E-Business Suite Release 12.1, see My Oracle Support article KB837684, Enabling TLS in Oracle E-Business Suite Release 12.1, Section 5.2: Configure Inbound Connections.
-
-
You can now configure access to the Oracle E-Business Suite web entry point. To do so, perform the steps in Manually Configure Firewall When Using Oracle HTTP Server or an On-Premises Load Balancer as the Web Entry Point.
Manually Configure Firewall When Using Oracle HTTP Server or an On-Premises Load Balancer as the Web Entry Point (Conditionally Required)
Perform the steps in this section to configure the required firewall rules if you are using Oracle HTTP Server or an on-premises load balancer as the web entry point. These steps apply if you used one of the following deployment options:
-
You used One-Click Provisioning to deploy your environment, which automatically configures the application tier node as the web entry type.
-
You used Advanced Provisioning to deploy your environment and chose either Application Tier Node or Manually Configured Load Balancer as the web entry type.
We recommend limiting access to a specific CIDR range.
-
First, on all application tier nodes, create firewall rules that allow inbound communication to the web entry port from the clients from which you will access the Oracle E-Business Suite URL. To do so, log on to the Oracle Cloud Infrastructure instance that hosts your Oracle E-Business Suite environment, using SSH. See Connecting to an Instance.
Then switch to the root user:
$ sudo su -Run the following commands to create the required firewall rules:
# firewall-cmd --zone=public --add-rich-rule='rule family=ipv4 source address=<source_CIDR_range> port port=<web_entry_port> protocol=tcp accept' --permanent
# firewall-cmd --zone=public --add-rich-rule='rule family=ipv4 source address=<source_CIDR_range> port port=<web_entry_port> protocol=tcp accept'
In these commands, replace
<source_CIDR_range>with the set of IP addresses from which you will access the Oracle E-Business Suite URL. Replace<web_entry_port>with the appropriate port, for example4443.Run the following command to restart the firewall to activate the changes:
# sudo systemctl restart firewalld
Run the following command to verify the current firewall settings:
# firewall-cmd --list-all
-
Next, update the security list for the subnet that contains the application tier nodes by adding a security rule that allows inbound communication on the web entry port from the clients from which you will access the Oracle E-Business Suite URL. See Working with Security Lists.
In the Oracle Cloud Infrastructure Console, open the security list for the application tier subnet and add a new entry under Allow rules for ingress with the following properties:
-
Source CIDR - The CIDR block for your on-premises network that includes the relevant clients, as specified in your firewall rules
-
Protocol -
TCP -
Destination Port Range - The web entry port, for example
443
-
Configure Security and Firewall Rules for Secure Access to the Fusion Middleware Control and WebLogic Server Administration Console (Conditionally Required)
The steps in this section are required only for Oracle E-Business Suite Release 12.2.
Administration of the Oracle Fusion Middleware 11g components delivered with Oracle E-Business Suite Release 12.2, including Oracle HTTP Server and Oracle WebLogic Server, requires secure access to the WebLogic Server administration ports running on the Oracle E-Business Suite primary application tier node. Ports 7001 and 7002 are the default WebLogic Server administration ports for the dual file system with Oracle E-Business Suite Release 12.2. The examples in this section use these default ports. If you have configured different port numbers, change the port numbers in the instructions to match the port numbers for your environment.
When you create an Oracle E-Business Suite Release 12.2 environment on Oracle Cloud Infrastructure, you should create a security rule and firewall rules that allow inbound communication on the WebLogic Server administration ports on the primary application tier node from the Oracle E-Business Suite Cloud Manager VM. These rules are required as a prerequisite so that a system administrator can securely access the administration ports and the Fusion Middleware Control and WebLogic Server Administration Console. See Access the Fusion Middleware Control and WebLogic Server Administration Console.
Perform the following steps to configure the required security rule and firewall rules:
-
Update the security list for the primary application tier node by adding a security rule that allows inbound communication on ports 7001 and 7002 from the Oracle E-Business Suite Cloud Manager VM. See Working with Security Lists.
In the Oracle Cloud Infrastructure console, open the security list for the Oracle E-Business Suite application tier subnet and add a new entry under Allow rules for ingress with the following properties:
-
Source CIDR - The CIDR for the Oracle E-Business Suite Cloud Manager VM
-
Protocol -
TCP -
Destination Port Range -
7001-7002
-
-
Create firewall rules on the primary application tier node that allow inbound communication on ports 7001 and 7002 from the subnet that contains the Oracle E-Business Suite Cloud Manager VM. First, log on to the Oracle Cloud Infrastructure instance that hosts your Oracle E-Business Suite environment, using SSH. See Connecting to an Instance.
Then switch to the
rootuser:$ sudo su -
Run the following commands to create the required firewall rules:
# firewall-cmd --zone=public --add-rich-rule 'rule family=ipv4 source address=<EBS_Cloud_Admin_Tool_VM_CIDR>   port port=7001 protocol=tcp accept' --permanent ;
# firewall-cmd --zone=public --add-rich-rule 'rule family=ipv4 source address=<EBS_Cloud_Admin_Tool_VM_CIDR> port port=7002 protocol=tcp accept' --permanent ;
# firewall-cmd --zone=public --add-rich-rule 'rule family=ipv4 source address=<EBS_Cloud_Admin_Tool_VM_CIDR>  port port=7001 protocol=tcp accept';
# firewall-cmd --zone=public --add-rich-rule 'rule family=ipv4 source address=<EBS_Cloud_Admin_Tool_VM_CIDR>  port port=7002 protocol=tcp accept';
Run the following command to restart the firewall to activate the changes:
# sudo systemctl restart firewalld
Run the following command to verify the current firewall settings:
# firewall-cmd --list-all
Set EBS_SYSTEM Password (Conditionally Required)
The steps in this section are required only for an environment created from a backup if the backup was created prior to the Oracle E-Business Suite Cloud Manager 23.3.1 release, and the following patches were present in the source system used to create the backup:
-
R12.AD.C.Delta.13 and R12.TXK.C.Delta.13, or a later version of the AD and TXK release update packs
-
The EBS System Schema Migration Completion Patch, Patch 32573930
Among other changes, the R12.AD.C.Delta.13 and R12.TXK.C.Delta.13 release update packs introduce a new schema named EBS_SYSTEM. By default, Oracle Advanced Provisioning sets the password for the EBS_SYSTEM schema to the same value as the password for the SYSTEM schema. After Advanced Provisioning is complete, you should set the password for the EBS_SYSTEM schema to a new value.
To reset the password for the EBS_SYSTEM schema, perform the following steps on the database node.
-
Source the database environment file.
-
For a multitenant database at the 12c release level or later, use the following commands to source the environment file:
$ source <ORACLE_HOME>/<CDB SID>_<hostname>.env
$ export ORACLE_PDB_SID=<PDB NAME>
-
For a non-multitenant 11g or 12c database, use the following commands to source the environment file:
$ source <CONTEXT_NAME>.env
-
-
Run the following commands:
$ sqlplus '/ as sysdba'
SQL> alter user EBS_SYSTEM identified by "<new password>";
Enable and Set Oracle E-Business Account Passwords (Conditionally Required)
In Oracle E-Business Suite Cloud Manager Release 22.2.1 and later, the One-Click Provisioning and Advanced Provisioning pages prompt you to specify a new APPS user password, and, in the case of Oracle E-Business Suite Release 12.2, a new WebLogic Server password.
The additional steps in this section are required only for a new environment, or for a cloned environment if the steps were not previously performed on the source environment. To ensure your environment is adequately protected, you must change your Oracle E-Business Suite account passwords.
If you created your environment from a backup, you can skip this section.
-
Log on to the Oracle Cloud Infrastructure instance that hosts your Oracle E-Business Suite environment.
-
Switch user from the
opcuser to theoracleuser using the following command:$ sudo su - oracle
-
Set the environment using the appropriate command for your Oracle E-Business Suite release:
-
Release 12.2
$ . /u01/install/APPS/EBSapps.env run
-
Release 12.1.3
$ . /u01/install/APPS/apps_st/appl/APPS<CONTEXT_NAME>.env run
-
-
Download Patch 24831241 to obtain scripts to enable the
SYSADMINuser and to enable demo users in a VISION demo environment.Download Patch 24831241 to the $PATCH_TOP directory and unzip the patch using the following commands:
$ cd $PATCH_TOP
$ unzip p24831241_R12_GENERIC.zip -d /u01/install/APPS/scripts/
-
To log in through the web interface, you must initially set a password of your choice for the
SYSADMINuser. After theSYSADMINuser is active with the new password, you can create new users or activate existing locked users. To enable theSYSADMINuser, run the following commands:$ mkdir -p ~/logs $ cd ~/logs $ sh /u01/install/APPS/scripts/enableSYSADMIN.sh
When prompted, enter a new password for the
SYSADMINuser.The
SYSADMINuser can now connect to Oracle E-Business Suite through the web interface and create new users or activate existing locked users. -
For a VISION demo environment, you can run another script to unlock a set of 36 application users that are typically used when demonstrating Oracle E-Business using the VISION database. Run this script with the same environment as when running the
enableSYSADMIN.shscript. To enable the demo users, run the following commands:$ cd ~/logs $ sh /u01/install/APPS/scripts/enableDEMOusers.sh
When prompted, enter a new password.
Do not run this script on a fresh or production environment.
For details about the default passwords set during installation, see:
-
Oracle E-Business Suite Release 12.2: Default passwords for application user accounts, Standard Installation, Oracle E-Business Suite Installation Guide: Using Rapid Install Release 12.2 (12.2.0)
-
Oracle E-Business Suite Release 12.1: Change Default Passwords, Oracle E-Business Suite Installation Guide: Using Rapid Install Release 12.1 (12.1.1)
Apply Oracle E-Business Suite and Database Patches (Conditionally Required)
If you provisioned your environment from a backup of an existing on-premises environment, then you must now apply any additional patches required for your release level and database tier. For a cloned environment or an environment provisioned from a backup of a Cloud environment, these steps are required only if you did not already apply these patches on the source environment.
-
Apply the Oracle E-Business Suite patches required for your release.
-
Release 12.2.9, 12.2.8, 12.2.7, or 12.2.6 - Patch 24300571:12.2.0
-
Release 12.2.5 - Patch 24300571:12.2.0 and Patch 23560508:R12.MSC.C
-
Release 12.2.4 - Patch 24300571:12.2.0 and Patch 23588491:R12.MSC.C
-
Release 12.2.3 - Patch 24300571:12.2.0 and Patch 23588492:R12.MSC.C
-
Release 12.1.3 - For Oracle E-Business Suite Release 12.1.3 on Oracle Database Release 12.1.0.2 only, you must apply interoperability Patch 25859639:12.1.0 on the application tier.
-
-
This step is required only if your new database tier is on Base Database Service 1-Node or 2-Node DB System or Exadata Database Service Dedicated. Apply one-off database patches per the following:
-
For Oracle E-Business Suite Release 12.2, ETCC recommended database patches have been applied as part of the automated provisioning process. If you applied any additional one-off database patches beyond those recommended by ETCC to the source on-premises database, then you must now reapply those additional one-off patches to your new Base Database Service 1-Node or 2-Node DB System or Exadata Database Service Dedicated database.
-
For Oracle E-Business Suite Release 12.1, if you applied any one-off database patches to the source on-premises database, then you must now reapply those one-off patches to your new Base Database Service 1-Node or 2-Node DB System or Exadata Database Service Dedicated database.
If your database tier is on an Oracle Cloud Infrastructure Compute VM, then you do not need to reapply any one-off database patches.
-
Configure Enterprise Command Centers after One-Click Provisioning (Conditionally Required)
If you create an environment with One-Click Provisioning and you want to use Enterprise Command Centers in that environment, perform the following configuration steps.
-
Update the source system URL.
-
Log into your Oracle E-Business Suite environment as the
sysadminuser, and select the ECC Developer responsibility. -
Select Source System in the navigation pane of the Oracle Enterprise Command Center Framework administration UI.
-
In the Source System Definition page, enter your Oracle E-Business Suite login URL in the Source System URL field. For more information on the login URL, see User Access.
-
-
Initially, the Oracle Enterprise Command Center Framework installation includes data only for the Oracle Assets Command Center (FA). Before you can access an Enterprise Command Center dashboard for any other products, you must perform a full load of the product-specific data into the Oracle Enterprise Command Center Framework installation.
-
Ensure that the Oracle E-Business Suite Cloud Manager VM can access the Oracle E-Business Suite login URL by either configuring a DNS entry for the Oracle E-Business Suite host name or updating the local hosts file on the VM. See User Access.
-
Run the data load concurrent program for your product as listed in Loading Product Data to Enterprise Command Centers, Installing Oracle Enterprise Command Center Framework, Release 12.2, My Oracle Support article KA980. For more details about each data load program, see your product-specific Enterprise Command Center documentation.
-
Review Secure Configuration Recommendations for Oracle E-Business Suite (Conditionally Required)
When you provision an environment or promote a standby environment, if the environment is at one of the following code levels, then Oracle E-Business Suite Cloud Manager initially places your Oracle E-Business Suite system in lockdown mode to prompt you to review and respond to the secure configuration recommendations.
-
Release 12.2.6 or the R12.ATG_PF.C.Delta.6 Release Update Pack or later
-
Release 12.1.3
In this case, a system administrator must resolve or acknowledge the recommended security configurations in the Secure Configuration Console to unlock the system for normal usage. To access this console, a user must have a responsibility that includes the Applications System (OAM_APP_SYSTEM) function privilege, such as the seeded System Administration or System Administrator responsibilities, and must be registered as a local user with Oracle E-Business Suite. The administrator must log in to Oracle E-Business Suite using the local login page (http(s)://[host]:[port]/OA_HTML/AppsLocalLogin.jsp) to navigate to the console and unlock the system. If a user with local system administrator privileges is not available, you can access the Secure Configuration Console through a command line utility. For more information, see Secure Configuration Console, Oracle E-Business Suite Security Guide or Secure Configuration Console, Secure Configuration Console in Oracle E-Business Suite Release 12.1.3, My Oracle Support article KB552039.
Additional Information: For more information on connecting to the Oracle E-Business Suite login page, see User Access.
If your environment is at a Release 12.2 code level earlier than Release 12.2.6 or the R12.ATG_PF.C.Delta.6 Release Update Pack, then the system will not be automatically placed into lockdown mode. However, it is highly recommended that you do the following:
-
Review and comply with the secure configuration recommendations in the Secure Configuration Console. See Secure Configuration Console, Oracle E-Business Suite Security Guide.
-
Update to the latest ATG_PF Release Update Pack as soon as possible.