Migrate an Oracle E-Business Suite Environment from On Premises: Reduced Downtime Lift and Shift
This chapter covers the following topics:
- Overview of Migrating an Oracle E-Business Suite Environment from On Premises: Reduced Downtime Lift and Shift
- Reduced Downtime Lift and Shift: Oracle Compute Cloud Service
- Reduced Downtime Lift and Shift: Database Cloud Service
Overview of Migrating an Oracle E-Business Suite Environment from On Premises: Reduced Downtime Lift and Shift
This chapter describes how you can use Oracle E-Business Suite automation to migrate an Oracle E-Business Suite environment from on-premises while minimizing the downtime required. This is accomplished by creating a standby environment in Oracle Cloud Infrastructure and then promoting that standby to accomplish the "lift and shift". We refer to this as a "reduced downtime lift and shift", due to the reduction of overall downtime compared to the more traditional lift and shift method described in Migrate an Oracle E-Business Suite Environment from On Premises: Traditional Lift and Shift.
The procedure you will use to conduct your reduced downtime lift and shift will differ based on which service you use to run your database, either:
-
Oracle Compute Cloud Service - See Reduced Downtime Lift and Shift: Oracle Compute Cloud Service
-
An Oracle Database Cloud Service - See Reduced Downtime Lift and Shift: Database Cloud Service
Note: When an environment is migrated using reduced downtime lift and shift, the database user profiles for the APPS, APPLSYS, APPLSYSPUB, EBS_SYSTEM, and APPS_NE users are each set to the EBS_APPS seeded profile.
-
The EBS_APPS profile is created if it is not already present.
-
If the EBS_APPS profile is present, Oracle E-Business Suite Cloud Manager ensures it matches the seeded profile definition.
Reduced Downtime Lift and Shift: Oracle Compute Cloud Service
This section describes how you can use Oracle E-Business Suite automation (and in particular, the on-premises Oracle Applications Manager combined with the Oracle E-Business Suite Cloud Manager) to create a standby environment in Oracle Cloud Infrastructure.
Promotion of the standby environment accomplishes a "lift and shift". We refer to this as a "reduced downtime lift and shift", due to the reduction of overall downtime that is required with the more traditional lift and shift method described in Migrate an Oracle E-Business Suite Environment from On Premises: Traditional Lift and Shift.
The standby creation and reduced downtime lift and shift features described here are available for Oracle E-Business Suite Release 12.2 with Database Releases 19c and 12.1.0.2, with the target of Compute.
Overview of Creating a Standby Environment for Compute Services
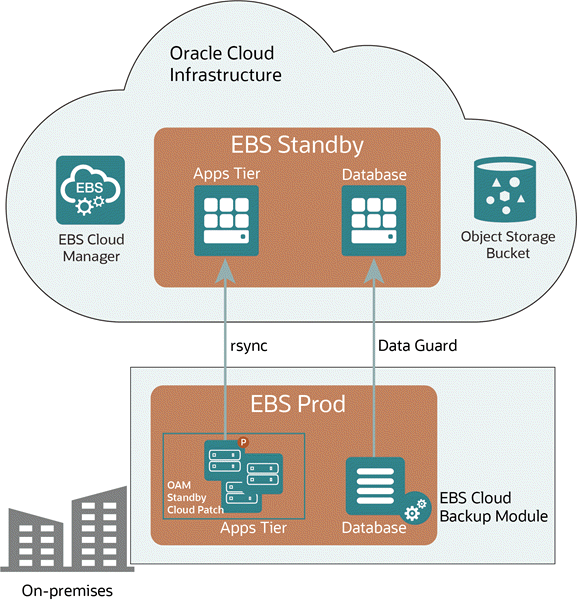
You can create a standby of your on-premises Oracle E-Business Suite installation in Oracle Cloud Infrastructure, and promote that standby to accomplish your lift and shift.
An Oracle Applications Manager standby cloud patch must be applied to your application tier and the Oracle E-Business Suite Cloud Backup module must be installed in your database tier. See My Oracle Support article KA1001, Getting Started with Oracle E-Business Suite on Oracle Cloud Infrastructure for more information.
The Oracle E-Business Suite Cloud Backup Module is used to introspect the database tier, create a backup of the Database Oracle Home in Oracle Cloud Infrastructure Object Storage and configure Oracle Data Guard on the source database.
The utility rsync is used to transfer the files on the applications tier, and Oracle Data Guard helps create and maintain the standby database. Once the standby environment is created in OCI using an Oracle Cloud Infrastructure Storage bucket to store its objects in a compartment, Oracle E-Business Suite Cloud Manager can manage the standby.
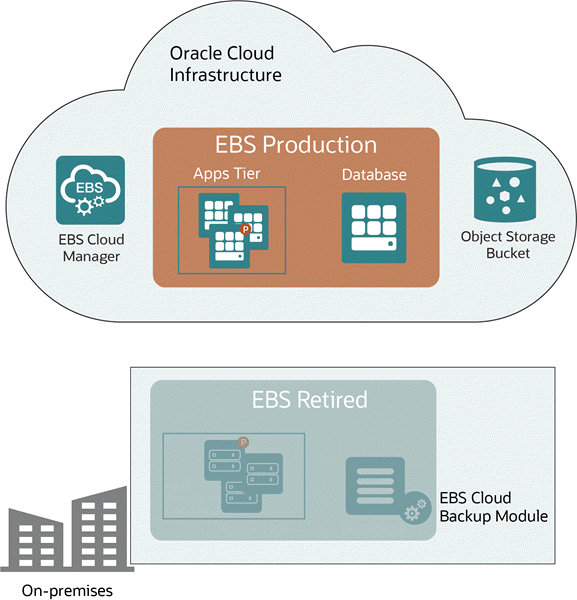
Once the standby environment is created in OCI, you can promote it to production using Oracle E-Business Suite Cloud Manager. The on-premises environment is then retired.
Note: Regarding performing maintenance on environments: you should not perform maintenance on standby environments. If you perform maintenance on a source environment you should re-create your standby environments.
A Standby Environment Promoted to Production
Topics in this section are:
Prerequisites for Creating a Standby Environment on Compute
- You must have Oracle E-Business Suite Cloud Manager in your tenancy.
- To create a standby environment, we recommend that you have cloud service resources that match or exceed those specified in the following table.
| Description | Machine Type | Number of Nodes | OCPUs Allocated | Memory | Storage | External IPs |
|---|---|---|---|---|---|---|
| Oracle Cloud Infrastructure Backup Service | Not applicable | Not applicable | Not applicable | Not applicable | Size of the database Oracle home in the source environment (object) | Not applicable |
| Oracle E-Business Suite Cloud Manager | VM | 1 | 1 | 7 GB | Required: 100 GB (block) | 1 |
| Application tier | VM | 1 | 1 | 14 GB per VM | Strictly dependent on your on-premises environment. The minimum requirements are as follows: 170 GB |
1 |
| Database tier on Oracle Cloud Infrastructure Compute | VM | 1 | 2 | 14 GB | Vision demo: 300 GB | 1 |
Prepare for Creating a Standby Environment on Compute
Follow the steps below to prepare to create a standby environment.
Set Up Certificates for Oracle E-Business Suite Cloud Manager
Oracle E-Business application tier nodes will invoke web services exposed by the Oracle E-Business Suite Cloud Manager. In order for Oracle E-Business Suite application tier nodes to invoke these REST services, they need to establish secure communication using TLS. The application tier nodes use a Java framework to invoke REST APIs, and the Java toolkit establishes the secure handshake after validating the certificate coming from the Cloud Manager. This validation requires that the Java toolkit recognizes the certificate authority (CA) that issued the Cloud Manager certificate.
The certificate status of the Oracle E-Business Cloud Manager load balancer will fall into one of these two categories:
-
A valid certificate issued by a CA with a properly DNS-registered, resolvable name.
-
A self-signed certificate generated during Cloud Manager configuration and associated with the IP address of the load balancer.
Set Up the Source Application Tier
-
Ensure that you have set up the certificate as described in Set Up Certificates for Oracle E-Business Suite Cloud Manager.
-
Ensure that you have applied all required patches listed for "Lift and Shift Oracle E-Business Suite from On-Premises" in My Oracle Support article KA1001, Getting Started with Oracle E-Business Suite on Oracle Cloud Infrastructure.
-
Apply Patch 37470749 to the source application tier using adop.
-
After completing the adop cycle, run
adpreclone.plon the new run filesystem on the source application tier.
Set Up the Source Database Tier
-
Ensure that the database is in Archive log mode.
-
Create wallet and autologin files if the database does not already have them.
For Database Release 12.1.0.2, ensure that the
sqlnet.orafile in the context directory is updated with the correct wallet location. For Database 19c, ensure that thesqlnet.orafiles of both the multitenant container database (CDB),NATIVE_TNS_ADMIN/sqlnet.ora, and the pluggable database (PDB),TNS_ADMIN/sqlnet.ora, are updated with the correct wallet location.If your database is Release 12.1.0.2, then sample commands are as follows:
$ sqlplus '/as sysdba'
SQL> ADMINISTER KEY MANAGEMENT CREATE KEYSTORE '<ORACLE_HOME>/admin/<SID>/<tde_wallet>' IDENTIFIED BY <Wallet_password>;
SQL> ADMINISTER KEY MANAGEMENT SET KEYSTORE OPEN IDENTIFIED BY <Wallet_password>;
SQL> ADMINISTER KEY MANAGEMENT SET KEY IDENTIFIED BY <Wallet_password> WITH BACKUP;
SQL> ADMINISTER KEY MANAGEMENT CREATE AUTO_LOGIN KEYSTORE FROM KEYSTORE '<ORACLE_HOME>/admin/<SID>/<tde_wallet>' IDENTIFIED BY <Wallet_password>;
If your database is Release 19c, connect to the CDB. The sample commands are as follows:
sqlplus '/as sysdba'
SQL> ADMINISTER KEY MANAGEMENT CREATE KEYSTORE '<ORACLE_HOME>/admin/<CDB_SID>/<tde_wallet>' IDENTIFIED BY <Wallet_password>;
SQL> ADMINISTER KEY MANAGEMENT SET KEYSTORE OPEN IDENTIFIED BY <Wallet_password> CONTAINER=ALL;
SQL> ADMINISTER KEY MANAGEMENT SET KEY IDENTIFIED BY <Wallet_password> WITH BACKUP CONTAINER=ALL;
SQL> ADMINISTER KEY MANAGEMENT CREATE AUTO_LOGIN KEYSTORE FROM KEYSTORE '<ORACLE_HOME>/admin/<SID>/<tde_wallet>' IDENTIFIED BY <Wallet_password>;
Ensure that the
sqlnet.orafiles (in$ORACLE_HOME/network/adminand$ORACLE_HOME/network/admin/<context_dir>) have an ENCRYPTION_WALLET_LOCATION entry like below:ENCRYPTION_WALLET_LOCATION = (SOURCE=(METHOD=FILE)(METHOD_DATA=(DIRECTORY=<ORACLE_HOME>/admin/<SID>/<tde_wallet>)))
-
Run adpreclone on the database Oracle home.
-
On the application tier, source the environment file and run:
$ $AD_TOP/bin/admkappsutil.pl
This script will create the
appsutil.zipfile. -
Copy this zip file to the
/tmpdirectory on the database tier. -
On the database tier, take a backup and remove the
$ORACLE_HOME/appsutil/clonedirectory. -
Change to the Oracle directory:
$ cd $ORACLE_HOME
-
Unzip the file:
$ unzip -o /tmp/appsutil.zip
-
For Database Release 12.1.0.2, run the script:
$ $ORACLE_HOME/perl/bin/perl $ORACLE_HOME/appsutil/scripts/<CONTEXT_NAME>/adpreclone.pl dbTier
For Database 19c, source the PDB_context.env file and then run the script:
$ $ORACLE_HOME/perl/bin/perl $ORACLE_HOME/appsutil/scripts/<CONTEXT_NAME>/adpreclone.pl dbTier
-
Install the Oracle E-Business Suite Cloud Backup Module
-
Install the Oracle E-Business Suite Cloud Backup Module on the database tier node. See: Install the Oracle E-Business Suite Cloud Backup Module for more information.
Steps for a Certificate Issued by a Certification Authority (Conditionally Required)
If you have a valid certificate issued by a Certificate Authority (CA) with a properly DNS-registered, resolvable name, then perform the following:
-
Obtain the certificate from your certificate authority.
-
Import the certificate to your source application tier nodes:
-
Copy the
democert.crtfile to each application tier node in your source system. -
Add the certificate to the keystore following the example commands below, one for each file system:
$ keytool -import -trustcacerts -keystore /u01/install/APPS/fs1/EBSapps/comn/util/jdk64/jre/lib/security/cacerts -file democert.crt -alias sample2021webentry

$ keytool -import -trustcacerts -keystore /u01/install/APPS/fs2/EBSapps/comn/util/jdk64/jre/lib/security/cacerts -file democert.crt -alias sample2021webentry
Note: You might need to grant write permissions to the
cacertsfile using the command:$ chmod u+w <cacerts_file>
The write permissions can be revoked after running the above
keytoolcommand using:$ chmod u-w <cacerts_file>
If prompted, enter the keystore password. See: The
cacertsCertificate File.For more information on managing the JDK
cacertsfile, refer to My Oracle Support article KA1047, Enabling TLS in Oracle E-Business Suite Release 12.2.
-
-
Stop and start the Oracle E-Business Suite instance.
Steps For a Self-Signed Certificate Using the Cloud Manager Administration Utility (Conditionally Required)
Use the Cloud Manager Administration Utility (ebscmadmin) if you are using a self-signed certificate generated during Cloud Manager configuration and you want to use the FQDN as the web entry point. For configuring self-signed certificates for Cloud Manager URLs with IP address, refer to Manual Steps For a Self-Signed Certificate (Conditionally Required).
To learn more about running the ebscmadmin utility to update the FQDN, see: Update the Oracle E-Business Suite Cloud Manager Load Balancer Fully Qualified Domain Name.
-
Run the
ebscmadmincommand from the Oracle E-Business Suite Cloud Manager VM to update Oracle E-Business Suite Cloud Manager Load Balancer with a new FQDN. This command also regenerates the load balancer self-signed certificate for the load balancer listener resource in OCI with the same Common Name (CN) as in the user-provided load balancer FQDN.For example, enter the following:
$ sudo su - oracle
$ cd /u01/install/APPS/apps-unlimited-ebs/bin
$ ./ebscmadmin update-load-balancer-fqdn <argument>
-
Import the certificate to your source application tier nodes:
-
Copy the
democert.crtfile to each application tier node in your source system. -
Add the certificate to the keystore following the example commands below, one for each file system:
$ keytool -import -trustcacerts -keystore /u01/install/APPS/fs1/EBSapps/comn/util/jdk64/jre/lib/security/cacerts -file democert.crt -alias sample2021webentry

$ keytool -import -trustcacerts -keystore /u01/install/APPS/fs2/EBSapps/comn/util/jdk64/jre/lib/security/cacerts -file democert.crt -alias sample2021webentry
Note: You might need to grant write permissions to the
cacertsfile using the command:$ chmod u+w <cacerts_file>
The write permissions can be revoked after running the above
keytoolcommand using:$ chmod u-w <cacerts_file>
If prompted, enter the keystore password. See: The
cacertsCertificate File.For more information on managing the JDK
cacertsfile, refer to My Oracle Support article KA1047, Enabling TLS in Oracle E-Business Suite Release 12.2.
-
-
Stop and start the Oracle E-Business Suite instance.
Manual Steps For a Self-Signed Certificate (Conditionally Required)
Perform these steps if you are using a self-signed certificate generated during Cloud Manager configuration and associated with the IP address of the load balancer.
-
Replace the self-signed certificate generated by the Cloud Manager with a new self-signed certificate generated using a common name (CN).
For example, say you are using the IP address of the load balancer as your web entry point. Log in to the Cloud Manager VM and run the command as in the following example:
$ openssl req -x509 -newkey rsa:4096 -sha256 -days 356 -nodes -keyout democert.key -out democert.crt -subj '/CN=192.0.2.254' -extensions san -config <( echo '[req]'; echo 'distinguished_name=req'; echo '[san]'; echo 'subjectAltName=IP:192.0.2.254')
-
Add the newly-created certificate where needed:
-
Add the certificate to the target OCI; for example,
sample2021-ebscm-instance-prov-vm-lbaas -
Select the corresponding load balancer in the OCI Console. Under Resources, click Certificates. From the Certificate Resource list, select the Load Balancer Managed Certificate certificate resource type. Click Add Certificate.
-
Add
democert.crtto the SSL certificate section anddemocert.keyto the private key section.
-
-
Update the listener. For example, update the listener in
sample2021-ebscm-instance-prov-vm-lbaasto select the newly-created certificate. -
Import the certificate to your source application tier nodes:
-
Copy the
democert.crtfile to each application tier node in your source system. -
Add the certificate to the keystore following the example commands below, one for each file system:
$ keytool -import -trustcacerts -keystore /u01/install/APPS/fs1/EBSapps/comn/util/jdk64/jre/lib/security/cacerts -file democert.crt -alias sample2021webentry

$ keytool -import -trustcacerts -keystore /u01/install/APPS/fs2/EBSapps/comn/util/jdk64/jre/lib/security/cacerts -file democert.crt -alias sample2021webentry
Note: You might need to grant write permissions to the
cacertsfile using the command:$ chmod u+w <cacerts_file>
The write permissions can be revoked after running the above
keytoolcommand using:$ chmod u-w <cacerts_file>
If prompted, enter the keystore password. See:The
cacertsCertificate File.For more information on managing the JDK
cacertsfile, refer to My Oracle Support article KA1047, Enabling TLS in Oracle E-Business Suite Release 12.2.
-
-
Stop and start the Oracle E-Business Suite instance.
Set Up Networking
Reserved Public IP Addresses
For information on managing public IP addresses, see: Public IP Addresses.
-
Create public IP reservations for the application tier and database tier using the OCI Console. Use the same compartment as the Oracle E-Business Suite compartment of the network profile.
-
Provide the created IPs in Standby Configuration page in Oracle Applications Manager for the target application and database tier IPs.
Opening Ports
The network access described below is required at the seclist level. For the source database, the same needs to be opened at the iptables level as well. The target iptables would be updated automatically.
If the source and target belong to the same network (same virtual cloud network), then communication between the source and the target occurs using private IPs; otherwise, communication uses public IPs. The reservation IPs for the target must be secured accordingly.
-
From the Target application tier, access the Source application tier: SSH connectivity (port 22)
-
From the Target database tier, access the Source database tier: TNS connectivity (port 1521)
-
From the Source database tier, access the Target database tier: TNS connectivity (port 1521)
The following are example commands to open the local firewall for Standby (Oracle Linux 7). The command could vary depending on the operation system version.
sudo firewall-cmd --zone=public --add-rich-rule 'rule family=ipv4 source address=<standby-oci-db-reserved-ip> port port=<active db listener port, eg. 1521> protocol=tcp accept' --permanent

sudo firewall-cmd --zone=public --add-rich-rule 'rule family=ipv4 source address=<standby-oci-db-reserved-ip> port port=<active db listener port, eg. 1521> protocol=tcp accept
-
From the Source application tier, access the Oracle E-Business Suite Cloud Manager URL.
Reserved Private IP Addresses
Creating a reservation is unnecessary in this scenario.
-
Ensure the IPs entered for the target application and database tiers are within the application tier and database tier subset CIDR respectively, and that these IPs are not already assigned to instances.
Create a Standby Environment on Compute for Oracle Cloud Infrastructure from an On-Premises Environment
Important: Before configuring a standby environment, ensure that there is an ingress rule defined in the Oracle E-Business Suite Cloud Manager LBaaS security list that allows connectivity from the on-premises Oracle E-Business Suite application tier node IP address. Otherwise, validation will not occur.
Ensure that the proxy values are set in the context file accordingly, run AutoConfig, and stop and start the application tier services.
If the proxy is used, set values for s_proxyhost, s_proxyport, s_proxybypassdomain, s_nonproxyhosts in the context file. If the proxy is not used, ensure these context values are cleared. To remove any proxy settings and also retain the null values for the proxy settings, set the following context variables as described below and run AutoConfig:
<proxyhost oa_var="s_proxyhost"></proxyhost>
<proxyport oa_var="s_proxyport" customized="yes"></proxyport>
<proxybypassdomain oa_var="s_proxybypassdomain" customized="yes"></proxybypassdomain>
<nonproxyhosts oa_var="s_nonproxyhosts"></nonproxyhosts>
To run AutoConfig:
cd $ADMIN_SCRIPTS_HOME ; ./adautocfg.sh
Ensure that the Resource Owner option is selected under Allowed Grant Types in the registration of Oracle E-Business Suite Cloud Manager as an application in Oracle Identity Cloud Service (IDCS). This configuration is required to allow REST calls from Oracle E-Business Suite. See Register Oracle E-Business Suite Cloud Manager as a Confidential Application.
Perform these steps to configure a standby environment in Oracle Applications Manager.
Access the Standby Environment Pages in Oracle Applications Manager
-
Log in to Oracle E-Business Suite on-premises environment as a user with access to Oracle Applications Manager. For example, log on as a user with the out-of-box System Administration responsibility.
-
Select the Oracle Applications Manager responsibility in the Navigator in the home page, then select Cloud Standby.
-
The Oracle Cloud Infrastructure page shows details for the OCI account: Tenancy, Account, and EBS Cloud Manager name. Any configurations for existing standby environments are also shown.
Edit the Oracle Cloud Infrastructure Account
You can edit some of the settings for Oracle E-Business Suite Cloud Manager here.
-
Click on Edit Oracle Cloud Infrastructure Account to edit the account details.
-
Enter a new Oracle Cloud Username.
-
Enter the Oracle Cloud Password.
-
Choose to define a new Cloud Manager Definition, or use an existing one.
If you choose a new definition, enter the following:
-
EBS Cloud Manager Name
-
EBS Cloud Manager URL: Select the IP address that you use to connect to the Cloud Manager, including the port if needed.
For example,
https://192.0.2.254
If you choose to use an existing definition, select it in the Cloud Manager field.
-
-
Click Validate to validate your settings.
-
The Oracle Cloud Infrastructure Tenancy Details are shown but cannot be edited:
-
Tenancy Name
-
Tenancy OCID
-
Username
-
User OCID
-
-
Click Save.
Enter Standby Environment Information and Introspect the Application Tier
-
On the main Oracle Cloud Infrastructure page, click Configure Standby Environment in the Standby Environments region.
-
Enter a Standby Environment Name.
-
Select a Network Profile. We recommend you choose a Network Profile enabled for the File Storage service. See Create a Network Profile for instructions.
-
The Region and Compartment are displayed.
-
Optionally select your operating system time zone. This is the operating system time zone for your application and database tier nodes.
Oracle E-Business Suite Cloud Manager will validate your selection for the server time zone, unless you check the box Bypass Server Timezone Profile Validation.
Warning: If you choose to override the time zone defined in the source environment, then the operating system for the new standby environment across all Compute instances and cloud services will be configured to use the selected time zone. After you provision your environment, and prior to starting any database and application tier services, you must set the
TZenvironment variable to match the Server Timezone profile option. Failure to do so could lead to data corruption. See: Time Zone Support in the Oracle E-Business Suite Setup Guide.For more information on time zone support, see: Time Zone Support in Oracle E-Business Suite Cloud Manager.
-
Specify a Source IP address.
This IP address is used to establish communication from the application tier node running in OCI. Ensure that the IP address you enter meets this purpose.
-
Click Introspect Apps Tier to submit a concurrent request to introspect the application tier.
-
The new standby environment configuration appears in the Standby Environments list.
Review Your Standby Environment Configuration In Progress in Oracle Applications Manager
-
Click the name of your new standby environment the Standby Environments list in Oracle Applications Manager.
-
The details of your standby environment configuration are shown, including the following:
-
Standby Environment Name
-
Network Profile
-
Region
-
Compartment Status
-
Standby Status
-
-
The Configuration Stages are also shown in a table. A concurrent request is submitted for each stage. Click on the Request ID link to view the log file of the concurrent request.
-
Information on the Application Tier is also shown, including:
-
Oracle E-Business Suite Version
-
OS User
-
Application Top directory
-
Middleware Licensing model
-
File System Type
For a shared file system, the File Storage Mount Target and Mount Options are shown.
Information for the local node and the standby node are given in a table.
-
-
Perform Database Tier Introspection as described below.
Perform Database Tier Introspection
-
If not done already, install the Oracle E-Business Suite Cloud Backup Module on the database tier node. See: Install the Oracle E-Business Suite Cloud Backup Module.
-
Run the
db-introspect.shscript. For example:$ RemoteClone/bin/db-introspect.sh --action introspect --context-file <context file, for example: /u01/install/APPS/12.1.0/appsutil/demosid_demo1221ccomp1db.xml> --standby-name <standby environment name given in the Introspect Application Tier page> --standby-reserved-ip <standby reserved IP or private IP depending on the --standby-reserved-ip-type> --standby-reserved-ip-type <Public or Private> --active-db-ip <active database IP reachable from target network> --oci-private-key-file <absolute path to key file> --ebs-username <for example: SYSADMIN> --listener-port <for example, 1521> --session-dir <absolute path session log directory, for example: /home/oracle/session>
Note the following for the parameters for the script:
-
For the parameter
--oci-private-key-file <absolute path to key file>, this value should be the API signing key of the user that was used to set the Oracle Cloud Infrastructure credentials. See: Edit Oracle Cloud Infrastructure Account. -
If the
--standby-reserved-ip-typevalue is Public, then the--standby-reserved-ipvalue must be a Public IP reservation created in OCI. If--standby-reserved-ip-typevalue is Private, then the--standby-reserved-ipvalue must be a Private IP that belongs to the DB Subnet CIDR Block and is not already assigned. -
For
-active-db-ip <active database IP reachable from target network>: This IP is used to connect to the active database from standby and also this IP is used to open local firewall on the standby database. Depending on the network configuration (Public or Private), use the active DB IP that is reachable from the standby to active and also for the successful communication from active to standby when this IP is allowed in the local firewall of the standby.
-
Enter Configuration Information for the Standby Application and Database Tiers
In the Standby Environment Configuration on Oracle Cloud Infrastructure page, add the following information:
-
Enter the reserved public or private IP for the application tier.
-
Enter the shape for the standby application and database tiers.
Flexible shapes are supported for both application and database tiers. Flexible shapes allow you to customize the number of OCPUs and the amount of memory when launching or resizing your VM.
-
Choose a middleware licensing model, either BYOL or UCM. If you choose BYOL, you are indicating that you have purchased or transferred the perpetual licenses required for customized Oracle E-Business Suite Applications. If you choose UCM, you are adopting the Universal Credits subscription-based model, and paying for usage as you go. Make sure you understand the cost associated with this choice.
If you chose BYOL, select the Image Build.
If you chose UCM, select the Image Version.
-
For Storage, choose the File System Type: Non-Shared or Shared.
If you choose Shared, then you are prompted for the File Storage Mount Target. Select a mount target from the list shown; this list of values is dependent on the network profile you selected during application tier introspection.
You can also specify Mount Options. Default parameters are shown. You can edit these options, but specifying a mount option or parameter that is not supported or recommended for a shared storage file system deployment may result in a provisioning failure. Exercise extreme caution when editing these parameters; options are not validated in this page.
-
Click Submit.
Review Standby Environment Configuration in Oracle Applications Manager
You can review your standby environment in Oracle E-Business Cloud Manager. See: Review Standby Environment Details.
If the configuration has failed, click Retry in its configuration review page to try configuring the standby environment again.
If the configuration has completed with a Successful or Failed status, you can click Remove Standby to remove the standby configuration.
From Oracle E-Business Cloud Manager, you can also:
Promote a Standby Environment on Compute Services
You can promote only standby environments that have been successfully configured.
Select the Standby Environment
-
Navigate to the Environments page in Oracle E-Business Suite Cloud Manager.
-
Select Promote from the Action menu for the standby environment you wish to promote.
-
Alternatively, select the standby environment and click on Promote from its Environment Details page.
Enter Standby Environment Details
The Environment Name, EBS Compartment, and Network Profile Name are shown and cannot be changed.
-
Enter the APPS Password.
-
Enter the WebLogic Server Password.
-
Optionally enter tagging information in the Tags region.
-
Tag Namespace: Select a predefined tag namespace or select None (add a free-form tag).
-
Tag Key: Enter the name you use to refer to the tag.
-
Value: Enter the value for the tag key.
-
-
Click Next.
Enter Database Information
Review and enter database details and related options.
-
The Database Name and PDB Name are shown but can be updated. The Database Service Type field is read-only.
Enter the following:
-
Logical Hostname: Provide the logical hostname that will be used as part of the Oracle E-Business Suite configuration. Note that this is not the physical hostname.
-
Logical Domain: Provide the logical domain that will be used as part of the Oracle E-Business Suite configuration. Note that this is not the physical domain.
-
VM Shape: This field is read-only. The shape shown is the shape selected during standby creation.
-
Enable TDE: This field is read-only and enabled by default.
-
Admin Password: The admin password for the database is used for the SYS user as well. If TDE is enabled for the environment, then this password is also used as the TDE wallet password.
-
New APPS Password: Enter a password for the APPS user.
-
New EBS_SYSTEM Password: If Oracle E-Business Suite System Schema Migration has been completed on the source environment, then enter a new EBS_SYSTEM password. This password must contain alphanumeric characters only. For more information on the Oracle E-Business Suite System Schema and the EBS_SYSTEM password, see My Oracle Support article KB837303, Oracle E-Business Suite Release 12.2 System Schema Migration.
-
New WebLogic Server Password: Enter a password for the Oracle WebLogic Server administration user on the environment.
-
-
Enter the Active Database credentials:
-
Admin Password
-
Wallet Password
-
-
Click Next.
Enter Application Tier Information
-
Define your zones in the Zone region.
For more information on zones, refer to My Oracle Support article KA1036, Oracle E-Business Suite Release 12.2 Configuration in a DMZ.
Note that you can have multiple zones across subnets. You can configure your environment such that you functional redirection per zone is in accordance with functional affinity.
Also, you can have a load balancer shared between multiple zones of the same type. This configuration allows for two separate URLs to resolve to the same IP address and the shared load balancer will target one back end set or another.
Note too that you have flexibility in your configuration. One zone, Zone A, can have one load balancer assigned to it, while another two zones, Zone B and Zone C, can have a second load balancer assigned to them.
Define your internal zone first.
Enter values for the following properties:
-
Name
-
Type
-
-
In the Web Entry Point region, enter values for the following properties:
-
Web Entry Type: Choose one of the following: New Load Balancer (LBaaS), Manually Configured Load Balancer to select a manually deployed existing load balancer, or Application Tier Node to choose the primary application tier as the entry point.
-
Load Balancer Shape: If you chose New Load Balancer as the web entry type, a new flexible shape load balancer will be created. Select the maximum bandwidth for your new load balancer. For example: 100 Mbps. The minimum bandwidth will default to 10 Mbps.
-
Protocol: Select the protocol for access to the environment, either http or https.
-
Hostname: Enter the host name for your web entry point. The web entry host name must be in lowercase. For example:
myhost -
Domain: Enter the domain for your web entry point. The web entry domain name must be in lowercase. For example:
example.com -
Port: Select the port for your web entry point. If there is no load balancer, then the port is automatically populated depending on the protocol: 8000 for http and 4443 for https. Otherwise, select the appropriate port for use with your load balancer, such as 80 for http or 443 for https. Note that to allow access to the Oracle E-Business Suite login URL, your network administrator must define an ingress rule in the load balancer security list. See Create Network Resources For Deploying Oracle E-Business Suite Environments.
-
-
When promoting an environment that uses File Storage service, the File System details are shown by default:
-
File System Type (Shared)
-
File System Name
-
File System OCID
-
File Storage Mount Target
-
Storage Type
Important: You must ensure you specify enough storage for your nodes. Refer to Oracle E-Business Suite Installation Guide: Using Rapid Install for guidelines on space usage.
If you choose Non-Shared, you must specify a value for the Block Volume Storage field for every node in the Application Tier Nodes field.
-
-
In the Logical Host region, enter values for the following properties:
-
Logical Host Option: Choose Automatic or Manual.
-
Logical Hostname Prefix: If you chose Automatic, enter your desired hostname prefix.
You do not need to enter this if you chose Manual for your logical host option, but you will be prompted for the Logical Hostname for your nodes in the Application Tier Nodes region.
-
Logical Domain: Enter the logical domain.
-
-
In the Application Tier Nodes region, enter properties for each node.
Note that you can define a specific shape for each application tier node.
-
Logical Hostname
-
Logical FQDN
-
Shape: You can change the shape of the node. When choosing a flexible shape, for example, VM.Standard.E3.Flex, use the sliders to choose the number of OCPUs and the amount of memory (GB).
-
Block Volume Storage
-
Fault Domain: Select the fault domain. Refer to Fault Domains for more information.
-
-
Click Save Zone to save your zone definition.
-
Define additional zones using the Add Zone button.
-
When you have completed adding your zones, click Next.
Specify Your Extensibility Options
You can optionally extend the standby promotion job to meet your own requirements. By default, Oracle E-Business Suite Cloud Manager follows a standard job definition for promotion. However, Oracle E-Business Suite Cloud Manager administrators can also create extended job definitions that include additional tasks as part of the promotion job. In this case you can select the appropriate extended job definition for Oracle E-Business Suite Cloud Manager to follow when promoting your environment. If you select an extended job definition, you may need to enter values for input parameters required by the additional tasks in that job definition.
Additional Information: For more information on using the Extensibility Framework to extend job definitions, see Set Up the Extensibility Framework.
Additionally, whether you are using the standard promotion job definition or an extended job definition, you can choose to have Oracle E-Business Suite Cloud Manager pause at specified points during the promotion job. For example, if you want to perform your own validations after a particular phase before allowing Oracle E-Business Suite Cloud Manager to proceed to the next phase, you can add a pause at that point. You can then resume the promotion job when you are ready to proceed. See Monitor Job Status.
Specify Your Job Definition
-
Optionally select an extended job definition for promoting your environment in the Job Definition field.
-
In the Task Parameters tab, specify any parameter values required for the additional tasks in the job definition. Some parameters may include default values, which you can override as needed.
Specify Your Job Definition Details
-
Click the Job Definition Details tab. This tab displays a list of the phases in the job definition and the tasks within each phase.
-
To specify that Oracle E-Business Suite Cloud Manager should pause its processing before a particular phase, click the Actions icon next to that phase, and then select Add Pause.
Note: Pauses occur before the phase at which they are defined.
-
Click Next.
Enter SSH Keys
Optionally upload SSH keys for users.
Note: You cannot add keys after the promotion process is completed.
-
Click Add Key.
-
Specify the tiers for the SSH key. Choose All Tiers, Application Tier, or Database Tier.
-
Specify the pertinent OS User type. Choose All Users, Operating System Administrator, or Application Administrator.
-
Upload the SSH key file. The file name will default in.
-
The system will validate the SSH key. Click Next to continue.
Review Your Promotion Details
-
Review the installation details; database details; application tier details, including zones; job definition details, and SSH key information.
-
To promote your environment, click Submit.
-
You can check the status of the job to promote the environment in the Jobs page.
A standby environment that has just been promoted successfully has the value "promote-standby (Successful)" in the Environment Details page, with a link to the Job Details page. See Review Job Status for more information.
Post-Promotion Steps
-
After the standby environment has been promoted, run the following cleanup script on the source database server to clean up the local configuration.
$ RemoteClone/bin/db-standby-cleanup.sh --context-file <absolute path to DB context file> --standby-name <standby name> --oci-private-key-file <absolute path to key file> --ebs-username <ebs username
-
Depending on the Oracle E-Business code level of your environment, Oracle E-Business Suite Cloud Manager may initially place the environment in lockdown mode to prompt you to review and respond to the secure configuration recommendations. In this case, a system administrator must resolve or acknowledge the recommended security configurations in the Secure Configuration Console to unlock the system for normal usage. See Review Secure Configuration Recommendations for Oracle E-Business Suite.
Delete a Standby Environment on Compute Cloud Service
You can delete a standby environment on Oracle Compute Cloud Service from within Oracle Applications Manager, but not within Oracle E-Business Suite Cloud Manager. You cannot delete a standby environment that has an "In Progress" status.
-
Navigate to the Oracle Cloud Infrastructure page within Oracle Applications Manager.
-
Click on the name of the standby environment you wish to delete.
-
Click Remove Standby in the Standby Environment Configuration on Oracle Cloud Infrastructure page.
-
After the standby environment has been deleted, run the following cleanup script on the source database server to clean up the local configuration.
$ RemoteClone/bin/db-standby-cleanup.sh --context-file <absolute path to DB context file> --standby-name <standby name> --oci-private-key-file <absolute path to key file> --ebs-username <ebs username> --session-dir <session dir to create temporary files and log files>
Reduced Downtime Lift and Shift: Database Cloud Service
The "Reduced Downtime Lift and Shift" capability is available for target environments which incorporate a database cloud service (that is, Oracle Base Database Service or Exadata Database Service). In this scenario, Cloud Manager creates a standby of an on-premises environment on OCI and promotes that standby to accomplish the lift and shift. This capability is supported for EBS 12.2 and Oracle Database 19c only and utilizes Oracle Zero Downtime Migration (ZDM).
Important: You should create only one standby environment from a single source environment. Only one standby environment can be promoted, so any others are unnecessary.
Important: Regarding performing maintenance on environments: You should not perform maintenance on standby environments. If you perform maintenance on a source environment, you should re-create your standby environment.
Note the following regarding the ZDM service:
-
The ZDM Service is stopped by default in Oracle E-Business Suite Cloud Manager, in version 25.1.2 and later.
-
When a "Standby" action is triggered from the Oracle E-Business Suite Cloud Manager UI, the ZDM service is started automatically if the service had been stopped.
-
The ZDM service can be started and stopped manually using the
ebscloudmgrctl.shutility. For more information on this utility, see Manage Services.
Topics in this section are:
Prerequisites for Creating a Standby Environment using a Database Cloud Service
- There is an SSH connection from Cloud Manager to the source application and database tier either directly or through a bastion server.
- There is an SSH connection from the target application tier to the source application tier either directly or through a bastion server.
- TNSPing from the source database tiers to target database tiers and vice-versa.
- The firewall port should be opened for the source application and database nodes.
- The source and target host names and scan names should be resolvable via DNS from both the source and target database tiers.
- The source environment should be Transparent Data Encryption (TDE)-enabled, all the tablespaces should be encrypted (excluding the TEMP tablespace) on both the CDB and the PDB, with an
oratabentry, listener entry, and redo log files in Oracle Managed Files (OMF). Thedg_broker_config_fileparameter needs to be set. For more information on TDE, see: Oracle Advanced Security Guide 19c. - On the source, the initialization parameter
LOG_ARCHIVE_DESTshould not be set. If that is set, it should be unset and the parameterLOG_ARCHIVE_DEST_1should be set instead with this value. - The database should be on the 19c Release Update (RU) 19.21 level or later. This requirement is subject to change based on the database quarterly updates currently supported by Oracle E-Business Suite Cloud Manager. See "Cloud Automation Support for Database Quarterly Updates" in My Oracle Support article KA1001, Getting Started with Oracle E-Business Suite on Oracle Cloud Infrastructure, for more information.
- A stage folder in the source environment must be created with proper privileges. Create the stage folder using
chmod 777 /u01/STAGE(but for base directory usechmod 755 /u01). - There must be OS compatibility between the source and target.
- If the target is on Oracle Base Database Service, then the source database OS must be in OL8. Otherwise, the process will fail during the pre-validation checks.
- Temporary space in the source database tier should not be less than 2G (both at the CDB and PDB levels).
- There are no adop active or running sessions. Also, after the standby is created, there should be no adop sessions running on the source; if there are any, then the promotion of the standby environment will fail.
- The folder
/tmpshould have ample space and thesudouser must have read and write privileges to it since it is used by ZDM. - The APPS password, WebLogic Server password, SYS password, and the TDE encryption password of the source environment must meet the Oracle E-Business Suite Cloud Manager security requirements.
- The TDE wallet password must not be changed from the source and target instances; doing so will cause issues while promoting the instance.
Create a Standby Environment with a Database Cloud Service
Follow these steps to create a standby of an on-premises environment in which the target environment incorporates a database cloud service such as Oracle Base Database Service or Exadata Database Service. Note that this capability is supported for Oracle E-Business Suite Release 12.2 and Oracle Database 19c only.
Enter Details for the Primary Environment Application Tier Node
-
On the Oracle E-Business Suite Cloud Manager Environments page, click Provision Environment and select Standby.
-
In the Primary Environment Application Details page, begin by entering the Primary node IP address.
Enter the admin application tier node IP address from the primary environment accessible from the Oracle E-Business Suite Cloud Manager VM or bastion server. Note that Oracle E-Business Suite Cloud Manager expects SSH connectivity on port 22.
-
Enter the OS user (application binaries owner).
-
Enter the OS privileged user (a user with
sudoercapabilities Cloud Manager uses to orchestrate the flow). -
Enter the Full path in Cloud Manager to SSH private key for OS privileged user.
The full path to the private key in the Oracle E-Business Suite Cloud Manager VM is used to establish a connection to the source application tier host. If a bastion server is used, the key will be used to connect from the bastion server; otherwise it will be used from the Cloud Manager VM. A private key configured with a passphrase is not supported.
-
Enter the APPS password for the source environment. Note that this password must conform to Oracle E-Business Suite Cloud Manager security requirements and contain alphanumeric characters only. This entry is validated after you select the Next button.
-
Enter the WebLogic Server password for the source environment. Note that this password must conform to Oracle E-Business Suite Cloud Manager security requirements. The password must be at least eight characters, and it must contain at least one alphabetic character plus at least one special character from
! " # $ % & ( ) * + , - . / : ; = < > ? @ ][ ^ _ ` { | } ~or at least one numeric character. This entry is validated after you select the Next button. -
Enter the Full path to Run file system context file. The value of this field must include the full path to the run file system context file; for example,
/u01/install/APPS/fs1/inst/apps/mypdb_app01/appl/admin/mypdb_app01.xml. -
Enter the Stage directory (OS privileged user writable directory). This temporary directory is used by the standby creation process and must be writeable by the OS privileged user.
-
If applicable, click the Use Bastion Server to connect to App Tier Node from Cloud Manager toggle switch.
-
If you are using a bastion server, enter the following:
-
Bastion IP address.
-
Bastion OS User
-
Path in Cloud Manager to SSH private key for Bastion OS user
-
-
Click Next.
Enter Primary Database Node Details
Enter the primary database node details. If you are using a clustered database, enter the details for the first node.
-
Enter the Database node private IP address.
-
Enter the OS user (Database binaries owner).
-
Enter the OS privileged user (user with
sudoercapabilities Cloud Manager uses to orchestrate the flow) . -
Enter the Full path in Cloud Manager to SSH Private key for OS privileged user. The value of this field must be the full path to the private key in Oracle E-Business Suite Cloud Manager VM that is used to establish a connection to the source database tier host. If a bastion server is used, the key will be used from the bastion server; otherwise it will be used from the Cloud Manager VM. A private key configured with a passphrase is not supported.
-
Enter the SYS password.
Note that the password for the source environment must meet Oracle E-Business Suite Cloud Manager security requirements. The password must not contain the username 'SYS'. The password must be 9 to 30 characters and contain at least two uppercase, two lowercase, two special, and two numeric characters. The special characters must be underscores (_), number signs (#), or hyphens (-).
The same password will be used as the standby database admin password.
-
Enter the TDE encryption password.
This password can be different from the SYS password but it must also conform to Oracle E-Business Suite Cloud Manager security requirements.
The same password will be used as the standby TDE encryption password.
-
Enter the Full path to Pluggable Database context file. The database context file name here must include the full path for the file; for example,
/u01/install/APPS/db19/appsutil/db/context.xml. -
Enter the Stage directory. This temporary directory is used by the standby creation process and must be writable by the OS privileged user.
-
If applicable, click the Use Bastion Server to connect to Database Node from Cloud Manager toggle switch.
-
If you are using a bastion server, enter the following:
-
Bastion IP address
-
Bastion OS User.
-
Path in Cloud Manager to SSH Private key for Bastion OS user
-
-
Click Next.
Enter Standby Details
Enter information for the new environment, including name, web entry point, and primary application tier node details.
-
Enter the Environment Name for your environment. For example: usdev1
-
Select the EBS Compartment. Only Oracle E-Business Suite compartments that you have access to are available in the list. The default is your root compartment.
-
The region is display-only.
-
Select the Network Profile that contains the network resources you want to use to provision your environment. For example:
DEFAULT_PROFILE_ADVANCED.Note: If you plan to provision an environment which contains a multinode application tier with a shared file system, your network profile must support FSS and therefore you cannot use the default profile.
Click the information icon to view the Network Profile Details. You may wish to capture this information for use later in the interview.
-
Optionally select your operating system time zone. This is the operating system time zone for your application and database tier nodes. For more information on time zone support, see: Time Zone Support in Oracle E-Business Suite Cloud Manager. Oracle E-Business Suite Cloud Manager will validate your selection for the server time zone, unless you check the box Bypass Server Timezone Profile Validation.
-
Under Admin Node Details, select the shape. Note that for an Oracle RAC environment, you must select a shape that supports it. For example: VM Standard2.2 (2 OCPU, 30GB RAM)
You can choose VM.Standard.E4.Flex or VM.Standard3.Flex based on the availability in the OCI region. With these choices, you can choose the number of OCPUs and the amount of memory. For VM.Standard.E4.Flex, the default number of OCPUs is 4 and the default amount of memory is 64 GB.
-
Select the Fusion Middleware license type.
-
Choose the File System Type: Non-Shared or Shared.
If you choose Shared, then you are prompted for the File Storage Mount Target. If the File Storage Mount Target for the network profile specified earlier matches any of the Mount Targets in the network compartment created on the Oracle Cloud Infrastructure, then that Mount Target appears in the list.
For a Shared File System Type, you can also specify Mount Options. Default parameters are shown. You can edit these options, but specifying a mount option or parameter that is not supported or recommended for a shared storage file system deployment may result in a provisioning failure. Exercise extreme caution when editing these parameters, as options are not validated in this page.
If you choose Non-Shared, you must specify a value for the Block Volume Storage field for every node in the Application Tier Nodes field.
Important: You must ensure you specify enough storage for your nodes. Refer to Oracle E-Business Suite Installation Guide: Using Rapid Install for guidelines on space usage.
-
Select the fault domain. Refer to Fault Domains for more information.
-
Optionally enter tagging information in the Tags region.
-
Tag Namespace: Select a predefined tag namespace or select None (add a free-form tag).
-
Tag Key: Enter the name you use to refer to the tag.
-
Value: Enter the value for the tag key.
-
-
Click Next.
Enter Standby Environment Database Details
Select the Standby Environment Database Service and enter details for it.
Standby Environment Database Details for Base Database Service DB System
-
Select the License Type.
Select License Included if you want to obtain a new license or Bring Your Own License (BYOL) if you want to use a license you already own.
-
The following fields are shown as display-only: the database name, the PDB name, and the DB patch level.
-
Select the shape.
-
Select the number of nodes.
-
Select the DB software edition. The options are: Enterprise Edition, Enterprise Edition High Performance, and Enterprise Edition Extreme Performance.
-
Select the fault domain. Refer to Fault Domains for more information.
-
Under Advanced Options, you can set RMAN_CHANNEL_COUNT. Specify the number of Recovery Manager (RMAN) staging channels to allocate for the standby environment. The default value used by RMAN is 100% of the number of OCPUs. The minimum value is one channel. The maximum value is 255 irrespective of shape.
-
Click Next.
Standby Environment Database Details for Oracle Exadata Database Service
-
Select the Exadata VM cluster compartment.
-
Select the Exadata VM cluster name.
-
Enter the Exadata infrastructure.
-
The following fields are shown as display-only: the database name, the PDB name, and the DB patch level.
-
Click Next.
Enter SSH Keys
Optionally upload SSH keys for users.
Note: You can add keys to the application tier only.
-
Click Add Key.
-
Specify the tiers for the SSH key. Choose All Tiers, Application Tier, or Database Tier.
-
Specify the pertinent OS User type. Choose All Users, Operating System Administrator, or Application Administrator.
-
Upload the SSH key file. The file name will default in.
-
The system will validate the SSH key. Click Next to continue.
Review Standby Environment Details
Review the details for your standby environment on this page. To create the standby environment, click Submit.
Promote a Standby Environment on a Database Cloud Service
You can promote only standby environments that have been successfully configured.
Important: Before proceeding with the promotion procedure, you must ensure that no concurrent requests are in the Running or Pending state. All running concurrent requests must be completed to a logical end.
Select the Standby Environment
-
Navigate to the Environments page in Oracle E-Business Suite Cloud Manager.
-
Select Promote from the Action menu for the standby environment you wish to promote.
-
Alternatively, select the standby environment and click on Promote from its Environment Details page.
Enter Standby Environment Details
The Environment Name, EBS Compartment, Region, and Network Profile Name are shown and cannot be changed.
-
Enter the Primary Instance credentials:
-
Enter the APPS Password.
-
Enter the WebLogic Server Password.
-
-
Optionally enter tagging information in the Tags region.
-
Tag Namespace: Select a predefined tag namespace or select None (add a free-form tag).
-
Tag Key: Enter the name you use to refer to the tag.
-
Value: Enter the value for the tag key.
-
-
Click Next.
Enter Database Tier Information
Enter database details and related options.
-
The Database Name, PDB Name, Database Service Type, VM Shape, and the selection for the Enable TDE checkbox are read-only.
-
Enter the EBS_SYSTEM Password.
-
Enter the SYS Password. This is the current SYS user password.
-
Enter the Wallet Password.
-
Click Next.
Enter Application Tier Information
-
Define your zones in the Zone region.
For more information on zones, refer to My Oracle Support article KA1036, Oracle E-Business Suite Release 12.2 Configuration in a DMZ.
Note that you can have multiple zones across subnets. You can configure your environment such that you functional redirection per zone is in accordance with functional affinity.
Also, you can have a load balancer shared between multiple zones of the same type. This configuration allows for two separate URLs to resolve to the same IP address and the shared load balancer will target one back-end set or another.
Note too that you have flexibility in your configuration. One zone, Zone A, can have one load balancer assigned to it, while another two zones, Zone B and Zone C, can have a second load balancer assigned to them.
Define your internal zone first.
Enter values for the following properties:
-
Name
-
Type
-
-
In the Web Entry Point region, enter values for the following properties:
-
Web Entry Type: Choose one of the following: New Load Balancer (LBaaS), Use OCI Load Balancer, Manually Configured Load Balancer to select a manually deployed existing load balancer, or Application Tier Node to choose the primary application tier as the entry point.
-
Load Balancer Shape: If you chose New Load Balancer as the web entry type, a new flexible shape load balancer will be created. Select the maximum bandwidth for your new load balancer. For example: 100 Mbps. The minimum bandwidth will default to 10 Mbps.
-
OCI Load Balancer: If you chose Use OCI Load Balancer, select the load balancer to use.
-
Protocol: Select the protocol for access to the environment, either http or https.
-
Hostname: Enter the host name for your web entry point. The web entry host name must be in lowercase. For example:
myhost -
Domain: Enter the domain for your web entry point. The web entry domain name must be in lowercase. For example:
example.com -
Port: Select the port for your web entry point. If there is no load balancer, then the port is automatically populated depending on the protocol: 8000 for http and 4443 for https. Otherwise, select the appropriate port for use with your load balancer, such as 80 for http or 443 for https. Note that to allow access to the Oracle E-Business Suite login URL, your network administrator must define an ingress rule in the load balancer security list. See Create Network Resources For Deploying Oracle E-Business Suite Environments.
-
-
When promoting an environment that uses the File Storage service, the File System details are shown by default:
-
File System Type (Shared)
-
File System Name
-
File System OCID
-
File Storage Mount Target
-
Storage Type
Important: You must ensure you specify enough storage for your nodes. Refer to Oracle E-Business Suite Installation Guide: Using Rapid Install for guidelines on space usage.
If you choose Non-Shared, you must specify a value for the Block Volume Storage field for every node in the Application Tier Nodes field.
-
-
In the Logical Host region, enter values for the following properties:
-
Logical Hostname Prefix: If you chose Automatic, enter your desired hostname prefix.
You do not need to enter this if you chose Manual for your logical host option, but you will be prompted for the Logical Hostname for your nodes in the Application Tier Nodes region.
-
Logical Domain: Enter the logical domain.
-
-
In the Application Tier Nodes region, enter properties for each node.
Note that you can define a specific shape for each application tier node.
-
Logical Hostname
-
Logical FQDN
-
Shape: You can change the shape of the node. When choosing a flexible shape, for example, VM.Standard.E3.Flex, use the sliders to choose the number of OCPUs and the amount of memory (GB).
-
Block Volume Storage
-
Fault Domain: Select the fault domain. Refer to Fault Domains for more information.
-
-
Click Save Zone to save your zone definition.
-
Define additional zones using the Add Zone button.
-
When you have completed adding your zones, click Next.
Specify Your Extensibility Options
You can optionally extend the standby promotion job to meet your own requirements. By default, Oracle E-Business Suite Cloud Manager follows a standard job definition for promotion. However, Oracle E-Business Suite Cloud Manager administrators can also create extended job definitions that include additional tasks as part of the promotion job. In this case you can select the appropriate extended job definition for Oracle E-Business Suite Cloud Manager to follow when promoting your environment. If you select an extended job definition, you may need to enter values for input parameters required by the additional tasks in that job definition.
Additional Information: For more information on using the Extensibility Framework to extend job definitions, see Set Up the Extensibility Framework.
Additionally, whether you are using the standard promotion job definition or an extended job definition, you can choose to have Oracle E-Business Suite Cloud Manager pause at specified points during the promotion job. For example, if you want to perform your own validations after a particular phase before allowing Oracle E-Business Suite Cloud Manager to proceed to the next phase, you can add a pause at that point. You can then resume the promotion job when you are ready to proceed. See Monitor Job Status.
Specify Your Job Definition
-
Optionally select an extended job definition for promoting your environment in the Job Definition field.
-
In the Task Parameters tab, specify any parameter values required for the additional tasks in the job definition. Some parameters may include default values, which you can override as needed.
Specify Your Job Definition Details
-
Click the Job Definition Details tab. This tab displays a list of the phases in the job definition and the tasks within each phase.
-
To specify that Oracle E-Business Suite Cloud Manager should pause its processing before a particular phase, click the Actions icon next to that phase, and then select Add Pause.
Note: Pauses occur before the phase at which they are defined.
-
Click Next.
Review Your Promotion Details
-
Review the installation details; database details; application tier details, including zones; and job definition details.
-
To promote your environment, click Submit.
-
You can check the status of the job to promote the environment in the Jobs page.
A standby environment that has just been promoted successfully has the value "promote-standby (Successful)" in the Environment Details page, with a link to the Job Details page. See Review Job Status for more information.
-
After the promotion is performed successfully, you should perform verification checks and then bring up the application services manually. You can also bring up the application services by using an extensible task.
Delete a Standby Environment on a Database Cloud Service
You can delete a standby environment on a database cloud service within Oracle E-Business Suite Cloud Manager. You cannot delete a standby environment that has an "In Progress" status.
-
Navigate to the standby environment's details page. See: Review Standby Environment Details.
-
Click the Delete button.
-
Enter the name of the environment to confirm that you want to delete it. Click Yes.