C Integrating Oracle Adaptive Access Manager with Access Manager
Integrating Oracle Adaptive Access Manager (OAAM) with Oracle Access Management Access Manager (Access Manager) enables fine control over the authentication process and provides full capabilities of pre- and post-authentication checking against Oracle Adaptive Access Manager policies.
This chapter provides step-by-step instructions for integrating Access Manager with Oracle Adaptive Access Manager to secure resources via risk-based authentication. The exact steps can vary depending on your specific deployment. Adapt information as required for your environment.
The integration instructions assume Identity Management components have been configured on separate WebLogic domains, as discussed in "Basic Integration Topology." For prerequisite and detailed information on how the components were installed and configured in this example integration, see Installation Guide for Oracle Identity and Access Management.
If you are deploying Oracle Identity Management components in an enterprise integration topology, as discussed in "The Enterprise Integration Topology," see Enterprise Deployment Guide for Oracle Identity and Access Management for implementation procedures. If you are planning to design and deploy a high availability environment for Access Manager and Oracle Adaptive Access Manager, see High Availability Guide for concepts and configuration steps.
This appendix contains these sections:
-
About Access Manager and Oracle Adaptive Access Manager Integration
-
Access Manager and OAAM TAP Integration with DCC WebGate Using Tunneling
-
Other Access Manager and OAAM Integration Configuration Tasks
Note:
Integration of Oracle Identity Manager provides additional features related to password collection. For information, see Chapter 3, "Integrating Access Manager, OAAM, and OIM".C.1 About Access Manager and Oracle Adaptive Access Manager Integration
Oracle Access Management Access Manager (Access Manager) provides the core functionality of Web Single Sign On (SSO), authentication, authorization, centralized policy administration and agent management, real-time session management and auditing.
Oracle Adaptive Access Manager 11g safeguards vital online business applications with strong yet easily deployed risk-based authentication, anti-phishing, and anti-malware capabilities.
This integration scenario enables you to control access to resources with Access Manager and provide strong multi-factor authentication and advanced real-time fraud prevention with Oracle Adaptive Access Manager. Advanced login security includes the virtual authentication devices, device fingerprinting, real-time risk analysis, and risk-based challenge.
You can integrate Oracle Adaptive Access Manager with Access Manager in one of two ways:
-
OAAM Basic
-
OAAM Advanced using TAP
For more information about the scenarios that are supported by each deployment, and the flow that achieves each scenario see, Section 1.5, "Common Integration Scenarios".
Note:
Oracle Access Management Access Manager and Oracle Adaptive Access Manager integrations using OAAMBasic and OAAMAdvanced authentication schemes are deprecated starting with 11.1.2.2 and will be desupported in 12.1.4 and future releases. The recommendation is to use the Oracle Access Management Access Manager and Oracle Adaptive Access Manager integration using Trusted Authentication Protocol (TAP) instead of OAAMBasic and OAAMAdvanced (without TAP) integrations.Table C-1 summarizes the Access Manager and Oracle Adaptive Access Manager integrations types.
Table C-1 Types of Access Manager and Oracle Adaptive Access Manager Integration
| Details | OAAM Basic | OAAM Advanced | OAAM Advanced Using TAP |
|---|---|---|---|
|
Available |
11.1.1.3.0 to 12.1.4 |
11.1.1.3.0 and prior to 11.1.1.5 |
11.1.1.5.0 and above OAAM Advanced using TAP is the supported OAAM Advanced integration with Access Manager. |
|
Access Manager Users |
For Access Manager users who want to add login security, including Knowledge Based Authentication (KBA). |
For Access Manager users who want advanced features and customizations beyond that available with OAAM Basic. |
For Access Manager users who want advanced features and customizations beyond that available with OAAM Basic. This option includes Step Authentication, which OAAM Advanced (without TAP) does not offer. |
|
Features |
Authentication schemes, device fingerprinting, risk analysis, KBA challenge mechanisms KBA is the only challenge mechanism available in this integration. Libraries and configuration interface for different flows (challenge, registration, and other flows). Many of the login security use cases available from Oracle Adaptive Access Manager |
Authentication schemes, device fingerprinting, risk analysis, KBA challenge mechanisms Advanced features and extensibility such as OTP Anywhere, challenge processor framework, shared library framework, and secure self-service password management flows OAAM can also be integrated with third party single sign-on products via systems integrators if required. |
Authentication schemes, device fingerprinting, risk analysis, KBA challenge mechanisms, and additional advanced security access features, such as Step Up Authentication Advanced features and extensibility such as OTP Anywhere, challenge processor framework, shared library framework, and secure self-service password management flows OAAM can also be integrated with third party single sign-on products via systems integrators if required. |
|
Deployment |
Native integration
OAAM Admin Server is required. OAAM Managed Server is not needed in this deployment. KBA is the only challenge mechanism available in this integration. The functionality is accessed through native OAAM calls. |
Integration via redirects and APIs OAAM Advanced requires full deployment of OAAM Admin and OAAM Managed Servers. Leverages the Java Oracle Access Protocol (OAP) library. |
OAAM Advanced using TAP requires full deployment OAAM Admin and OAAM Managed Servers. Leverages the Java Oracle Access Protocol (OAP) library. |
|
OAAM Database |
Required |
Required |
Required |
|
Supported Agents |
10g WebGate and Single Sign-On (OSSO) Agent |
10g WebGate |
10g or 11g WebGates |
|
Authentication Scheme |
OAAMBasic Protects OAAM-related resources with a default context type. This scheme should be used when basic integration with OAAM is required. Here, advanced features like OTP are not supported. For information about the OAAMBasic scheme, see "Managing Authentication Schemes" in Administrator's Guide for Oracle Access Management. |
OAAMAdvanced Protects OAAM-related resources with an external context type. This authentication scheme is used when complete integration with OAAM is required. A Webgate must front end the partner. For information about the OAAMAdvanced scheme, see "Managing Authentication Schemes" in Administrator's Guide for Oracle Access Management. |
TAPScheme Protects resources in an Access Manager and OAAM integration that uses TAP. This scheme delegates authentication to a third party and Access Manager asserts the token sent back. For information about the TAPScheme scheme, see "Managing Authentication Schemes" in Administrator's Guide for Oracle Access Management. |
|
Allows customization and extension of OAAM flows |
No OAAM Basic is not customizable beyond basic screen branding. |
Yes More configurable user flows |
Yes More configurable user flows |
|
Self-service password management flows |
No. OAAM Basic cannot integrate with Oracle Identity Manager |
Yes OAAM Advanced can integrate with Oracle Identity Manager |
Yes OAAM Advanced using TAP can integrate with Oracle Identity Manager. |
|
End of flow |
OAM calls the OAAM APIs to execute post-authentication rules. Based on the results, renders the appropriate pages. |
OAAM runs post-authentication rules to determine risk and execute actions. OAAM sets the SSO cookie and redirects the user to the requested resource. |
OAAM runs post-authentication rules to determine risk and execute actions. Access Manager sets the SSO cookie and redirects the user to the requested resource. |
|
Deprecated |
Yes Deprecated starting with 11.1.2.2 and will be desupported in 12.1.4 and future releases. |
Yes Deprecated starting with 11.1.2.2 and will be desupported in 12.1.4 and future releases. |
No |
|
Where information is located |
Refer to Section C.3, "OAAM Basic Integration with Access Manager" |
Refer to the Oracle Fusion Middleware Integration Guide for Oracle Access Manager 11g Release 1 (11.1.1) for this version of OAAM Advanced integration with Access Manager. |
Refer to Section C.4, "OAAM Advanced Integration with Access Manager." |
For information on authentication flows, see "About OAAM Authentication, Password Management and Customer Care Flows" in Administering Oracle Adaptive Access Manager.
C.2 Definitions, Acronyms, and Abbreviations
This section provides key definitions, acronyms, and abbreviations that are related to this integration.
Table C-2 OAAM and Access Manager Integration Terms
| Term | Definition |
|---|---|
|
Action |
Oracle Adaptive Access Manager provides functionality to calculate the risk of an access request or an event or a transaction, and determines proper outcomes to prevent fraud and misuse. The outcome can be an action, which is an event activated when a rule is triggered. For example: block access, challenge question, ask for PIN or password, and other actions. For information, see "Managing Policies, Rules, and Conditions" in Administering Oracle Adaptive Access Manager. |
|
Alert |
Alerts are messages that indicate the occurrence of an event. An event can be that a rule was triggered, a trigger combination was met, or an override was used. Alert groups are used as results within rules so that when a rule is triggered all of the alerts within the groups are created. For information, see "Managing Policies, Rules, and Conditions" in Administering Oracle Adaptive Access Manager. |
|
Authentication |
The process of verifying a person's, device's, or application's identity. Authentication deals with the question "Who is trying to access my services?" |
|
Authentication Level |
Access Manager supports various authentication levels to which resources can be configured so as to provide discrete levels of security required to access various resources. Discrete authentication levels distinguish highly protected resources from other resources. The TAP token sent by Access Manager provides parameters related to the authentication level. Authentication level is the trust level of the authentication scheme. This reflects the challenge method and degree of trust used to protect transport of credentials from the user. The trust level is expressed as an integer value between 0 (no trust) and 99 (highest level of trust). Note: After a user is authenticated for a resource at a specified level, the user is automatically authenticated for other resources in the same application domain or in different application domains, if the resources have the same or a lower trust level as the original resource. Current Authentication level is the current authentication level of the user. Target Authentication level is the authentication level required to access the protected resource. |
|
Authorization |
Authorization regards the question "Who can access what resources offered by which components?" |
|
Authentication Scheme |
Access to a resource or group of resources can be governed by a single authentication process known as an authentication scheme. An authentication scheme is a named component that defines the challenge mechanism required to authenticate a user. Each authentication scheme must also include a defined authentication module. When you register a partner (either using the Oracle Access Management Console or the remote registration tool), the application domain that is created is seeded with a policy that uses the authentication scheme that is set as the default scheme. You can choose any of the existing authentication schemes as the default for use during policy creation. |
|
Authentipad Checkpoint |
The Authentipad checkpoint determines the type of device to use based on the purpose of the device. |
|
Blocked |
If a user is blocked, it is because a policy has found certain conditions to be |
|
Challenge Parameters |
Challenge parameters are short text strings consumed and interpreted by WebGates and Credential Collector modules to operate in the manner indicated by those values. The syntax for specifying any challenge parameter is: <parameter>=<value> This syntax is not specific to any WebGate release (10g versus 11g). Authentication schemes are independent of WebGate release. |
|
Challenge Questions |
Challenge Questions are a finite list of questions used for secondary authentication. During registration, users are presented with several drop-down question lists called "menus." For example, he may be presented with three question menus. A user must select one question from each menu and enter answers for them during registration. Only one question from each question menu can be registered. These questions become the user's "registered questions." When rules in OAAM Admin trigger challenge questions, OAAM Server displays the challenge questions and accepts the answers in a secure way for users. The questions can be presented in the QuestionPad, TextPad, and other virtual authentication devices, where the challenge question is embedded into the image of the authenticator, or simple HTML. |
|
Checkpoint |
A checkpoint is a specified point in a session when Oracle Adaptive Access Manager collects and evaluates security data using the rules engine. Examples of checkpoints are:
For information on various checkpoints, see "Managing Policies, Rules, and Conditions" in Administering Oracle Adaptive Access Manager. |
|
Delegated Authentication Protocol |
The Delegated Authentication Protocol (DAP) challenge mechanism indicates that Access Manager does an assertion of the token that it receives, which differs from the standard challenge "FORM" mechanism with the external option. |
|
Device |
A "device" is a PC, notebook, mobile phone, smart phone, or other web-enabled machine used by a user |
|
Device fingerprinting |
Device fingerprinting collects information about the device such as browser type, browser headers, operating system type, locale, and other attributes. Fingerprint data represents the data collected for a device during the login process that can be used to identify the device whenever it is used to log in. The fingerprinting process produces a fingerprint that is unique to the user and designed to protect against the "replay attacks" and the "cookie-based registration bypass" process. The fingerprint details help in identifying a device, check whether it is secure, and determine the risk level for the authentication or transaction. A customer typically uses these devices to log in. Devices can be a PC, notebook, mobile phone, smart phone, or other web-enabled machine. |
|
IAMSuiteAgent |
The IAMSuiteAgent (Security Provider in WebLogic Server and corresponding 10g Webgate Profile in Access Manager) is installed out of the box when you install Access Manager. It is implemented directly on the WebLogic Server and evaluates all requests coming in to the WebLogic Server. IAMSuiteAgent is preconfigured to provide Single-Sign On (using the IAMSuiteAgent WebGate Profile in Access Manager) for the IdM domain consoles, Oracle Identity Manager, Oracle Adaptive Access Manager, and other Identity Management servers created during domain creation. It is like a WebGate, but it only protects internal URLs (configured out of the box with the IAM Suite application domain in Access Manager) provided by various products in the Identity and Access Management Suite. In enterprise deployments, there is usually a reverse proxy layer of web servers between the Identity and Access Management products and the end user. Because of this, you could remove the IAMSuiteAgent (Security Provider in WebLogic Server) and configure appropriate WebGate and Host Identifiers through the Oracle Access Management Administration Console and use the IAM Suite application domain with the newly created WebGate front ending Identity and Access Management components/products. If required, resources similar to IAM Suite application domain can be added to the authentication/authorization policies of the WebGate's application domain (if a new application domain is created with the creation of the WebGate Profile front ending Identity and Access Management components/products). Even after disabling/deleting IAMSuiteAgent Provider on WebLogic, the IAMSuite WebGate profile on Access Manager could be used. This IAMSuite WebGate profile is used in the Access Manager and OAAM integration using TAP. |
|
Knowledge Based Authentication (KBA) |
Knowledge-based authentication (KBA) is a secondary authentication method that provides an infrastructure based on registered challenge questions. It enables end-users to select questions and provide answers which are used to challenge them later on. Security administration include:
For information, see "Managing Knowledge-Based Authentication" in the Administering Oracle Adaptive Access Manager. |
|
KeyPad |
A key pad is a virtual keyboard for entry of passwords, credit card number, and so on. The KeyPad protects against Trojan or keylogging. |
|
LDAPScheme |
LDAPScheme is an authentication scheme used to protect Access Manager-related resources (URLs) for most directory types based on a form challenge method. |
|
Multi-Level Authentication |
Every authentication scheme requires an authentication level. The lower this number, the less stringent the scheme. A higher level number indicates a more secure authentication mechanism. Single Sign-On (SSO) capability enables users to access more than one protected resource or application with a single sign in. After a successful user authentication at a specific level, the user can access one or more resources protected by one or more application domains. However, the authentication schemes used by the application domains must be at the same level (or lower). When a user accesses a resource protected with an authentication level that is greater than the level of his current SSO token, he is re-authenticated. In the Step Up Authentication case, the user maintains his current level of access even if failing the challenge presented for the higher level. This is "additional authentication". For information, see "Managing Authentication and Shared Policy Components" in Administrator's Guide for Oracle Access Management. |
|
Oracle Access Protocol (OAP) |
Oracle Access Protocol (OAP) enables communication between Access System components (for example, OAM Server, WebGate) during user authentication and authorization. This protocol was formerly known as NetPoint Access Protocol (NAP) or COREid Access Protocol. |
|
One-time Password (OTP) |
One-time Password is a risk-based challenge solution consisting of a server generated one time password delivered to an end user via a configured out of band channel. Supported OTP delivery channels include short message service (SMS), email, and instant messaging. OTP can be used to compliment KBA challenge or instead of KBA. As well both OTP and KBA can be used alongside practically any other authentication type required in a deployment. Oracle Adaptive Access Manager also provides a challenge processor framework. This framework can be used to implement custom risk-based challenge solutions combining third party authentication products or services with OAAM real-time risk evaluations. For information, see "Setting Up OTP Anywhere" in Administering Oracle Adaptive Access Manager. |
|
Access Manager and Oracle Adaptive Access Manager TAP Integration |
In Access Manager and Oracle Adaptive Access Manager TAP Integration, OAAM Server acts as a trusted partner application. The OAAM Server uses the Trusted Authentication Protocol (TAP) to communicate the authenticated user name to OAM Server after it performs strong authentication, risk and fraud analysis and OAM Server will own the responsibility of redirecting to the protected resource. |
|
OAAM Admin |
Administration Web application for all environment and Adaptive Risk Manager and Adaptive Strong Authenticator features. |
|
OAMAdminConsoleScheme |
Authentication scheme for Oracle Access Management Console. |
|
OAAMAdvanced |
Authentication scheme that protects resources with an external context type. This authentication scheme is used when complete integration of OAAM is required. A WebGate must front end the partner. |
|
OAAMBasic |
Authentication scheme that protects resources with a default context type. This scheme should be used when OAAM Basic integration with Access Manager is required. Here, advanced features like OTP are not supported. |
|
OAAM Server |
Adaptive Risk Manager and Adaptive Strong Authentication features, Web services, LDAP integration and user Web application used in all deployment types except native integration |
|
Policies |
Policies contain security rules and configurations used to evaluate the level of risk at each checkpoint. For information, see "Managing Policies, Rules, and Conditions" in Administering Oracle Adaptive Access Manager. |
|
Post-authentication rules |
Rules are run after a user is successfully authenticated. For information, see "Managing Policies, Rules, and Conditions" in Administering Oracle Adaptive Access Manager. |
|
Pre-authentication rules |
Rules are run before a user completes the authentication process. For information, see "Managing Policies, Rules, and Conditions" in Administering Oracle Adaptive Access Manager. |
|
Profile |
The customer's registration information including security phrase, image, challenge questions, challenge (question and OTP) counters, and OTP. |
|
Protection level |
There are three protection levels in which to choose from:
|
|
Registration |
Registration is the enrollment process, the opening of a new account, or other event where information is obtained from the user. During the Registration process, the user is asked to register for questions, image, phrase and OTP (email, phone, and so on) if the deployment supports OTP. Once successfully registered, OTP can be used as a secondary authentication to challenge the user. |
|
Risk score |
OAAM risk scoring is a product of numerous fraud detection inputs such as a valid user, device, location, and so on. These inputs are weighted and analyzed within the OAAM fraud analytics engine. The policy generates a risk score based on dozens of attributes and factors. Depending on how the rules in a policy are configured, the system can yield an elevated risk score for more risky situations and lower scores for lower-risk situations. The degree of elevation can be adjusted with the weight assigned to the particular risk. The risk score is then used as an input in the rules engine. The rules engine evaluates the fraud risk and makes a decision on the action to take. |
|
Fraud rules are used to evaluate the level of risk at each checkpoint. For information on policies and rules, see the "OAAM Policy Concepts and Reference" chapter in the Administering Oracle Adaptive Access Manager. |
|
|
Step Up Authentication |
Step Up Authentication occurs when a user is attempting to access a resource more sensitive than ones he had already accessed in the session. To gain access to the more sensitive resource, a higher level of assurance is required. Access Manager resources are graded by authentication level, which defines the relative sensitivity of a resource. For example, if a user accesses a corporate portal home page that is defined as authentication level 3, a basic password authentication is required. The time card application that links off the portal home is more sensitive than the portal home page, so the application is defined as authentication level 4, which requires basic password and risk-based authentication provided by OAAM. So, if a user logs in to the portal with a valid user name and password, and then clicks the time card link, his device is fingerprinted and risk analysis determines if additional authentication, such as a challenge question, is required to allow him access. |
|
Strong Authentication |
An authentication factor is a piece of information and process used to authenticate or verify the identity of a person or other entity requesting access under security constraints. Two-factor authentication (T-FA) is a system wherein two different factors are used in conjunction to authenticate. Using two factors as opposed to one factor generally delivers a higher level of authentication assurance. Using more than one factor is sometimes called strong authentication or multi-factor authentication. |
|
TAP |
TAP stands for trusted authentication protocol. This is to be used when authentication is performed by a third party and Access Manager asserts the token sent back. After asserting the token, Access Manager creates its cookie and continues the normal single-sign on flow. A trust mechanism exists between the OAM Server and the external third party which performs the authentication. In this scenario, Access Manager acts as an asserter and not authenticator. |
|
TAPScheme |
This is the authentication scheme that is used to protect resources in an Access Manager and OAAM integration that uses TAP. If you want two TAP partners with different tapRedirectUrls, create a new authentication scheme using the Oracle Access Management Console and use that scheme. When configured, this authentication scheme can collect context-specific information before submitting the request to the Access Server. Context-specific information can be in the form of an external call for information. |
|
TextPad |
Personalized device for entering a password or PIN using a regular keyboard. This method of data entry helps to defend against phishing. TextPad is often deployed as the default for all users in a large deployment then each user individually can upgrade to another device if they wish. The personal image and phrase a user registers and sees every time they login to the valid site serves as a shared secret between user and server. |
|
Virtual authenticators |
A personalized device for entering a password or PIN or an authentication credential entry device to protect users while interacting with a protected web application. The virtual authentication devices harden the process of entering and transmitting authentication credentials and provide end users with verification they are authenticating on the valid application. For information on virtual authenticators, see "Customizing Virtual Authentication Devices" in the Developer's Guide for Oracle Adaptive Access Manager. |
|
Web Agent |
A single sign-on agent (also known as a policy-enforcement agent, or simply an agent) is any front-ending entity that acts as an access client to enable single sign-on across enterprise applications. To secure access to protected resources, a Web server, Application Server, or third-party application must be associated with a registered policy enforcement agent. The agent acts as a filter for HTTP requests, and must be installed on the computer hosting the Web server where the application resides. Individual agents must be registered with Access Manager 11g to set up the required trust mechanism between the agent and OAM Server. Registered agents delegate authentication tasks to the OAM Server. |
|
WebGate |
Web server plug-in that acts as an access client. WebGate intercepts HTTP requests for Web resources and forwards them to the OAM Server for authentication and authorization |
C.3 OAAM Basic Integration with Access Manager
OAAM Basic integration with Access Manager, which is a native integration, requires the OAM Server (which is embedded in Access Manager) and OAAM Admin Server in the Identity Management Middleware WebLogic Domain and a functional OAAM database. Knowledge-based Authentication (KBA) is the only challenge mechanism available in this integration.
The OAAM Admin Server is used by Access Manager Administrators to import and export policies, create new policies, view sessions, and configure Oracle Adaptive Access Manager functionality. When policies are imported, exported, or configured, the changes are saved to the OAAM database.
Oracle Adaptive Access Manager is integrated with Access Manager through the extension libraries and uses them directly. The OAAM Server is not needed in this deployment since the rules engine and the runtime functionality of Oracle Adaptive Access Manager are provided using these libraries. When a user enters the registration flow, Access Manager shows the user the virtual authentication devices and runs the pre-authentication policies by using the OAAM libraries to make API calls. The OAAM libraries internally make JDBC calls to save the data related to the user to the OAAM database.
This section explains how to configure OAAM Basic integration with Access Manager.
The following topics explain how this type of integration is implemented:
C.3.1 Prerequisites for OAAM Basic Integration with Access Manager
Prior to integrating Oracle Adaptive Access Manager with Access Manager, you must have installed all the required components, including any dependencies, and configured the environment in preparation for the integration tasks that follow.
Note:
Key installation and configuration information is provided in this section. However, not all component prerequisite, dependency, and installation instruction is duplicated here. Adapt information as required for your environment.For complete installation information, follow the instructions in Installation Guide for Oracle Identity and Access Management.
Table C-3 lists the required components that must be installed and configured before the integration tasks are performed.
Table C-3 Required Components for Integration
| Component | Information |
|---|---|
|
Access Manager |
Access Manager is installed and configured. For information on the installation and configuration Access Manager, see "Installing and Configuring Oracle Identity and Access Management (11.1.2)" and "Configuring Oracle Access Management" in Installation Guide for Oracle Identity and Access Management. |
|
Oracle Adaptive Access Manager |
Oracle Adaptive Access Manager is installed and configured. For information on the installation and configuration of Oracle Adaptive Access Manager, see "Installing and Configuring Oracle Identity and Access Management (11.1.2)" and "Configuring Oracle Adaptive Access Manager" in Installation Guide for Oracle Identity and Access Management. |
C.3.2 Starting the Administration Server and Access Manager Managed Server
Start the Administration Server and Access Manager Managed Server.
-
Start the WebLogic Administration Server:
DOMAIN_HOME/bin/startWeblogic.sh -
Start the managed server hosting the OAM Server:
DOMAIN_HOME/bin/startManagedWeblogic.sh oam_server1
For information on starting the Administration Server and Managed Servers, see "Starting the Stack" in Installation Guide for Oracle Identity and Access Management.
C.3.3 Configuring OAAM Basic Integration with Access Manager
Follow the steps in this section to implement the Access Manager and Oracle Adaptive Access Manager integration.
Creating a Resource in Access Manager
-
Log in to the Oracle Access Management Console:
http://oam_adminserver_host:oam_adminserver_port/oamconsole
-
In the Oracle Access Management Console, click Application Security at the top of the window.
-
In the Application Security console, click Application Domains in the Access Manager section.
-
In the Search Application Domains page that appears, enter
IAM Suitein the Name field. -
Click the Search button to initiate the search.
-
Click IAM Suite in the Search Results table and click Edit.
-
In the IAM Suite Application Domain, click the Resources tab, then click Create in the Search Results toolbar.
-
In the Create Resource page, create the protected resource.
For example, provide the following information for the resource:
-
Host Identifier:
IDMDomain -
Resource URL:
/higherriskresource
-
-
Click Apply to add this resource to the Application Domain.
For information on creating a resource see "Adding and Managing Policy Resource Definitions" in Administrator's Guide for Oracle Access Management.
Create a New Authentication Policy
Create a new Authentication Policy under IAMSuiteAgent and make sure to set the Authentication Scheme to OAAMBasic.
In this step, you are associating the protected resource with the OAAMBasic Authentication Scheme.
-
In the Oracle Access Management Console, click Application Security at the top of the window.
-
In the Application Security console, click Application Domains in the Access Manager section.
-
In the Search Application Domains page that appears, enter
IAM Suitein the Name field. -
Click the Search button to initiate the search.
-
Choose IAM Suite in the Search Results table and click Edit.
-
In the IAM Suite Application Domain page, click the Authentication Policies tab, then click the Create button in the Search Results toolbar to open the Create Authentication Policy page.
-
In the Create Authentication Policy page, add the required elements for the policy you are creating:
Name: A unique name used as an identifier. For example,
HighPolicy.Description (optional): Optional unique text that describes this authentication policy.
Authentication Scheme:
OAAMBasicSuccess URL: The redirect URL to be used upon successful authentication.
Failure URL: The redirect URL to be used if authentication fails.
-
In the Create Authentication Policy page, add the resource you have created:
-
Click the Resources tab.
-
Click the Add button in the Resources tab.
-
Click the Search button to display all the resources available.
-
Choose the URL of the resource you created in the
IDMDomain. For example,/higherriskresource.The listed URLs were added to this application domain earlier. You can add one or more resources to protect with this authentication policy. The resource definition must exist within the application domain before you can include it in a policy.
-
Click Add Selected.
-
-
Click Apply to save changes.
-
In the Create Authentication Policy page, click the Responses tab to add responses.
Responses are the obligations (post authentication actions) to be carried out by the Web agent. After successful authentication, the application server hosting the protected application can assert the user identity based on these responses. After a failed authentication, the browser redirects the request to a pre-configured URL
For information on responses, see "Adding and Managing Policy Responses for SSO" in Administrator's Guide for Oracle Access Management.
-
Close the page when you finish.
For information on creating an authentication policy for a particular resource, see "Defining Authentication Policies for Specific Resources" in Administrator's Guide for Oracle Access Management.
Create a New Authorization Policy
Create a new authorization policy.
-
In the Oracle Access Management Console, click Application Security at the top of the window.
-
In the Application Security console, click Application Domains in the Access Manager section.
-
In the Search Application Domains page that appears, enter
IAM Suitein the Name field. -
Click the Search button to initiate the search.
-
Click IAM Suite in the Search Results table and click Edit.
-
In the IAM Suite Application Domain page, click the Authorization Policies tab, then click the Create button in the Search Results toolbar. to open the Create Authorization Policy page.
-
Click the Summary tab and enter a unique name for this authorization policy.
-
Click the Resources tab and click the Add button.
-
Click the Search button to display all the resources available.
-
From the Results table, click the resource URL in the IDMDomain.
Resource URL:
/higherriskresource -
Click Add Selected.
-
Click Apply to save changes and close the confirmation window.
For information on creating an authorization policy for a specific resource, see "Defining Authorization Policies for Specific Resources" in Administrator's Guide for Oracle Access Management.
Create User with Privileges to Log into the OAAM Administration Console
Create an OAAM user that has the correct privileges to log in to the OAAM Administration Console and then grant the necessary groups to the user.
For information on creating OAAM users and assigning them to groups, see Section C.4.4, "Creating the OAAM Users and OAAM Groups."
Locate and modify the oam-config.xml file manually using a text editor.
The oam-config.xml file contains all Access Manager-related system configuration data and is located in the DOMAIN_HOME/config/fmwconfig directory.
Locate the following line and set the OAAMEnabled property to true as shown:
<Setting Name="OAAMEnabled" Type="xsd:boolean">true</Setting>
Note:
In theoam-config.xml file, you must increment the version number given in the file for this integration to work. For example, if the version number is 1 in the file, change it to 2.If you prefer to use the configureOAAM WLST command to create the data source, associate it as a target with the OAM Server, and enable the property in the oam-config.xml, refer to "Using ConfigureOAAM WLST Command to Create the Data Source in OAAM Basic Integration with Access Manager".
For information on the oam-config.xml file, see "About the Oracle Access Management Configuration Data File: oam-config.xml" in Administrator's Guide for Oracle Access Management.
Start the OAAM Admin Server, oaam_admin_server1.
DOMAIN_HOME/bin/startManagedWeblogic.sh oaam_admin_server1
A full snapshot of policies, rules, challenge questions, dependent components, and configurations is shipped with Oracle Adaptive Access Manager. This snapshot is required for the minimum configuration of OAAM. Import the snapshot into the system by following the instructions in Section C.4.5, "Importing the Oracle Adaptive Access Manager Snapshot."
Shut down the OAAM Administration Server
Shut down the OAAM Administration Server, oaam_admin_server1:
DOMAIN_HOME/bin/stopManagedWeblogic.sh oaam_admin_server1
-
Log in to the Oracle WebLogic Administration Console:
http://weblogic_admin_server:7001/console -
Since Oracle Adaptive Access Manager is not installed in the same WebLogic Domain as Access Manager, perform the following steps for Access Manager:
-
Create a data source with the following JNDI name:
jdbc/OAAM_SERVER_DB_DS
Note:
The name of the data source can be any valid string, but the JNDI name should be as shown above. -
To the schema you created as part of the Oracle Adaptive Access Manager configuration, provide the connection details for the OAAM Database.
-
-
Click Services and then Database Resources and locate the OAAM_SERVER_DB_DS resource.
-
Lock the environment by clicking the Lock button in the upper left corner of the WebLogic Administration Console.
-
Open the OAAM_SERVER_DB_DS resource and click the Target tab. Once there, you are presented a list of WebLogic Servers that are available.
-
Associate Administration Server and oam_server1 as targets with the data source.
-
Click the Activate button in the upper left corner of the Oracle WebLogic Administration Console.
For information on configuring JDBC data sources, see "Configuring JDBC Data Sources" in Oracle Fusion Middleware Configuring and Managing JDBC Data Sources for Oracle WebLogic Server.
-
To verify the configuration, remote register two agents, each protecting a resource.
-
Use the Oracle Access Management Console to associate the first resource with the
OAAMBasicpolicy for the authentication flow. Associate the second resource with theLDAPScheme. -
Access the protected resource configured earlier to verify the configuration.
You are prompted to enter a user name. Then, on a separate screen you are prompted for the password.
Once the user name and password are validated you are asked to select and answer three challenge questions. Once completed you are taken to the protected application.
C.4 OAAM Advanced Integration with Access Manager
Integrating Oracle Adaptive Access Manager with Access Manager provides an enterprise with advanced access security features that greatly improve the level of protection for applications. Features including anti-phishing, anti-malware, device fingerprinting, behavioral profiling, geolocation mapping, real-time risk analysis and multiple risk-based challenge mechanisms such as one-time password and knowledge based authentication questions provide an increased level of access security.
This section explains how to integrate Oracle Adaptive Access Manager with Access Manager in "OAAM Advanced using TAP."
In OAAM Advanced Integration using TAP, OAAM Server acts as a trusted partner application. The OAAM Server uses the Trusted authentication protocol (TAP) to communicate the authenticated username to OAM Server after it performs strong authentication and risk and fraud analysis. The OAM Server then redirects the user to the protected resource.
OAAM Advanced integration with Access Manager can involve scenarios with or without Oracle Identity Manager.
Integration with Oracle Identity Manager provides users with richer password management functionality, including secure "Forgot Password" and "Change Password" flows.
For integration details, see Chapter 3, "Integrating Access Manager, OAAM, and OIM".
Without Oracle Identity Manager
If Oracle Identity Manager is not part of your environment, follow the integration procedure described in this chapter.
C.4.1 Roadmap for OAAM Advanced Integration with Access Manager
Table C-4 lists the high-level tasks for integrating Oracle Adaptive Access Manager with Access Manager.
The configuration instructions assume Oracle Adaptive Access Manager is integrated with Access Manager using the out-of-the box integration.
Table C-4 Roadmap for OAAM Advanced Integration with Access Manager
|
1 |
Verify that all required components have been installed and configured prior to integration. |
For information, see "Prerequisites for OAAM Advanced Integration with Access Manager." |
|
2 |
Ensure the Access Manager and OAAM Administration Consoles and managed servers are running. |
For information, see "Restarting the Servers." |
|
3 |
Create the OAAM users. |
For information, see "Creating the OAAM Users and OAAM Groups." |
|
4 |
Import the OAAM base snapshot. |
For information, see "Importing the Oracle Adaptive Access Manager Snapshot." |
|
5 |
Validate that Access Manager was set up correctly. |
For information, see "Validating Initial Configuration of Access Manager." |
|
6 |
Validate that OAAM was set up correctly. |
For information, see "Validating Initial Configuration of Oracle Adaptive Access Manager." |
|
7 |
Register the WebGate agent with Access Manager 11g to set up the required trust mechanism between the Agent and OAM Server. |
For information, see "Registering the WebGate with Access Manager 11g Using the Oracle Access Management Console." |
|
8 |
Register the OAAM Server to act as a trusted partner application to Access Manager. |
For information, see "Registering the OAAM Server as a Partner Application to Access Manager." |
|
9 |
Add the agent password to the Agent profile. |
For information, see "Adding an Agent Password to the IAMSuiteAgent Profile." |
|
10 |
Update IAMSuiteAgent. |
For information, see "Updating the Domain Agent Definition If Using Domain Agent for IDM Domain Consoles." |
|
11 |
Verify TAP partner registration using the Oracle Access Management tester. |
For information, see "Verifying TAP Partner Registration." |
|
12 |
Set up TAP integration properties in OAAM. |
For information, see "Setting Up Access Manager TAP Integration Properties in OAAM." |
|
13 |
Configure the integration to use OAAM TAPScheme to protect Identity Management product resources in the IAMSuiteAgent application domain. |
For information, see "Configuring the Integration to Use TAPScheme to Protect Identity Management Resources in the IAMSuiteAgent Application Domain." |
|
14 |
Configure the authentication scheme in the policy-protected resource policy to protect a resource with the OAAM TAPScheme. |
For information, see "Configuring a Resource to be Protected with TAPScheme." |
|
15 |
Validate the Access Manager and Oracle Adaptive Access Manager Integration. |
For information, see "Validating the Access Manager and Oracle Adaptive Access Manager Integration." |
C.4.2 Prerequisites for OAAM Advanced Integration with Access Manager
Prior to configuring Oracle Adaptive Access Manager with Access Manager, you must have installed all the required components, including any dependencies, and configured the environment in preparation of the integration tasks that follow.
Note:
Key installation and configuration information is provided in this section. However, not all component prerequisite, dependency, and installation instruction is duplicated here. Adapt information as required for your environment.For complete installation information, follow the instructions in Installation Guide for Oracle Identity and Access Management.
Table C-5 lists the required components that must be installed and configured before the integration tasks are performed.
Table C-5 Required Components for Integration
| Component | Information |
|---|---|
|
Access Manager |
Access Manager is installed and configured. Each Oracle Identity and Access Management 11g Release 2 (11.1.2.3.0) domain must be configured to have a Database Security Store. Irrespective of the number of domains in a logical Oracle Identity and Access Management 11g Release 2 (11.1.2.3.0) deployment (a logical deployment is a collection of Oracle Identity and Access Management products running in one or more domains and using a single database to hold product schemas), all domains share the same Database Security Store and use the same domain encryption key. The Database Security Store is created at the time of creating the first domain, and then each new domain created is joined with the Database Security Store already created. At installation, Access Manager is configured with the Database Security store. The Access Manager and Oracle Adaptive Access Manager wiring requires the Database Security Store. For information on the installation of Access Manager, see "Installing and Configuring Oracle Identity and Access Management (11.1.2.3.0)" in Installation Guide for Oracle Identity and Access Management. For information on the configuration of Access Manager in a new or existing WebLogic Domain and the configuration of the Database Security Store, see "Configuring Oracle Access Management" in the Installation Guide for Oracle Identity and Access Management. In addition, see "Securing Communication" in the Administrator's Guide for Oracle Access Management for information about the configuration of Access Manager in Open, Simple, or Cert mode. |
|
Oracle Adaptive Access Manager |
Oracle Adaptive Access Manager is installed and configured. For information on the installation and configuration of Oracle Adaptive Access Manager, see "Installing and Configuring Oracle Identity and Access Management (11.1.2.3.0)" and "Configuring Oracle Adaptive Access Manager" in Installation Guide for Oracle Identity and Access Management. Because the installations are in a split domain, the |
|
Oracle HTTP Server |
For more information on the installation of the Oracle HTTP Server (OHS), see Oracle Fusion Middleware Installation Guide for Oracle Web Tier. |
|
Oracle Access Manager 10g or Access Manager 11g agent (WebGate) |
For information on the installation of the Oracle Access Management 11g WebGate, see "Installing Oracle HTTP Server 11g WebGate" in Oracle Fusion Middleware Installing Webgates for Oracle Access Manager. For information on the installation of the Oracle Access Manager 10g WebGate, see "Registering and Managing 10g WebGates with Access Manager 11g" in Administrator's Guide for Oracle Access Management. |
C.4.3 Restarting the Servers
Before you can perform tasks in this section, ensure that the Oracle Access Management Console and OAAM Administration Console and managed servers are running. To restart the servers, perform these steps:
-
Start the WebLogic Administration Server:
OAM_DOMAIN_HOME/bin/startWeblogic.shSince OAAM is installed and configured in a different WebLogic Domain from Access Manager, you must also start the WebLogic Administration Server located in
OAAM_Domain_Home:OAAM_DOMAIN_HOME/bin/startWeblogic.shOAM_DOMAIN_HOMEis the WebLogic Domain which contains Access Manager andOAAM_DOMAIN_HOMEis the WebLogic Domain which contains OAAM. -
Start the managed server hosting the OAM Server:
OAM_DOMAIN_HOME/bin/startManagedWeblogic.sh oam_server1
-
Start the managed server hosting OAAM Admin Server:
OAAM_DOMAIN_HOME/bin/startManagedWeblogic.sh oaam_admin_server1
-
Start the managed server hosting the Oracle Adaptive Access Manager runtime server:
OAAM_DOMAIN_HOME/bin/startManagedWeblogic.sh oaam_server_server1
For information on starting the Administration Server and Managed Servers, see "Starting the Stack" in Installation Guide for Oracle Identity and Access Management.
C.4.4 Creating the OAAM Users and OAAM Groups
Note:
Skip this step if you have already created OAAM users and OAAM groups during post-installation.Before integrating Oracle Adaptive Access Manager with Access Manager, you must take into account whether the OAAM Administration Console is being protected. In order to access the OAAM Administration Console, you must create administration users.
-
If you are protecting the OAAM Administration Console, you must create users and groups in the external LDAP store using the
idmConfigTool. For details, see Section D.4.2.3, "prepareIDStore mode=OAAM"OR
-
If you are not protecting the OAAM Administration Console, create the administration user using the WebLogic Administration Console.
To disable OAAM Administration Console protection, refer to Section C.6.5, "Disabling OAAM Administration Console Protection."
The following are instructions to create an administration user using the WebLogic Administration Console and associate that user to an OAAM group:
-
Create groups in the external LDAP store using the
idmConfigTool. For details, see Section D.4.2.3, "prepareIDStore mode=OAAM" -
Log in to the Oracle WebLogic Administration Console for your WebLogic Domain.
-
Under Domain Structure in the left pane, select Security Realms.
-
In the Summary of Security Realms page, select the realm that you are configuring (for example,
myrealm). -
In the Settings for Realm Name page select Users and Groups and then Users.
-
Click New and provide the required information to create a user, such as
user1, in the security realm:-
Name:
oaam_admin_username -
Description: optional
-
Provider:
DefaultAuthenticator -
Password: Enter a password for the administrator
-
Confirmation: Re-enter the password for the administrator
Important: User names must not include tabs or any of the following characters: semicolons, commas, plus signs, equal signs, and single backslash characters. In addition, it may not start with a pound sign or double quotations. If a user is created with any of the invalid characters, the WebLogic domain can become corrupted.
-
-
Click OK to save your changes.
user1 appears in the User table.
-
In the Users table, select the newly created user,
user1. -
In the Settings for User Name page, click the Groups tab.
-
Select a group or groups from the Available list box with the
OAAMkeyword to the user,user1.To add a user1 to a group, click the right arrow to move the selection to the Chosen list box.
You must set up the OAAM groups in the external LDAP store prior to associating users to the groups; otherwise, they will not be available.
-
Click Save.
For information on creating users and assigning them to groups, see Oracle Fusion Middleware Oracle WebLogic Server Administration Console Online Help.
C.4.5 Importing the Oracle Adaptive Access Manager Snapshot
Note:
Skip this step if you have already imported the OAAM Snapshot during post-installation.A full snapshot of policies, rules, challenge questions, dependent components, and configurations is shipped with Oracle Adaptive Access Manager. This snapshot is required for the minimum configuration of Oracle Adaptive Access Manager. Import the snapshot into the system by following these instructions:
-
Log in to the OAAM Administration Console with the newly created user.
http://oaam_managed_server_host:oaam_admin_managed_server_port/oaam_admin
-
Open System Snapshot under Environment in the Navigation tree.
The System Snapshots Search page is displayed.
-
Click the Load from File button in the upper right.
A Load and Restore Snapshot screen appears.
-
Deselect Back up current system now and click Continue.
-
When the dialog appears with the message that you have not chosen to back up the current system, and do you want to continue, click Continue.
-
Click the Choose File button.
-
Now that you are ready to load the snapshot, click the Browse button in the dialog in which you can enter the filename of the snapshot you want to load. A screen appears for you to navigate to the directory where the snapshot file is located. Click Open. Then, click the Load button to load the snapshot into the system.
The snapshot file,
oaam_base_snapshot.zipis located in theOracle_IDM1/oaam/initdirectory where the OAAM base content is shipped. -
Click OK.
You have loaded the snapshot into memory, but the items in the snapshot are not effective yet. Unless you click the Restore button, the items in the snapshot have not been applied.
-
To apply the snapshot, click Restore.
Once you have applied the snapshot, make sure it appears in the System Snapshots page.
To ensure correct operation, make sure that the default base policies and challenge questions shipped with Oracle Adaptive Access Manager have been imported into your system. You may encounter a non-working URL if policies and challenge questions are not available as expected in your Oracle Adaptive Access Manager environment.
For information on searching for OAAM policies, see "Searching for a Policy" in Oracle Fusion Middleware Administrator's Guide for Oracle Adaptive Access Manager.
For information on searching for challenge questions, see "Searching for a Challenge Question" in Administering Oracle Adaptive Access Manager.
For information on the location of the base policies and default question zip files shipped with Oracle Adaptive Access Manager, see "Importing the OAAM Snapshot" in Administering Oracle Adaptive Access Manager.
C.4.6 Validating Initial Configuration of Access Manager
Verify that Access Manager is set up correctly by accessing the Welcome to Oracle Access Management page.
-
Log in to the Oracle Access Management Console:
http://oam_adminserver_host:oam_adminserver_port/oamconsole
You should be redirected to the OAM Server for login.
-
Provide the WebLogic Admin user name and password.
If the login is successful, the Welcome to Oracle Access Management page is displayed.
C.4.7 Validating Initial Configuration of Oracle Adaptive Access Manager
Verify that Oracle Adaptive Access Manager is set up correctly by accessing the OAAM Server.
-
Log in to the OAAM Server:
http://host:port/oaam_server
-
Provide any user name and click Continue.
-
Provide the password as
testbecause the Access Manager and Oracle Adaptive Access Manager integration has not yet been performed. You must change the password immediately after the integration. -
Complete the registration.
A successful login indicates that you have configured the initial configuration correctly.
Note:
The test login URL/oaam_server is used to verify that the OAAM configuration is working before proceeding with the integration of Access Manager. This URL is not intended for use after the integration of Access Manager and OAAM. For information, see Section C.8.2.5, "OAAM Test Login URL /oaam_server Fails After Access Manager and Oracle Adaptive Access Manager Integration."C.4.8 Registering the WebGate with Access Manager 11g Using the Oracle Access Management Console
Register the WebGate agent with Access Manager 11g to set up the required trust mechanism between the Agent and OAM Server. After registration, the Agent collaborates communication between the OAM Server and its services and acts as a filter for HTTP/HTTPS requests. The Agent intercepts requests for resources protected by Access Manager and works with Access Manager to fulfill access requirements.
Prior to installing the WebGate with Access Manager, review Oracle Fusion Middleware Supported System Configurations from the Oracle Technology Network to locate the certification information for the 10g or 11g WebGate you want to use for your deployment. This section provides information on registering the 11g WebGate with Access Manager 11g. For information on installing and registering 10g WebGates to use with Access Manager 11g, see "Registering and Managing 10g WebGates with Access Manager 11g" in Administrator's Guide for Oracle Access Management.
C.4.8.1 Prerequisites for WebGate Registration
To register WebGate with Access Manager, ensure that the following required components, including any dependencies, are installed and configured:
-
WebLogic Server for Oracle HTTP Server.
-
Oracle HTTP Server installed and configured using the Oracle Web Tier installer. The following is an example of the
OHS_Homelocation:MW_Home/Oracle_WT1Oracle HTTP Server provides a listener for Oracle WebLogic Server and the framework for hosting static pages, dynamic pages, and applications over the Web.
For information about installing and configuring Oracle HTTP Server 11g, see the Oracle Fusion Middleware Installation Guide for Oracle Web Tier.
-
Oracle HTTP Server WebGate for Access Manager installed. The following is an example of the
WebGate_Homelocation:MW_Home/Oracle_OAMWebGate1Oracle HTTP Server WebGate installation packages are found on media and virtual media that is separate from the core components. You can download the Oracle HTTP Server WebGate software from the Oracle Technology Network (OTN):
http://www.oracle.com/technetwork/index.html
For detailed information on installing the Oracle HTTP Server WebGate, see "Installing and Configuring Oracle HTTP Server 11g WebGate for OAM" in Oracle Fusion Middleware Installing Webgates for Oracle Access Manager.
-
If you are using Windows 2003 or Windows 2008 64-bit operating systems, you must install Microsoft Visual C++ 2005 libraries on the machine hosting the Oracle HTTP Server 11g WebGate for Access Manager. These libraries are required for the WebGate.
-
Java runtime environment (JRE) 1.6 or higher installed.
C.4.8.2 Configure Oracle HTTP Server with WebGate
After installing the Oracle HTTP Server 11g WebGate for Access Manager, you must create an instance of WebGate which has the same instance home as the Oracle HTTP Server and update the Oracle HTTP Server configuration file with the WebGate configuration. For detailed instructions, see "Post-Installation Steps for Oracle HTTP Server 11g WebGate" in Oracle Fusion Middleware Installing Webgates for Oracle Access Manager.
Following the directions in "Post-Installation Steps for Oracle HTTP Server 11g WebGate," you will:
-
Create a WebGate instance and copy the Agent configuration files from the
WebGate_Homedirectory to the WebGate instance location.WebGate_Homeis the directory where you have installed Oracle HTTP Server WebGate and defined it as the Oracle Home for WebGate, as in the following example:MW_HOME/Oracle_OAMWebGate1The WebGate Instance Home must be the Instance Home of Oracle HTTP Server, as in the following example:
MW_HOME/Oracle_WT1/instances/instance1/config/OHS/ohs1 -
Update
httpd.confwith the WebGate configuration.
C.4.8.3 Register the WebGate as a Partner with Access Manager 11g Using the Oracle Access Management Console
To register the WebGate as a partner with Access Manager 11g:
-
Log in to the Oracle Access Management Console:
http://oam_adminserver_host:oam_adminserver_port/oamconsole
-
Register the new WebGate agent with Access Manager by using the Oracle Access Management Console. For information, see "Registering an OAM Agent Using the Console" in the Administrator's Guide for Oracle Access Management.
-
Click the Edit button in the tool bar to display the configuration page.
-
Set the Access Client Password and click Apply. Note the Artifacts location in the confirmation message.
The Access Client Password is the unique password for Agent. When the Agent connects to an OAM Server, it uses the password to authenticate itself to the server. This prevents unauthorized agents from connecting and obtaining policy information.
-
In the Artifacts Location, locate the
ObAccessClient.xmlconfiguration file andcwallet.ssofile and copy them to the following directory:OHS_Home/instances/instance/config/OHS/component/webgate/config
C.4.8.4 Restarting the Oracle HTTP Server WebGate
Restart Oracle HTTP Server for the changes to take effect.
-
Navigate to the
OHS_HOME/instances/instance/bindirectory. -
Restart the Oracle HTTP Server instance by using the following command:
opmnctl stopall
opmnctl startall
C.4.8.5 Validating the WebGate Setup
Once the setup of WebGate is complete, validate the registration as follows:
-
Verify the WebGate configuration by accessing the protected URL:
http://ohs_host:ohs_port/
You should be redirected to Access Manager single sign-on (SSO) login page for authentication.
-
Enter user name and password.
The Oracle HTTP Server Welcome page is displayed.
This is the partner that will be protected using Oracle Adaptive Access Manager.
C.4.9 Registering the OAAM Server as a Partner Application to Access Manager
A partner application is any application that delegates the authentication function to Access Manager 11g. After registering with Access Manager as a partner application, OAAM can communicate with Access Manager using Trusted Authentication Protocol (TAP) and validate user authentications with Access Manager so Access Manager can create the required cookies and continue the normal single-sign on flow in which it redirects the user to the protected resource.
To register the OAAM Server as a trusted partner, follow these steps:
-
Ensure that the OAM Administration Server is running.
-
Create a
keystoredirectory to hold the OAAM Keystore by executing the following:mkdir IAM_ORACLE_HOME/TAP/TapKeyStore -
Set up the environment for the Oracle WebLogic Scripting Tool (WLST).
-
Navigate to the
IAM_ORACLE_HOME/common/bindirectory:cd IAM_ORACLE_HOME/common/bin -
Enter the WLST shell environment by executing:
./wlst.sh
-
Enter
Connectto connect to the WebLogic Administration Server. -
Enter username. For example,
admin_username. -
Enter password. For example,
admin_password. -
Enter
t3://hostname:portFor example:
t3://AdminHostname:7001
-
-
Using the WLST shell, run the
registerThirdPartyTAPPartnercommand:registerThirdPartyTAPPartner(partnerName = "partnerName", keystoreLocation= "path to keystore", password="keystore password", tapTokenVersion="v2.0", tapScheme="TAPScheme", tapRedirectUrl="OAAM login URL")
An example is provided below.
registerThirdPartyTAPPartner(partnerName = "OAAMTAPPartner", keystoreLocation=
"IAM_ORACLE_HOME/TAP/TapKeyStore/mykeystore.jks" , password="password",
tapTokenVersion="v2.0", tapScheme="TAPScheme", tapRedirectUrl="http://OAAM_
Managed_server_host:14300/oaam_server/oamLoginPage.jsp")
Table C-6 TAP Partner Registration Parameters
Parameters Descriptions partnerName
The name of the partner should be unique. It can be any name used for identifying the third party partner. If the partner exists in Access Manager, the configuration will be overwritten.
keystoreLocation
The keystore location is an existing location. If the directory path specified is not present, an error occurs. You must provide the complete path including the keystore file name. In the example shown earlier, the keystore location was
IAM_ORACLE_HOME/TAP/TapKeyStore/mykeystore.jks. Another example iskeystoreLocation= "/scratch/jsmith/dwps1tap/TapKeyStore/mykeystore.jks". When you run the commandregisterThirdPartyTAPPartner, the keystore file is created in that location specified. On Windows, the path must be escaped. For example:"C:\\oam-oaam\\tap\\tapkeystore\\mykeystore.jks"
password
The keystore password used to encrypt the keystore. The keystore is created by running command
registerThirdPartyTAPPartnerin the location as specified for parameterkeystoreLocation. Make a note of the password as you will need it later.tapTokenVersion
Version of the Trusted Authentication Protocol.
tapTokenVersionis alwaysv2.0for 11.1.1.5.0 and 11.1.2.0. If using IDContext Claims, it isv2.1.tapScheme
Trusted Authentication Protocol Authentication Scheme (TAPScheme out of the box.) This is the authentication scheme that will be updated. If you want two tap partners with different tapRedirectUrls, create a new authentication scheme using the Oracle Access Management Console and use that scheme here.
The authentication scheme will be created automatically while you are running the
registerThirdPartyTAPPartnercommand in the instructions above. The name ofTAPSchemewill be passed as parameter to that command. The example command hastapScheme="TAPScheme".tapRedirectUrl
Third party access URL. The TAP redirect URL should be accessible. If it is not, registration of the partner fails with the message:
Error! Hyperlink reference not valid.tapRedirectUrlis constructed as follows:http://oaamserver_host:oaamserver_port/oaam_server/oamLoginPage.jsp
Ensure that the OAAM Server is running; otherwise registration will fail. The credential collector page will be served by the OAAM Server. The authentication scheme created by
registerThirdPartyTAPPartner(TAPScheme) points to the OAAM Server credential collector page as the redirectURL.
C.4.10 Adding an Agent Password to the IAMSuiteAgent Profile
When Access Manager is installed, the IAMSuiteAgent (Security Provider in WebLogic and corresponding 10g Webgate Profile in Access Manager) is created. By default there is no password set. In OAAM and Access Manager integration using TAP, when OAAM connects to Access Manager, it uses the IAMSuiteAgent profile (configured while setting up TAP integration in OAAM using the OAAM CLI) and that connection requires an agent password.
You must set an agent password for the IAMSuiteAgent profile in Access Manager. It is a required step for Access Manager and Oracle Adaptive Access Manager integration since the password is used in multiple places. To set the password, proceed as follows:
-
Log in to the Oracle Access Management Console:
http://oam_adminserver_host:oam_adminserver_port/oamconsole
-
In the Oracle Access Management Console, click Application Security at the top of the window.
-
In the Application Security console, click Agents in the Agents section.
The Search SSO Agents page opens with the WebGates tab active.
-
In the Search SSO Agents page that appears, enter IAMSuiteAgent as the name of the agent you want to find.
-
Click the Search button to initiate the search.
-
Choose IAMSuiteAgent in the Search Results table and click Edit.
-
In the IAMSuiteAgent Webgate page, specify the password in the Access Client Password field and click Apply to save the changes.
C.4.11 Updating the Domain Agent Definition If Using Domain Agent for IDM Domain Consoles
IAMSuiteAgent is implemented directly on the WebLogic Server and preconfigured to provide Single-Sign On (using IAMSuiteAgent Webgate Profile in Access Manager) for the IDM domain consoles
If the IAMSuiteAgent provider in WebLogic is not disabled/deleted and the IAMSuiteAgent profile in Access Manager is working in Open mode, after completing the steps in Section C.4.10, "Adding an Agent Password to the IAMSuiteAgent Profile," you must update the IAMSuiteAgent provider configuration in WebLogic with the password if you want to continue using the IAMSuiteAgent for the IDM domain consoles.
Note: The IAMSuiteAgent is now in Open Mode with password authentication.
To update the domain agent definition, proceed as follows:
-
Log in to WebLogic Administration Console:
http:oam_adminserver_host:port/console
-
Select Security Realms from the Domain Structure menu.
-
Click myrealm.
-
Click the Providers tab.
-
Select IAMSuiteAgent from the list of authentication providers.
-
Click Provider Specific.
-
Enter the agent password and confirm the password.
This is a required step.
-
Click Save.
-
Click Activate Change in the top left corner.
-
Restart the WebLogic Administration Server, OAAM Admin and managed servers, and OAM Server.
C.4.12 Verifying TAP Partner Registration
To verify the TAP partner registration, follow the instructions below.
C.4.12.1 Verifying the Challenge URL
To validate the Access Manager configuration, perform the following steps:
-
Log in to the Oracle Access Management Console:
http://oam_adminserver_host:oam_adminserver_port/oamconsole
-
In the Oracle Access Management Console, click Application Security at the top of the window.
-
In the Application Security Console, click Authentication Schemes in the Access Manager section.
-
In the Search Authentication Schemes page, enter
TAPSchemein the Name field. -
Click the Search button to initiate the search.
-
Choose TAPScheme in the Search Results table and click Edit.
For specific details on the TAPScheme, see "Pre-configured Authentication Schemes" in Administrator's Guide for Oracle Access Management.
-
In the TAPScheme Authentication Scheme page, verify that the Challenge Method is
DAPand the Authentication Module isDAP.For information on the DAP challenge method, see "About Challenge Methods" in Administrator's Guide for Oracle Access Management.
-
If the tapRedirectUrl is, for example,
http://OAAM_Managed_server_host:14300/oaam_server/oamLoginPage.jsp, verify that the Challenge URL is set to:/oaam_server/oamLoginPage.jsp
The Challenge URL shows the
tapRedirectUrlthat had been specified when OAAM was registered with Access Manager as a partner application. The host and port part of the URL is parameterized in Challenge Parameter.The parameters
TAPPartnerId=OAAMTAPPartnerandSERVER_HOST_ALIAS=OAMSERVERshould already be listed as Challenge Parameters.Server host alias is a logical hostname generated for the given OAAM server host name and port in the
registerThirdPartyPartnerWLST command. The physical hostname and port is stored under$DOMAIN_HOME/config/fmwconfig/oam-config.xmlin/NGAMConfiguration/DeployedComponent/Server/NGAMServer/Profile/OAMServerProfile/HostAlias/HOST_ALIAS_<NUMBER> path
-
Check that the challenge parameters are set correctly.
For information on Authentication Scheme elements, see "About Authentication Schemes and Pages" in the Administrator's Guide for Oracle Access Management.
C.4.12.2 Adding the MatchLDAPAttribute Challenge Parameter in the TAPScheme
You must add the MatchLDAPAttribute challenge parameter and set it to the User Name Attribute as specified in the LDAP Identity Store.
-
In the Authentication Scheme page, position your cursor in the Challenge Parameter field and press Enter using your keyboard.
-
In the new line, add an entry for the challenge parameter.
For example,
MatchLDAPAttribute=uidMatchLDAPAttributemust be set to theUser Name Attributeas specified in the LDAP Identity Store. For example,uid,mail,cn, and so on.Note:
The challenge parameter is case-sensitive.For information, see "Managing User Identity Stores" in Administrator's Guide for Oracle Access Management.
-
Click Apply to submit the change.
-
Close the confirmation window.
C.4.12.3 Validating the IAMSuiteAgent Setup
To test the IAMSuiteAgent profile in Access Manager, proceed as follows:
-
Restart the managed server hosting the OAM Server.
-
Stop the managed server hosting the OAM Server:
OAM_DOMAIN_HOME/bin/stopManagedWeblogic.sh oam_server1
-
Start the managed server hosting the OAM Server:
OAM_DOMAIN_HOME/bin/startManagedWeblogic.sh oam_server1
-
-
Ensure that
JAVA_HOMEis set in your environment. -
Add
JAVA_HOME/binto yourPATH, for example:export PATH=$JAVA_HOME/bin:$PATH
-
Change the directory to:
IAM_ORACLE_HOME/oam/server/tester -
Launch Oracle Access Management tester:
java -jar oamtest.jar
The Oracle Access Management Tester Console appears.
-
In the Server Connection section provide server connection details as follows:
-
IP Address: Access Manager Managed Server Host
-
Port: Oracle Access Management Oracle Access Protocol (OAP) Port
-
Agent ID:
IAMSuiteAgent -
Agent Password:
Passwordprovided in Section C.4.10, "Adding an Agent Password to the IAMSuiteAgent Profile."
The Server Connection section provides fields for the information required to establish a connection to the OAM Server.
-
-
Click Connect.
If you can connect to the server, the next section, Protected Resource URI, will be enabled.
-
The Protected Resource URI section provides information about a resource whose protected status needs to be validated.
In this section, provide the protected resource URI as follows:
-
Host:
IAMSuiteAgent -
Port:
80 -
Resource:
/oamTAPAuthenticateNote:
You can test any other resource protected usingTAPSchemeother thanoamTAPAuthenticate.
-
-
Click Validate.
The Validate button is used to submit the Validate Resource server request. If the validation is successful, the next section for User Identity will be enabled.
-
In the User Identity section, provide
User Identityand click Authenticate. If the authentication is successful, the setup is successful.
For information on the Oracle Access Management Tester, see "Validating Connectivity and Policies Using the Access Tester" in Administrator's Guide for Oracle Access Management.
C.4.13 Setting Up Access Manager TAP Integration Properties in OAAM
In OAAM and Access Manager integration using TAP, when OAAM connects to Access Manager, it uses the IAMSuiteAgent profile, which is configured while setting up TAP integration in OAAM.
To run setupOAMTapIntegration.sh to configure Access Manager for TAP Integration, proceed as follows:
Note:
If the OAAM command line script fails to run, then execute it as follows:
bash script_name
-
Ensure that the OAAM managed server is running.
-
Copy the OAAM
clifolder to a temporary directory:cp -r OAAM_HOME/oaam/cli /temp/oaam_cli -
Open the
oaam_cli.propertieslocated intemp/oaam_cli/conf/bharosa_properties. -
Using a text editor, set the properties as described in Table C-7.
Parameter Details oaam.adminserver.hostname
This is the Admin Server host of the WebLogic Server Domain where OAAM is installed.
oaam.adminserver.port
This is the Admin Server port of the WebLogic Server Domain where OAAM is installed.
oaam.db.url
This is the valid JDBC URL of the OAAM database in the format:
jdbc:oracle:thin:@db_host:db_port:db_sid
oaam.uio.oam.tap.keystoreFile
This is the location of keystore file generated by the
registerThirdPartyTAPPartnerWLST command.Copy the file from the location specified in the above WLST command for parameter
keystoreLocation. If Access Manager and OAAM are on different machines, you will need to manually copy the keystore file created in the OAM Server to the OAAM Server and provide the location on the OAAM Server here.On Windows, the file path value must be escaped. For example:
C:\\oam-oaam\\tap\\keystore\\store.jks
oaam.uio.oam.tap.partnername
This is
partnerNameused in the WLST commandregisterThirdPartyTAPPartnercommand. For example,OAAMPartner.oaam.uio.oam.host
This is the Access Manager Primary Host.
oaam.uio.oam.port
This is the Access Manager Primary Oracle Access Protocol (OAP) Port. This is the OAM Server port, with the default port number 5575.
oaam.uio.oam.webgate_id
This is the
IAMSuiteAgentvalue. Do not change this.oaam.uio.oam.secondary.host
Name of the secondary OAM Server Host machine. This property is used for high availability. You could specify the fail-over hostname using this property.
oaam.uio.oam.secondary.host.port
This is the Access Manager Secondary OAP Port. This property is used for high availability. You could specify the fail-over port using this property.
oaam.uio.oam.security.mode
This depends on the Access Manager security transport mode in use. The value can be
1(for Open),2(for Simple), or3(for Cert). The default, if not specified, is1(Open).oam.uio.oam.rootcertificate.keystore.filepath
The location of the Keystore file generated for the root certificate:
DOMAIN_HOME/output/webgate-ssl/oamclient-truststore.jksThis is required only for security modes
2(Simple) and3(Cert).oam.uio.oam.privatekeycertificate.keystore.filepath
The location of the Keystore file generated for private key:
DOMAIN_HOME/output/webgate-ssl/oamclient-keystore.jks.Private key is only required if you set up Access Manager and OAAM in Simple and Cert mode.
oaam.csf.useMBeans
For a multiple domain installation, the
oaam.csf.useMBeansproperty must be set to true. For information on setting this parameter, see "Set Up the Credential Store Framework (CSF) Configuration" in Administering Oracle Adaptive Access Manager. -
Save the changes and quit the editor.
-
Set Middleware and Java Home environment variables.
For bash:
export ORACLE_MW_HOME=Location_of_WebLogic_installation_where_Oracle_Adaptive_
Access_Manager_is_installed
export JAVA_HOME=Location_of_JDK_used_for_the_WebLogic_installation
or
For csh:
setenv ORACLE_MW_HOME Location_of_WebLogic_installation_where_Oracle_Adaptive_
Access_Manager_is_installed
setenv JAVA_HOME Location_of_JDK_used_for_the_WebLogic_installation
-
Change directory to
temp/oaam_cli/. -
Run the OAAM setup integration script using the following command:
./setupOAMTapIntegration.sh conf/bharosa_properties/oaam_cli.properties
This script sets the properties required for the integration in OAAM.
-
When the command runs, it prompts you for the following information:
-
Weblogic Server Home Directory: Usually
$ORACLE_MW_HOME/wlserver_10.3 -
OAAM Admin server username: This is the Admin Server user name of the WebLogic Server Domain (WebLogic Admin user name).
-
OAAM Admin server password: This is the password for the Administration Server user (WebLogic Admin password).
-
OAAM database username: OAAM database user.
-
OAAM database password: Password for the OAAM database user.
-
Access Manager WebGate Credentials to be stored in CSF: Enter WebGate password.
-
Access Manager TAP Key store file password: The password you assigned when you registered the TAP partner. For information, see Registering the OAAM Server as a Partner Application to Access Manager.
Note:
You must provide the WebLogic Admin user name and password when running thesetupOAMTAPIntegrationscript. If you provide the OAAM Admin user name and password, the script fails because the OAAM Admin user does not have the permissions required to run the script.When you set up Access Manager and Oracle Adaptive Access Manager integration in simple or Cert mode, the additional inputs you will have to provide are as follows:
-
Access Manager Private Key certificate Keystore file password: The Simple Mode Pass Phrase. You can obtain it by executing the WLST command
displaySimpleModeGlobalPassphrase. -
Oracle Access Management Global Pass phrase: The Simple Mode Pass Phrase. You can obtain it by executing the WLST command
displaySimpleModeGlobalPassphrase.
For information, refer to "Retrieving the Global Passphrase for Simple Mode" in the Administrator's Guide for Oracle Access Management.
-
C.4.14 Configuring the Integration to Use TAPScheme to Protect Identity Management Resources in the IAMSuiteAgent Application Domain
Note:
The instructions in this section should only be performed if you want to useTAPscheme in the IAMSuiteAgent application domain.If you want to protect Identity Management resources in the IAM Suite domain with TAPscheme, proceed as follows:
-
Log in to the Oracle Access Management Console:
http://oam_adminserver_host:oam_adminserver_port/oamconsole
-
In the Oracle Access Management Console, click Application Security at the top of the window.
-
In the Application Security console, click Application Domains in the Access Manager section.
-
In the Search Application Domains page that appears, enter
IAM Suitein the Name field. -
Click the Search button to initiate the search.
-
Click IAM Suite in the Search Results table and click Edit.
-
In the IAM Suite Application Domain page, click the Authentication Policies tab.
-
Click Protected HigherLevel Policy to display its configuration.
-
In the Resources tab, click /oamTAPAuthenticate in the Resources table.
-
Click the Delete button in the table.
-
Click Apply to submit changes and close the confirmation window.
-
In the IAM Suite Application Domain page, click the Authentication Policies tab, then click the Create button to open the Create Authentication Policy page.
-
Enter a unique name in the Name field.
-
For authentication scheme, choose LDAPScheme.
-
Click the Resources tab.
-
Click the Add button in the Resources tab.
-
Click the Search button.
-
Click /oamTAPAuthenticate in the Results table.
-
Click Add Selected.
-
Click Apply to save changes and close the confirmation window.
For Access Manager to be able to override the resource URL before handing it off to OAAM, you must set up the TAPOverrideResource challenge parameter in TAPScheme.
-
In the Oracle Access Management Console, click Application Security at the top of the window.
-
In the Application Security Console, click Authentication Schemes in the Access Manager section.
-
In the Search Authentication Schemes page, enter
TAPSchemein the Name field. -
Click the Search button to initiate the search.
-
Choose TAPScheme in the Search Results table and click Edit.
For specific details on the TAPScheme, see "Pre-configured Authentication Schemes" in Administrator's Guide for Oracle Access Management.
-
In the Authentication Scheme page, position your cursor in the Challenge Parameter field and press Enter using your keyboard.
-
In the new line, add
TAPOverrideResource=http://IAMSuiteAgent:80/oamTAPAuthenticatefor a challenge parameter ofTAPScheme. -
Click Apply to save changes and close the confirmation window.
C.4.15 Configuring a Resource to be Protected with TAPScheme
To protect a resource with the OAAM TAPScheme, proceed as follows:
C.4.15.1 Creating a New Resource under the Application Domain
To create a new resource to protect, proceed as follows:
-
In the Oracle Access Management Console, click Application Security at the top of the window.
-
In the Application Security console, click Application Domains in the Access Manager section.
-
In the Search Application Domains page that appears, enter
IAM Suitein the Name field. -
Click the Search button to initiate the search.
-
Choose IAM Suite in the Search Results table and click Edit.
-
In the IAM Suite Application Domain page, click the Resources tab, then click Create in the Search Results toolbar.
-
In the Resource Definition page, add the following information:
Type:
http. The HTTP type is the default; it covers resources that are accessed using either the HTTP or HTTPS protocol. Policies that govern a particular resource apply to all operations.Description: An optional unique description for this resource.
Host identifier:
IAMSuiteAgentResource URL: The URL value must be expressed as a single relative URL string that represents a path component of a full URL composed of a series of hierarchical levels separated by the '/' character. The URL value of a resource must begin with / and must match a resource value for the chosen host identifier.
For example:
/higherriskresourceProtection Level:
Protected -
Click Apply to add this resource to the Application Domain.
For information on creating a resource see "Adding and Managing Policy Resource Definitions" in Administrator's Guide for Oracle Access Management.
C.4.15.2 Creating a New Authentication Policy that Uses TAPScheme to Protect the Resource
To create a new authentication policy that uses the TAPScheme authentication to protect the resource, proceed as follows:
-
In the Oracle Access Management Console, click Application Security at the top of the window.
-
In the Application Security console, click Application Domains.
-
In the Search Application Domains page that appears, enter
IAM Suitein the Name field. -
Click the Search button to initiate the search.
-
Choose IAM Suite in the Search Results table and click Edit.
-
In the IAM Suite Application Domain page, click the Authentication Policies tab, and then click the Create button to open the Create Authentication Policy page.
-
In the Create Authentication Policy page, add the required elements for the policy you are creating:
Name: A unique name used as an identifier. For example,
HighPolicy.Description (optional): Optional unique text that describes this authentication policy.
Authentication Scheme:
TAPSchemeSuccess URL: The redirect URL to be used upon successful authentication.
Failure URL: The redirect URL to be used if authentication fails.
-
On the same page, add the resource you have created:
-
Click the Resources tab.
-
Click the Add button in the Resources tab.
-
Click the Search button to display all the resources available.
-
Choose the URL of a resource from those listed. For example,
/higherriskresource.The listed URLs were added to this application domain earlier. You can add one or more resources to protect with this authentication policy. The resource definition must exist within the application domain before you can include it in a policy.
-
Click Add Selected.
-
-
Click Apply to save changes and close the confirmation window.
-
In the Create Authentication Policy page, click the Responses tab to add responses.
Responses are the obligations (post authentication actions) to be carried out by the Web agent. After successful authentication, the application server hosting the protected application can assert the user identity based on these responses. After a failed authentication, the browser redirects the request to a pre-configured URL
For information on responses, see "Adding and Managing Policy Responses for SSO" in Administrator's Guide for Oracle Access Management.
-
Close the page when you finish.
For information on creating an authentication policy for a particular resource, see "Defining Authentication Policies for Specific Resources" in Administrator's Guide for Oracle Access Management.
C.4.16 Validating the Access Manager and Oracle Adaptive Access Manager Integration
Try to access the protected resource. You should be redirected to OAAM for registration and challenge. The OAAM login page is shown instead of the Access Manager login page.
C.5 Access Manager and OAAM TAP Integration with DCC WebGate Using Tunneling
This section describes the steps to set up a Detached Credential Collector (DCC) WebGate with tunneling in an environment that has Access Manager integrated with Oracle Adaptive Access Manager using TAP.
For information on credential collection, see the "Understanding Credential Collection and Login" chapter in Administrator's Guide for Oracle Access Management.
Prior to configuring Oracle Adaptive Access Manager with Access Manager, you must have installed all the required components, including any dependencies, and configured the environment in preparation of the integration tasks that follow. For prerequisites, see Section C.4.2, "Prerequisites for OAAM Advanced Integration with Access Manager."
C.5.1 Roadmap for Access Manager and OAAM TAP Integration with DCC WebGate
Table C-8 lists the high-level tasks for integrating Oracle Adaptive Access Manager with Access Manager using TAP with a DCC WebGate.
Table C-8 Integration for Access Manager and Oracle Adaptive Access Manager Using TAP with DCC
| Number | Task | Information |
|---|---|---|
|
1 |
Integrate Access Manager with OAAM using TAP integration. |
For information, see "Integrating Access Manager with OAAM using TAP integration." |
|
2 |
Set up a DCC WebGate and enable tunneling. |
For information, see "Setting Up a DCC WebGate and Enabling Tunneling." |
|
3 |
Configure the |
For information, see "Configuring Resources in the Application Domain of the DCC WebGate." |
|
4 |
Edit the TAP Authentication Scheme to use the DCC WebGate. |
For information, see "Editing the TAP Authentication Scheme to Use the DCC WebGate." |
|
5 |
Configure an authentication scheme to use the DCC WebGate. This step is performed if you want to set up step up authentication. |
For information, see "Configure an Authentication Scheme to Use the DCC WebGate (Optional)." |
C.5.2 Integrating Access Manager with OAAM using TAP integration
To integrate Access Manager with OAAM using TAP integration, follow the instructions in Section C.4, "OAAM Advanced Integration with Access Manager."
C.5.3 Setting Up a DCC WebGate and Enabling Tunneling
To configure a WebGate as a DCC WebGate and enable DCC and tunneling:
-
Install the Oracle HTTP Server WebGate.
Oracle HTTP Server WebGate installation packages are found on media and virtual media that is separate from the core components. You can download the Oracle HTTP Server WebGate software from the Oracle Technology Network (OTN):
http://www.oracle.com/technetwork/index.html
For detailed information on installing the Oracle HTTP Server WebGate, see "Installing Oracle HTTP Server 11g WebGate" in Oracle Fusion Middleware Installing Webgates for Oracle Access Manager.
-
Log in to the Oracle Access Management Console:
http://oam_adminserver_host:oam_adminserver_port/oamconsole
-
Register the new WebGate with Access Manager. For information, see "Registering an OAM Agent Using the Console" in the Administrator's Guide for Oracle Access Management.
-
In the Application Security console, click Agents in the Agents section to find and open the registration page for the 11.1.2 Webgate that will function as the DCC.
-
Enable detached credential collection and tunneling on this WebGate as follows:
-
Click Apply to save changes and close the confirmation window.
For more information on configuring 11g WebGates for DCC, see "Enabling DCC Credential Operations" in Administrator's Guide for Oracle Access Management.
C.5.4 Configuring Resources in the Application Domain of the DCC WebGate
To configure the /oam resource in the DCC WebGate, proceed as follows:
-
In the Oracle Access Management Console, click Application Security at the top of the window.
-
In the Application Security console, click Application Domains in the Access Manager section.
-
In the Search Application Domains page that appears, enter the name of the Application Domain related to the DCC WebGate.
-
Click the Search button to initiate the search.
-
Choose the Application Domain in the Search Results table and click Edit.
-
In the Application Domain page, click the Resources tab.
-
Configure the resource
/oam/**as a public resources by setting the Authentication Policy as Public Resource Policy and the Authorization Policy as Public Resource Policy. -
Set
/oam/**to unprotected. -
Set
/favicon.icoas excluded resource.
C.5.5 Editing the TAP Authentication Scheme to Use the DCC WebGate
Edit the TAP Authentication Scheme as follows:
-
In the Oracle Access Management Console, click Application Security at the top of the window.
-
In the Application Security Console, click Authentication Schemes in the Access Manager section.
-
In the Search Authentication Schemes page, enter
TAPSchemein the Name field. -
Click the Search button to initiate the search.
-
Choose TAPScheme in the Search Results table and click Edit.
For specific details on the TAPScheme, see "Pre-configured Authentication Schemes" in Administrator's Guide for Oracle Access Management.
-
In the Challenge Redirect URL field, enter:
http://DCC_WG_host:DCC_WG_port/oam/server/
-
Click Apply to save changes and close the confirmation window.
C.5.6 Configure an Authentication Scheme to Use the DCC WebGate (Optional)
If you want to set up the step-up authentication, create an LDAP scheme as follows:
-
In the Oracle Access Management Console, click Application Security at the top of the window.
-
In the Application Security Console, click Authentication Schemes in the Access Manager section.
-
In the Search Authentication Schemes page, click Create.
-
Fill in the Create Authentication Scheme page by supplying the following information:
-
Name: DCC Authentication Scheme
-
Authentication Level: 2
-
Challenge Method: FORM
-
Challenge Redirect URL:
http://DCC_WG_host:DCC_WG_port/oam/server/
-
Authentication Module: LDAPPlugin
-
Challenge URL:
/pages/login.jsp -
Context Type: Default
-
Context Value:
/oam -
Challenge Parameters:
OverrideRetryLimit=0
-
-
Click Apply to submit the new scheme.
-
Close the confirmation window.
C.6 Other Access Manager and OAAM Integration Configuration Tasks
This section describes other configuration procedures that you may need depending on your deployment.
C.6.1 Changing the Authentication Level of the TAPScheme Authentication Scheme
To change the authentication level of the TAPScheme authentication scheme, proceed as follows:
-
Log in to the Oracle Access Management Console:
http://oam_adminserver_host:oam_adminserver_port/oamconsole
-
In the Oracle Access Management Console, click Application Security at the top of the window.
-
In the Application Security Console, click Authentication Schemes in the Access Manager section.
-
In the Search Authentication Schemes page, enter
TAPSchemein the Name field. -
Click the Search button to initiate the search.
-
Choose TAPScheme in the Search Results table and click Edit.
For specific details on the TAPScheme, see "Pre-configured Authentication Schemes" in Administrator's Guide for Oracle Access Management.
-
Change the authentication level.
-
Click Apply to save changes and close the confirmation window.
C.6.2 Setting Up Oracle Adaptive Access Manager and Access Manager Integration When Access Manager is in Simple Mode
To set up Oracle Adaptive Access Manager and Access Manager integration in Simple mode, proceed as follows.
C.6.2.1 Configuring Simple Mode Communication with Access Manager
Securing communication between OAM Servers and clients (WebGates) means defining the transport security mode for the OAP channel within the component registration page. The transport security communication mode is chosen during Access Manager installation. In Simple mode, the installer generates a random global passphrase initially, which can be edited as required later.
Simple mode is used if you have some security concerns, such as not wanting to transmit passwords as plain text, but you do not manage your own Certificate Authority (CA). In this case, Access Manager 11g Servers and WebGates use the same certificates, issued and signed by Oracle CA.
For information on configuring Access Manager for Simple mode communication, see Administrator's Guide for Oracle Access Management.
C.6.2.2 Setting OAAM Properties for Access Manager for Simple Mode
Follow the steps in Section C.4.13, "Setting Up Access Manager TAP Integration Properties in OAAM." When you edit the oaam_cli.properties file, set the following properties in addition to ones specified in Table C-7.
Table C-10 Properties for Security Mode
| Parameters | Details |
|---|---|
|
oaam.uio.oam.security.mode |
This depends on the Access Manager security transport mode in use. The value can be 1 (for Open), 2 (for Simple), or 3 (for Cert). The default, if not specified, is 1 (Open). |
|
oam.uio.oam.rootcertificate.keystore.filepath |
The location of the Keystore file generated for the root certificate:
DOMAIN_HOME/output/webgate-ssl/oamclient-truststore.jks
This is required only for security modes 2 (Simple) and 3 (Cert). |
|
oam.uio.oam.privatekeycertificate.keystore.filepath |
The location of the Keystore file generated for private key:
DOMAIN_HOME/output/webgate-ssl/oamclient-keystore.jks
This is required for security modes 2 (Simple) and 3 (Cert) |
C.6.3 Configuring Identity Context Claims in the Access Manager and OAAM TAP Integration
Identity Context allows organizations to meet growing security threats by leveraging the context-aware policy management and authorization capabilities built into the Oracle Access Management platform. Identity Context secures access to resources using traditional security controls (such as roles and groups) as well as dynamic data established during authentication and authorization (such as authentication strength, risk levels, device trust and the like).
To use identity context claims in the Access Manager and OAAM TAP integration, follow the below steps:
-
In
Domain_Home/config/fmw-config/oam-config.xml, search for the setting with the TAP partner name. You would have specified the TAP Partner name while registering the TAP partner for Access Manager. For example,OAAMPartner. Change the OAAM partner'sTapTokenVersionfromv2.0tov2.1. -
Change the version setting on the OAAM side from
v2.0tov2.1by adding/editing a property through the OAAM Administration Console. To do this, proceed as follows:-
Log in to the OAAM Administration Console:
http://oaam_managed_server_host:oaam_admin_managed_server_port/oaam_admin
-
In the left pane, click Environment and double-click Properties. The Properties search page is displayed.
-
Search for property with the name
oaam.uio.oam.dap_token.versionand set its value tov2.1. -
In case the property does not exist, add a new property with the name
oaam.uio.oam.dap_token.versionand the value asv2.1. -
Click Save.
-
-
In the TAP Scheme of the Access Management policy, add the following challenge parameter:
TAPOverrideResource=http://IAMSuiteAgent:80/oamTAPAuthenticate. To do that, proceed as follows:-
Log in to the Oracle Access Management Console:
http://oam_adminserver_host:oam_adminserver_port/oamconsole
-
In the Oracle Access Management Console, click Application Security at the top of the window.
-
In the Application Security Console, click Authentication Schemes in the Access Manager section.
-
In the Search Authentication Schemes page, enter
TAPSchemein the Name field. -
Click the Search button to initiate the search.
-
Choose TAPScheme in the Search Results table and click Edit.
For specific details on the TAPScheme, see "Pre-configured Authentication Schemes" in Administrator's Guide for Oracle Access Management.
-
In the Authentication Scheme page, position your cursor in the Challenge Parameter field and press Enter using your keyboard.
-
In the new line, add
TAPOverrideResource=http://IAMSuiteAgent:80/oamTAPAuthenticatefor a challenge parameter ofTAPScheme. -
Click Apply to save changes and close the confirmation window.
-
C.6.4 Enabling Oracle Adaptive Access Manager to Transfer Data to Access Manager over HTTP Post-Based Front Channel
The Access Manager and Oracle Adaptive Access Manager integration flow involves transferring information required to perform authentication, preserving Access Manager context information, providing the TAP token, and so on.
During this integration flow, Access Manager can preserve its context as a cookie. In cases where this context is large such as form data, Access Manager can send its context information through POST data to Oracle Adaptive Access Manager and Oracle Adaptive Access Manager can transfer this data back to Access Manager over an HTTP POST-based front channel message. The mechanism used in the Oracle Adaptive Access Manager side to preserve Access Manager context allows preserving at least 8K of data. This ensures that Access Manager can preserve the end application's form data during re-authentication so the end user does not have to retype it again.
For Oracle Adaptive Access Manager to be able to generate a POST-based response back to Access Manager and preserve at least 8K of Access Manager's context data, you must set oaam.uio.oam.dopost to true.
To change the setting, proceed as follows:
-
Log in to the OAAM Administration Console:
http://oaam_managed_server_host:oaam_admin_managed_server_port/oaam_admin
-
In the left pane, click Environment and double-click Properties. The Properties search page is displayed.
-
Search for property with the name
oaam.uio.oam.dopostand set its value totrue. -
In case the property does not exist, add a new property with the name
oaam.uio.oam.dopostand the value astrue. -
Click Save.
C.6.5 Disabling OAAM Administration Console Protection
You can disable OAAM Administration Console protection by disabling the IAMSuiteAgent that protects it.
To do so, either the WLSAGENT_DISABLED system property or environment variable must be set to true for the servers on which the agent should be disabled.
For instructions on disabling the IAMSuiteAgent, see "Disabling IAMSuiteAgent" in Administrator's Guide for Oracle Access Management.
C.6.6 Disabling Step Up Authentication
If you want to disable the Step Up Authentication scenario, the following property has to be set to false:
oaam.uio.oam.integration.stepup.enabled
By default this property is set to true. To change the setting on the Oracle Adaptive Access Manager side by adding/editing a property through the OAAM Administration Console, proceed as follows:
-
Log in to the OAAM Administration Console.
http://oaam_managed_server_host:oaam_admin_managed_server_port/oaam_admin
-
In the left pane, click Environment and double-click Properties. The Properties search page is displayed.
-
Search for property with the name
oaam.uio.oam.integration.stepup.enabledand set its value tofalse.In case the property does not exist, add a new property.
If set to
false, the user is prompted for credentials when he tries to access a higher protected resource after he had been authenticated for the lower protected resource. -
Click Save.
C.6.7 Changing the Oracle Adaptive Access Manager Password Length Limit
Oracle Adaptive Access Manager accepts a limit of 25 characters for passwords. If users log in to OAAM Server for the first time and the password they enter is more than 25 bytes, they are returned to the user name page with an error that their password is invalid.
To change the character limit for passwords entered in to OAAM Server, you must update the following property using the OAAM Administration Console:
bharosa.authentipad.textpad.datafield.maxLength
Instructions to update the character limit using the OAAM Administration Console are as follows:
-
Log in to the OAAM Administration Console:
http://oaam_managed_server_host:oaam_admin_managed_server_port/oaam_admin
-
In the left pane, click Environment and double-click Properties. The Properties search page is displayed.
-
Search for property with the name
bharosa.authentipad.textpad.datafield.maxLengthand change its value. -
Click Save.
C.6.8 Adding Customizations Using the OAAM Extensions Shared Library
If you are configuring integration with Access Manager 11g using the TAP scheme and adding customizations using the OAAM Extensions Shared Library, the property bharosa.uio.proxy.mode.flag must be set to false.
If the property is set to true, the Oracle Adaptive Access Manager and Access Manager integration using TAP will fail with the following message:
Sorry, the identification you entered was not recognized.
In cases where the property has been set to true, change the setting as follows:
-
Log in to the OAAM Administration Console:
http://oaam_managed_server_host:oaam_admin_managed_server_port/oaam_admin
-
In the left pane, click Environment and double-click Properties. The Properties search page is displayed.
-
Search for property with name
bharosa.uio.proxy.mode.flagand set its value tofalse. -
In cases where the property does not exist, add a new property with the name
bharosa.uio.proxy.mode.flagand the value asfalse. -
Click Save.
For information on Oracle Adaptive Access Manager customization, see:
C.6.9 Enabling the Single Login Page Flow
For details, see "Enabling the Single Login Page Flow" in Developer's Guide for Oracle Adaptive Access Manager.
C.7 Resource Protection Scenario
This scenario illustrates an example where a user changes the authentication levels for the TAPScheme. Login and Step Up authentication flows are also illustrated based on these settings.
C.7.1 Resource Protection Scenario: Changing Authentication Level of TAPScheme
To change the authentication level, proceed as follows:
-
Log in to the Oracle Access Management Console:
http://oam_adminserver_host:oam_adminserver_port/oamconsole
-
In the Oracle Access Management Console, click Application Security at the top of the window.
-
In the Application Security Console, click Authentication Schemes in the Access Manager section.
-
In the Search Authentication Schemes page, enter
TAPSchemein the Name field. -
Click the Search button to initiate the search.
-
Choose TAPScheme in the Search Results table and click Edit.
For specific details on the TAPScheme, see "Pre-configured Authentication Schemes" in Administrator's Guide for Oracle Access Management.
-
Increase the value for the Authentication Level. For example if the value is
2, change it to4.TAPSchemewill be protecting the higher protected resource. -
Click Apply to save the changes.
-
In the Search Authentication Schemes page, search for OAMAdminConsoleScheme.
-
Click the OAMAdminConsoleScheme link.
-
Ensure that the Authentication Level value is lower than that of
TAPScheme.OAMAdminConsoleSchemewill be protecting the lower protected resource.
C.7.2 Resource Protection Scenario: Removing OAAM Administration Console from Protected Higher Level Policy
In this example, the OAAM Administration Console is moved from the Protected Higher Level Policy.
-
In the Oracle Access Management Console, click Application Security at the top of the window.
-
In the Application Security console, click Application Domains in the Access Manager section.
-
In the Search Application Domains page that appears, enter
IAM Suitein the Name field. -
Click the Search button to initiate the search.
-
Choose IAM Suite in the Search Results table and click Edit.
-
In the IAM Suite Application Domain page, click the Resources tab, then click Create in the Search Results toolbar.
-
Click the Authentication Policies tab.
-
Click Protected HigherLevel Policy to display its configuration.
-
In the Resources tab, remove /oaam_admin/** and click Apply to apply the change.
C.7.3 Resource Protection Scenario: Creating a New Policy that Uses TAPScheme to Protect the Resource
Create a new policy with TAPScheme and protect Oracle Adaptive Access Manager as a higher protected resource.
-
Click the Authentication Policies tab, then click the Create button to open the Create Authentication Policy page.
-
Specify a policy name in the Name field. For example,
TestPolicy. -
In Authentication Scheme, select TAPScheme from the Authentication Scheme drop-down list.
-
Add resources:
-
Click the Resources tab in the Authentication Policy page.
-
Click the Add button in the Resources tab.
-
Click the Search button.
-
Select /oaam_admin/** as the resource.
-
Click Add Selected.
-
-
Click Apply to create the authentication policy.
Now the higher protected resource is the OAAM Administration Console protected by TAPScheme and the lower protected resource is the Oracle Access Management Console protected by OAMAdminConsoleScheme.
C.7.4 Resource Protection Scenario: Creating an New OAAM User
For information on creating a user, see Section C.4.4, "Creating the OAAM Users and OAAM Groups."
C.7.5 Resource Protection Scenario: Login Flow
This section presents an example of a Login flow where the user registers his virtual authentication device and challenge questions. The example is based on the setup that was performed in Section C.7.1, "Resource Protection Scenario: Changing Authentication Level of TAPScheme" through Section C.7.4, "Resource Protection Scenario: Creating an New OAAM User."
In this example, the higher protected resource is the OAAM Administration Console protected by TAPScheme and the lower protected resource is the Oracle Access Management Console protected by OAMAdminConsoleScheme.
The Login flow is as follows:
-
Access the protected resource, the OAAM Administration Console, by entering its URL in a web browser.
The Access Manager user name page appears.
You are redirected to OAAM Server.
-
In the Access Manager user name page, as shown in Figure C-1, enter the user name and click Continue.
Figure C-1 Access Management User Name Page
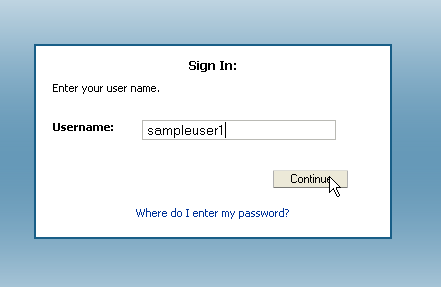
Description of ''Figure C-1 Access Management User Name Page''
-
The Password page appears with TextPad for you to enter the password, as shown in Figure C-2. Enter the password and click Enter.
-
In the Registration page, click Continue for the option to begin registering a profile for the user, as shown in Figure C-3.
-
In the Security Device registration page, as shown in Figure C-4, select your security device and click Continue.
-
In the Security Questions registration page register challenge questions.
Figure C-5 Challenge Question Registration
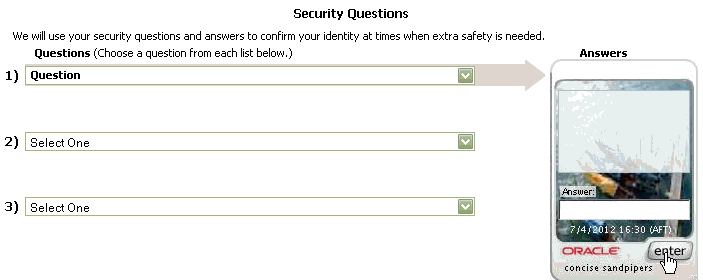
Description of ''Figure C-5 Challenge Question Registration''
-
You are allowed to access the protected resource, the OAAM Administration Console.
Figure C-6 OAAM Administration Console Cases Page: Accessing the Protected Resource
Description of ''Figure C-6 OAAM Administration Console Cases Page: Accessing the Protected Resource''
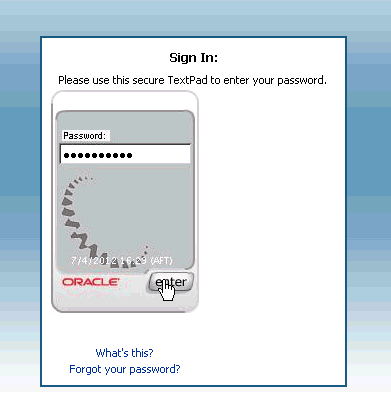

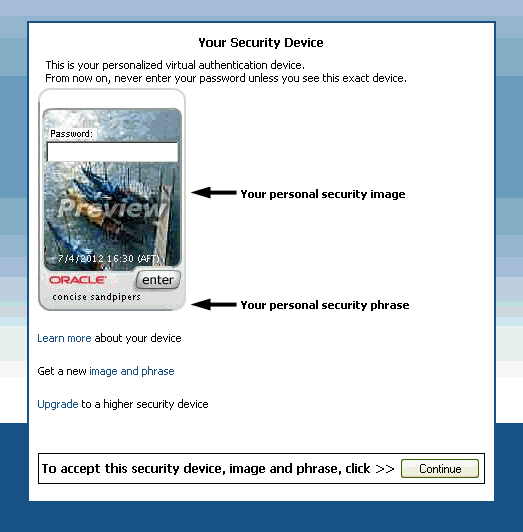
C.7.6 Resource Protection Scenario: Step Up Authentication Flow
This section presents an example of the Step Up Authentication flow for the user who registered his profile and was allowed access to the higher protected resource in Section C.7.5, "Resource Protection Scenario: Login Flow." The example is based on the setup performed in Section C.7.1, "Resource Protection Scenario: Changing Authentication Level of TAPScheme" through Section C.7.4, "Resource Protection Scenario: Creating an New OAAM User."
In this example, the higher protected resource is the OAAM Administration Console protected by TAPScheme and the lower protected resource is the Oracle Access Management Console protected by OAMAdminConsoleScheme.
The Step Up Authentication flow is as follows:
-
Access the lower protected resource, the Oracle Access Management Console, by entering the URL in a web browser.
At this point in the Step Up example, you have not been authenticated yet. When you access the lower risk resource, you are shown the Oracle Access Management login page, which has the user name and password on the same page.
Figure C-7 Access Management Login: Logging In to the Lower Risk Resource
Description of ''Figure C-7 Access Management Login: Logging In to the Lower Risk Resource''
-
Enter the credentials of the user who has registered a profile (see Section C.7.5, "Resource Protection Scenario: Login Flow") and click Login.
-
After providing credentials and being successfully authenticated, you now have access to the lower protected resource. The Oracle Access Management Console, as shown.
-
Access the higher protected resource, the OAAM Administration Console, by entering the URL in a Web browser.
Since you have already been authenticated, OAM Server does not present the Login page. However, Oracle Adaptive Access Manager will run its fraud detection policies. In this example, Oracle Adaptive Access Manager runs the post-authentication rules and determines that your risk score is low, so it does not execute any actions (for example, KBA or OTP) or generate any alerts that were specified in the policy. Figure C-8 shows the Step Up Authentication process where you are being logged in to the higher protected resource since you have already been authenticated earlier when you accessed the lower protected resource, and the post-authentication rules have determined that your risk score is low.
Figure C-8 Step Up Authentication: Log In to the Higher Protected Resource
Description of ''Figure C-8 Step Up Authentication: Log In to the Higher Protected Resource''
You now have access to the higher protected resource, the OAAM Administration Console.
C.8 Troubleshooting Common Problems
This section describes common problems you might encounter in an Oracle Adaptive Access Manager and Access Manager integrated environment and explains how to solve them. It is organized by common problem types and contains the following topics
In addition to this section, review the Oracle Fusion Middleware Error Messages Reference for information about the error messages you may encounter.
For information about additional troubleshooting resources, see Section 1.7, "Using My Oracle Support for Additional Troubleshooting Information."
C.8.1 OAAM Basic Integration with Access Manager
This provides solutions for integration issues pertaining to OAAM Basic integration with Access Manager.
C.8.1.1 Internet Explorer 7 and OAAM Basic Integration with Access Manager
In the OAAM Basic integration with Access Manager, you are forwarded to the OAAM page when you access a protected resource.
If you are using Microsoft Internet Explorer 7, when you enter a user name and click Submit, you are stuck on the next page (/oam/pages/oaam/handleLogin.jsp) instead of being redirected to the password page automatically.
To resolve this problem, you can use the following workaround.
Click the Continue link to take you to /oam/pages/oaam/handleJump.jsp?clientOffset=-7.
C.8.1.2 Access Manager and Oracle Adaptive Access Manager Integration and Changes in the Console
An error occurs during the OAAM Basic integration with Access Manager flow.
The OAAMEnabled value is configured incorrectly.
In an environment where OAAM Basic integration with Access Manager is enabled, the following entry OAAMEnabled under oam-config.xml must be set to true:
 <Setting Name="OAAM" Type="htf:map">
      <Setting Name="OAAMEnabled" Type="xsd:boolean">true</Setting>
 </Setting>
...
If an error occurs in OAAM Basic integration with Access Manager flows, check the value of this flag. In certain environments (Windows) or scenarios, such as creating a new Oracle Internet Directory and associating it with the OAAMBasic scheme, the original flows might be broken. OAAM Basic integration with Access Manager does not work because the OAAMEnabled flag is reset to false.
C.8.1.3 OTP Challenge Not Supported in OAAM Basic integration with Access Manager
In OAAM Basic integration with Access Manager, during registration with Access Manager after registering the challenge questions, you are forwarded to a contact page to enter a mobile number.
In this mode of integration, with OTP unsupported, this page is not significant. You complete the registration by entering a mobile number in the following form, and Submit.
:09900502139
The OAAM Challenge SMS policy has been configured to run instead of the OAAM Challenge policy.
To resolve this issue, replace the OAAM Challenge SMS policy with the OAAM Challenge policy, to prevent a challenge flow request to OTP:
-
Search for
OAAM Challenge Policy. -
Under Action Group, replace OAAM Challenge SMS with OAAM Challenge every where you find it.
-
Save the policy.
C.8.1.4 Using ConfigureOAAM WLST Command to Create the Data Source in OAAM Basic Integration with Access Manager
You can use the configureOAAM WLST command to create the data source, associate it as a target with the OAM Server, and the OAAMEnabled property in the oam-config.xml file. The syntax is as follows:
configureOAAM(dataSourceName,paramNameValueList)
where:
-
dataSourceNameis the name of the data source to be created -
paramNameValueListis a comma-separated list of parameter name-value pairs. The format of each name-value pair is as follows:paramName='paramValue'
The mandatory parameters are:
-
hostName: The name of the database host -
port: The database port -
sid: The database identifier (database sid) -
userName: The OAAM schema name -
passWord: The OAAM schema password
The optional parameters are:
-
maxConnectionSize: The maximum connection reserve time out size -
maxPoolSize: The maximum size of connection pool
-
For example:
configureOAAM(dataSourceName = "MyOAAMDS", hostName = "host.mycorp.example.com",
port = "1521", sid = "sid", userName = "username", passWord = "password",
maxConnectionSize = None, maxPoolSize = None, serverName = "oam_server1")
Note:
SID = requires the service name.C.8.2 Login Failure
This section provides solutions for login issues.
C.8.2.1 Login Page Does Not Display Error
When the OAM login page is tunneled (/oam/**), the login page does not display an error message when the login fails.
The resources in the Application Domain of the DCC WebGate were not configured correctly.
You must configure the properties in the Application Domain of the DCC WebGate as follows:
/oam/** as an unprotected resource
/favicon.ico as an excluded resource
C.8.2.2 Non-ASCII Credentials
When using a non-ASCII user name or password in the native authentication flow, a message similar to the following is displayed:
Sorry, the identification you entered was not recognized. Please try again.
The non-ASCII characters are in the credentials.
To resolve the problem:
-
Set the
PRE_CLASSPATHvariable to${ORACLE_HOME}/common/lib/nap-api.jar.For C shell:
setenv  ORACLE_HOME "IAMSUITE INSTALL DIR"
setenv PRE_CLASSPATH "${ORACLE_HOME}/common/lib/nap-api.jar"
For
bash/kshshell:export ORACLE_HOME=IAMSUITE INSTALL DIR export PRE_CLASSPATH="${ORACLE_HOME}/common/lib/nap-api.jar" -
Start the managed server related to
OAAM_SERVER.
C.8.2.3 Mixed Case Logins
After successful authentication on Access Manager and Oracle Adaptive Access Manager, a registered user was asked to register his profile again after he entered his mixed-case user name in a different case combination than what he registered.
The user name is case-sensitive. By default, if a user enters a mixed-case user name in a case combination that is different from the registered user, the OAAM Server will consider the user to be unregistered. For example, if user userxy tries to log in by entering user name userXY, he will be asked to register his profile again.
To ensure that logins are successful on both OAM Server and OAAM Server, you must configure the OAAM Server to consider user names as case-insensitive. To achieve this set the following property:
bharosa.uio.default.username.case.sensitive=false
Change the setting as follows:
-
Log in to the OAAM Administration Console:
http://oaam_managed_server_host:oaam_admin_managed_server_port/oaam_admin
-
In the left pane, click Environment and double-click Properties. The Properties search page is displayed.
-
Search for property with name
bharosa.uio.default.username.case.sensitiveand set its value tofalse. -
In cases where the property does not exist, add a new property with the name
bharosa.uio.default.username.case.sensitiveand the value asfalse. -
Click Save.
C.8.2.4 Cookie Domain Definition
Incorrect value of the cookie domain in your configuration can result in login failure.
For correct WebGate operation, ensure that the property oaam.uio.oam.obsso_cookie_domain is set to match the corresponding value in Access Manager.
In the agent configuration page in the Oracle Access Management Console, the Primary Cookie Domain parameter describes the Web server domain on which the Agent is deployed, for instance, .example.com. The cookie domain was configured to enable single sign-on among Web servers. The Web servers for which you configure single sign-on must have the same Primary Cookie Domain value. WebGate uses this parameter to create the ObSSOCookie authentication cookie.
To change the oaam.uio.oam.obsso_cookie_domain setting as follows:
-
Log in to the OAAM Administration Console:
http://oaam_managed_server_host:oaam_admin_managed_server_port/oaam_admin
-
In the left pane, click Environment and double-click Properties. The Properties search page is displayed.
-
Search for property with name
oaam.uio.oam.obsso_cookie_domainand set its value to match the Primary Cookie Domain setting. -
Click Save.
C.8.2.5 OAAM Test Login URL /oaam_server Fails After Access Manager and Oracle Adaptive Access Manager Integration
The test login URL /oaam_server is used to verify that the Oracle Adaptive Access Manager configuration is working before proceeding with the integration of Access Manager and Oracle Adaptive Access Manager using the TAP scheme. This URL is not intended for use after the integration, at which point, the user should not have direct access to the OAAM Server. If the user navigates to the URL and enters his user name, he is directed to the page where the password is entered. After submitting the password, the login will fail and the following error will be displayed:
Error Sorry, the identification you entered was not recognized. Please try again
C.8.2.6 Login to a Protected Resource May Fail in an Access Manager Release 2 PS2 and Oracle Adaptive Access Manager Release 2 TAP Integrated Environment
Log in to a protected resource may fail with an invalid class exception in an Access Manager Release 2 PS2 and Oracle Adaptive Access Manager Release 2 TAP integrated environment if a user session is still active prior to the Access Manager upgrade from Release 2 to Release 2 PS2 and the pre-upgrade session information is used post-upgrade. For the integration to work properly, before shutting down or starting the servers prior to the upgrade, you must stop all existing stale pre-upgrade sessions by clicking Delete All User Sessions in the Session Management page. For more information about session management, refer to the "About the Session Management Pages" section in the "Maintaining Access Manager Sessions" chapter of the Administrator's Guide for Oracle Access Management 11g Release 2.
C.8.3 Identity Store
This section provides solutions for identity store issues.
C.8.3.1 Username Attribute Incorrect Setting
The user experiences a login failure.
If the username attribute in the identity store is not cn, a login failure occurs.
To fix this problem, proceed as follows:
-
Log in to the Oracle Access Management Console:
http://oam_adminserver_host:oam_adminserver_port/oamconsole
-
In the Oracle Access Management Console, click Application Security at the top of the window.
-
In the Application Security Console, click Authentication Schemes in the Access Manager section.
-
In the Search Authentication Schemes page, enter
TAPSchemein the Name field. -
Click the Search button to initiate the search.
-
Choose TAPScheme in the Search Results table and click Edit.
For specific details on the TAPScheme, see "Pre-configured Authentication Schemes" in Administrator's Guide for Oracle Access Management.
-
In the Authentication Scheme page, position your cursor in the Challenge Parameter field and press Enter using your keyboard.
-
Add the challenge parameter
MatchLDAPAttributeand set the value to theusernameattribute specified in your identity store. The challenge parameter is case-sensitive so ensure that you have enter it correctly.For example, you could set it to
uid,mail,cn, and so onIf the
usernameattribute isuid, you would addMatchLDAPAttribute=uidNote:
To add another parameter to an existing parameter, you must position your cursor in the Challenge Parameter field and press Enter using your keyboard. -
Click Apply to submit the change.
C.8.3.2 In the Access Manager and Oracle Adaptive Access Manager Integration TAP Could Not Modify User Attribute
Authentication succeeds but the final redirect fails with the following errors:
Module oracle.oam.user.identity.provider
Message Principal object is not serializable; getGroups call will result in
an extra LDAP call

Module oracle.oam.engine.authn
Message Cannot assert the username from DAP token

Module oracle.oam.user.identity.provider
Message Could not modify user attribute for user : cn, attribute :
userRuleAdmin, value : {2} .
In integration scenarios coupled with multiple identity stores, the user identity store that is set as the Default Store is used for authentication and assertion.
For the Access Manager and Oracle Adaptive Access Manager integration which uses the TAP, the assertion for the TAPScheme Authentication scheme is made against the Default Store. In this case the backend channel authentication made against the LDAP module uses a specific user identity store (OID, for example). When the user name is returned to Access Manager, the assertion occurs against the Default Store (not the same OID that was used for the authentication).
Note:
For Session Impersonation, the Oracle Internet Directory instance that is used for the user and grants must be the Default Store.If you change the Default Store to point to a different store, ensure that TAPScheme also points to same store.
C.8.3.3 No Synchronization Between Database and LDAP
Registered status records remain in the OAAM database even if registered users are removed from LDAP. When the user is added to LDAP again, the old image, phrase, and challenge questions are used, because the OAAM database and LDAP are not synchronized.
C.8.4 Miscellaneous
This section provides solutions and tips for miscellaneous issues.
C.8.4.1 Multiple Sessions Created for a Particular User Instead of a Unified Session
In an Access Manager and OAAM integrated environment, if multiple sessions are created instead of a unified session for a particular user, set the following OAAM property to work around this issue:
oaam.uio.oam.authenticate.withoutsession=false
C.8.4.2 Integration Failure Due to Network Delay
Increase TokenValiditySeconds using Oracle Access Management Console if the integration fails.
-
Log in to the Oracle Access Management Console:
http://oam_adminserver_host:oam_adminserver_port/oamconsole
-
In the Oracle Access Management Console, click Application Security at the top of the window.
-
In the Application Security Console, click Authentication Schemes in the Access Manager section.
-
In the Search Authentication Schemes page, enter
TAPSchemein the Name field. -
Click the Search button to initiate the search.
-
Choose TAPScheme in the Search Results table and click Edit.
For specific details on the TAPScheme, see "Pre-configured Authentication Schemes" in Administrator's Guide for Oracle Access Management.
-
Add the challenge parameter
TotalValiditySecondsand set the value to the desired number. The default value is 1 second. The challenge parameter is case-sensitive so ensure that you have enter it correctly.For example,
TotalValiditySeconds=4Note:
To add a parameter when there are existing parameters, you must position your cursor in the Challenge Parameter field and press Enter using your keyboard, and then enter the new parameter.Figure C-10 TAPScheme Authentication Scheme
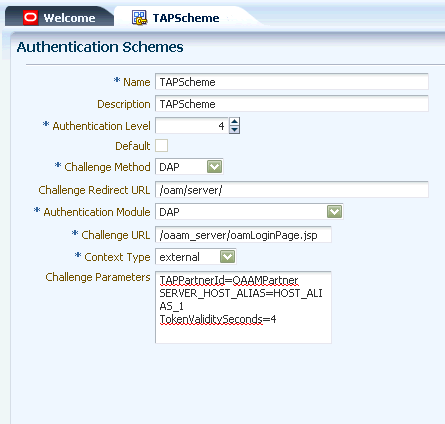
Description of ''Figure C-10 TAPScheme Authentication Scheme''
-
Click Apply to apply the changes.
C.8.4.3 Changing the TAP Token Version to 2.1
The oam-config.xml file contains all Access Manager-related system configuration data and is located in the DOMAIN_HOME/config/fmwconfig directory.
-
Open the
oam-config.xmlfile in a text editor.vi DOMAIN_HOME/config/fmwconfig/oam-config.xml -
Search for
OAAMPartner. -
Change the value of the
TapTokenVersionfromv2.0tov2.1. -
Save the changes.
:wq!
-
Log in to the OAAM Administration Console.
http://oaam_managed_server_host:oaam_admin_managed_server_port/oaam_admin
-
In the left panel, click Properties under the Environment node.
-
Click the New Property button in the Properties page.
-
Specify the new property as:
Name:
oaam.uio.oam.dap_token.versionValue:
v2.1 -
Click Create.
-
Log in to the Oracle Access Management Console.
http://oam_adminserver_host:oam_adminserver_port/oamconsole
-
In the Oracle Access Management Console, click Application Security at the top of the window.
-
In the Application Security Console, click Authentication Schemes in the Access Manager section.
-
In the Name field, enter
TAPSchemeas the target scheme name. -
Click the Search button to initiate the search.
-
In the list of search results, select TAPScheme as the target scheme.
-
Add the challenge parameter
TAPOverrideResource=http://IAMSuiteAgent:80/oamTAPAuthenticate. The challenge parameter is case-sensitive so ensure that you have enter it correctly.Note:
To add a parameter when there are existing parameters, you must position your cursor in the Challenge Parameter field and press Enter using your keyboard, and then enter the new parameter. -
Click Apply to apply the changes.
C.8.4.4 Resource Protected by OAAMAdvanced Scheme Is Not Accessible in Access Manager 11.1.1.4.0 and OAAM 11.1.1.5.0 Integration
You cannot access a resource protected by the OAAMAdvanced authentication scheme in an Access Manager 11.1.1.4.0 and OAAM 11.1.1.5.0 integration.
In an Access Manager 11.1.1.4.0 and OAAM 11.1.1.5.0 integration, you must set the WebGate password for OAAM and several parameters in addition to those documented in this chapter in order for the integration to work properly.
To resolve this problem:
-
Set the WebGate password for OAAM.
-
Set
oaam.uio.oam.authenticate.withoutsessiontofalse. By default, this is set totrue.
C.8.4.5 Additional Properties to Set If Using OAAMAdvanced Scheme
If you are using the OAAMAdvanced scheme in OAAM Advanced integration with Access Manager, ensure that these properties are set:
-
For Access Management 11g:
oaam.uio.oam.authenticate.withoutsession = false
-
For Access Management 11g and 10g:
oracle.oaam.httputil.usecookieapi = true
C.8.4.6 Accessing LDAP Protected Resource as a Test
When setting up the environment, you may want to first verify that you can access a page protected by Access Manager using the LDAP authentication scheme. If you cannot access the page, try to resolve this issue before proceeding with the configuration.