
|
|
|
Corporate Agreements
Corporate Agreements functionality is available when the OPI <version number> OCIS license code is active. Access Corporate Agreements by selecting Profiles>Corporate Agreements.
Two application settings are available for activation: Global>Profile>Settings>CORP AGR SUBSIDIARIES>Master Account or Relationship.
Note: The information directly below pertains mainly to when the setting Master Account has been activated. For specific information on functionality related to activating the Relationship setting, which allows you to manage Corporate Agreements by using the relationships built through On Behalf functionality (Profiles>On Behalf>Groups and Users), refer to Corporate Agreement Relationship Functionality, below.
The Corporate Agreements module helps users maintain detailed information pertaining to companies and their negotiated rates in a central location within OCIS. Any profile type can have negotiated rates, though they are usually associated with companies, groups, and travel agents. Even though much of the information is for viewing purposes, corporate agreements functionality provides users with the ability to assign rate codes to a company, create subsidiaries of a parent company and assign the same rates, and make available the negotiated rates at appropriate properties: individual or those grouped by regions. This is done conveniently through the use of a Master Account Id, that links the parent company profile, subsidiaries, rates, and properties together. The corporate agreement negotiated rates created here apply when users search and make reservations for guests (who qualify under the corporate agreement) at the Sell and Rate Availability screens. Corporate agreements can be viewed at the CRO and at those properties having OCIS and a thin client.
Notes: 1) Only one agreement per company can be in effect for any time period. 2) The Master Account numbering scheme, linking the parent company and its subsidiaries, is user-definable.
The Corporate Agreements module allows you to:
The Corporate Agreement list appears when Profiles>Corporate Agreements is selected. At this screen, you can search for and view a company with corporate agreements. You can also select various function buttons to view, edit, and create corporate agreements.
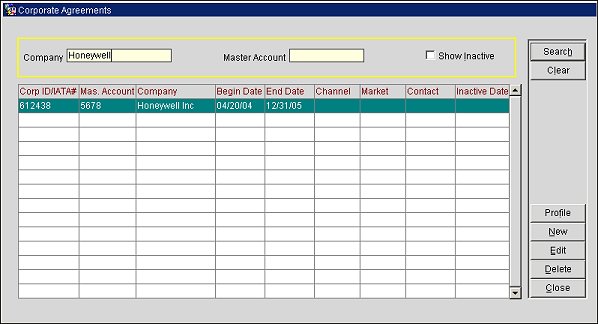
Company. If you want to edit or view an existing company's corporate agreement, enter the company name into this field and select the Search button. The company and its corporate agreement will appear in the grid.
Master Account. You can also search for an existing company and its corporate agreement(s) by selecting the company's master account ID from the Master Account drop down list. (The master account ID is assigned to the company at the Account Profile screen or at the Corporate Agreements - New screen and specifically relates to the corporate agreement.) Select the Search button. The corporate agreement and its parameters appear in the grid.
Corp ID/IATA#. The unique corporate Id or travel agent's IATA Number (International Association of Travel Agents). This Id was assigned when the profile was created.
Mas. Account. The account Id (used for purposes of relating the corporate agreement and company), assigned to the company by the user at either the Profile screen or Corporate Agreements - New screen.
Company. Name of the company associated with the agreement.
Begin Date. The beginning date of when the agreement becomes active.
End Date. The ending date when the agreement is no longer active.
Source. The code representing who referred the customer for the corporate agreement, such as CRO, Property, TA.
Market. The market code, used to identify the market group the company belongs to.
Contact. Name of the person associated with the corporate agreement who can be contacted.
Profile. Highlight an existing company on the grid and select the Profile button to view its profile. The Account Profile screen appears. At the Profile screen you can add or edit a Master Account Id and also edit the company profile, if necessary.
New. Select this button to create and set up a new corporate agreement. The Corporate Agreement - New screen appears.
Edit. Select this button to edit an existing corporate agreement. The Corporate Agreement - Edit screen appears.
Delete. Select this button to delete the highlighted corporate agreement from the company.
The process of setting up corporate agreements may involve the following activities:
Note: Before the corporate agreement can be associated to the company, several things must be in place:
- The Setup>Application Settings Function of Profiles/Keywords must be set to Y.
- The company must have a profile. Select the Profile button to access the Profile Account screen and create a profile, if necessary.
- The company must have a Master Account Id. This Id is created either at the Profile screen or at the Corporate Agreements - New screen. (Instructions are included below for creating an account Id at the Corporate Agreements - New screen.)
- To create the Master Account Id at the Profile screen, access the Profile screen by selecting the Profiles button.
- At the company profile, select the Keyword button.
- At the Profiles Keyword screen, select the New button.
- At the Add Edit Keywords screen, from the Keyword Type drop down list of values, select Master_Account. Enter the unique master account Id for this company in the Keyword field. (All changes to the keyword are displayed in the User Activity Log.)
- Select the OK button to save the new master account Id.
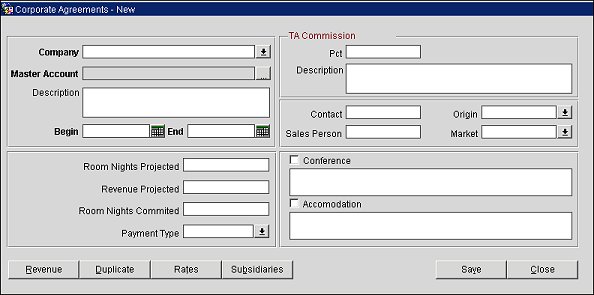
To set up a new corporate agreement, select the New button from the Corporate Agreements screen. The Corporate Agreements - New screen appears. Enter the required fields in this screen, highlighted in bold. Select Save when you are through. More instructions are below.
(To view or edit an existing corporate agreement, highlight the corporate agreement and select the Edit button. The Corporate Agreements - Edit screen appears with previously entered information pertaining to the agreement.)
Company. To enter an existing company name, select the down arrow and search for the company from the Profile Search screen. On the Profile Search screen, select the company name.
Master Account. Enter the Master Account Id for this company. If the company selected at the Company drop down list already has a master account Id, the Id automatically appears. If not, enter the Master Account Id for the parent company.
Apply Master. Select this button to apply a new Master Account Id to a parent company or to apply the Master Account Id to subsidiaries.
Description. Enter a description of the agreement and company, if desired.
Begin. Enter the beginning date of when the corporate agreement applies. Only one agreement can be effective during any given time period for the same company profile.
End. Enter the date when the corporate agreement ends.
TA Commission Pct. Enter the percentage the travel agent receives for commission for any nights booked under this agreement.
TA Commission Description. Enter any information about the travel agency or commission, if desired.
Contract. Enter the name of the contact person for this agreement.
Source. Enter the source of who referred this customer for the corporate agreement, such as CRO, Property, TA.
Sales Person. Enter the name of the sales person who sold this agreement.
Market. Enter the market code to identify the market group the company belongs to.
Room Nights Projected. Enter the number of room nights the customer anticipates using during the beginning and end dates of this agreement.
Revenue Projected. Enter the amount of revenue the customer anticipates generating during the time period of this agreement.
Room Nights Committed. Enter the number of room nights the customer has actually committed to.
Payment Type. Enter the type of payment accepted for guests staying under this agreement. This is for informational purposes, identifying the agreed payment type. Select the drop down list of values. (The Payment Types that are used in the Corporate Agreement are set up under System Setup>Profiles>Corporate Agreement Payments. See Corporate Agreement Payment Types.)
Conference. Select this option if a conference is expected while this agreement is in effect. Enter additional information about the conference.
Accommodation. Select this option if accommodations need to be addressed under the agreement. Enter text to supply additional information about the accommodations.
Revenue. Select this button to view the total revenue of the Master Profile listed per year. The CIS Stay History Summary - Yearly screen appears. This shows the total revenue of the Master Profile listed per year, as well as the amount of reservations booked, cancelled and No showed, and also the amount of nights booked. To view more details, select the Details button on subsequent screens.
Duplicates. Select this button to copy the details from the current agreement to a new agreement with a new time period. The duplicate profile appears with the beginning date of the agreement automatically advanced one day from the previous agreement's ending date - as only one agreement for a company can be in effect at a time. Note that rate codes are not copied.
Rates. Select this button to view and edit the rate codes associated with the company profile and subsidiaries, according to the agreement. The Rates screen appears, displaying a list of rate codes, their description, and associated properties.
Subsidiaries. Select this button to view any subsidiaries of this company. The Subsidiaries screen appears and displays the list of company subsidiaries that are part of the corporate agreement. These subsidiaries must have been associated the corresponding parent company profile by the Master Account Id before they display here.
Save. Select this button to save the new corporate agreement or the changes you made.
You can add, view and edit rates for a region or property for a corporate agreement. Highlight the corporate agreement on the Corporate Agreements list whose rates you would like to add or edit. Select the Edit button. The Rates screen appears with a list of rates applicable for various properties.
At the Rates screen, highlight the rate code you are interested in editing or select New to add a new rate. After selecting the New or Edit buttons at the Rates screen, the Rates - New or Edit screen appears.
Note: Applying Rates must be done every time a subsidiary is added to the parent company, whenever a property is added, or whenever rates have changed.
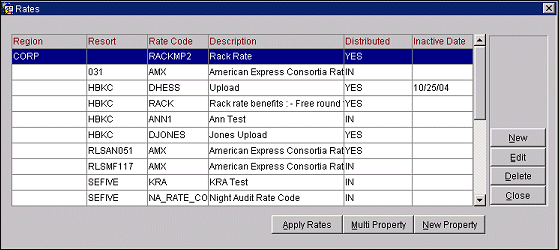
Region. Identifies the region where multiple properties are grouped and where the associated rate code will be used.
Resort. If not associated with a region, the individual properties are listed where the associated rate code will be used.
Rate Code. The rate code associated with the corporate agreement.
Description. The description of the rate code.
Distributed. Indicates if the rate code is assigned to the company or if it has been distributed to the properties. IN = the rate codes have been entered in the system, but not yet applied to the properties. YES = the rate codes have been entered and applied to the properties for the corporate agreement.
Inactive Date. The date the agreement ended or was made inactive by the user.
New. Select this button to set up new rates for the corporate agreement. The Rates - New screen appears. See below.
Edit. Highlight a rate on the Rates screen and select the Edit button to edit the rate for the corporate agreement. The Rates - Edit screen appears. See below.
Delete. Highlight a rate on the Rates screen and select the Delete button to delete the rate from the Corporate Agreement.
Apply Rates. Select this button to apply the rates to the parent company and also to all subsidiary profiles belonging to the parent company. The Rates are automatically updated in the “Neg. Rates” of the profiles. These can be viewed at Profile>Options>Neg Rates. When selected, a unique job will be created in OPERA to update rates for the corporate agreement. Multiple rate updates can be made for an account (e.g., updating rates for multiple corporate agreements) and thus multiple jobs can simultaneously run in OPERA for an account.
Note: Go to Utilities>Utilities>OPERA Scheduler to view the job for updating the corporate agreement's negotiated rate. If duplicate negotiated rates are attached to the parent or any subsidiary company profile, the job will skip the duplicate record in OPERA Scheduler and a message will display indicating that this is a duplicate negotiated rate. It will then continue to the next record.
Multi Property. Select this button to set up one rate for more than one property at the same time. The Select Rate Code screen appears where you select the desired rate code. When a rate code is selected, the multi property Resort List screen appears. On the Resort List screen, select the properties you want to apply this rate code to. The added properties appear on the Rates screen with the distributed status of IN.
New Property. Select this button if the client purchased a new property and set it up in ORS. Now, the property needs to have rates associated to it and needs to be added to the corporate agreement. The New Resort screen appears. See Adding a New Property.
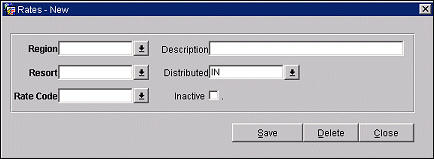
Region. If applicable, select the region where the properties are grouped from the drop down list. This is useful if you need to set up the same rate code for multiple properties.
Resort. Select the property where the associated rate code will be used. This is a required field if the Region field is left blank.
Rate Code. Select the rate code to be associated with the corporate agreement from the list of values.
Description. This field automatically displays with the description of the selected rate code.
Distributed. This field automatically fills in with the Distribution status of IN. To distribute the rate code to the parent company and subsidiaries, you will need to save your changes here, return to the Rates screen, and select the Apply Rates button.
Inactive. Select this check box if you want to deactivate the corresponding rate code for the current corporate agreement.
Save. Select this button to save the new rate.
Delete. Select this button to delete the rate code from the corporate agreement.
The New Resort screen provides a convenient way to add a new property and rates to the corporate agreement. You can select an existing property associated to the corporate agreement whose rate codes you want to select. Then, you select the new property you want applied to the corporate agreement. (The new property must already be set up.)
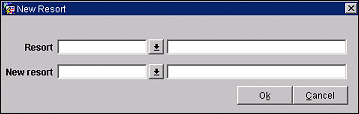
Resort. Select the existing property from the drop down list whose rate codes you want for the new property.
New resort. Select the new resort from the drop down list you want to add rate codes for.
OK. Select the OK button after you have made your selections. The new property appears on the Rates screen with the Distribution status of IN.
Note: To associate the rates to the region and properties, at the Rates screen, highlight the new property and select the Apply Rates button. The rates are distributed and the Distribution status is YES.
You can create subsidiaries of a parent company. Subsidiary profiles are linked to the parent company through the Master Account Id. You can only edit a client's associated subsidiaries through the Profile screen.
If a change is made to a master account Id associated with a corporate profile, you need to apply the changed master account Id to all the associated subsidiaries. The Apply Master button, when selected on the Corporate Agreement - New or Edit screen, automatically updates the Master company profile and all the current subsidiaries.
Before creating new subsidiaries, you must already have:
Apply the Master Account Id of the parent company to the subsidiary, by selecting the Apply Master button at the Corporate Agreement - Edit screen.
To view subsidiaries of a parent company having the same corporate agreement, select the Subsidiaries button from the Corporate Agreements - Edit button. The Subsidiaries screen displays with a list of the companies that are subsidiaries to the parent company.
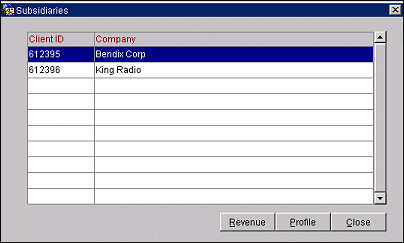
Client Id. The unique Id of the subsidiary client, assigned when the profile was created.
Company. The name of the subsidiary company.
Revenue. Select this button if you want to view the revenue generated by the highlighted subsidiary for the past year. The CIS Stay History Summary - Yearly screen appears.
Profile. Select this button if you want to view the highlighted subsidiary company profile. The Profile screen appears.
New. Select New if you want to search for a company profile at the Profile Search screen, edit the profile, and attach a master account to it.
You can view revenue associated with a corporate agreement. To view the revenue generated by a corporate agreement:
When creating a new agreement for a new time period or creating one having similar characteristics as an existing agreement, you can copy an existing agreement. You don't have to enter similar information over again. Then, you can edit the existing information to update the information.
On the Corporate Agreements List screen, select the corporate agreement you want to duplicate and either double-click it or select the Edit button. The Corporate Agreements - New screen appears.
On the Corporate Agreements - New screen, select the Duplicate button. A popup message confirms that the corporate agreement has been copied. The duplicate setup screen appears with the beginning date automatically advanced one day from the previous record's end date. (Only one agreement can be in effect at a time for the Master Account Id.)
When you activate the Relationship application setting (Global>Profile>Settings>CORP AGR SUBSIDIARIES>Relationship), you can have multiple levels of the Hierarchy Tree (including those created through On Behalf functionality) and maintain a Master Account # for the entire Tree. These can be transferred to V6 properties.
The Application Setting of Global>OWS>Function>ON BEHALF BOOKING should be set to Y. This enables the Menu item of Profiles>On Behalf to display where you can configure the Hierarchy Tree for Companies.
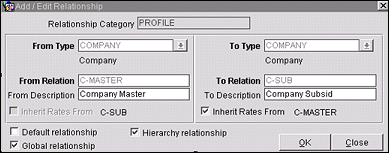
Configure Company Relationship Types as Hierarchy and Global, with Inherit Rates selected in order to Transfer via the Interface. This is done by accessing Configuration>Profiles>Relationship Types. Refer to Relationship Types for more information.
Ensure that all the Company profiles that you wish to make a part of the Hierarchy Tree are already created in the ORS database. The following example shows configured profiles.
Relation Master*
Relation Master USA
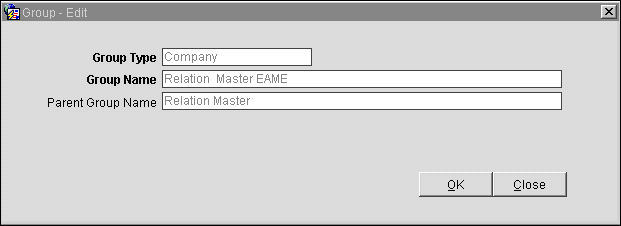
Relation Master EAME
Relation Master NY
Relation Master FL
Relation Master Neuss
Relation Master Berlin
* If the client has some V6 and/or V7 properties, then a MASTER ACCOUNT Keyword would be assigned to only the top most profile on the tree. In the above example this would be Relation Master.
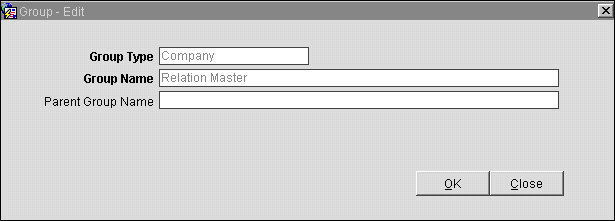
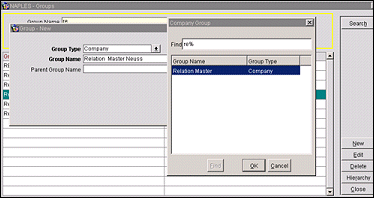
Once profiles exist in the ORS database, the Relationship Hierarchy tree can be built from the Profile>On Behalf>Groups Menu item. It is recommended that you start initially from the top of your tree. In this example, this would be Relation Master. The parent group name would be null as Relation Master is at the top.
Continue building the tree down.
When creating a new group, select New from the Groups screen. In our example, select the Group Type (Company), the Group Name which you are adding to the tree (Relation Master Neuss) and the LOV for Parent Group (the name is the Group Name initially created, however, once applying the OK button the user will be able to actually select the Parent Group Name from the Tree.)
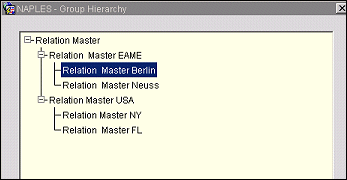
The completed Hierarchy Tree, from the example.
Because Inherit Rates was selected on the Relationship Type configuration screen, the Neg. Rate only has to be attached to the Group Name Profile.
Observe the Profile Search screen where the first column contains the symbols of # or $. # indicates that the Neg. Rates is associated by the Inherit Rates functionality via the Relationship. The $ indicates if Neg. Rate has been associated directly to the profile.
You can manage Corporate Agreements by using the relationships built through On Behalf functionality (Profiles>On Behalf>Groups and Users). Access Corporate Agreements by selecting Profiles>Corporate Agreements. The Corporate Agreement screen appears.
Note: For this information to apply, the previous configuration and setup procedures must have been completed, including the activation of the application setting of Global>Profile>Settings>CORP AGR SUBSIDIARIES>Relationship.
See Also