
|
|
|
Edit Users
Select Configuration > Setup > User Configuration > Users or Setup > User Configuration > Users to display the Users screen. This screen is the starting point for creating, viewing, and modifying employee-related information for your property.
Every person that will be actively using OPERA (setting up, configuring, and managing the system; and performing day-to-day operations) must be identified as a user starting from the Users screen. Here you will define all the users of the system, give them a user ID, assign a default password, and, as needed, assign a cashier number, and define their access permissions by assigning them to one or more user groups. In addition, you can manage security options such as resetting the user's password and locking or unlocking the user's access to OPERA.
Note: A max of three browser sessions can be open at one time by a user.
Note: Ensure that you have established job titles and departments before you set up users because each employee must be assigned a specific job title.
Note: LDAP users are not visible to users who are not a member of the OPERA Supervisor group.
The Users screen list all currently defined OPERA users.
Note: If an OCM user is assigned to a specific property in MyFidelio, the OCM user will see other users displayed on the Users screen if they were created in ORS and if they had ORS as their assigned property.
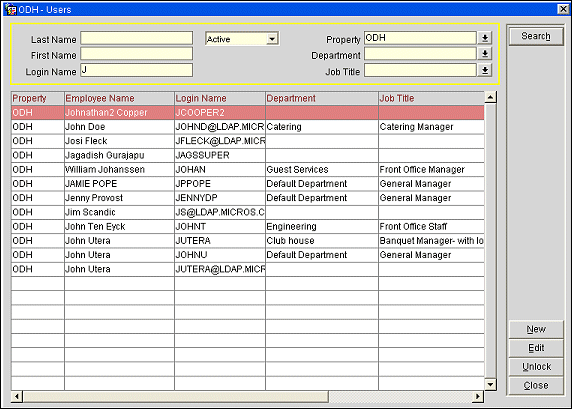
Note: Users whose accounts are automatically locked due to invalid login attempts or because the account has been manually disabled are highlighted in pink on the Users screen grid. Click on the user's account and select the Unlock button (available to users who have the SETUP CONFIG > EMPLOYEE UNLOCK permission) to unlock the account. A user must be an OPERA Supervisor or a member of an OPERA group having Supervisor rights in order to unlock an OPERA Supervisor or member of an OPERA Supervisor group. See User Password for additional details on the Unlock feature.
Note: Unlocking an OPERA Supervisor account or the account of a user belonging to a user group that has Supervisor rights can only be done by another user having Supervisor rights.
Use the search options to find specific user records. Enter your search options and select the Search button. The grid will list the users matching your search criteria.
Last Name. Enter the user's last name.
First Name. Enter the user's first name.
Login Name. Enter the user's login name.
Note: To search using the First Name, Last Name, or Login Name fields, enter the user's first, last, or login name, as appropriate; or, you may enter the first part of the name you are searching for. For example, to search for login name JOHAN, you could enter JOHAN, or simply J or JO, or JOH, etc. The more characters you enter, the narrower the search and the fewer the matching search results.
Active/Inactive / Terminated/All. Select the option that corresponds to the category of users you wish to list.
Property. (Available if the OPP_MHOT Multi-property license is active.) Select the property at which you wish to search for users.
Department. Select the department whose users you wish to identify.
Job Title. Select the job title of the users you wish to identify.
The following information is shown for each user who matches your search criteria:
Property. (Available if the OPP_MHOT multi-property license is active.) Property to which the employee record is defined and that matches the property defined in the search.
Employee Name. Employee's name.
Login Name. The user ID used by the employee to log in to OPERA.
Job Title. Employee's job title.
Emp. No. Employee number.
Cashier ID. Employee's cashier ID, if the employee has an assigned cashier ID.
Last Login. Date and time when the employee last logged in to OPERA.
Owner. When the OPS/OPC<version number> Sales and Catering license code is active, this is the Owner name for this user. This is usually the user's initials. The owner name is used to identify the user when, for example, the user is the Sales Manager who owns an Activity, Contact, or Account.

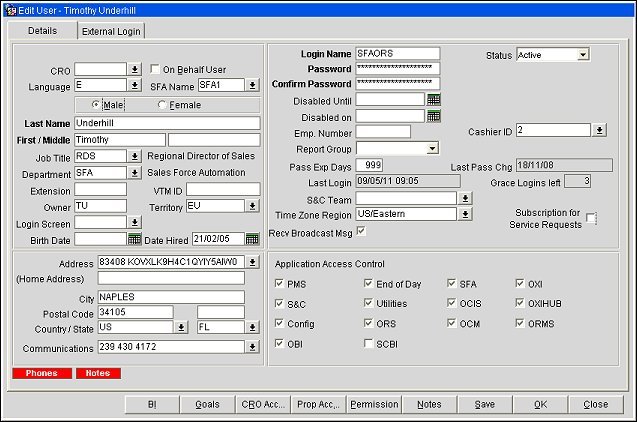
To edit an existing user's record, highlight your choice and select the Edit button and the Edit User screen appears. To create a new user, select the New button and the Create New user screen displays.
The following button functions may be available on the Edit User screen.
BI. This button is available if the OPB_<version number> OPERA Business Intelligence Enterprise Edition or OPI_BUIP_<version number> OPERA Business Intelligence Standard Edition license code is active. The BI button also displays when the add-on license OPS_SAREP S&C <version number> S&C Advanced Reporting and ORO_<version number> Oracle BI SE-one User Interface license for S&C Advanced Reporting views are active - with the OBI > Parameter > USE BI GROUPS FOR OLTP set to Y.
Users with the permission DATAMART > Manage BI Access can set up access for other users for property levels and subject areas in OBI and S&C Advanced Reporting. Select the BI button to display the OBI Options screen. The selections made at the OBI Options screen will be available when the assigned user accesses the OBI or S&C Advanced Reporting applications. (See OBI User Access for more information.)
Note: When the OPB_<version number> OPERA Business Intelligence Enterprise Edition (OBIEE) or OPI_BUIP_<version number> OPERA Business Intelligence Standard Edition license code is active, you must select the OBI check box on the Details tab/Application Access so the licensed OBI application is available. The OBI menu button will display on the OPERA Sign-on screen. When OBIEE is active, both the OBI menu button and the S&C Advanced Reporting button appear on the OPERA Sign-on Screen.
When the add-on license OPS_SAREP S&C <version number> and ORO_<version number> Oracle BI SE-one User Interface license for S&C Advanced Reporting views are active (without an active OPB_<version number> OPERA Business Intelligence Enterprise Edition or OPI_BUIP_<version number> OPERA Business Intelligence Standard Edition license codes), you must select the SCBI check box on the Details tab/Application Access so the licensed S&C Advanced Reporting application and S&C Advanced Reporting button is available on the OPERA Sign-on Screen.
Goals. (Available if the OPS_<version number> OPERA Sales and Catering license is active.) Set sales, performance, or other types of goals for the highlighted user. Specific goals depend on the department or organizational group. (See Employee Goals for details.)
CRO Acc. (Available if the OPR_<version number> ORS license is active.) Displays the CRO Access screen where you can select the CROs this employee will have access to.
Prop Acc. Property access. (Available if the OPR_<version number> ORS license is active, if the OPP_MHOT Multi-property PMS license is active, or in single-property PMS environments when multiple single properties are supported by one database schema.) See Button Functions below, for more details.
Note: For users assigned the OPERA Supervisor Group, this button will not display.
Permission. Display the User Permissions screen where you can work with user permissions setup.
Notes. Select New to add a note to this user record, Edit to modify an existing note, or Delete to remove a note from this user record. See Note Types, Notes, and Notes Fields for more information.
Property. In ORS, this field is available when the OPERA Channel Management license or the MyFidelio license is active. In other applications, this field is available when the logged in user has access to multiple properties. Select the down arrow to choose the property where the user is to be configured.
Language. The preferred language for OPERA displays for this user.
OCM User. (Available if the MyFidelio license is active.) Select this check box if the user will be an OPERA Channel Management user. The user will be granted property permissions for access in the OCM application at the property selected in the Property field.
CRO. (Available if the OPR_<version number> ORS license is active.) Select the down arrow to choose the default login central reservations office for this user.
On Behalf User. (Available if the OPR_<version number> ORS license is active and the OWS > ON BEHALF BOOKING application setting is set to Y.) Select the check box if the user is going to be an On Behalf User. Users that are granted this allows users with login rights and permission (Bookers) to make reservations for (on behalf) other specified people (Companies/Travel Agents/Bookers), based on established relationships. Once the check box is selected, the Login Domain text entry field is displayed and enter the Login name.
SFA Name. (Available if the SFA license is active.) Select the drop down arrow to select the SFA property code for the user.
Male/Female. Select a radio button to indicate the user's gender.
Last Name. User's last name.
First/Middle. User's first and middle names.
Job Title. Select the down arrow to choose a job title. This field is only mandatory when the OPP_QMGS Quality Management System add-on license code is active.
Department. Select the down arrow to choose the department to which this user is assigned. A user can only belong to one department. This field is only mandatory when the OPP_QMGS Quality Management System add-on license code is active.
Note: For users who access OPERA via LDAP integration, the Job Title and Department fields will be automatically filled in provided a Title and Department are provided for the user in the LDAP directory, and matching Job Title descriptions and Department descriptions have been configured in OPERA. OPERA Job Title and Department descriptions, along with their corresponding codes, must be identical (including case sensitive) for all properties. For information on setup for LDAP, see LDAP Integration.
Extension. User's phone extension.
VTM ID. User's Voice and Touch Entry (VTM) system ID for the OPERA Quality Management System.
Owner. When the OPS/OPC<version number> Sales and Catering license code is active, this is the Owner name for this user. This is usually the user's initials. The owner name is used to identify the user when, for example, the user is the Sales Manager who owns an Activity, Contact, or Account.
Note: Throughout the OPERA Sales and Catering application, when selecting an owner from an Owner field LOV, all owners with property access to the selected property will be listed in the Owner field LOVs. Or, for a single property, all owners with access to the logged in property will be listed in the Owner field LOVs. Users in the OPERA Supervisor group have access to all properties. See Property Access under Button Functions, below.
Note: When this field is updated for a user, then the Owner is updated automatically throughout OPERA upon saving the changes for the user, except for the Owner field on the Account Profile and Contact Profile screens. In order for the Owner field to be updated on these two screens, OPERA must be logged out of and logged back into. The reasoning behind this is that the Owner field on these two screens is cached for better performance.
Territory. Territory name (such as a Sales Territory) associated with this user.
Login Screen. Select a particular screen to automatically display when the user logs in to OPERA.
If the S&C license code (OPS/OPC/OSL/OSM/OPL/OPM) is active, the following screen is available for selection:
If the application function CALENDAR is active, the following screen is available for selection:
If the application functions DIARY, CENTRAL DIARY or FUNCTION DIARY are active, the following screen is available for selection:
Note: When the application function DIARY is active, the function diary is not accessible from the S&C application.
If the application function GRC is active, the following screen is available for selection:
If the S&C license code (OPS/OPC/OPL/OPM) is active, the following screen is available for selection:
If the Web Self Service (OPE) or PMS (OPP) license codes are active, the following additional screens are available for selection:
Birth Date. Employee's birth date.
Date Hired. The employee's hiring date. For new users, the default is today's date. A calendar feature is available.
Login Name. Employee user name required for the user to log in to OPERA.
Password. Enter the user's login password. For security, certain requirements must be met:
For security, asterisks are displayed in this field to represent the password.
Confirm Password. Re-enter the password as a confirmation. For security, asterisks are displayed in this field to represent the password.
Note: For security, when you change a user's password on the Edit User screen, the user will be forced to change their password the next time they log in.
Note: Users may change their passwords using the Miscellaneous > Change Password menu bar option. See Change Password for details. By default, OPERA requires users to change their passwords every 90 days.
Note: All activity related to password changes and lockout status changes are recorded in the User Activity Log.
Status. Select Active, Inactive, or Terminated from the employee status drop down menu.
Note: It is possible to inactivate users even if their Owner initials are linked with the following records:
- Past blocks with Departure Date prior to the actual Business Date
- Current and future Blocks with the Status Code Reason Type Cancel/Lost/Refused
- Leads with Departure Date prior to the actual Business Date
- Activities that have an end date prior to the actual Business Date
- Campaigns that have been completed or are inactive
- Potentials with End Date prior to the actual Business Date
- FIT Contracts with end date prior to actual Business Date
- Profiles that are inactive
- Individual or Group profiles that are active
When a user who is a primary owner is made inactive, the Owner fields are gray in the following screens: Accounts Screen, Contact Screen, Activity Screen, Potential Screen, FIT Contract Screen, Business Block Screen, Quick Business Block Screen, SFA Business Block Screen, and Campaign screen.
Note: If the Gaming & Comp Accounting license is active OPP_GCA Comp Accounting, the employee cannot be inactivated if he or she has authorized comp routing for currently in- house guests or for guests with future reservations.
Disabled Until. Date until which this user is prevented from logging in. You may enter any future date in this field. If no Disabled On date is entered, the account is disabled immediately. If a Disabled On date is entered, it must be earlier than the Disabled Until date. If the user's account is disabled, you may clear both the Disabled Until field and the Disabled On field to re-enable the account and allow the user to attempt to log in immediately. (Like all OPERA features, the ability to manage this feature is controlled by a user permission — SETUP CONFIG > EMPLOYEE UNLOCK.)
Disabled On. Date on which this user was (or is to be) prevented from logging in. To disable this user's ability to log in to OPERA, enter the current date (to disable log in immediately) or any future date (to disable log in on that future date) in this field. If a date is also entered in the Disable Until field, the date in the Disabled On field must be earlier than the Disabled Until date. If no Disabled Until date is entered, the user will be prevented from logging in until login is re-enabled. To re-enable the account and allow the user to again log in, clear the Disabled On field and the Disabled Until field. (Like all OPERA features, the ability to manage this feature is controlled by a user permission — SETUP CONFIG > EMPLOYEE UNLOCK.)
Note: By default, users are automatically locked out of OPERA (that is, prevented from logging in) after 6 invalid login attempts. (This number of invalid login attempts is specified by PCI security guidelines.) In the automatic lock out scenario, the locked-out user is prevented from logging in until the number of minutes specified by the GENERAL > DEFAULT TIME TO UNLOCK ACCOUNT application setting have passed. If a Default Time to Unlock Account has not been specified, the user may not log in until an OPERA user with SETUP CONFIG > EMPLOYEE UNLOCK permission uses the Clear Lock button on the User Password screen. To reach this screen, highlight the locked account on the Users list screen and select the Unlock button. (See User Password for details.) The Clear Lock button may also be used when a Default Time to Unlock has been specified, but you wish to allow the user to log in before the designated time has elapsed.
Cashier ID. Select the down arrow to display the Cashier Setup screen. From this screen you may choose an existing cashier ID or create a new cashier ID for the user if the user is to have an assigned cashier ID. Saving any new or updated cashier will not be complete until the Save, OK, or Yes (on the save changes message prompt) button is selected. If a new cashier is created or an existing cashier modified and the user exits out of the Employee screen without saving any changes, then the new cashier or updates will be lost.
If the CASHIERING > FLOATING CASHIER ID application parameter is set to Y, and the employee does not have an assigned cashier ID, the employee may select a cashier ID from the Cashier Login screen. (See Cashier Setup and Cashier Login for details.)
Note: If the CASHIERING > FLOATING CASHIER ID application parameter is set to N (the default) for the property, and the user does not have a cashier ID assigned here, the employee may not log on to Cashiering functions for the property.
To delete a Cashier ID from a user, highlight the Cashier ID and press the Delete key.
Note: A Cashier ID may not be deleted for a user if that Cashier is Open. The Cashier must be closed (Cashiering > Cashier Shift Functions > Cashier Shift Close) before the Cashier ID can be deleted.
Emp Number. Employee's employee number.
Report Group. Select the user's default report group from the report list. Selecting a report group for the user automatically displays that report group and all of the reports within that group when the user selects Miscellaneous > Reports. For example, if an Account Receivable user is being configured, then selecting the Accounts Receivable report group here will default to the Accounts Receivable report group and display all of the reports that have been assigned to that group when they access the reports.
Pass Exp Days. Password Expiry Days. The number of days remaining before the user's password expires. The default number of days is 90.
Five days before the password will expire, the system will start prompting the user for a password change with the following message: Account will expire soon. Please change your password. Remaining day(s) <# of remaining days>. The system will keep prompting the user to change his password until the change takes place or the account finally expires. Use Grace Logins (implemented using the GENERAL > GRACE LOGINS application setting) to allow a set number of logins after the password has expired.
Last Pass Chg. (Read only.) Last Password Change. The date of the last time the password for this user was changed. If you work with an expiry time for passwords, you may use this information to calculate how long the user password will still be valid. Once a user has changed his/her password, this field will be updated with the new date.
Last Login. (Disabled when creating a new user.) This read-only field indicates the last login date and time.
Grace Logins Left. (Read-only.) The number of grace logins remaining for this user. A grace login allows the user to log in to OPERA after their password has expired. The user will be warned at each grace login that their password must be changed. The Grace Logins Left field displays a number calculated from the Grace Logins application setting minus the times the user has logged in without changing their password after the password has expired. Once the grace logins have been exhausted, the user will not be able to access the system without changing their password. If no grace logins are allowed, the user must change their passwords immediately when the password expires.
S&C Team. When the OPS/OPC<version number> Sales and Catering license code is active, select the S&C Team(s) that this user is assigned to. When establishing ownership of Accounts, Business Blocks, or Potentials, you may use S&C Teams to search for Sales Managers. One employee may belong to more than one S&C Team. Teams are not property-specific.
Time Zone Region. Available when the OPS/OPC<version number> or OPS/OPS Sales and Catering license is active and when the ACTIVITY > USE TIME ZONES FOR ACTIVITIES application parameter is set to Y. Select the down arrow to choose a time zone for display/printing of date and time information related to activities for this user. See Activity Time Zones for details.
Login Domain. (Available if the OPR_<version number> ORS license is active and the OWS > ON BEHALF BOOKING application setting is set to Y.) When the On Behalf User check box is selected, enter the Login Domain for the user.
Recv Broadcast Message. If selected, broadcast messages will be shown to the logged in user. For example, OPERA checks for changes in interface or processor status (Running or Not Running) every two minutes, and if there is a change in the status, a broadcast message is displayed to inform the user about the current status. By default, the check box is selected; however, if the site prefers not to show messages to certain users, they can unselect the check box.
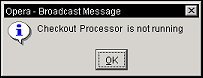
A message is stored and sent for only the first time there is a change in the interface/processor status during an active session, regardless of the number of times the status may have changed.
Subscription for Service Requests. Available when the application function GENERAL > SERVICE REQUESTS is active. Select this check box to receive Service Request notifications. A broadcast message pops up whenever a new Service Request has been entered for the department that you are associated with.
Address. Enter the user's home address. You may enter alternate/multiple addresses (business, vacation, other) once you have entered a home address by clicking the drop down arrow.
City. City location of the home address.
Postal Code. Address Zip code or other postal code.
Country/State. Country and state portion of address.
Communications. Enter the user's home phone number. You may enter alternate/multiple phone numbers, email, fax, and other communications information once you have entered a home phone number by clicking the drop down arrow.
The OPERA applications licensed to the property are listed here as check boxes. Select the check boxes for those applications that this user will be able to access via the Single Sign-on screen.
Note: For users who access OPERA via LDAP integration, application access control is determined by the OPERA user group(s) to which the user is assigned; the Application Access Control options are not shown on the Users screen. For information on User Group setup for LDAP, see LDAP Integration.
When the OPZ_<version number> Operetta license is active, when new employees are created these check boxes are not displayed and are internally marked for the PMS and OXI applications only. When the user logs into the Single Sign-on screen, the user will then see the PMS and OXI (required for MyFidelio access) buttons to access the corresponding applications. This is assuming that an OXI schema exists for the property.
![]()
When the OPS_SAREP S&C add-on license is active, users can be granted access to OPERA S&C Advanced Reporting, by selecting the Application Access Control check box, SCBI. When checked, the user will have a button for S&C Advanced Reporting on the Single Sign-on screen. If the application setting OBI > Parameter > USE BI GROUPS FOR OLTP is active, the BI Options button displays on the User Details screen. Select this button to provide the user access to various levels and subject areas for S&C Advanced Reporting. See S&C Advanced Reporting Setup for more information.
The Rate/Salary tab only appears if the OPP_QMGS Quality Management System add on license is active.
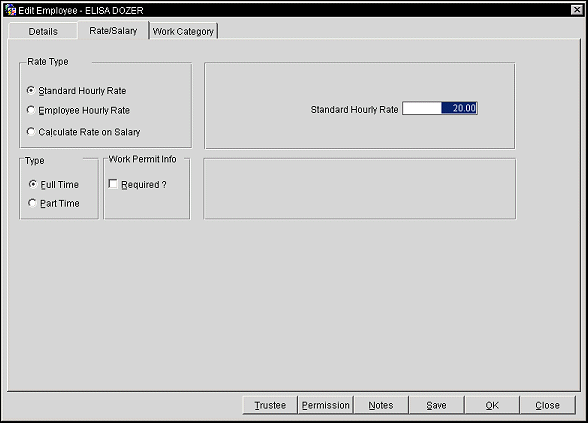
Rate Type. Select the Standard Hourly Rate, Employee Hourly Rate, or Calculate Rate on Salary radio button to indicate the basis of hourly or salary rate calculation for an employee.
Salary Type. The Full Time and Part Time radio buttons.
Work Permit Info. Check the Required? check box if the employee is required by law to possess a work permit. Enter the Work Permit Number and Work Permit Expiry Date.
The Work Category tab only appears if the OPP_QMGS Quality Management System add on license is active. This is used to assign specific work categories to a user, so that when a task is created, it can automatically be assigned to a particular work category and then to a particular user within that category, if it has been configured for the user.

All. Select all Work Categories.
None. Un-select all Work Categories.
Group. Assign User Groups permissions to the selected user. When this button is selected the Select User Groups screen displays. User Groups that the user already belongs to are marked with an X. Select the group you wish to assign this user to and then select the OK button.
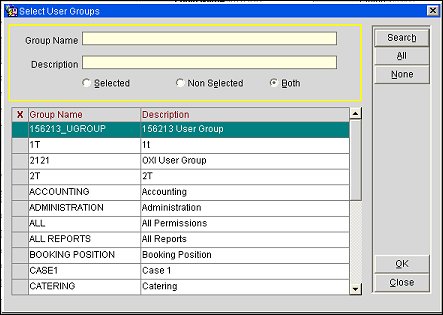
Use the Group Name and Description search options to locate specific user groups. Use the Selected, Non Selected or Both radio buttons to display user groups that are already chosen for the user, those that are not chosen for the user, or both. Use the All or None buttons to select all user groups or to unselect all user groups.
Note: The Group button displays when the application function GENERAL > USER GROUP ADMINISTRATION is active and when the user assigning the user groups has the permission User Group Administration assigned to them. If the parameter is active but the user assigning the user groups does not have the necessary permission, this button displays but is not accessible (grayed out). The user assigning the User Groups does not have to be a part of that group but does need to have the permission User Group Administration assigned to them.
Trustee. Assign permissions of another user by proxy to the selected user. The user assigning trustee rights must have the permission(s) they are attempting to assign. See Trustee Rights for more details.
Goals. Set employee production goals for Catering, Rooms or Activities (see Employee Goals for more details).
Note: The Goals button is only available when the OPS<version number> Sales and Catering license code is active, and only if the user has an Owner ID specified in the Owner field.
Prop Acc. (Available to the logged in user when the PROPERTY CONFIG > MANAGE PROPERTY ACCESS permission is assigned.) Allows for users to be configured for multiple properties provided the OPP_MHOT Multi-property PMS license or the OPR_<version number>ORS license is active, or in single property PMS environments when multiple single properties are supported by one database schema.) Select the Prop Acc button to display a multi-select list of all eligible properties. Use of this feature enables a single point of user administration while enabling a user to access multiple properties using the same login credentials (including their Cashier ID) with a customizable set of permissions for each property (if necessary). Refer to User Property Permissions and Single Sign-On Screen for further details.
Note: For users assigned the OPERA Supervisor Group, this button will not display.
Permission. Accesses the User Permissions Screen. From here, a user's permissions may be added, modified or removed.
Notes. Launches the Employee Notes screen where notes relevant to the selected user can be added, modified or removed. When notes are added to a user account, a Notes lamp displays on the Edit User screen.
Save. Saves the changes made to the selected user and leave the Edit User screen open.
OK. Saves the changes made to the selected user and close the Edit User screen.
Close. Closes the Edit User screen.
The External Login tab provides features that allow you to configure the user for accessing licensed external systems (e.g., Concept Activities) from within OPERA.
The External Login tab appears when the GENERAL > USE EXTERNAL LOGIN application parameter is set to Y and the proper interface is active for the property.
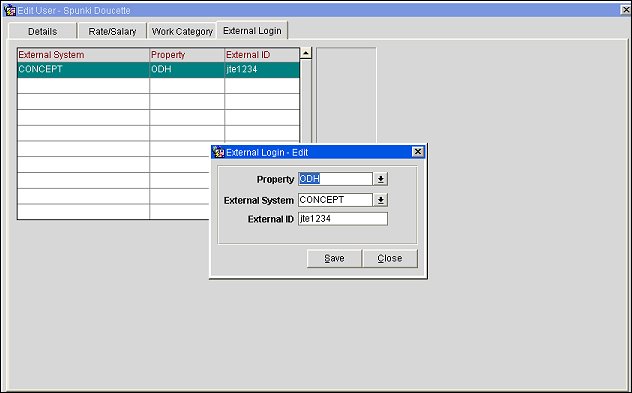
To add access to an external system for the user, select the New button. To update access attributes, highlight your choice and select the Edit button. The External Login - New or External Login - Edit screen appears.
Provide the following information and select the Save button.
Property. Available if the OPP_MHOT Multi-property PMS add-on license is active. Select the property from which the user is to be given access to an external system.
External System. Select the external system to which the user is to be given access.
External ID. Login name defined for this user on the external system.
See Also