
|
|
|
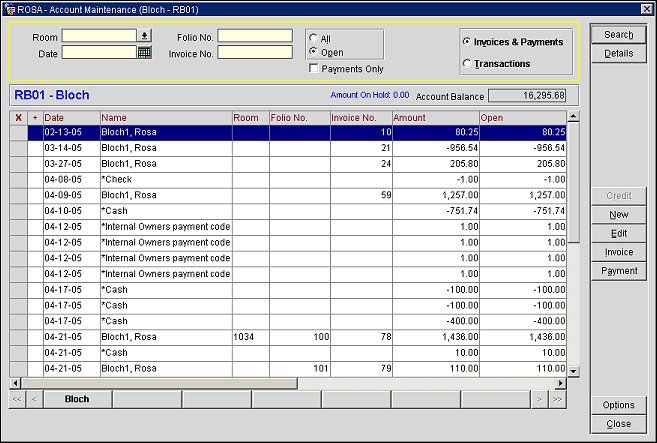
Owner Account Maintenance Screen Invoices and Payments View
To work in the Invoices and Payments view of the Reserve Account Maintenance screen, select an account from the Owner Account Search screen and then select the Invoices & Payments radio button.
Note: The Transactions and Invoices & Payments are separated for an Owner's account in order to accumulate as many postings that may be needed for the month or fiscal period. When the Ownership>Auto Invoice Creation application function is set to Y and the owner account is at the end of the month or fiscal period, all of the postings are automatically collected into one invoice during the night audit and can then be forwarded to the owner. But if the Ownership>Auto Invoice Creation application function is set to N, then the invoices must be created manually for the month or fiscal period.
Note: Transactions defined within a particular statement period through the use of the Effective Date functionality will be invoiced with all of the other transactions that were posted within that period.
Your screen will look similar to the following image:
Select the Invoices and Payments radio button, then complete one or more of the following search criteria to narrow the results in the Results Grid.
Date. Use the calendar tool to select the date of the invoice, or you may enter the date manually.
Folio No. Enter the full folio number or the first part of the folio number.
Invoice No. Enter the full invoice number or the first part of the invoice number.
All. Select the All radio button to display all invoices, regardless of whether they are open invoices (those having a non-zero balance) or zero balance invoices.
Open. Display only open invoices (those having a non-zero balance).
Payments Only. Select this check box if you wish to display only the payments associated with this account.
Select the Details button to expand the Account Maintenance screen and see a view-only summary of the reserve account details.

The left side of the Account Details area displays basic account information about the account, including the account type and phone, fax, and email information. The right side displays a breakdown of the account balance by each of the aging periods set up for the property.
The Account Header, found directly above the account grid, displays the account name and number, the amount on hold (if any), and the total account balance.

Account Number/Name. Number and name attached to the account.
Amount on Hold. Available when the Ownership>Hold AR Revenue application parameter is set to Y, this is the amount of Owner revenue from reservations having direct bill to AR. In the event that an amount is On Hold, the Account Balance field will display a different amounts on the Owner Account Search Balance column and the Account Balance on the Owner Account Maintenance screen.
Account Balance. The total open amount for all invoices belonging to this account.
The following information is available in the search results grid:
X. An X in this column indicates that the record is selected for an account maintenance function. Click in the X column to select the record. Or you may select the record by highlighting it and selecting the spacebar. If you are choosing only one record for a function, you may simply highlight the record without placing an X in this column.
+. A plus sign (+) in this column indicates that two or more invoices have been compressed. Click the + to display the individual invoices. When you do so, the + changes to a -. Click the - to "roll up" the display of individual invoices. (See Compress Invoices for details.)
Name. For invoices, the name that appears on the folio; for payments, the payment method. Payments are prefixed by an asterisk for easy identification. In addition, the asterisk makes it possible for you to click on the Name column heading to display all payment entries followed by all invoice entries for easy review.
Folio No. Folio number of the folio covered by this invoice. A folio number will not appear for compressed invoices, payments, or old balances.
Invoice No. Invoice number assigned by OPERA when the folio is transferred to AR or when a new invoice is created in AR. Payments do not have an invoice number assigned.
Amount. Amount of the invoice or payment.
Open. Balance remaining on the invoice (amount minus paid).
Paid. Total amount paid. (This amount encompasses all payments against this invoice.) For invoices, this is a negative number. For payments, this is a positive number.
Currency. For invoices, the code for the preferred currency selected for the profile to which the account is attached. For payments, the code for the currency in which the payment was made.
Adjusted. An X in this field indicates that this invoice or payment was adjusted.
Transferred. An X in this field indicates that the invoice or payment has been transferred to another account. Use the Edit option from the right- click Quick Menu to display the Edit Postings screen. The Invoice Reference field on the Edit Postings screen shows the account to which the invoice was transferred. (See AR Transfer for details.)
Age. The age of the invoice, in days.
Note: When multiple invoices are compressed, the age shown applies to the compressed invoice. Once invoices are compressed, age information is no longer tracked for the individual invoices.
Supplement. Additional information regarding the invoice or payment.
Reference. Invoice or payment reference information. For payments, the credit card number used for the payment. A POS check number may also appear here.
The following function buttons are available on this screen:
Credit. Display the Credit Bill screen and apply a credit to an invoice. See Credit Bill for details.
New. Create a new invoice to the account and post transactions directly to that invoice. When creating a new invoice, it will be mandatory to enter the room class, market code, and source code. By entering this mandatory information, OPERA can allocate the revenue to the correct code for comparison with statistical reports and the revenue in ledgers. See Creating A New Invoice for details.
Edit. Display the Edit Postings screen for the invoice or payment highlighted in the search results grid. This screen shows the details of the invoice or payment, and allows you to edit the reference and supplement information. From the Edit Postings screen you may also access the profile to which the invoice or payment is attached. (This button is not available for closed invoices.) See Editing Postings for details.
Void. Available when the Ownership>Special Owner Revenue Handling application function is set to Y, select to void invoices that had been created from the Transactions View of the Owner Account Maintenance Screen. Voiding a transaction from here will move the transaction back into the Transactions View.
Invoice. Display the Invoice Details screen to view and manage the invoice details for the selected invoice. From the Invoice Details screen you may add new postings to the invoice, edit transaction details, adjust postings based on transaction codes, print the invoice, or access the profile to which the AR account is attached. See Invoice Details for details.
Payment. Make a payment on one or more selected invoice(s). Apply credit to the account at large, to one or more specific invoices, or to the oldest invoices. The Pay button is active only when there is an open amount on at least one of the invoices you choose. See Applying Payments for details.
Compress. To combine two or more invoices into one invoice, mark the invoices you wish to combine with an X in the X column and select Compress. You might use this feature, for example, to combine several invoices that are for small amounts. Once an invoice is compressed, you may not post additional charges to the invoice or make adjustments to the transactions on the invoice. See Compressing Invoices for details.
Options. Display the Options menu.
|
You can right-click with your mouse on any entry in the Account Maintenance screen search results grid to display the Quick Menu. This feature allows you quick access to the most used functions.
Edit. Display the Edit Postings screen for the invoice or payment highlighted in the search results grid. This screen shows the details of the invoice or payment, and allows you to edit the reference and supplement information. From the Edit Postings screen you may also access the profile to which the invoice or payment is attached. See Editing Postings for details.
Uncompress. To split two or more invoices that have been compressed into one invoice, highlight the compressed invoice and select Uncompress. You may only uncompress an invoice on the same business date on which it was compressed. Thereafter, the details are still available in view-only mode, but the invoice cannot be uncompressed. See Uncompress Invoices for details.
Unapply. To unapply one or more payments made to an invoice on today's business date, highlight the invoice to which the payment(s) were applied and select this option. The payment may then be applied to another invoice. See Unapplying Payments for details.
Reverse Payment. To "undo" or reverse a payment that has been applied to the account on today's business date, highlight the payment you wish to reverse and select this option. A reverse posting transaction will be added to the account. Reversing a payment voids the payment so that is does not show as having been posted. See Reverse a Payment for details.
First. Scroll the grid to display and highlight the first entry in the AR Account screen search results grid.
Last. Scroll the grid to display and highlight the last entry in the AR Account screen search results grid.
See Also