Install a New Oracle F160 Flash Card (Server Power-Off)
To install a new Oracle Flash Accelerator F160 PCIe Card into a supported server:
Note - Refer to the server's service manual for PCIe card installation instructions.
- Prepare the Oracle F160 Flash Card for installation.
- Back up your data, as required, before changing your server configuration.
-
Identify a supported and available PCIe slot in the server.
Refer to the server's service manual for PCIe slot locations in the server.
Refer to Supported Hardware and Software in Oracle Flash Accelerator F160 PCIe Card and Oracle 1.6 TB NVMe SSD Product Notes at:
-
Prepare the server for service.

Caution - Hazardous voltages are present. Disconnect the server from the main power and from any networks before installing the card to avoid electrical shock.
Note - Your server chassis might require a PCIe carrier extension for each installed Oracle Flash Accelerator F160 PCIe Card to facilitate air flow. Your server chassis might contain a card carrier or other configuration. Refer to the server's service manual for PCIe card installation instructions.-
Ensure that you have already taken antistatic measures.
See ESD Safety Measures.
- Remove the server from active operation.
-
Turn off the server.
Power down the system.
- Disconnect all power cords from the server power supplies.
- Remove the cover from the chassis.
-
Ensure that you have already taken antistatic measures.
-
Record the serial number of the Oracle F160 Flash Card and PCIe slot number where the card
will be installed.
This server slot information can be used at a later time for identifying Oracle F160 Flash Cards from the console.
Refer to the server's service manual.
-
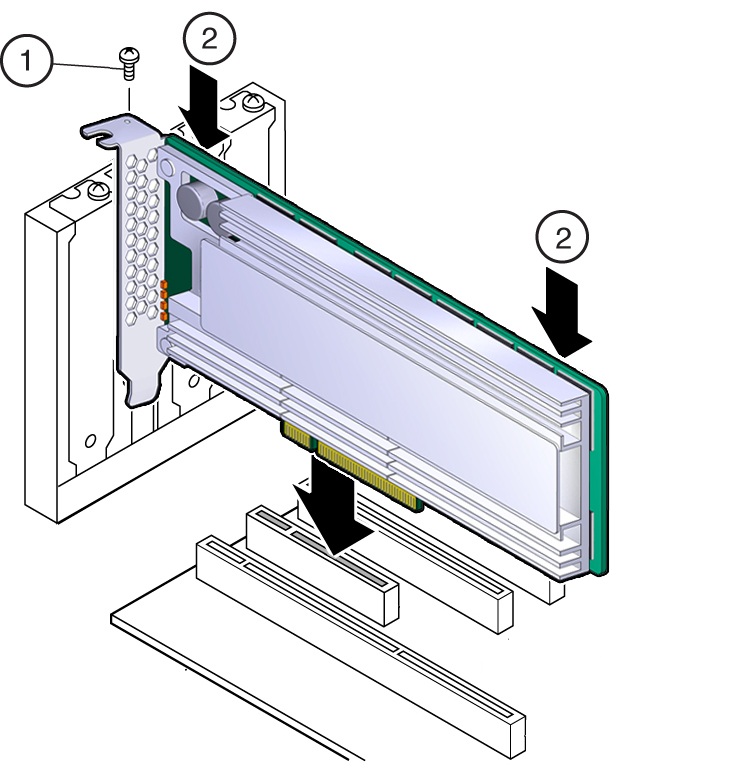
Insert the Oracle F160 Flash Card in the supported PCIe slot.
- Remove the blank bracket panel on the server chassis that aligns with the empty PCIe slot. Save the bracket screw, if applicable.
- Press down gently, but firmly, to properly seat the card in the slot.
The following figure shows how to insert the Oracle F160 Flash Card in a PCI Express slot:

Note - Your server chassis might contain a card carrier or other configuration. Refer to the server's service manual for PCIe card installation instructions. -
Secure the card bracket to the server chassis.
Engage the server retention mechanism to secure the card to the server chassis.
or: Install the bracket screw, as required to secure the card to the server chassis.
-
Return the server to service.
Refer to the servers service manual.
- Replace the cover if applicable.
- Reconnect the power cord and any network cables.
-
Power on the system.
The card hardware insertion is complete
-
Configure the server for the new Oracle F160 Flash Card.
Refer to the servers administration guide or the OS documentation.
- If applicable, perform any required commands for your system to install the device driver for the new Oracle F160 Flash Card.
- If applicable, perform any required commands for your system to recognize the new Oracle F160 Flash Card.
-
Verify successful installation of the Oracle F160 Flash Card through your server operating
system.
When the installation is complete, the Oracle Flash Accelerator F160 PCIe Card is visible to your server operating system.
- Configure the system to maximize flash technology.