Create Block Train
The Create Block  Train walks you through the steps (or "stops") to create a new block reservation, gathering information as the process progresses. The details for the stops are visible in a quick view on the right.
|
|
|
|
|
Currently there are no videos for this topic. |
|
|
|
|
|
Can I use an existing Group Profile to create the Block? How do I change a Block status? What do Elastic and Non-Elastic mean?
|
|
Create Block Process
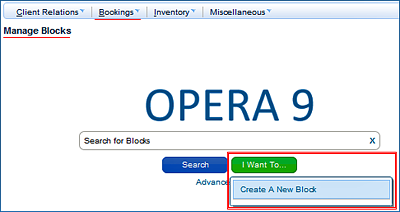
To Create a Block, select Create a New Block from the "I want to" section on the Manage Blocks Search screen. ![]()
Create Block uses a 4-step "train" approach that walks you through the process steps for creating a new Block, associating profiles, attaching rates and marketing information, and setting the Block's status. You can move forward and backward through the train by selecting the stop or by using the Previous or Next buttons.
Create Block Process Steps (Train)

Create Block Step 1 -- Block Definition -- the Block is named, the Block Code is created, and the event dates are defined.
Create Block Step 2 -- Associated Profiles -- Attach related profiles to link the profile and its attributes to the Block. If a Group Profile is not attached, one will be automatically created upon completion of the Block creation.
Create Block Step 3 -- Marketing and Financial -- Add the primary Rate Code, Marketing, and Source information.
Create Block Step 4 -- Change Block Status -- Set a new Status and Reservation type for the block. You can also preview the next available statuses in the status flow for your choice.
|
|
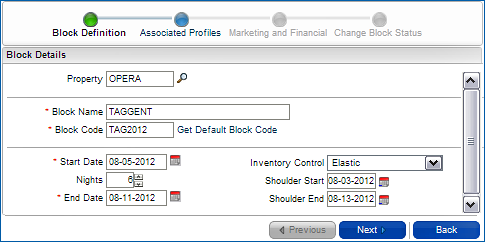
In the Block Definition step the Block is named, the Block Code is created, and the event dates are defined.
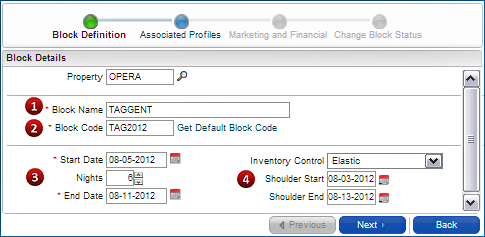
1. The Block Name identifies the group within the resort, and is the name that agents search for when booking the group.
2. The Block Code can be entered, or you can use Get Default Block Code to have a block code generated for you. If the Default Block Code Template parameter is configured, the Block Code generator will use the template format.
3. Start and End Dates - These are the actual Start and End dates for the event. Use the Inventory Control Elastic setting with shoulder dates if you want to allow reservations to be sold beyond the original allotment.
4. Inventory Control can be Elastic, Non-Elastic, or abide by Sell Limits. Shoulder* Start and End dates (for Elastic and Sell Limits) can be set days out from the contracted Start and End dates (the number of days out depends on the setting in the Maximum Shoulder Days parameter).
*Shoulder Dates parameter must be On to use Shoulder Dates. Shoulder Dates can also be set after block creation using the Manage Block screen > Block Details jump.
|
|
Attach related profiles to link the profile and its attributes to the Block. For example, if a Negotiated Rate exists on an attached profile, that rate will be available for the subsequent Marketing and Financials step.
If you don't have an existing profile already created that you want attached to your block, you can create a new one by selecting the icon. If a Group profile is not attached here, one will be automatically created upon completion of the Block creation.
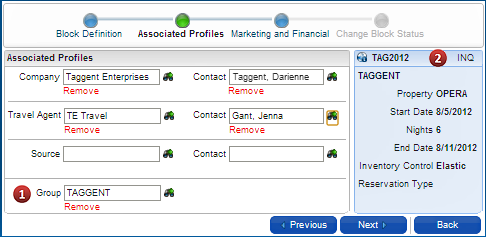
The Block details appear in the right panel for reference, including the block's initial status, and gathers information throughout the subsequent steps.
|
|
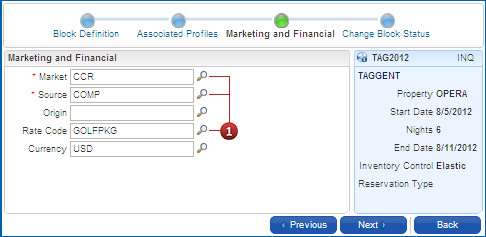
In the Marketing and Financial step, add the primary Rate Code, Marketing, and Source information.
If a profile is attached to the block in step 2, and that attached profile has a negotiated rate(s), that negotiated rate(s) will be available here in the list of values.
The Market and Source codes are mandatory. If a Rate Code that is configured with a Market and Source code is selected first, the Market and Source codes fields will populate with those values.
|
|
Select a status in the New Status column to set a new Status and Reservation type for the block.
The current (starting) status displays in the Block details box (see the rectangle in the image below). You can select a new status (1) or leave the status as is by selecting Save changes or Save and go to Presentation (the Manage Blocks screen).
Hover over a status in the New Status column to preview the Next Available Statuses in the status flow.
When selecting a non-cancel status, the default reservation type is automatically populated in the Reservation Type field at the bottom of the screen, and can be edited if desired.
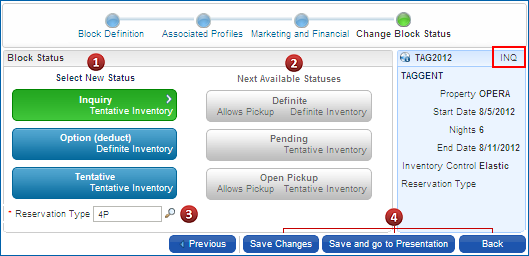
Save Changes saves the Block and returns to the Search screen.
Save and go to Presentation saves the Block and moves to the full Block screen
Back does not save the Block and returns to the Search screen.

 Screen Details
 Videos and Tutorials
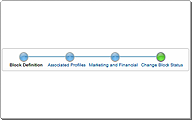

 FAQs
FAQs