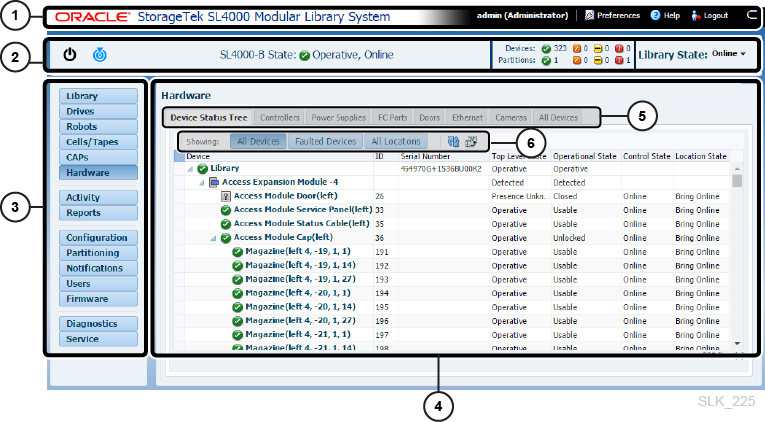
3 Basic GUI Operations
Log into the GUI
You can access the GUI remotely with a browser, through the front touch screen, or through a keyboard and monitor connected to the Base module.
Note:
After five invalid attempts to log in, you will be locked out for 30 minutes. Contact the library administrator to unlock your account (see "Unlock a User Account").Log in Remotely
-
Obtain the library host name or IP address. If not using the standard port numbers, obtain the port number from the library administrator.
-
In a browser, navigate to:
<Hostname or IP address of the library>:<port>
You only need the port number if not using the standard port numbers of 80 (http) or 433 (https). For example, if using the port 7102:
MyLibrary.mycompany.com:7102Note:
If you receive an "HTTPS connection untrusted" warning, configure the browser to trust the user interface server by following the browser's on-screen instructions (see "Manage the Library's SSL/TLS Certificate for HTTPS"). -
On the log in screen, enter your user name and password. Click Log In.
Log in Locally at the Front Touch Screen of the Library
-
Touch the op panel screen to activate it. If nothing displays, the display is either set to the rear VGA port or a different controller. Press the SOURCE button (see "Operator Panel" for a diagram) to set the controller source to the active library controller (L1).
-
On the log in screen, enter your user name and password. Click Log In.
Log in Locally Using a Keyboard, Mouse, and Monitor
-
Connect a keyboard and mouse to the USB ports on the library controller in the Base card cage (see "Library Controller (LOC)" for a diagram).
-
Connect a monitor to the VGA port on the video card in the Base card cage (see "Video Card (LOV)" for a diagram).
-
Press the SELECT button on the video card to set the display to the VGA port (see "Video Card (LOV)" for a diagram). Set the controller source to the active library controller (L1).
-
On the log in screen, enter your user name and password. Click Log In.
Areas of the GUI
-
Masthead — Displays the current user and contains user preferences, help, and logout.
-
Status bar — Displays the current library, device, and partition state (see "View the State of the Library, Devices, and Partitions in the Status Bar") and control over the state of the library (see "Set the Library Online or Offline", "Restart the Library or Reboot Library Operating System", and "Turn Off the Library").
-
Navigation — Click to view different parts of the GUI. Depending upon the user's role, some of these buttons may not appear (see "Available Functions for Each User Role").
-
Content area — Changes depending on the navigation and tab selected.
-
Tabs — Displays different content for the current page.
-
Action buttons — Performs various GUI tasks (such as Add a Partition, Refresh, and so on). Hover over the icons to display tool tips.
Export a GUI Table to a Spreadsheet
You can export an .xls file for any of the tables found in the GUI.
-
Navigate to the table.
-
Click Export
 .
. -
Save the file to the desired location.
-
Open the file in a spreadsheet application (such as Microsoft Excel).
Note:
The extension of the file is .xls, but the format is html. When opening the file in a spreadsheet program, you may be required to verify that the file is not corrupt and from a trusted source. -
You may need to change the format of any Date/Time columns. If using Excel, select the columns. Select Format Cell, Custom, and then enter the format, such as
mm/dd/yy hh:mm:ss.0;@.If you select Format Cell, Date, and select a date type like
MM/DD/YY HH:MM, then time will be rounded to the nearest minute.
Search and Sort Tables
You can search and sort the tables in the GUI. If you need additional sorting capabilities, you can export the table as a spreadsheet (see "Export a GUI Table to a Spreadsheet").
Search in a Table Using Filters
-
Click in the white search bar above a column title.
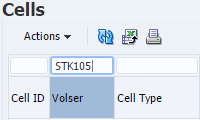
-
Enter a search value. The value must match exactly (not case sensitive), or you can use a search operator:
-
> (greater than) and < (less than) — valid for numeric fields or strings with values. For example Media Type:
<LtoGen6or Date/Time:>2017-06-16(YYYY-MM-DD must be specified fully, therefore >2017-06 would not work). -
! (not equal to) — such as
!Completeor!DefaultPartition -
* (wildcard) — For example,
Z*matches all rows starting with the letter Z.-
Wildcard is valid for text fields only, not valid for numeric or date fields.
-
Only use one wildcard per filter. Do not use with any other search operator.
-
-
For numeric fields, do not use a comma in your search (for example, use
5280instead of5,280). -
Null values will never match any filter.
Note:
The search is not case sensitive and you can only use one search operator at a time, so!Default*(which uses two operators) will return no results. -
-
Press Enter or click Refresh
 .
. -
To remove the filter: Delete the text, and then press Enter or click Refresh
.

Navigate the GUI with Keyboard
For accessibility purposes, you can use the following keyboard actions to navigate the GUI.
-
Tab traversal — All active elements of the page are accessible by tab traversal. Use the Tab key to move to the next control and Shift+Tab to move to the previous control. In most cases, when a control has focus, you can initiate the action by pressing Enter.
-
Arrow keys — Some complex components use arrow keys to navigate after the component receives focus using the Tab key.