Automate Media Validation Using Policies
Media validation policies automate validation by defining how STA selects media to test.
Based on the user-defined criteria for the policy, STA identifies media within the tape library system that should be validated. For each media selected, STA generates a validation request, which is submitted to the validation queue. As soon as a compatible drive becomes available, the validation starts. STA manages this activity automatically.
Depending on the number of media validation policies and how they are defined, validation could occur several times a day on a single piece of media. To prevent this, STA limits automated validations to one per day for each media. Once a validation request has been generated for a piece of media, STA will not generate any additional validation requests for it that day.
Create, Copy, or Modify a Media Validation Policy
The Media Validation Policy wizard leads you through the steps to define all information for the policy. You can define multiple media validation policies.
-
You must have Administrator privileges to create or modify policies. You must have Operator or Administrator privileges to view the list of policies.
-
In the left navigation, expand Setup & Administration, then select Media Validation.
-
The defined policies are listed in the Media Validation Policies section.
-
Use the toolbar to:
-
Create a new policy: click New Media Validation Policy
 .
. -
Copy a policy: select a policy in the list, and then click Copy Policy
 .
. -
Modify a policy: select a policy in the list, and then click Edit Policy
 .
. -
Delete a policy: select a policy in the list, and then click Delete Policy
 . You do not need to disable a media validation policy before deleting it.
-
-
Use the wizard to configure the policy. Proceed to Media Validation Policy Wizard.
Media Validation Policy Wizard
The wizard appears whenever you create, modify, or copy a media validation policy. Use the wizard to define the media validation policy.
Note:
On any screen of the wizard, select the breadcrumb links to go to any screen you have already visited.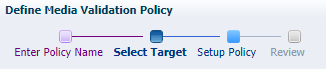
-
To access the wizard, complete the steps in Create, Copy, or Modify a Media Validation Policy.
-
On the Policy Name screen of the wizard, enter:
-
Policy Name — A unique name using any alphanumeric characters up to 250 characters in length, such as "MV-Lib2-Complete-Verify". All sample alert policies beginning with "STA," so you should not start with this prefix.
-
Policy Description (optional) — Use this information to describe what the policy does, such as "Selects T10K media that have Action health and performs a Complete Verify".
-
-
On the Select Target screen of the wizard, select either:
-
Select media format and optional library complex — Select this if you want this policy to validate media using a specific recording format. Then select:
-
Media Format — The media recording formats you want this policy to validate. Select as many formats as you want.
-
Library Complex — If you select None, the policy will validate the specified media types across all complexes. If you select a library complex, the policy will validate only media within that complex.
-
-
Select logical group — Select this if you want this policy to validate media in a specific predefined logical group.
-
Logical Groups — Select a logical group that includes T10000 media in SL8500 or SL3000libraries with validation drives, as STA does not verify this for you. If you select a logical group that includes both media and drives, the policy applies to the media only and does not affect the drives.
-
-
-
On the Setup Policy screen of the wizard, select:
-
Policy Criteria — Select an option from the drop-down menu:
-
Random Selection – Randomly selects media for validation whenever a validation drive in the standalone library or library complex is available.
-
Media Health = Action – Selects media that have had a specified number of successive exchanges resulting in an Exchange Media Health of Action. You can specify from one to five exchanges.
-
Media Health = Evaluate – Selects media that have had a specified number of successive exchanges resulting in an Exchange Media Health of Evaluate. You can specify from one to five exchanges.
-
Media Health = Monitor – Selects media that have had a specified number of successive exchanges resulting in an Exchange Media Health of Monitor. You can specify from one to five exchanges.
-
Extended Period of non-use – Selects media that have not had an exchange for a specified number of days. You can specify from 365 to 1,095 days (one to three years).
-
Newly Entered – Selects media that have recently been entered into the library.
-
Bad MIR Detected – Selects media with an exchange resulting in a Bad MIR Detected error. A bad media information record (MIR) indicates degraded high-speed access on the media.
-
Days since last validation - Selects media that have not been validated for the specified number of days. You can specify from 365 to 1,095 days.
-
-
Validation Test Type — select the type of verification test you want the drive to perform. See Types of Media Validation Tests. If you select Complete Verify or Complete Verify Plus, you must also select one of the following options.
-
Perform validations from beginning of tape – Testing of all T10000T2 media will start from the beginning of tape (BOT), even if the media has already been partially validated.
-
Continue validations from last known validated data point – Resumes T10000T2 media that has been partially validated, if the drive can determine this from the media RFID chip. If the drive cannot determine where the previous validation left off, it will start from the beginning of tape (BOT).
See Resume Validations on T10000T2 Media for details on these options.
-
-
-
On the Review screen:
-
Verify that all the policy information is correct.
-
Use the Enable Alert Policy checkbox as follows:
-
Select the check box to create the policy and enable it immediately.
-
Deselect the check box to create the policy but leave it disabled for now.
-
-
-
Click Save.
Enable or Disable a Media Validation Policy
Control the generation of automated media validation requests by enabling or disabling media validation policies.
-
You must have Administrator privileges.
-
In the left navigation, expand Setup & Administration, select Media Validation.
-
Select the policy you want to modify. Click Enable Media Validation Policy
 or Disable Media Validation Policy
  , as applicable.
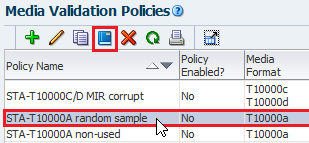
-
The policy is updated according to your selection.
-
If enabled, STA immediately begins evaluating media against the policy criteria and generating media validation requests.
-
If disabled, STA no longer generates media validation requests for the policy. Any pending or in-progress media validation requests are processed to completion unless you cancel them. See Cancel In-Progress or Pending Media Validation Requests.
-
Identify Media Eligible for Automated Validation
Media must have a minimum history to be used for policy-driven validation.
Note:
If you have enabled drive calibration, any media in the calibration media logical group will be automatically exclude from all validation policies.A minimum history means that the media must have values for the following:
-
Exchange Recording Technique
-
Media Suspicion Level
-
MB Written
If you want STA to validate media that does not have this history, you should manually initiate a Basic Verify. See Submit Manual Media Validation Requests.