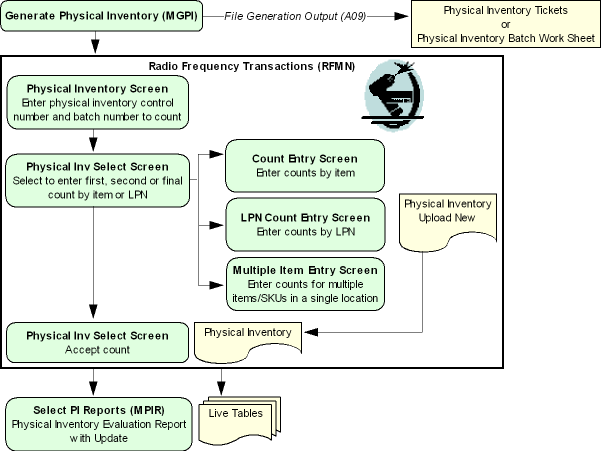
RF Physical Inventory allows you to use an RF gun to enter physical inventory counts in the Radio Frequency Transactions (RFMN) menu option. As you enter the count, the system creates records in the Physical Inventory Upload New table. When you accept a count, the system uploads the records from the Physical Inventory Upload New table to the Physical Inventory table. When you print the Physical Inventory Evaluation report with Update, the system completes the physical inventory and updates the live tables.
RF Physical Inventory Illustration:
In this topic:
• RF Physical Inventory Process
• Selecting the RF Physical Inventory Batch to Count
• Physical Inventory Screen Errors
• Counting an RF Physical Inventory by Item or LPN
• Physical Inv Select Screen Errors
• Entering RF Physical Inventory Counts by Item
• Entering RF Physical Inventory Counts by LPN
• LPN Count Entry Screen Errors
• Entering RF Physical Inventory Counts by Multiple Item
In order to use RF Physical Inventory, the Upload Counts (A12) system control value must be unselected.
If the Default Item in RF Physical (K67) system control value is selected, the system defaults the item and SKU for a location when you scan the location barcode on the Count Entry Screen in RF Physical Inventory; otherwise, you will need to scan the short SKU or UPC barcode or manually enter the item information.
Entering RF Physical Inventory Counts by Multiple Item is available only if the Batch Grouping (L64) system control value is set to LOCATION; if this system control value is set to ITEM/LOC, you must enter RF physical inventory counts by item or LPN.
In addition, the setting of the Entry Method (A01) and File Generation Output (A09) system control values control how RF physical inventories are processed.
Entry Method |
File Generation Output |
Result |
SHEET (recommended setting) |
SHEET, LOCATION or AISLE |
The system prints the Physical Inventory Batch Work Sheet to aid in the physical inventory count. You can enter counts using an RF gun or the Entering Physical Counts by Worksheets (MPIE) menu option. |
TICKETS |
TICKETS |
The system prints Physical Inventory Tickets to aid in the physical inventory count. You can enter counts using an RF gun or the Entering Physical Counts by Tickets (MPIE) menu option. |
See the Physical Inventory Values (C15) umbrella system control value for more information on the values required to perform a physical inventory.
Items with special characters: RF Physical Inventory does not accept items whose item code begins with as asterisk.
Use the following steps to complete an RF Physical Inventory.
1. |
Complete all processes that affect inventory. For example, complete all inventory receipts, inventory transactions, suspense placements, shipment confirmation and billing. Alternatively, you can void outstanding pick slips and cancel outstanding batch inventory transactions, work orders, and replenishments. |
2. |
Use the Generating a Physical Inventory (MGPI) menu option to generate the physical inventory. • If the File Generation Output (A09) system control value is set to TICKETS, the system prints Physical Inventory Tickets to aid in the physical inventory count. • If the File Generation Output (A09) system control value is set to SHEET, LOCATION, or AISLE, the system prints the Physical Inventory Batch Work Sheet to aid in the physical inventory count. |
3. |
Use an RF gun to enter a first count for each item location. • On the Physical Inventory Screen, enter the physical inventory control number and batch number to count. • On the Physical Inv Select Screen, select to count by LPN, item or multiple item. • If you select to count by LPN, enter the count for each LPN using the LPN Location Screen and LPN Count Entry Screen. • If you select to count by item, enter the count for each item on the Count Entry Screen. • If you select to count by multiple item, enter the count for each item/SKU in a specified warehouse and location on the Multiple Item Scan Screen. Note: Entering RF physical inventory counts by multiple item is available only if the Batch Grouping (L64) system control value is set to LOCATION. • When you have completed the first count, accept the count on the Physical Inv Select Screen. Note: You can also use the Enter Physical Counts (MPIE) menu option to enter the first, second, or final counts; however, you cannot enter the same count for a physical inventory control number/batch number using both an RF gun and the Enter Physical Counts (MPIE) menu option. |
4. |
Print the Physical Evaluation Variance Report by Unit Variance to analyze the results of the first count without processing the update. See Printing Physical Inventory Reports (MPIR). Note: This report does not include counts entered in RF physical inventory until you accept the count to upload the records from the Physical Inventory Upload New table to the Physical Inventory table. You can use the Pending RF Physical Inventory Batches Report to review physical inventory batches that exist in the Physical Inventory Upload New table. |
5. |
Optionally, generate batch sheets or tickets for the second count. See Reprinting Batch Sheets or Tickets (RPIF). |
6. |
Repeat step 3 to enter a second count. |
7. |
Print the Physical Evaluation Variance Report by Unit Variance to analyze the results of the second count without processing the update. In addition, print the Compare Physical Inventory Counts by Batch Report or Compare Physical Count Tickets Report to analyze the differences between the first and second counts. Note: These reports do not include counts entered in RF physical inventory until you accept the count to upload the records from the Physical Inventory Upload New table to the Physical Inventory table. You can use the Pending RF Physical Inventory Batches Report to review physical inventory batches that exist in the Physical Inventory Upload New table. |
8. |
Optionally, generate batch sheets or tickets for the final count. See Reprinting Batch Sheets or Tickets (RPIF). |
9. |
Repeat step 3 to enter a final count. |
10. |
Print the Physical Evaluation Variance Report by Unit Variance to analyze the results of the final count without processing the update. |
11. |
Print the Physical Inventory Evaluation report with Update when the physical inventory is complete and you want to update the on-hand inventory with counted quantities. See Printing the Physical Inventory Evaluation Variance Report with Update. |
Unlocking a physical inventory batch: If the physical inventory count process is interrupted by an unexpected browser session end, you can unlock the physical inventory batch using the Unlocking a Physical Inventory Batch (MUPB) menu option. Once you unlock a physical inventory batch, you can continue where you left off in the inventory verification process when the unexpected session end occurred.
Canceling an RF physical inventory: You can use the Canceling a Physical Inventory (CPHI) menu option to cancel a physical inventory. When you cancel an RF physical inventory, the system removes the records for the physical inventory from the Physical Inventory Upload New table and Physical Inventory table.
For more information: See:
• Physical Inventory Overview for an overview of the physical inventory process.
• Updating CWSerenade with Physical Inventory Counts for the updates that take place when you run the Physical Inventory Evaluation Report with Update under Printing Physical Inventory Reports (MPIR).
• Generating a Physical Inventory (MGPI) for more information on how to generate a physical inventory.
• Printing the Physical Inventory Evaluation Variance Report with Update for more information on completing a physical inventory.
Selecting the RF Physical Inventory Batch to Count
Purpose: Use the Physical Inventory screen to enter the physical inventory control number and batch number to count.
Access to the first, second, and final counts is controlled by secured features:
• Physical Inventory First Count Entry (A58)
• Physical Inventory Second Count Entry (A59)
• Physical Inventory Final Count Entry (A02)
You must enter the counts in the correct sequence, and you cannot enter first or second counts once you have accepted the count; you must advance to the next count. For the second and final counts, you do not have to enter counts for every item location more than once. The system uses the most recently entered count for each item location when you process the physical inventory update.
How to display this screen: Select option 5. Physical Inventory and select OK or press Enter at the RF MAIN MENU Screen; see RF Screen Layout.
Cursor placement: When you first advance to this screen, the system places the cursor in the Ctl field.
Audible beep: If you have configured the RF gun to emit an audible beep for certain RF actions, the gun emits a high-pitched single beep when you first advance to the Physical Inventory screen, indicating the screen is ready to continue.
Completing the Physical Inventory Screen
Use the following steps the select the physical inventory batch you wish to count.
1. Optionally, enter the company associated with the physical inventory in the Cmp field. The code for the company you are currently in defaults, but you can override it.
2. Enter the control number for the physical inventory batch in the Ctl field.
3. Enter the batch number for the physical inventory in the Btch field.
4. Enter the count you wish to enter in the Cnt field.
5. Select OK or press Enter to validate your entries; see Physical Inventory Screen Errors for a list of errors. If configured, the system emits a medium-pitched double beep to notify the user that confirmation is required; Configuring the RF Gun to Beep for RF Actions.
6. Select OK or press Enter again to advance to the Physical Inv Select Screen, where you can select to count by item, LPN, or multiple item. The system updates the Status of the Physical Inventory Batch to L (locked) so that another user cannot enter counts at the same time for the same control number and batch.
Field |
Description |
|
Company |
A code for the company associated with the physical inventory batch. The code for the company you are currently in defaults, but you can override it. Company codes are defined in and validated against the Company table. Numeric, 3 positions; required. |
|
Control number |
The control number assigned to the physical inventory batch you are counting. Physical inventory control numbers are validated against the Physical Inventory Batch table. Numeric, 3 positions; required. |
|
Batch number |
The number assigned to the physical inventory batch for which you are entering count information. Even if you do not use batching (the Assign Batch Numbers (A07) system control value is unselected), the system assigns batch number 1 to the physical inventory. Physical inventory batch numbers are validated against the Physical Inventory Batch table. Numeric, 5 positions; required. |
|
Count |
The count you wish to enter for the physical inventory. Valid values are: • 1 = Enter the first count. • 2 = Enter the second count. • 3 = Enter the final count. You must enter the counts in the correct sequence (1, then 2, then 3), and you cannot enter first or second counts once you have accepted the count; you must advance to the next count. Access to the first, second, and final counts is controlled by secured features: • Physical Inventory First Count Entry (A58) • Physical Inventory Second Count Entry (A59) • Physical Inventory Final Count Entry (A02) You cannot enter a count that is currently being counted by another RF user or in the Enter Physical Counts (MPIE) menu option. Numeric, 1 position; required. |
Screen Option |
Procedure |
Continue with count entry |
Enter the count you wish to enter in the Cnt field and select OK or press Enter to advance to the Physical Inv Select Screen, where you can select to count by item, LPN, or multiple item. The system updates the Status of the Physical Inventory Batch to L (locked) so that another user cannot enter counts at the same time for the same control number and batch. |
Clear the information from the screen and restore the defaults |
Select Clr or press F8. |
Exit the screen |
Select Exit or press F3. |
Physical Inventory Screen Errors
If configured, the RF gun emits a low pitched triple beep when an error occurs on the Physical Inventory screen that requires user intervention; see Configuring the RF Gun to Beep for RF Actions.
Error Message |
Cause |
Invalid Cmp |
The Cmp field is blank or contains an invalid company number. |
Ctl # required |
You did not enter a control number for the physical inventory batch in the Ctl field. |
Btch # required |
You did not enter a batch number for the physical inventory batch in the Btch field. |
Invalid Ctl\Btch # |
The control number and batch number you entered for the physical inventory in the Ctl and Btch fields does not exist in the Physical Inventory Batch table. |
Invalid count |
The count you entered in the Cnt field is invalid. Valid values are 1, 2, and 3. |
Count required |
You did not specify the count you wish to enter in the Cnt field. |
Not auth count 1 |
You selected to enter a first count and you do not have authority to the Physical Inventory First Count Entry (A58) secured feature. |
Not auth count 2 |
You selected to enter a second count and you do not have authority to the Physical Inventory Second Count Entry (A59) secured feature. |
Not auth count 3 |
You selected to enter a final count and you do not have authority to the Physical Inventory Final Count Entry (A02) secured feature. |
Count 2 entered |
You selected to enter a second count and the first count has not yet been entered. |
Count 3 entered |
You selected to enter a final count and the first or second count has not yet been entered. |
Count 1 not entered |
The first count has not been entered for the batch or has been started in Enter Physical Counts (MPIE) but not yet accepted. |
Count 2 required |
You selected to enter a final count, the second count has not yet been entered for the batch, and the Number of Counts Required per Physical (A13) system control value is set to 2. |
Count 1 complete |
The first count has already been accepted and uploaded from the Physical Inventory Upload New table to the Physical Inventory table. Accepting the count closes it off from further entry. In order to enter or correct item location or LPN counts; you must enter the second count instead. |
Count 2 complete |
The second count has already been accepted and uploaded from the Physical Inventory Upload New table to the Physical Inventory table. Accepting the count closes it off from further entry. In order to enter or correct item location or LPN counts; you must enter the final count instead. |
Cnt 1 in progress |
The first count is being counted in the Enter Physical Counts (MPIE) menu option. |
Cnt 2 in progress |
The second count is being counted in the Enter Physical Counts (MPIE) menu option. |
Cnt 3 in progress |
The final count is being counted in the Enter Physical Counts (MPIE) menu option or has already been accepted. |
Batch locked |
The control number and batch number entered is being worked on by another user either in RF Physical Inventory or in the Enter Physical Counts (MPIE) menu option. When a user works on a physical inventory batch, the system updates the Status field in the Physical Inventory Batch table to L (locked). The system updates this field to O (open) once the control number and batch number are not longer being worked on. |
Counting an RF Physical Inventory by Item or LPN
Purpose: Use the Physical Inv Select screen to:
• Select whether you wish to count a physical inventory batch by item or LPN.
LPN count allows you to count the number of units of an item associated with an LPN that are in a location. The system creates or updates an LPN based on the information you enter on the LPN Location Screen and LPN Count Entry Screen.
Item count allows you to count the number of units of an item in a location. Counting by item, rather than by LPN, is useful if stock exists in a location that is not currently associated with an LPN; for example, if the items were in your warehouse before you began assigning LPNs or if the items are in a primary location and their LPNs were deleted.
There are two types of item count:
• Use Regular count if you typically store a single item/SKU in a location. The Count Entry Screen allows you to scan a location, scan an item/SKU using the short SKU barcode or UPC barcode, and enter a count for the item/SKU in the location. The system updates the count in the Physical Inventory Upload New table when you select OK or press Enter.
• Use Multiple item count if you typically store more than one item/SKU in a location. The Multiple Item Entry Screen allows you to scan a location and advance to the Multiple Item Scan Screen where you can scan an item/SKU using the short SKU barcode or UPC barcode. The system enters a count for a quantity of one for the item/SKU in the location. Continue to scan the short SKU barcode or UPC barcode to increment the count for the item/SKU and location until the correct count is reached. The system updates the count in the Physical Inventory Upload New table when you select OK or press Enter. Note: Entering RF physical inventory counts by multiple item is available only if the Batch Grouping (L64) system control value is set to LOCATION.
• Accept the count for a physical inventory batch. Authority to accept a count is controlled by these secured features:
• Physical Inventory First Count Accept (A61)
• Physical Inventory Second Count Accept (A62)
• Physical Inventory Final Count Accept (A63)
Unlocking a physical inventory batch: If the physical inventory count process is interrupted by an unexpected browser session end, you can unlock the physical inventory batch using the Unlocking a Physical Inventory Batch (MUPB) menu option. Once you unlock a physical inventory batch, you can continue where you left off in the inventory verification process when the unexpected session end occurred.
How to display this screen: Complete the Physical Inventory Screen and select OK or press Enter; see RF Screen Layout.
Cursor placement: When you first advance to this screen, the system places the cursor in the Option field.
Identifying the physical inventory and count: The line below the screen title indicates the control number for the physical inventory and the batch number for which you are entering counts, and whether the count is the first, second, or final count. For example: #1-2 1st Count indicates you selected control number 1 for the physical inventory, you are entering counts for batch number 2, and the counts are for the first count.
Completing the Physical Inv Select Screen
Use the following steps to enter a count for a physical inventory batch and accept the count once entry is complete.
1. |
Specify whether you wish to enter counts by item, LPN or multiple item. • Enter 1 in the Option field and select OK or press Enter to enter counts by item. The system validates your entry. Select OK or press Enter again to advance to the Count Entry Screen. • Enter 2 in the Option field and select OK or press Enter to enter counts by LPN. The system validates your entry. Select OK or press Enter again to advance to the LPN Location Screen. • Enter 3 in the Option field and select OK or press Enter to enter counts by multiple item. The system validates your entry. Select OK or press Enter again to advance to the Multiple Item Entry Screen. Note: Entering RF physical inventory counts by multiple item is available only if the Batch Grouping (L64) system control value is set to LOCATION. |
2. |
Once you have completed entry for a count, you can accept it. • Enter 4 in the Option field and select OK or press Enter to validate your entry. Select OK or press Enter again to accept the count. • The system displays the message PI_UPLD Submitted at the bottom of the screen. This job transfers the records for the count from the Physical Inventory Upload New table to the Physical Inventory table. • Any records in the Physical Inventory Upload New table that are in error are removed from the table and print on the Physical Inventory Scan Errors Report when you accept the physical inventory count. Accepting the count closes it off from further entry. For example, when you accept a first count, you can no longer enter or correct item location or LPN counts for the first count; you must enter a second or final count instead. Note: If you enter a count for an item location using both item entry and LPN entry, the system creates a separate record for each entry in the Physical Inventory Upload New table; when you process the physical inventory, the system adds the count for the two records together. For example, if you enter a count of 2 using item entry and a count of 1 using LPN entry for item ABC in location C010101, the system records the physical count for item ABC in location C010101 as 3. |
Screen Option |
Procedure |
Enter counts by item |
Enter 1 in the Option field and select OK or press Enter to advance to the Count Entry Screen. |
Enter counts by LPN |
Enter 2 in the Option field and select OK or press Enter to advance to the LPN Location Screen. |
Enter counts by multiple item |
Enter 3 in the Option field and select OK or press Enter to advance to the Multiple Item Entry Screen. Note: Entering RF physical inventory counts by multiple item is available only if the Batch Grouping (L64) system control value is set to LOCATION. |
Accept a count |
Enter 4 in the Option field and select OK or press Enter to accept the physical inventory count. The system transfers the records for the count from the Physical Inventory Upload New table to the Physical Inventory table. Any records in the Physical Inventory Upload New table that are in error are removed from the table and print on the Physical Inventory Scan Errors Report when you accept the physical inventory count. See Printing the Physical Inventory Evaluation Variance Report with Update for more information on completing a physical inventory and see Updating CWSerenade with Physical Inventory Counts for the updates that take place when you run the Physical Inventory Evaluation Report with Update under Printing Physical Inventory Reports (MPIR). |
Physical Inv Select Screen Errors
Error Message |
Cause |
Not Auth To Accept |
You do not have authority to the Physical Inventory First Count Accept (A61), Physical Inventory Second Count Accept (A62), or Physical Inventory Final Count Accept (A63) secured feature. |
Accept cnt 1 first |
You entered 4 (Accept Batch) in the Option field for count 2 and you have not yet accepted count 1. |
Accept cnt 2 first |
You entered 4 (Accept Batch) in the Option field for count 3 and you have not yet accepted count 2. |
Option Unavailable |
You entered 3 (Multiple Item Entry) in the Option field and the Batch Grouping (L64) system control value is set to ITEM/LOC instead of LOCATION. |
Entering RF Physical Inventory Counts by Item
Purpose: Use the Count Entry screen to enter counts for each item in a location in the selected physical inventory batch.
Counting by item, rather than by LPN, is useful if stock exists in a location that is not currently associated with an LPN; for example, if the items were in your warehouse before you began assigning LPNs or if the items are in a primary location and their LPNs were deleted.
When you enter a count for an item location, the system creates a record in the Physical Inventory Upload New table. The record remains in the Physical Inventory Upload New table until you accept the count.
For more information: See Printing the Physical Inventory Evaluation Variance Report with Update for more information on completing a physical inventory and see Updating CWSerenade with Physical Inventory Counts for the updates that take place when you run the Physical Inventory Evaluation Report with Update under Printing Physical Inventory Reports (MPIR).
How to display this screen: Enter 1 in the Option field and select OK or press Enter on the Physical Inv Select Screen; see RF Screen Layout.
Cursor placement: When you first advance to this screen, the system places the cursor in the Loc field.
Identifying the physical inventory and count: The line below the screen title indicates the control number for the physical inventory and the batch number for which you are entering counts, and whether the count is the first, second, or final count. For example: #1-2 1st Count indicates you selected control number 1 for the physical inventory, you are entering counts for batch number 2, and the counts are for the first count.
Completing the Count Entry Screen
Use the following steps to enter counts for each item location in the selected physical inventory batch. In addition, if the Create Location/Item Location/Item Warehouse from PI Upload (F09) system control value is selected, you can add an item location count to the physical inventory batch.
1. |
Scan the location barcode on the RF Bin Location Label or manually complete the Warehouse and Location fields. To scan the location barcode on the Bin Location label correctly, the cursor on the screen must be in the Location field. |
2. |
If the Default Item in RF Physical (K67) system control value is selected, the system defaults the item and SKU for the scanned location; otherwise, you will need to continue to the next step to scan or enter the item and SKU to count. Note: If more than one item exists in a location, the system defaults the first item in alphanumeric order that has not yet been counted. When the system defaults the item and SKU, the system advances the cursor to the Qty field; if the system does not default an item and SKU, the system advances the cursor to the SS or UPC field. |
3. |
The setting of the Default Scan Type for RF Receiving and PI (K68) system control value controls whether you can scan the short SKU barcode or UPC barcode to default the item and SKU. • If set to blank or SHORTSKU, the system displays the SS field where you can scan the short SKU barcode on the RF Item Label or manually complete the SS field to default the associated item and SKU to the Itm and SKU fields. • If set to UPC08, UPC12, UPC13, or UPC14, the system displays the UPC field where you can scan the UPC barcode or manually complete the UPC field to default the associated item and SKU to the Itm and SKU fields. The setting also indicates the length of the UPC barcode that can be scanned. Note: Include any leading zeros. For example, if the UPC code is 06012011, enter 06012011 and not 6012011. • Optionally, you can manually enter the item and SKU in the Itm and SKU fields. Note: If you enter a value in the SS or UPC field and the Itm and SKU fields, the value in the SS or UPC field takes precedence. Once you define an item and SKU, the system advances the cursor to the Qty field. |
4. |
Enter the number of units of the item found in the location in the Qty field. If the count is zero, enter 0 if this is the first time you are counting the item location. If you leave the Qty field blank and select OK or press Enter, the system records the count as zero. You cannot enter a negative quantity. Note: If you did not complete count entry for the previous record, the system retains the last quantity entered. |
5. |
Select OK or press Enter to validate your change. See Count Entry Screen Errors for a list of errors you can receive on the Count Entry Screen. • If the item location already exists in the physical inventory batch, select OK or press Enter again to update the count in the Physical Inventory Upload New table. • If the item location does not already exist in the physical inventory batch, select Crt to create it. Note: The Crt option is available only if the Create Location/Item Location/Item Warehouse from PI Upload (F09) system control value is selected. The system displays the message Record created and creates a new record in the Physical Inventory Upload New table for the specified physical inventory control number and batch. In addition, if the item location and item warehouse records do not already exist, the system creates them. Note: If you enter another count for this physical inventory batch, the new record will be available to count; you will not need to recreate it. |
You can enter a count for another item location or exit the screen to return to the Physical Inv Select Screen where you can select to enter counts by LPN or accept the count.
Note: If you do not accept the count, the batch will remain open for further entry.
Field |
Description |
|
unlabeled field to the left of the Loc field |
A code for the warehouse where the physical inventory is being performed. Warehouse codes are defined in and validated against the Warehouse table. Warehouse Default The warehouse code associated with the physical inventory batch you selected defaults, but you can override it. If the physical inventory batch is associated with more than one warehouse, the first warehouse in numeric order defaults. Numeric, 3 positions; required. |
|
Location |
The code for the location where the item is being counted. Location codes are defined in and validated against the Location table. The location must be a valid location for the specified warehouse. The location must be a valid location for the specified item. Scanning the Location Barcode on the Bin Location Label To scan the bin location barcode on the RF Bin Location Label correctly, the cursor on the screen must be in the Loc field. Alphanumeric, 7 positions; required. |
|
Short SKU |
The short SKU code for the item in the location being counted. Short SKU codes are defined in and validated against the SKU table. This field displays only if the Default Scan Type for RF Receiving and PI (K68) system control value is set to blank or SHORTSKU. Scanning the Short SKU Barcode on the Item Label To scan the short SKU barcode on the RF Item Label correctly, the cursor on the screen must be in the SS field. Numeric, 7 positions; optional. |
The UPC code for the item in the location being counted. UPC codes are defined in and validated against the Item UPC table; see Work with UPC Codes Screen. This field displays only if the Default Scan Type for RF Receiving and PI (K68) system control value is set to UPC08, UPC12, UPC13 or UPC14. • If set to UPC08, the UPC scanned cannot be greater than 8 positions. • If set to UPC12, the UPC scanned cannot be greater than 12 positions. • If set to UPC13, the UPC scanned cannot be greater than 13 positions. • If set to UPC14, the UPC scanned cannot be greater than 14 positions. Scanning the UPC Barcode To scan the UPC barcode correctly, the cursor on the screen must be in the UPC field. Note: Include any leading zeros. For example, if the UPC code is 06012011, enter 06012011 and not 6012011. Alphanumeric, 14 positions; optional. |
|
|
Item |
The code for the item in the location being counted. Item codes are defined in and validated against the Item table. The item cannot be flagged as a non-inventory item. Numeric, 12 positions; required if Short SKU or UPC is not entered. |
A code for the SKU of the item. SKU codes are defined in and validated against the SKU table. Alphanumeric, three 4 position fields; required if the item contains SKUs. |
|
The number of units of the item found in the location. If you have previously entered a count for an item location in this batch but have not yet accepted the batch, the previously entered count defaults. You can override any previously entered item location counts at this screen. If you enter a zero count, the system updates the item location count to zero when you complete the physical inventory. Unless this is a primary location, the system deletes the item location record at this time as well. Numeric, 7 positions; required. |
Screen Option |
Procedure |
Enter a count for an item location |
See Completing the Count Entry Screen for instructions. |
Create a new record in the physical batch for a specified item location |
Select Crt to create the item location count in the physical. In addition, if the item location and item warehouse records do not already exist, the system creates them. This option is available only if the Create Location/Item Location/Item Warehouse from PI Upload (F09) system control value is selected. See Completing the Count Entry Screen for instructions. |
Clear the information from the screen and restore the defaults |
Select Clr or press F8. |
Exit the screen without entering a count for an item location |
Select Exit or press F3. |
Error Message |
Cause |
Warehouse required |
The Warehouse field is blank. |
Invalid warehouse |
The warehouse code in the Warehouse field is an invalid warehouse. |
Whs not in batch |
The warehouse code in the Warehouse field is not part of the physical inventory batch. |
Location required |
The Loc field is blank. |
Invalid location |
The location code in the Loc field is an invalid location for the specified warehouse. |
Loc not in batch |
The location entered is a valid location for the specified warehouse, but the location does not exist in the physical inventory batch. Verify that you have selected to count the correct physical inventory control number and batch number. If the Create Location/Item Location/Item Warehouse from PI Upload (F09) system control value is selected, you can select Crt to create the item location in the batch; see Completing the Count Entry Screen. |
Item Required |
The Itm field is blank and you selected to create a new item location count. |
Invalid short SKU |
The short SKU code in the SS field is an invalid short SKU code. |
Invalid UPC |
The UPC code in the UPC field is an invalid UPC code. The system validates the UPC code based on the setting of the Default Scan Type for RF Receiving and PI (K68) system control value. |
Invalid item |
The item code in the Itm field is an invalid item code. |
Invalid SKU |
The SKU code in the SKU field is an invalid SKU for the specified item. |
Invalid item loc |
An item location record does not exist for the item and location specified. If the Create Location/Item Location/Item Warehouse from PI Upload (F09) system control value is selected, you can select Crt to create the item location in the batch; see Completing the Count Entry Screen. |
Item not in batch |
The item location entered is a valid item location, but the item does not exist in the physical inventory batch. Verify that you have selected to count the correct physical inventory control number and batch number. If the Create Location/Item Location/Item Warehouse from PI Upload (F09) system control value is selected, you can select Crt to create the item location in the batch; see Completing the Count Entry Screen. |
Item is non-inv |
The item is flagged as a non-inventory item. |
Qty required |
The Qty field is blank and you selected to create a new item location count. |
Record exists |
You selected to create an item location that already exists in the Physical Inventory Upload New table for the physical inventory batch. |
Itm\Loc other batch |
The item and location you wish to create in the physical inventory batch already exists in another batch that is part of the physical inventory. Enter a count for this item location in the other batch. |
Qty negative |
You cannot enter a negative quantity in the Qty field. |
Entering RF Physical Inventory Counts by LPN
Use the LPN Location Screen and LPN Count Entry Screen to count the number of units of an item associated with an LPN that are in a location.
When you enter a count by LPN, the system creates a record in the Physical Inventory Upload New table. The record remains in the Physical Inventory Upload New table until you accept the count and move the records to the Physical Inventory table.
LPN Updates
When you complete the physical inventory, the system creates or updates an LPN based on the LPN number, warehouse, location, and quantity you define.
• If the LPN is counted in a location that differs from the location in which the system thinks it exists, the system adds the LPN to the location being counted and adjusts the quantity in the old item location by summing the remaining LPNs associated with that item location.
• If the count for an LPN is 0, the system deletes the LPN. If all LPNs for an item location are deleted and the on hand quantity is 0, the system also deletes the item location.
• If an item location record does not already exist for the entered LPN information, the system creates it as long as the count is greater than 0.
• When you update the item location for an LPN:
• If the location is an intransit location, the system updates the LPN’s status to I (Intransit).
• If the location is not an intransit location, the system updates the LPN’s status to A (Active).
Note:
• In order to create an LPN record, Item Location record, and/or Item Warehouse record when entering RF physical inventory counts by LPN, the Create Location/Item Location/Item Warehouse from PI Upload (F09) system control value must be selected.
• The system allows you to change the warehouse/location defined for an LPN, but not the item/SKU.
• If you count the same LPN record in more than one item location, the count is entered for the last item location record processed.
• If you create a new LPN record or change the quantity on an existing LPN for an item location that prints on the Unprocessed Physical Inventory Records Report due to an item location error, the system will still process the LPN physical inventory transaction even though the item location physical inventory transaction failed. This may cause a discrepancy in your inventory.
Physical Evaluation Variance report: When you generate one of the Physical Evaluation Variance reports, the report indicates when an LPN has been created or its location has changed. See Printing Physical Inventory Reports (MPIR).
LPN creation history: When an LPN is created, the system also creates a record in the LPN Creation History table, providing details of the LPN: LPN number, associated PO number (if any), LPN quantity, date and time created, item/SKU, warehouse, location, user ID, and the program that created the LPN.
For more information: See Printing the Physical Inventory Evaluation Variance Report with Update for more information on completing a physical inventory and see Updating CWSerenade with Physical Inventory Counts for the updates that take place when you run the Physical Inventory Evaluation Report with Update under Printing Physical Inventory Reports (MPIR).
LPN Update Examples
• Example: LPN is counted in the location where the system thinks it resides for a different quantity
• Example: LPN is counted in a location different from where the system thinks it resides
• Example: LPN is counted that does not exist in the License Plate table
• Example: LPN is not counted in the location where the system thinks it resides
Example: LPN is counted in the location where the system thinks it resides for a different quantity
LPN before physical:
LPN 412
Item PHY1
Qty 100
Whs/Location 100 BULK1
During the physical count for location BULK1, you scan LPN 412 and count 25 of item PHY1.
LPN after physical:
LPN 412
Item PHY1
Qty 25
Whs/Location 100 BULK1
When you complete the physical, the system:
• Increases the on-hand quantity in the item warehouse (100) and item location (BULK1) by the new count (25).
• Updates the LPN quantity in the License Plate table to the new count (25).
• Creates a P Physical inventory transaction history record for the new count (25).
Example: LPN is counted in a location different from where the system thinks it resides
LPN before physical:
LPN 412
Item PHY1
Qty 25
Whs/Location 100 BULK1
During the physical count for location BULK2, you scan LPN 412 and count 25 of item PHY1.
LPN after physical:
LPN 412
Item PHY1
Qty 25
Whs/Location 100 BULK2
When you complete the physical, the system:
• If you select to display LPN details when you run the Physical Evaluation Variance Report by Unit Variance, the message WHS/LOC CHANGED FROM 100/BULK1 prints on the variance report.
• Adds LPN 412 to the BULK2 location.
• Adjusts the on-hand quantity in the item warehouse (100) and item locations (BULK1 and BULK2) by the new count (subtracts 25 from BULK1 and adds 25 to BULK2).
• Updates the location for the LPN in the License Plate table by the new location (BULK2).
• Creates a P Physical inventory transaction history record for the count:
• -25 moved from item location BULK1.
• 25 moved to item location BULK2.
Example: LPN is counted that does not exist in the License Plate table
During the physical count for location BULK2, you scan LPN 414 and count 100 of item PHY2.
LPN after physical:
LPN 414
Item PHY2
Qty 100
Whs/Location 100 BULK2
When you complete the physical, the system:
• If you select to display LPN details when you run the Physical Evaluation Variance Report by Unit Variance, the message NEW LPN prints on the variance report.
• Creates a record in the Item Warehouse (100) and Item Location (BULK2) tables for item PHY2.
• Creates a record in the License Plate table for LPN 414.
• Creates a P Physical inventory transaction history record for 100 units of item PHY2 in location BULK2.
Example: LPN is not counted in the location where the system thinks it resides
LPN before physical:
LPN 413
Item PHY1
Qty 50
Whs/Location 100 BULK2
During the physical count for location BULK2, you do not enter a count for LPN 413.
When you complete the physical, the system:
• Removes LPN 413 from the License Plate table.
• Creates a P Physical inventory transaction history record for -50 units of item PHY1 moved from location BULK2.
Purpose: Use this screen to scan or enter the warehouse and location associated with the counts for the selected physical inventory batch.
How to display this screen: Enter 2 in the Option field and select OK or press Enter on the Physical Inv Select Screen; see RF Screen Layout.
Cursor placement: When you first advance to this screen, the system places the cursor in the Location field.
Identifying the physical inventory and count: The line below the screen title indicates the control number for the physical inventory and the batch number for which you are entering counts, and whether the count is the first, second, or final count. For example: #1-2 1st Count indicates you selected control number 1 for the physical inventory, you are entering counts for batch number 2, and the counts are for the first count.
Completing the LPN Location Screen
Use the following steps to define the warehouse and location associated with the counts for the selected physical inventory batch.
1. |
Scan the location barcode on the RF Bin Location Label or manually complete the Warehouse and Location fields. To scan the location barcode correctly, the cursor on the screen must be in the Location field. |
2. |
If you scanned the location barcode on the RF Bin Location Label, the system automatically advances you to the LPN Count Entry Screen. If you manually completed the warehouse and location fields, you must first select OK or press Enter before advancing to the LPN Count Entry Screen. See LPN Location Screen Errors for a list of errors you can receive on the LPN Location Screen. |
Field |
Description |
Warehouse unlabeled field to the left of the Loc field |
A code for the warehouse that contains the location associated with the physical inventory count. Warehouse codes are defined in and validated against the Warehouse table. The warehouse code you enter must be a valid warehouse in the physical inventory batch. Warehouse Default The first warehouse code defined for the physical inventory batch defaults; however, you can override it. Numeric, 3 positions; required. |
Loc Location |
The code for the location where the item is being counted. Location codes are defined in and validated against the Location table. The location code you enter must be a valid location in the physical inventory batch. Scanning the Location Barcode on the Bin Location Label To scan the bin location barcode on the RF Bin Location Label correctly, the cursor on the screen must be in the Loc field. Alphanumeric, 7 positions; required. |
Screen Option |
Procedure |
Specify the warehouse and location associated with the LPN count |
See Completing the LPN Location Screen for instructions. |
Clear the information from the screen and restore the defaults |
Select Clr or press F8. |
Exit the screen without entering a count for an LPN |
Select Exit or press F3. |
Error Message |
Cause |
Warehouse required |
The Warehouse field is blank. |
Invalid warehouse |
The warehouse code in the Warehouse field is an invalid warehouse. |
Whs not in batch |
The warehouse code in the Warehouse field is not part of the physical inventory batch. |
Location required |
The Loc field is blank. |
Invalid location |
The location code in the Loc field is an invalid location for the specified warehouse. |
Loc not in batch |
The location entered is a valid location for the specified warehouse, but the location does not exist in the physical inventory batch. Verify that you have selected to count the correct physical inventory control number and batch number. |
Location is primary |
You selected to create an LPN for a primary location. LPNs are not allowed in primary locations. |
Purpose: Use this screen to enter a count for the number of units of an item associated with an LPN in the specified location.
How to display this screen: Complete the LPN Location Screen; see RF Screen Layout.
Cursor placement: When you first advance to this screen, the system places the cursor in the Company field.
Identifying the physical inventory and count: The line below the screen title indicates the control number for the physical inventory and the batch number for which you are entering counts, and whether the count is the first, second, or final count. For example: #1-2 1st Count indicates you selected control number 1 for the physical inventory, you are entering counts for batch number 2, and the counts are for the first count.
Completing the LPN Count Entry Screen
Use the following steps to enter counts for each SKU in the selected physical inventory batch. In addition, if the Create Location/Item Location/Item Warehouse from PI Upload (F09) system control value is selected, the system allows you to create a new record in the physical inventory batch. The system also creates a new Item Location, Item Warehouse, or LPN record if it does not already exist.
1. |
Scan the LPN barcode on the RF LPN Label or manually complete the Company and LPN fields and select OK or press Enter. To scan the LPN barcode on the LPN label correctly, the cursor on the screen must be in the Company field. |
2. |
When you scan the LPN barcode or manually complete the Company and LPN fields: • If the LPN already exists in the License Plate table, the system: • Automatically populates the SS and Qty fields with the information defined for the LPN and advances the cursor to the Qty field. • If you have not previously entered a count for the LPN in this batch, the Qty defaults from the License Plate field. If you have previously entered a count for the LPN in this batch but have not yet accepted the batch, the previously entered count from the Physical Inventory Upload New table defaults. • You can retain the default LPN quantity or enter a new count in the Qty field. If the count is zero, enter 0 if this is the first time you are counting the LPN. You cannot enter a negative quantity. • If the LPN does not exist in the License Plate table, the system advances the cursor to the SS field. • Scan the item barcode or manually complete the SS field. To scan the item barcode correctly, the cursor on the screen must be in the SS field. The system advances the cursor to the Qty field. • Enter the number of units of the item for the LPN in the Qty field. If the count is zero, enter 0 if this is the first time you are counting the LPN. You cannot enter a negative quantity. |
3. |
Select OK or press Enter to validate your entry. See LPN Count Entry Screen Errors for a list of errors you can receive on the LPN Count Entry Screen. Select OK or press Enter again to update the count in the Physical Inventory Upload New table. If the LPN does not already exist in the physical inventory batch, the system creates a new record in the Physical Inventory Upload New table for the specified physical inventory control number and batch if the Create Location/Item Location/Item Warehouse from PI Upload (F09) system control value is selected. Note: If you enter another count for this physical inventory batch, the new record will not be available to count; you will need to recreate it. When you complete the physical inventory: • If the LPN record does not already exist in the License Plate table, or if the Item Location or Item Warehouse does not already exist, the system creates them if the Create Location/Item Location/Item Warehouse from PI Upload (F09) system control value is selected. • If the LPN is counted in a location that differs from the location in which the system thinks it exists, the system adds the LPN to the location being counted and adjusts the quantity in the old item location by summing the remaining LPNs associated with that item location. • If the count for an LPN is 0, the system deletes the LPN. If all LPNs for an item location are deleted and the on hand quantity is 0, the system also deletes the item location. • When you update the item location for an LPN: • If the location is an intransit location, the system updates the LPN’s status to I (Intransit). • If the location is not an intransit location, the system updates the LPN’s status to A (Active). See Printing the Physical Inventory Evaluation Variance Report with Update for more information on completing a physical inventory and see Updating CWSerenade with Physical Inventory Counts for the updates that take place when you run the Physical Inventory Evaluation Report with Update under Printing Physical Inventory Reports (MPIR). |
You can enter a count for another LPN or exit the screen to return to the LPN Location Screen where you can select to enter counts for another location.
Note: If you do not accept the count, the batch will remain open for further entry.
Field |
Description |
Warehouse unlabeled field to the left of the Loc field |
A code for the warehouse that contains the location associated with the physical inventory count. Warehouse Default The warehouse code specified on the LPN Location Screen defaults. Numeric, 3 positions; display-only. |
Loc Location |
The code for the location where the item is being counted. Location Default The location code specified on the LPN Location Screen defaults. Alphanumeric, 7 positions; display-only. |
Company unlabeled field to the left of the LPN field |
A code for the company where the physical inventory is being performed. The company code associated with the physical inventory batch you selected defaults, but you can override it. Company codes are defined in and validated against the Company table. Scanning the LPN Barcode on the LPN Label To scan the LPN barcode on the RF LPN Label correctly, the cursor on the screen must be in the Company field. Selecting a Different Company If you select a different company, the system validates that you have authority to the company and that the company is part of the physical inventory batch. Numeric, 3 positions; required. |
|
License plate number |
The LPN for the item location you wish to count. If the LPN is counted in a location that differs from the location in which the system thinks it exists, the system adds the LPN to the location being counted and adjusts the quantity in the old item location by summing the remaining LPNs associated with that item location. Numeric, 6 positions; required. |
The short SKU code for the SKU you wish to count. The SKU code defaults if you scan the LPN barcode on the RF LPN Label. Short SKU codes are defined in and validated against the SKU table. Numeric, 7 positions; required. |
|
The number of units of the item found in the location for the LPN. If the LPN exists in the License Plate table, and: • You have not previously entered a count for the LPN in this batch, the Qty defaults from the License Plate table. • You have previously entered a count for the LPN in this batch but have not yet accepted the batch, the previously entered count defaults. If the count for an LPN is 0, the system deletes the LPN. If all LPNs for an item location are deleted and the on hand quantity is 0, the system also deletes the item location. Numeric, 7 positions; required. |
Screen Option |
Procedure |
Enter a count for an LPN |
See Completing the LPN Count Entry Screen for instructions. |
Clear the information from the screen and restore the defaults |
Select Clr or press F8. |
Exit the screen without entering a count for an LPN |
Select Exit or press F3. |
Error Message |
Cause |
Invalid short SKU |
The short SKU code in the SS field is an invalid short SKU code. |
LPN has diff item |
The short SKU code entered in the SS field is not associated with the entered LPN. |
Invalid item loc |
An item location record does not exist for the item and location specified and the Create Location/Item Location/Item Warehouse from PI Upload (F09) system control value is not selected. |
Item not in batch |
The item location entered is a valid item location, but the item exists in a different physical inventory batch. Verify that you have selected to count the correct physical inventory control number and batch number. |
Item is non-inv |
The item is flagged as a non-inventory item. |
Qty required |
The Qty field is blank and you selected to create a new item location count. |
LPN required |
The LPN field is blank. |
LPN not found |
The LPN number in the LPN field does not exist in the physical inventory batch and the Create Location/Item Location/Item Warehouse from PI Upload (F09) system control value is not selected. |
Itm\Loc other batch |
The item and location you wish to create in the physical inventory batch already exists in another batch that is part of the physical inventory. Enter a count for this item location in the other batch. |
Qty negative |
You cannot enter a negative quantity in the Qty field. |
Entering RF Physical Inventory Counts by Multiple Item
Purpose: Use the Multiple Item Entry Screen and Multiple Item Scan Screen to enter counts for each item/SKU in a location in the selected physical inventory batch.
The Multiple Item Entry Screen allows you to scan a location and advance to the Multiple Item Scan Screen where you can scan an item/SKU using the short SKU barcode or UPC barcode. The system enters a count for a quantity of one for the item/SKU in the location. You can continue to scan the short SKU barcode or UPC barcode to increment the count for the item/SKU and location until the correct count is reached. The system updates the count in the Physical Inventory Upload New table when you select OK or press Enter.
Note: Entering RF physical inventory counts by multiple item is available only if the Batch Grouping (L64) system control value is set to LOCATION.
Counting by item, rather than by LPN, is useful if stock exists in a location that is not currently associated with an LPN; for example, if the items where in your warehouse before you began assigning LPNs or if the items are in a primary location and their LPNs were deleted.
When you enter a count for an item location, the system creates a record in the Physical Inventory Upload New table. The record remains in the Physical Inventory Upload New table until you accept the count.
How to display this screen: Enter 3 in the Option field and select OK or press Enter on the Physical Inv Select Screen; see RF Screen Layout.
Cursor placement: When you first advance to this screen, the system places the cursor in the Loc field.
Audible beep: If you have configured the RF gun to emit an audible beep for certain RF actions, the gun emits a high-pitched single beep when you first advance to the Multiple Item Entry screen, indicating the screen is ready to continue. See Configuring the RF Gun to Beep for RF Actions.
Identifying the physical inventory and count: The line below the screen title indicates the control number for the physical inventory and the batch number for which you are entering counts, and whether the count is the first, second, or final count. Example: #1-2 1st Count indicates you selected control number 1 for the physical inventory, you are entering counts for batch number 2, and the counts are for the first count.
Completing the Multiple Item Entry Screen
Use the following steps to scan the location barcode so that you can enter counts for each item in the location in the selected physical inventory batch.
1. |
Scan the location barcode on the RF Bin Location Label or manually complete the Warehouse and Location fields. To scan the location barcode on the Bin Location label correctly, the cursor on the screen must be in the Location field. The system validates that the warehouse and location are valid for the physical inventory batch. |
2. |
As soon as you enter a valid location, the system advances you to the Multiple Item Scan Screen. |
Field |
Description |
|
unlabeled field to the left of the Loc field |
A code for the warehouse where the physical inventory is being performed. Warehouse codes are defined in and validated against the Warehouse table. Warehouse Default The warehouse code associated with the physical inventory batch you selected defaults, but you can override it. If the physical inventory batch is associated with more than one warehouse, the first warehouse in numeric order defaults. Numeric, 3 positions; required. |
|
Location |
The code for the location where the item is being counted. Location codes are defined in and validated against the Location table. The location must be a valid location for the specified warehouse. Scanning the Location Barcode on the Bin Location Label To scan the bin location barcode on the RF Bin Location Label correctly, the cursor on the screen must be in the Loc field. Alphanumeric, 7 positions; required. |
Screen Option |
Procedure |
Scan the location barcode so that you can enter counts for each item in the location |
See Completing the Multiple Item Entry Screen for instructions. |
Clear the information from the screen and restore the defaults |
Select Clr or press F8. |
Exit the screen |
Select Exit or press F3. |
Multiple Item Entry Screen Errors
If configured, the RF gun emits a low pitched triple beep when an error occurs on the Multiple Item Entry screen that requires user intervention; see Configuring the RF Gun to Beep for RF Actions.
Error Message |
Cause |
Warehouse required |
The Warehouse field is blank. |
Invalid warehouse |
The warehouse code in the Warehouse field is an invalid warehouse. |
Whs not in batch |
The warehouse code in the Warehouse field is not part of the physical inventory batch. |
Location required |
The Loc field is blank. |
Invalid location |
The location code in the Loc field is an invalid location for the specified warehouse. |
Loc not in batch |
The location entered is a valid location for the specified warehouse, but the location does not exist in the physical inventory batch. Verify that you have selected to count the correct physical inventory control number and batch number. |
How to display this screen: Scan a location barcode on the Multiple Item Entry Screen.
Cursor placement: When you first advance to this screen, the system places the cursor in the SS or UPC field.
Audible beep: If you have configured the RF gun to emit an audible beep for certain RF actions, the gun emits a high-pitched single beep when you first advance to the Multiple Item Scan screen, indicating the screen is ready to continue.
Identifying the physical inventory and count: The line below the screen title indicates the control number for the physical inventory and the batch number for which you are entering counts, and whether the count is the first, second, or final count. Example: #1-2 1st Count indicates you selected control number 1 for the physical inventory, you are entering counts for batch number 2, and the counts are for the first count.
Identifying the location: The line above the SS or UPC field indicates the warehouse and location for which you are currently entering counts.
Completing the Multiple Item Scan Screen
Use the following steps to enter counts for each item in the location in the selected physical inventory batch.
1. |
The setting of the Default Scan Type for RF Receiving and PI (K68) system control value controls whether you can scan the short SKU barcode or UPC barcode to default the item and SKU. • If set to blank or SHORTSKU, the system displays the SS field where you can scan the short SKU barcode on the RF Item Label or manually complete the SS field to enter a count for the item/SKU. • If set to UPC08, UPC12, UPC13, or UPC14, the system displays the UPC field where you can scan the UPC barcode or manually complete the UPC field to enter a count for the item/SKU. Note: Include any leading zeros. For example, if the UPC code is 06012011, enter 06012011 and not 6012011. |
2. |
When you enter a valid value in the SS or UPC field, the system enters a count for a quantity of one for the item/SKU and location, and if configured, emits a high-pitched single beep when the count is complete, indicating the screen is ready to continue; see Configuring the RF Gun to Beep for RF Actions. Continue to scan the RF Item label or UPC label until the correct count quantity is reached. The Count/Loc field displays the number of units that have been scanned for the specified warehouse and location, across all items/SKUs. Each time you scan an item/SKU in the specified warehouse and location, this number increments by one. If the item does not already exist in the physical inventory batch for the specified location: • if the Create Location/Item Location/Item Warehouse from PI Upload (F09) system control value is selected, the system enters a count for a quantity of one for the item/SKU and location and creates a record in the Physical Inventory Upload New table when you exit the screen. In addition, if the item location and item warehouse records do not already exist, the system creates them. • if the Create Location/Item Location/Item Warehouse from PI Upload (F09) system control value is unselected, • and an item location already exists for the specified location, the system enters a count for a quantity of one for the item/SKU and location and creates a record in the Physical Inventory Upload New table when you exit the screen. • and an item location does not exist for the specified location, the system ignores the count for this item and does not create a record in the Physical Inventory Upload New table when you exit the screen. |
3. |
Once you have completed the count for the specified item/SKU and location, you can: • Scan the short SKU barcode or UPC barcode for a different item/SKU to enter a count for the new item/SKU in the same warehouse and location. • Exit the screen to return to the Physical Inv Select Screen. When you exit the screen, the system adds the count for each item in the location to the Physical Inventory Upload New table. The system updates the status of the record in the Physical Inventory Upload New table to E Error if it is invalid. Any records in the Physical Inventory Upload New table that are in error are removed from the table and print on the Physical Inventory Scan Errors report when you accept the physical inventory batch. When you return to the Physical Inv Select screen, you can select to enter counts by item or LPN or accept the count. Note: If you do not accept the count, the batch will remain open for further entry. |
Field |
Description |
Warehouse unlabeled field to the left of the Loc field |
A code for the warehouse where the physical inventory is being performed. This is the warehouse you entered on the Multiple Item Entry Screen. Numeric, 3 positions; display-only. |
Loc Location |
The code for the location where the item is being counted. This is the location you entered on the Multiple Item Entry Screen. Alphanumeric, 7 positions; display-only. |
|
Short SKU |
The short SKU code for the item in the location being counted. Short SKU codes are defined in and validated against the SKU table. This field displays only if the Default Scan Type for RF Receiving and PI (K68) system control value is set to blank or SHORTSKU. Scanning the Short SKU Barcode on the Item Label To scan the short SKU barcode on the RF Item Label correctly, the cursor on the screen must be in the SS field. Numeric, 7 positions; optional. |
The UPC code for the item in the location being counted. UPC codes are defined in and validated against the Item UPC table; see Work with UPC Codes Screen. This field displays only if the Default Scan Type for RF Receiving and PI (K68) system control value is set to UPC08, UPC12, UPC13 or UPC14. • If set to UPC08, the UPC scanned cannot be greater than 8 positions. • If set to UPC12, the UPC scanned cannot be greater than 12 positions. • If set to UPC13, the UPC scanned cannot be greater than 13 positions. • If set to UPC14, the UPC scanned cannot be greater than 14 positions. Scanning the UPC Barcode To scan the UPC barcode correctly, the cursor on the screen must be in the UPC field. Note: Include any leading zeros. For example, if the UPC code is 06012011, enter 06012011 and not 6012011. Alphanumeric, 14 positions; optional. |
|
Count/Loc Count for location |
The number of units, across all items/SKUs, counted for the specified warehouse and location. The system increments this number by one each time you scan the short SKU barcode or UPC barcode for an item/SKU. Numeric, 7 positions; display-only. |
Screen Option |
Procedure |
Enter a count for an item in the location |
See Completing the Multiple Item Scan Screen for instructions. |
Exit the screen and add the count for each item in the location to the Physical Inventory Upload New table |
Select OK or press Enter. |
Select Exit or press F3. |
