Purpose: Performing a physical inventory is the process of counting the actual items that you have in one or more warehouses (or a portion of a warehouse), comparing the quantity counted (or physical quantity) to the on-hand quantity on the system, and updating the system with the correct inventory counts.
The system provides several options to assist you with the physical inventory process. You can:
• use your own batch sheets or tickets, system-generated tickets, or RF devices to perform the count. If you use system-generated batch sheets or tickets, you can print the current on-hand quantity or suppress those numbers.
• perform the physical inventory for the entire warehouse, for selected areas of the warehouse, or cycle count.
• single count or double count each item, and recount items when the first and second count vary.
• establish allowable variances by item, by dollar amount, or by percentage for variance reporting.
• optionally, clear all existing LPNs from the system and recreate the LPN table.
Send information to an external system? Optionally, you can use the Populate Physical Inventory Audit Table (L19) system control value to save information in the Physical Inventory Audit Table, so that you can send the information in that table to an external system.
In this topic:
• The Physical Inventory Process
• Generating the Physical Inventory
• Printing Batch Sheets or Tickets
• Physical Inventory Reporting
• Updating CWSerenade with Physical Inventory Counts
• Steps to Performing a Physical Inventory
• Canceling a Physical Inventory
The Physical Inventory Process
Purpose: You can use some or all of these steps to perform a physical inventory, depending upon how your system is configured.
• Generating the Physical Inventory for the selected warehouse, locations, status or cycles
• Printing Batch Sheets or Tickets, if you are not using your own forms
• counting the inventory and recording the counts
• Entering Counts, or uploading the information from an external system
• using Physical Inventory Reporting to perform an initial analysis to determine any item count variances
• optionally, enter a second and/or final count, and review variances as necessary
• Updating CWSerenade with Physical Inventory Counts with the new inventory counts
Physical Inventory Process Summary
The table below explains how you process physical inventories, based on the setting of the Entry Method (A01), File Generation Output (A09), and Upload Counts (A12) system control values.
Entry Method |
Generation Output |
Upload Counts |
Result |
If you are uploading counts from an external system: |
|||
blank |
NONE or blank |
Selected |
Use Uploading Physical Counts (MPIU) to upload counts from an external system. |
SHEET |
Any value except TICKETS |
Selected |
Use Uploading Physical Counts (MPIU) to upload counts from an external system and enter the second and final counts using the Entering Physical Counts by Worksheets (MPIE) menu option. If the File Generation Output (A09) system control value is set to SHEET, LOCATION, or AISLE, the system prints the Physical Inventory Batch Work Sheet to aid in the count. |
TICKETS |
TICKETS |
Selected |
Use Uploading Physical Counts (MPIU) to upload counts from an external system and enter the second and final counts using the Entering Physical Counts by Tickets (MPIE) menu option. The system prints Physical Inventory Tickets to aid in the count. |
If you are entering counts using the Enter Physical Counts (MPIE) menu option (by sheet or ticket) or using an RF Gun in RF Physical Inventory: |
|||
SHEET |
SHEET, LOCATION or AISLE |
Unselected |
Print the Physical Inventory Batch Work Sheet and enter counts using the Entering Physical Counts by Worksheets (MPIE) menu option or an RF gun in RF Physical Inventory. |
TICKETS |
TICKETS |
Unselected |
Print Physical Inventory Tickets and enter counts using the Entering Physical Counts by Tickets (MPIE) menu option or an RF gun in RF Physical Inventory. |
Generating the Physical Inventory
When you perform a physical inventory, the system creates a snapshot copy of the Item Location table. The snapshot table contains the items, locations, and on-hand quantities (perpetual count) for each item being counted as of the time you generated the physical inventory.
Which item/locations are included in the physical inventory? The selection criteria you define on the Generate Physical Inventory Screen determines which item/locations the system includes in the physical inventory. You can limit the physical inventory to:
• A specified Warehouse.
• Specified Zones. Within zone, you can further limit the physical inventory to a Range of aisles.
• A Range of locations.
• A Maximum number of item locations to count.
Note: Only item/locations that meet all of the selection criteria defined are included in the physical inventory.
Item selection used flag: When you generate a physical inventory by item status or cycle count, the system sets the Item Selection Used field in the Physical Inventory Batch table to Y. When this field is Y and you enter counts using RF Physical Inventory by multiple item, the system places any counts for an item location that was not part of the generated physical inventory in an error status and includes the item locations in error on the Physical Inventory Scan Errors Report. See Entering RF Physical Inventory Counts by Multiple Item in RF Physical Inventory for more information.
LPNs: If you use LPNs to manage your warehouse, you can select the Clear LPN file before generate field to clear the LPN table and rebuild the LPN records when you enter or upload counts.
Control ID: You can assign a user-defined Control ID to the physical inventory; when you submit the inventory updates, the program saves this ID number as part of the inventory transaction history record.
Generating multiple physical inventories: You create a separate physical inventory with a unique control number each time you use Generating a Physical Inventory (MGPI). The system allows you to have multiple physical inventories in process at one time, based on the Number of Outstanding Physicals (A05) system control value.
Before starting a physical inventory: It is recommended that you take the following steps before you generate a physical inventory:
• Confirm or void all outstanding pick slips in all included item/locations.
• Complete or cancel all replenishments, batch inventory transactions, and work orders for all included item/locations.
• Clear the billing data queue.
Taking these steps will help prevent inventory transaction errors, such as a negative on-hand quantity or physical inventory miscounts.
Inventory Freeze and Item/Location Exclusions
When you generate a physical inventory, the system selects the Physical freeze flag for each item/location included in the physical inventory if you select the Freeze Item During Physical (A10) system control value. Freezing the item/location prevents the system from:
• Including the item/location in another physical inventory.
• Generating pick slips (see Performing Pick Slip Generation).
• Using the item/location in primary location replenishment (see Replenish Primary Locations).
• Using the item/location in warehouse replenishment (see Replenish Warehouses).
• Receiving inventory to the item/location (see Receiving Purchase Orders (PORC)).
• Processing any inventory transactions for the item/location.
A physical inventory freeze for an item/location prevents miscounts and inventory transaction errors.
You can also select the Reservation freeze for the item/location through the Create Item Location Screen or the Change Item Location Screen. This flag determines if pick slips print or if a replenishment occurs. Since the Physical freeze flag controls these transactions also, the Reservation freeze flag is only supplemental during a physical inventory.
The system resets the Physical freeze flag and the Reservation freeze when you perform the physical inventory update. In situations where the flags are not reset (for example, if there was an inventory transaction error), you can use Resetting the Freeze Flags (RPFF) to unfreeze the item/location.
Additionally, any item/location whose Item transfer pending flag is selected (including item/locations with open work orders) will be excluded from the physical inventory. See Finished Good Work Order Processing (WWOR) for more information on work orders.
Using Physical Inventory Batches
You can assign batch numbers to the physical inventory output to control the number of item/locations or the number of locations (based on the setting defined in the Batch Grouping (L64) system control value) that are included in each batch. Batching item/locations or locations in the physical inventory table allows you to:
• limit the number of item/locations or locations in each batch.
• enter counts for each batch separately.
• perform the inventory evaluations and updates for each batch separately.
When you use batching, the system assigns a batch number to each group of item/locations or locations when you generate the physical inventory. The batch tables are keyed by control number and batch number, which allows you to perform each function in the physical inventory process separately for each batch.
Using batches can make your count entry process much easier, as it facilitates multiple operators entering counts batch-by-batch at separate terminals.
To assign batch numbers: The Assign Batch Numbers (A07) system control value defines whether the system groups a physical inventory into one or more batches.
• If unselected, all item/locations are included in a single physical inventory and all physical inventory functions take place for each item/location at the same time.
• If selected, the system assigns one or more batch numbers to the physical inventory.
Assigning batch numbers allows you to generate Physical Inventory reports by specific batch, and update the system with physical inventory counts by batch. This may make your count entry process easier, since you can have more than one person entering counts at one time with less chance of mistakenly overwriting each others' entries. However, if you assign batch numbers, you cannot produce a variance report that includes all item/locations in a warehouse.
Defining a batch: The following system control values determine when the system starts a new physical inventory batch.
The Batch Grouping (L64) system control value defines how the system defines a physical inventory batch.
• ITEM/LOC indicates the system counts item/locations to reach the batch size.
• LOCATION indicates the system counts locations to reach the batch size.
The Batch Size (A08) system control value defines the number of item/locations or the number of locations to include in a batch before starting a new batch.
Example: You generate a physical inventory for warehouse 1 that includes the following item/locations.
Item |
Location |
IT1 |
A010101 |
IT2 |
A010101 |
IT3 |
A010101 |
IT3 |
A010102 |
IT3 |
A010103 |
IT4 |
A010103 |
IT5 |
A010103 |
IT4 |
A010104 |
IT5 |
A010105 |
The Batch Size (A08) is 3.
Batch Grouping (L64) |
Results |
ITEM/LOC (the system counts item/locations to reach the batch size) |
The system creates the following batches: Batch 1 includes the following item/locations: 1. IT1/A010101 2. IT2/A010101 3. IT3/A010101 Batch 2 includes the following item/locations: 1. IT3/A010102 2. IT3/A010103 3. IT4/A010103 Batch 3 includes the following item/location: 1. IT5/A010103 2. IT4/A010104 3. IT5/A010105 |
LOCATION (the system counts locations to reach the batch size) |
The system creates the following batches: Batch 1 includes the following item/locations: 1. IT1/A010101, IT2/A010101, IT3/A010101 2. IT3/A010102 3. IT3/A010103, IT4/A010103, IT5/A010103 Batch 2 includes the following item/locations: 1. IT4/A010104 2. IT5/A010105 |
The setting of the File Generation Output (A09) system control value also determines when the system starts a new batch.
File Generation Output (A09) |
Batch Grouping (L64) |
System starts a new batch when: |
SHEETS |
ITEM/LOC |
• The warehouse changes, or • The number of item/locations reaches the maximum Batch Size (A08). |
SHEETS |
LOCATION |
• The warehouse changes, or • The number of locations reaches the maximum Batch Size (A08). |
LOCATION |
ITEM/LOC |
• The zone changes, or • The number of item/locations reaches the maximum Batch Size (A08). |
LOCATION |
LOCATION |
• The zone changes, or • The number of locations reaches the maximum Batch Size (A08). |
AISLE |
ITEM/LOC |
• The aisle changes, or • The number of item/locations reaches the maximum Batch Size (A08). |
AISLE |
LOCATION |
• The aisle changes, or • The number of locations reaches the maximum Batch Size (A08). |
TICKETS |
ITEM/LOC |
The number of item/locations reaches the maximum Batch Size (A08). |
TICKETS |
LOCATION |
The number of locations reaches the maximum Batch Size (A08). |
NONE |
N/A |
If File Generation Output (A09) is set to NONE, the system does not assign batch numbers. In this situation, the entire physical inventory is assigned to batch 1. |
Printing Batch Sheets or Tickets
Output format: You have the option of printing batch sheets or tickets when you generate the physical inventory. The File Generation Output (A09) system control value determines which type will print. This setting must be consistent with the Entry Method (A01) system control value. Valid combinations are:
File Generation Output (A09) |
Result |
TICKETS |
The system prints a Physical Inventory Ticket for each item/location in the physical inventory. Note: If you enter TICKETS, the Entry Method (A01) system control value must also be set to TICKETS. |
SHEET |
The system prints the Physical Inventory Batch Work Sheet. • If Assign Batch Numbers (A07) is selected, item locations appear in alphanumeric sequence by location code, then item code, then by the Sort sequence number for the SKU. Page breaks by location type and batch quantity (specified in the Batch Size (A08) system control value). Batches may be split across sheets. If a batch splits across sheets because of different location types, the sheets within the batch appear in location type sequence (PRIMARY, SECONDARY, BULK, then TEMPORARY). • If Assign Batch Numbers (A07) is unselected, item locations appear in location type sequence (PRIMARY, SECONDARY, BULK, then TEMPORARY), then alphanumeric sequence by location code, then alphanumeric sequence by item code, then by the Sort sequence number for the SKU. Page breaks by size of batch sheet and location type, but not by location code. Note: If you enter SHEET, the Entry Method (A01) system control value must also be set to SHEET. |
LOCATION |
The system prints the Physical Inventory Batch Work Sheet. • If Assign Batch Numbers (A07) is selected, item locations appear in alphanumeric sequence by location code, then item code, then by the Sort sequence number for the SKU. Page breaks by location and batch quantity. Batches are not split across sheets. A blank sheet appears between each batch sheet. • If Assign Batch Numbers (A07) is unselected, item locations appear in location type sequence (PRIMARY, SECONDARY, BULK, then TEMPORARY), then alphanumeric sequence by location code, then alphanumeric sequence by item code, then by the Sort sequence number for the SKU. Page breaks by size of batch sheet and location code. Note: If you enter LOCATION, the Entry Method (A01) system control value must be set to SHEET. |
AISLE |
The system prints the Physical Inventory Batch Work Sheet. • If Assign Batch Numbers (A07) is selected, item locations appear in zone/aisle sequence, then alphanumeric sequence by item code, then by the Sort sequence number for the SKU. Page breaks by size of batch sheet and zone/aisle. • If Assign Batch Numbers (A07) is unselected, item locations appear in location type sequence (PRIMARY, SECONDARY, BULK, then TEMPORARY), then alphanumeric sequence by location code, then alphanumeric sequence by item code, then by the Sort sequence number for the SKU. Page breaks by size of batch sheet and location code. Note: If you enter AISLE, the Entry Method (A01) system control value must be set to SHEET. |
NONE or Blank |
The system does not print a Physical Inventory Ticket or Physical Inventory Batch Work Sheet when you generate a physical inventory. Note: If you enter NONE or leave this field blank, the Upload Counts (A12) system control value must be selected. |
If you attempt an invalid setting an error message will display, either at the Physical Inventory Values (C15) umbrella screen, or when you attempt to generate the physical inventory.
Print current on hand quantity? If you are using the system-generated batch sheets or tickets, you can print the current on-hand quantity in the item/location on the forms. The Print On Hand Quantity (A11) system control value controls whether the on-hand quantity prints.
Reprinting batch sheets and tickets: The batch sheets and tickets that print during the generation process are for the first count. You can print sheets or tickets for a second or final count through Entering Physical Counts by Tickets (MPIE), Entering Physical Counts by Worksheets (MPIE) or Reprinting Batch Sheets or Tickets (RPIF).
Determining the count entry format: The setting of the Entry Method (A01) system control value controls how you enter counts.
Entry Method |
Result |
If the Upload Counts (A12) system control value is selected: |
|
blank |
Use Uploading Physical Counts (MPIU) to upload counts from an external system. |
SHEET |
Use Uploading Physical Counts (MPIU) to upload counts from an external system and enter the second and final counts using the Entering Physical Counts by Worksheets (MPIE) menu option. |
TICKETS |
Use Uploading Physical Counts (MPIU) to upload counts from an external system and enter the second and final counts using the Entering Physical Counts by Tickets (MPIE) menu option. |
If the Upload Counts (A12) system control value is unselected: |
|
SHEET |
Use the Entering Physical Counts by Worksheets (MPIE) menu option or RF Physical Inventory to enter the first, second, and final counts. |
TICKETS |
Use the Entering Physical Counts by Tickets (MPIE) menu option or RF Physical Inventory to enter the first, second, and final counts. |
How many counts? The Number of Counts Required per Physical (A13) system control value controls whether you must enter a second count:
• If you set this field to 1, you must enter only a first count or a final count. However, you have the option of entering a first and second count, or a first and final count, or a first, second, and final count.
• If you set this field to 2, you must enter both a first count and a second count. However, you have the option of also entering a final count.
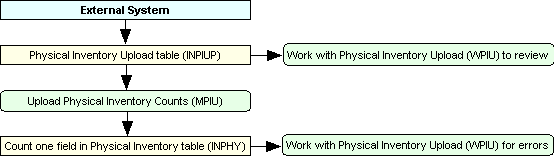
Uploading Physical Inventory Counts from an External System
Use the following steps if you upload counts from an external system:
• Use the Working with File Uploads (WUPL) menu option to upload records to the Physical Inventory Upload table.
• Use the Uploading Physical Counts (MPIU) menu option to transfer the counts from the Physical Inventory Upload table to the Physical Inventory table.
• If there are resulting errors, use the Work with Physical Inventory Upload Screen to review and correct them.
Entering Physical Inventory Counts with Sheets
When you use the Entering Physical Counts by Worksheets (MPIE) menu option or RF Physical Inventory, the system uses the most recent count for every item/location at the time you process the physical inventory update. If the first count you entered for an item/location is correct, you need not enter it again. See the table below for count entry examples.
First Count |
Second Count |
Final Count |
Physical Inventory Update |
10 |
none |
none |
10 |
none |
11 |
12 |
12 |
none |
15 |
Enter |
0 |
The system informs you if any item/locations have unentered counts at the completion of each count, both in Enter Physical Counts (MPIE) and the No Entry Audit Report. If you make any entry, even 0, the system records this item/location as having been counted.
When you enter or change counts in Enter Physical Counts (MPIE), you should take care not to Tab through any previously entered counts. To the system, this is the same as entering 0 as the count for the item/location. If this is the last count you enter for the item/location, the system will reset the on-hand quantity for the item/location to zero when you process the physical inventory update.
Important: You must select OK after entering counts in Enter Physical Counts (MPIE) but before repositioning or paging down to have the system accept your counts. If you have more than one person entering counts for the same batch at one time, each one should enter a different location in the scan field so that they do not overwrite each others' entries. Additionally, each person should be sure to exit by selecting Exit so they do not lock the batch.
Entering Physical Inventory Counts with Tickets
When you use the Entering Physical Counts by Tickets (MPIE) menu option, you enter counts one ticket at a time. The system does not perform the same batch validations with tickets as it does with sheets, such as for unentered counts.
Unlocking a Physical Inventory Batch
If the physical inventory count process is interrupted by an unexpected browser session end, you can unlock the physical inventory batch using the Unlocking a Physical Inventory Batch (MUPB) menu option. Once you unlock a physical inventory batch, you can continue where you left off in the inventory verification process when the unexpected session end occurred.
Accepting Physical Inventory Counts
The process of accepting counts varies depending on whether you use tickets or sheets.
• Sheets: When you accept a first or a second count, that count is then closed. You cannot perform additional entry or make any changes for that count. The exception is the final count, which you can always change as long as you have not processed the physical inventory update.
• Tickets: You can generate tickets for the next counts at any time through the Generate Physical Inventory Tickets Screen (Second or Final Count). You do not need to have entered all the count quantities for the first count tickets before you begin to enter second counts; however, you cannot enter a second count for a ticket before entering a first count.
Generating Sheets/Tickets for Second and Final Physical Inventory Counts
You can generate batch sheets or tickets for the second or final count on request during count entry, or through Reprinting Batch Sheets or Tickets (RPIF). Generally, you generate sheets or tickets for the second count when the first count for the batch has been entered. You generally generate sheets or tickets for the final count when the second count for the batch has been entered.
Note: When you use tickets, you must first print tickets for subsequent counts through ticket entry to have the system assign new ticket numbers; use the Reprint Physical Inventory File function for reprinting existing tickets only.
Adding Records to the Physical Inventory
You can add item/locations to the physical inventory when the first count is being performed in Enter Physical Counts (MPIE) or during the first, second, or final count in RF Physical Inventory. You might do so if you find the wrong item in a location during the count. For example, if you have a ticket or batch sheet entry for item AA100 in location A010101, and you find item BB100 in that location instead, you can add a record for item BB100 to enter the count.
The system adds the record to the Item Location table when you process the physical inventory update.
You can also add LPNs to the table while entering counts. This may be useful if you select the Clear LPN file before generate field at the time you generated the physical inventory. The system rebuilds the LPN records when you process the physical inventory update.
You can also use the create physical inventory option to correct existing LPN records. When you create a physical inventory record during first count entry, you assign it an existing LPN. When you process the physical inventory update, the new LPN record overwrites the previously existing LPN.
You can create a new physical inventory ticket or sheet record when the first count is being performed in Enter Physical Counts (MPIE) or during the first, second, or final count in RF Physical Inventory.
Physical Inventory Secured Features
The following secured features control access to physical inventory count entry:
• Physical Inventory Generation (A04)
• Physical Inventory First Count Entry (A58)
• Physical Inventory Second Count Entry (A59)
• Physical Inventory Final Count Entry (A02)
• Physical Inventory First Count Accept (A61)
• Physical Inventory Second Count Accept (A62)
• Physical Inventory Final Count Accept (A63)
Purpose: You can generate the following reports during the physical inventory process:
• Physical Evaluation Variance Report by Unit Variance or Physical Evaluation Variance Report by Item Warehouse (if you use FIFO costing), which provide the variance amount between the on-hand quantity and the current count for each item/location. The variance is reported by units, unit percentage, cost, or cost percentage. Selecting this option does not process any table updates.
• PI Batch Listing, which lists the batches that were generated as part of the physical inventory.
• Pending RF Physical Inventory Batches Report, which lists the physical inventory batches that exist in the Physical Inventory Upload New table. The system creates a record in this table when you enter counts for a physical inventory batch in RF Physical Inventory; the records remain in this table until you accept the batch and upload the records to the Physical Inventory table.
• Compare Physical Inventory Counts by Batch Report, which lists the first count quantity, second count quantity, and the variance between the two counts for each item/location.
• Physical Inventory Ticket Listing, which lists the item/location information for each ticket.
• Outstanding Physical Listing, which lists the physical inventory tables in process. The report lists each batch that has not yet been updated.
• No Entry Audit Report, which lists each item/location without an entered count.
• Zero Count Report, which lists each item/location whose last entered count is zero, but which previously had a count entered that was greater than zero.
• Physical Inventory Evaluation Variance Report with Update, which provides the same information as the other variance reports. When you select this option, the variance information is reported and the live tables are updated with the new on-hand quantities.
You can also generate:
• Compare Physical Count Tickets Report
• Physical Inventory New On Hand Change Report
• Unprocessed Physical Inventory Records Report
• Reserved Quantity Greater Than On Hand Report
• Physical Inventory Upload Error List
• Physical Inventory Item Location Audit Report
Updating CWSerenade with Physical Inventory Counts
Overview: Once the physical counts have been entered and the variances have been reviewed, the live tables can be updated with the results of the physical inventory. This occurs when you run the Physical Inventory Evaluation Report with Update under Printing Physical Inventory Reports (MPIR).
The system does the following to determine the new on-hand quantity for each item/location included in the physical inventory when the update is performed:
1. The on-hand quantity in the Physical Inventory table is subtracted from the last physical count entered for the item/location to determine the variance amount.
2. The variance amount is either added to or subtracted from the on-hand quantity in the Item Location table to determine the new on-hand quantity as a result of the physical inventory.
Example: |
A physical inventory table was generated on June 1. Item AA100 had an on-hand quantity of 100 units in location A010101. During the count, only 97 units of the item were found in that location. The system recorded a variance of -3. The physical counts were completed on June 3. On June 4, five units of AA100 were shipped from location A010101. On June 5, the reconciliation process was completed and the physical inventory update was processed. The on-hand quantity for item AA100 in location A010101 was changed to 92 units. |
The variance amount from the snapshot table, not the last physical count, was posted to the live tables. This update method allows you to conduct business during the physical inventory process if you need to. However, you should do so with care, because it is possible to create errors or miscounts.
Complete vs. partial update: When you process the physical inventory update function, you can update the on-hand quantities for each item/location included in the physical inventory table, or you can update the on-hand quantity for only those item/locations for which a count was entered.
For example, if you are doing a complete physical, the system will post the variance amount to each item/location for which you entered a count. If a count was not entered for an item/location included in the table, the on-hand quantity is set to zero.
If you are performing a partial physical inventory, the system will post the variance amount to each item/location for which you entered a count. If you did not enter a count for an item/location in the physical inventory, the on-hand quantity in that item/location will not be changed.
Table updates: When you process the physical inventory update, the system updates the following:
• The On-hand quantity in the Item Location table and the On-hand quantity in the Item Warehouse table
• The LPN quantity and/or LPN location if you entered counts by LPN; see Entering RF Physical Inventory Counts by LPN
• The Last physical date in the Item Location table
• The Reservation freeze and the Physical freeze flag in the Item Location table, if the Freeze Item During Physical (A10) value in the System Control table is selected.
• The system writes an inventory transaction history record for each item/location updated as a result of the physical inventory (the transaction type is P). If there were any item/locations with zero quantities when you began the physical inventory, and whose counts were not changed during the process, the system deletes these item/location records at this time and writes a record of this action to the Inventory Transaction History table as well. However, the system does not delete an item's primary location as a result of physical inventory updating.
Unreserving reserved order lines: When you perform the physical inventory update, if the on hand quantity for an item warehouse is less than the reserved quantity, the system:
• unreserves order detail lines starting with the most recent reservation, using this calculation:
quantity reserved - quantity on hand = quantity to unreserve
• once the necessary reserved quantity of the item is unreserved, the system backorders the item in the warehouse where is was reserved.
If the item is in more than one batch, the on hand quantity for the item warehouse is the net result of all batch updates.
Example: You perform a physical inventory update for item AA100 in multiple batches.
On hand quantity in item/warehouse = 22 (location A on hand = 18, location B on hand = 4)
Reserved quantity in item/warehouse before the physical inventory update = 16
Pick slip preparation: When the system unreserves order lines, the system also removes any pick slip preparation that may have been applied to the order and then reevaluates the order for pick slip preparation; see Preparing Orders for Pick Slip Generation.
Example 1: You perform a physical inventory update for batch 1 (location A only) |
||
Count |
Variance |
Results |
10 |
8- |
Since the physical inventory count for location A (10) is less than the original on hand quantity for location A (18), the variance is 8-.
new on hand quantity 10 - original on hand quantity 18 = variance 8-
The new on hand quantity for the item warehouse is 14
10 in location A + 4 in location B = 14 in item warehouse
Since the new on hand quantity for the item warehouse (14) is less than the reserved quantity (16), the system unreserves 2 order detail lines and places them on backorder:
item warehouse quantity 14 - reserved quantity 16 = 2 unreserved order detail lines (reserved quantity = 14) |
Example 2: You perform a physical inventory for batch 2 (location B only) after the batch 1 update |
||
Count |
Variance |
Results |
11 |
7+ |
Since the physical inventory count for location B (11) is greater than the original on hand quantity for location B (4), the variance is 7+.
new on hand quantity 11 - original on hand quantity 4 = variance 7+
The new on hand quantity for the item warehouse is 21.
10 in location A + 11 in location B = 21 in item warehouse
Since the new on hand quantity for the item warehouse (21) is greater than the reserved quantity (14), the system sends a record to Evaluate Backorders to try to reserve backordered order detail lines. Since we unreserved 2 order detail lines in example 1, the system can reserve the 2 detail lines again and bring the reserved quantity up to 16. The system can also reserve 5 more backordered detail lines if they exist and bring the reserved quantity up to 21 to match the on hand quantity. |
Example 3: You perform a physical inventory for batch 1 and batch 2 together (location A and location B) |
||
Count |
Variance |
Results |
Loc A = 10 Loc B = 11 |
8- 7+ |
Since the physical inventory count for location A (10) is less than the original on hand quantity for location A (18), the variance is 8-.
new on hand quantity 10 - original on hand quantity 18 = variance 8-
Since the physical inventory count for location B (11) is greater than the original on hand quantity for location B (4), the variance is 7+.
new on hand quantity 11 - original on hand quantity 4 = variance 7+
The new on hand quantity for the item warehouse is 21.
10 in location A + 11 in location B = 21 in item warehouse
Since the new on hand quantity for the item warehouse (21) is greater than the reserved quantity (16), the system sends a record to Evaluate Backorders to try to reserve any backordered order detail lines. |
Reporting: The Physical Evaluation Variance Report by Unit Variance or Physical Evaluation Variance Report by Item Warehouse print when the update process is complete. These reports list the item/locations that were updated, the new on-hand quantity, and the variance amount.
The variance amounts are reported by:
• units
• unit percentage
• cost
• cost percentage
At this time, the Physical Inventory New On Hand Change Report, the Unprocessed Physical Inventory Records Report, and the Reserved Quantity Greater Than On Hand Report print as well.
Update audit table? If the Populate Physical Inventory Audit Table (L19) system control value is selected, running the report with update also creates records in the Physical Inventory Audit Table so that you can send the information to an external system.
Steps to Performing a Physical Inventory
Instructions: Use the following steps to perform a physical inventory.
1. |
Complete all processes that affect inventory. For example, complete all inventory receipts, inventory transactions, suspense placements, shipment confirmation and billing. Alternatively, you can void outstanding pick slips and cancel outstanding batch inventory transactions, work orders, and replenishments. |
2. |
Generate the physical inventory for the desired warehouses or portions of warehouses. See Generating a Physical Inventory (MGPI). |
3. |
Perform the first count for each item/location. • Use the Uploading Physical Counts (MPIU) menu option to upload counts from the Physical Inventory Upload table to the Physical Inventory table. • Use RF Physical Inventory to use an RF gun to enter counts in the Radio Frequency Transactions (RFMN) menu option and upload the counts from the Physical Inventory Upload New table to the Physical Inventory table. • Use the Entering Physical Counts by Tickets (MPIE) menu option to enter counts in the Physical Inventory table using ticket entry. • Use the Entering Physical Counts by Worksheets (MPIE) menu option to enter counts in the Physical Inventory table using sheet entry. |
4. |
Print the Physical Inventory Evaluation Report to analyze the results of the first count without processing the update. See Printing Physical Inventory Reports (MPIR). |
5. |
Optionally, generate batch sheets or tickets for the second count. See Reprinting Batch Sheets or Tickets (RPIF). |
6. |
Perform the second count for all uncounted or changed item/locations. |
7. |
Print the Physical Inventory Evaluation Report to analyze the results of the second count without processing the update. In addition, print the Compare Physical Inventory Counts by Batch Report or Compare Physical Count Tickets Report to analyze the differences between the first and second counts. |
8. |
Optionally, generate batch sheets or tickets for the final count. See Reprinting Batch Sheets or Tickets (RPIF). |
9. |
Perform a final count for all item/locations where the first and second counts differ. |
10. |
Print the Physical Inventory Evaluation Report to analyze the results of the final count without processing the update. |
11. |
Print the Physical Inventory Evaluation report with Update when the physical inventory is complete and you want to update the live tables. See Printing the Physical Inventory Evaluation Variance Report with Update. |
Canceling a Physical Inventory
To cancel: You can cancel a physical inventory batch at any time with Canceling a Physical Inventory (CPHI). When you submit the cancellation, the system deletes the records from the Physical Inventory table and resets (unselects) the Reservation freeze and the Physical freeze flag.
| Physical Inventory Processing | Contents | SCVs | Search | Glossary | Reports | Solutions | XML | Index | Generating a Physical Inventory (MGPI) |

WH01_01 OROMS 5.0 2018 OTN