
|
|
|
Creating or Changing an Event
Individual events can be created or edited by starting at any of several places in the system. Select the Event button on the Account, Contact, or Business Block screens, or select the New or Edit button on the Event Search screen or the Events screen. The Events screen can also be accessed by double-clicking an event in the Event Grid of the Event Resources screen. To display the Event Search screen, select Business Management>Events from the main menu.
Note: When the business block catering status is in a return-to-inventory status, (i.e. Cancelled), it is not possible to copy one of the events associated with that catering event to another function space. Nor can new events be created for that business block.
Note: If desired, multiple events attached to the business block can be edited at the same time with the Multi Event Edit screen. See Editing Multiple Events for more information.
All events must be attached to a business block. If the event is created using the New button on the Event Search screen, you will be prompted to identify the business block to which the event will be attached. To choose the business block to which the event will be attached, use the Business Block Search screen.
When you access the Events screen from the Events button on a Contacts or Account screen, you will be prompted to search for an existing business block with which the event will be associated, or to create a new business block for the Event.
Note: The dates of an event must be within the dates specified on the business block header. To create an event for a date outside the dates of the header, first change the dates of the header, then create the event.
In a Master/Sub Block or Master/Sub-Allocation structure events can, and should, be attached directly to the Sub-Blocks/Allocation rather than the Master. Events are still accessible from the Master Block/Allocation and all events attached to Sub-Blocks/Allocations created from the Master can be seen and/or edited by selecting the Events button on the Master Block/Allocation. Selecting the Events button from the Master that has Sub-Blocks or Sub-Allocations with no existing events, will launch the Event Search screen. From here you can create the event in the same manner as you would for a regular Business Block. The main difference is that you will be instructed to select a Sub-Block or Sub-Allocation to attach the event to, rather than the Master.
Once a catering event has been attached to a business block, you may want to include additional events as part of the package. The Events screen now includes an Add to Package flag to allow you to incorporate a new event into a catering package that has already been attached to the booking. See Adding and Editing a Catering Package for more details.
To Create an event you have three options for creating a new event.
Note: When booking subsequent events into a function space that has been booked as shareable for the first event, a screen is displayed notifying the user of the events that are already booked for that room. The screen displays the booking name, event type, and attendees for the already booked events.
Note: Quick Event is also an option when the Catering > Quick Events application parameter is set to Y. Entries can be directly made into the Event Screen Account and Contact fields and will be used as parameters in the Quick Profile screen. Default reservation types for deduct and nondeduct reservations associated with the Quick Event are set by the Catering > Default Res Type Deduct and the Default Res Type Nondeduct application settings.
Note: If you right click on an Alternate Event and select the option Convert to Master Event, the Alternate Event is deleted and the Alternate Master is updated with the Function Space, Rental, Setup Style and Setup/Setdown times of the Alternate Event.
Search for an existing event, highlight your choice, then select the Edit button to view and modify the event details on the Events screen.
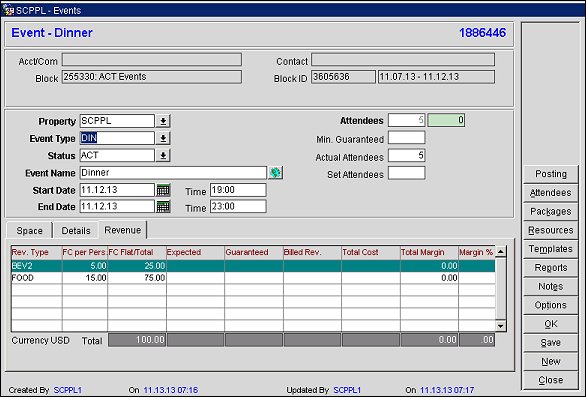
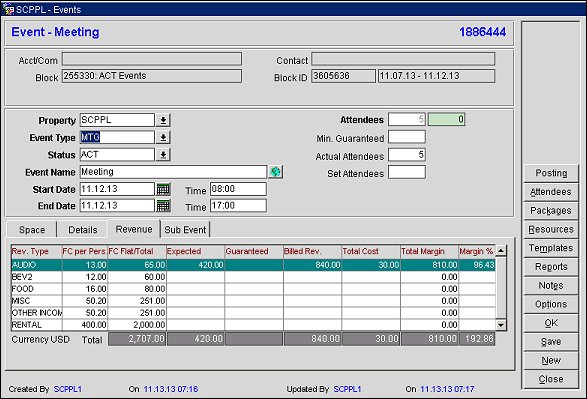
Event. (Blank for a new event). The name of the event, followed by the event ID.
Acct/Com. The name of the account. When the appropriate View and Edit Profile permissions have been granted, double-clicking on this field will display the Account/Company Profile screen for the profile that is currently populated in the field.
Contact. The name of the contact for this business block. When the appropriate View and Edit Profile permissions have been granted, double-clicking on this field will display the Contact Profile screen for the profile that is currently populated in the field.
Block. The name of this business block. When the Blocks > Business Blocks application is set to Y and the Blocks > Block View permission has been granted, double-clicking on this field will display the Business Block screen with the Block information populated. But if the Blocks > Business Blocks application function is set to N, the Blocks > Quick Business Block application parameter is set to Y, and the Blocks > Block View permission has been granted, double-clicking on this field will display the Quick Business Block screen with the Block detail populated.
Block ID. The unique ID assigned to this business block. The start and end dates of the block are shown to the right of the block ID.
Agenda ID. Only accessible when the event is accessed from the F&B Agenda, the Agenda ID is displayed here. This ID can be used as a search filter on the Event Search screen.
Sub-event/Master Event. If this event is a sub event of another (master) event, or a master Event having sub-events, a grid displaying the associated master event or sub-events is visible in the Sub Event/Master Event tab. Click in an entry to display the master event or sub-event in the Event screen.
Property. If the multi-property version is installed, select the property.
Event Type. Select from the down arrow to choose an event type. If default start and end times and forecasting figures are attached to the selected event type these values will automatically be transferred to the appropriate fields on the Event screen.
Note: Because event information such as the event start and end times may default depending on the event type, these fields will be cleared when you select a new event type. These fields will then be populated with default information for the new event type. To prevent removing the defaulted data for an event when changing the event type, set the Catering > Keep Event Details on Type Change application parameter to Y.
Status. The Catering status of this event. Select the down arrow to choose from the available statuses.
Notes: When the application parameter Catering > Apply Status Change from Event is set to Y and you change the status of an event, the Save Choice(s) screen appears. You can select to apply the status changes to All Events, Events of Same Status, Events on the Same Date, or to the Current Event (default). 'Apply status changes to' can be made to Sub Events.
When changing the status of an Event to Actual, you must also select the appropriate option in the ‘Apply attendee change to’ section for the actual attendees to be updated on the other events (All Non-Pkg Events, Non-Pkg Events with Same Alt. Num., Non-Pkg Events on the Same Date, or on the Current Event). If the Use Forecast Revenue Only check box is selected, it will become unselected when the event turns to Actual.
When the catering status of a block is a return-to-inventory status such as LOST or CANCELED, and the buttons Packages, Templates or Resources are accessed from either the Event Search or Event Edit screens, the corresponding screens for these options will display in VIEW ONLY mode.
Event Name. The name copies from the event type configuration. To modify, type a new name.
Start Date. The default start date from the business header displays. To modify, enter a new date manually, or click the Calendar button. Select the Month, Day and Year. The selected date appears at the bottom of the calendar. When you have chosen the date, select OK.
Start Time. Enter the start time. If a default start time has been configured for the selected event type, this field will be filled automatically on event type selection. It can be modified at any time.
End Date. The default end date displays.
End Time. Enter the end time. If a default end time has been configured for the selected event type, this field will be filled automatically on event type selection. It can be modified at any time. When creating a new sub-event, the selected time period must overlap or touch the event times of the master event.
Note: When the application parameter Catering > Apply Status Change from Event is set to Y, and the following fields are updated: Attendees, Min Guaranteed or Actual Attendees (all described below), the Save Choice(s) prompt appears that includes options to apply changes to either All Non-Pkg Events, Non-Pkg with Same Alt. Num, Non-Pkg Events on the Same Date, or the Current Event. Select Non-Pkg Events on the Same Date if you want to only update the attendees for events on the same date as the event being updated.
If you select to update Matching Menu Resources, OPERA will only update the menu resources that matched the event before the update. If the menu or menu items were not the same as the event before the update, those numbers will not be updated.
Attendees. This number copies from the business block header and indicates the expected number of attendees. To modify, type in a new number. When the number of attendees is updated from a Master Event, these changes are reflected to Alternate and Sub-Events as well. When the application function Catering > Attendee Management is active and the Registration Req. check box is selected on the Details Tab, another field displays indicating the number of attendees that are actually registered for the event. It is not possible to change the number of expected attendees below the number of registered attendees. (The number of attendees can also be changed from the Catering tab for a Business Block that has Catering Packages attached. See Catering Tab for more information.)
Minimum Guaranteed. Enter a minimum guaranteed number of attendees. When GTD numbers are entered on an Event, that value is the Attendee number displayed on the Event Search screen. Additionally, the catering forecast reports will use the GTD numbers in their calculations.
Actual Attendees. The actual number of attendees for the event. This field fills in automatically with the number of attendees at the time the status of the event becomes ACTUAL.
Set Attendees. Specifies the set number of attendees for the event. The value recorded here can also be added to the following reports:
When an Alternate Master is turned to ACT, deleting the Alternate Event, you are prompted with the message, 'Do you want to add the rental amount from the alternate event to the alternate master event?'
If you select Yes the following will occur:
If you select No, the conversion is completed, but the rental on the Alternate Master does not change.
When the number of Attendees is updated from an Alternate Master Event, the Alternate Events will also be modified with the same change.
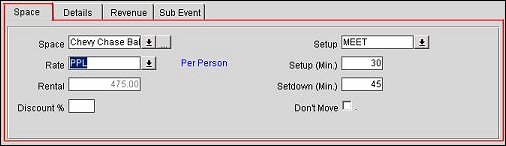
Space. Clicking on the ellipsis [...] button will open the Event Space Setup screen. From here a function space can be attached, detached or changed. If the function space has been used as search criteria on the event search screen, the space will have been automatically attached to the event and will show in this field. If the function space is sharable, (two or more events could potentially use the space at one time) that space can be exclusive or non-exclusive. If the shareable space is booked as being "exclusive," this means that the first event to book the space has the option of "exclusive" and that no other event can be booked there. If the space is "non-exclusive," any subsequent bookings for that space during all or part of the same time period will not be prompted to make an exclusive booking. If the function space is set up as a force alternate, then the user must also select an alternate function space. A window is automatically displayed that will allow the user to choose an alternate space and the information will be copied over to the alternate space, in a special form of sub-event (alternate event).
Note: When a new event for a new block is created with the same beginning and end dates for the same function space as an existing block and event that is not exclusive (but shareable), the following occurs. When the new event is created and OK is selected, a prompt appears. The prompt lists the other events sharing this function space with the time or date and asks if you want to continue. Select Yes to proceed. Set a Rate and Setup Style on the Event screen and select Save. The new event will be scheduled for the same function space during the same specified dates.
When changing the function space on a master event that has sub events, the Apply changes to sub event screen appears.
The following logic applies to the Function Space check box:
1. If at least 1 sub event has the same space as the master event and the master event space is changed, the Function Space check box will be checked by default. Only the sub events with the same space or no space will be updated.
2. If at least 1 sub event does not have a function space and the master does have a space and the master event space is changed, the Function Space check box will not be checked by default. Only the sub events with the same space or no space will be updated.
3. If all of the sub events have a different space than the master event and the master event space is changed, the user will not be prompted to update the space on the sub events.
Rate. Select the down arrow button to select from a list of all rate codes configured for the selected function space. The Rate field is not available when the Blocks > Diary application function is set to Y or when the S&C license OPL or OPM is Active. In those scenarios, the rental amount shall be manually entered into the Rental field.
Note: When the application function CATERING > FUNCTION SPACE REVENUE MINIMUMS is set to Y, the LOV will include information about Rate Codes that have been configured with an F&B Minimum. The Rate Amount column will calculate the Rental Amount + the F&B Minimum less any contributing Revenues already attached to the Event. The F&B Minimum column displays the F&B Minimum configured for that Rate Code for the selected Function Space, the value of which is taken from the value entered on the Function Space Header (see Rooms Screen Function Space tab). When a Discount % is applied to the Function Space Rate Code, the discount will be applied to the F&B Minimum as well as to the Rental Amount.
Note: Updates to function space configurations (function space rate codes, seasonal rates, F&B minimums) are exchanged between remote properties and the central SFA by the Synchronize Function Space Utility to facilitate web bookings. When an event is exchanged between the remote property and central SFA, and the rate is not CUSTOM, then the rate amount as configured on the rate code at the receiving property will be applied to the event and the rental revenue calculated accordingly. CUSTOM rates carry the amount on the event and insert the amount into the remote system.
Rental. The configured rental amount for the selected rate code or, for the CUSTOM rate code, the value entered by the user.
Note: When the application parameter CATERING > COPY EXPECTED RENTAL TO FORECAST is active and the Use Forecast Revenue Only check box is selected for the Event on the Event > Details Tab, the Expected Rental Function Space Revenue will be updated in the Forecasted Function Space Revenue (Revenue tab/FC columns). See Copy Expected Rental to Forecast application parameter for more information.
Note: Updates to function space configurations (function space rate codes, seasonal rates, F&B minimums) are exchanged between remote properties and the central SFA by the Synchronize Function Space Utility to facilitate web bookings. Event revenue exchange excludes rental revenue calculated from space rental because this revenue is calculated and applied at the receiving system.
F&B Min. This field displays the minimum food and beverage revenue required for the selected function space/rate code, if not met by event's F&B revenue contribution the amount to pay for the function space will be adjusted to compensate the gap to meet the minimum F&B revenue required. It is only visible when application function CATERING > FUNCTION SPACE REVENUE MINIMUMS is set to Y and the selected rate code has an F&B minimum defined and that minimum will be displayed.
Amount. This field is only visible when the application function CATERING > FUNCTION SPACE REVENUE MINIMUMS is set to Y and the selected rate code has an F&B minimum defined. It represents the total amount to pay for the function space by calculating F&B Minimum + Rental less booked revenues that contribute to the F&B Minimum.
Discount %. Discount percentage, if applicable. The Discount % field is not available when the CUSTOM rate code is selected, when the BLOCKS > DIARY application function is set to Y, or when the S&C license OPL or OPM is Active.
Setup. Select the down arrow to choose from a list of all set-up styles configured for the selected function space.
Setup (Min.). This field is automatically populated from the selected set-up style if configured. It denotes the amount of time in minutes that is required to set up the function space in the selected style. It can be changed if necessary
Setdown (Min.). This field is automatically populated from the selected set-up style if configured. It denotes the amount of time in minutes that is required to set down the function space from the selected style into its default setting. The time can be changed if necessary.
Don't Move. Check if the event cannot be moved to another room.
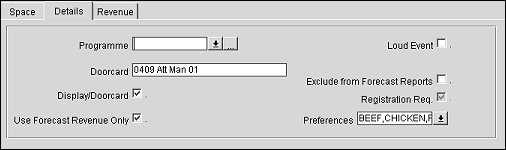
Programme. The programme with which this event is associated.
Doorcard. This information will be transferred from the Catering tab of the business block. It can be changed here on a per event basis.
Display/Doorcard. Select this check box to display the doorcard information on the Event Overview report. When a readerboard interface is active, select this check box to display the event on the readerboard.
Use Forecast Revenue Only. (Available when the application parameter Catering > Use Forecast Revenue Only is set to Y) This option instructs OPERA to only use the forecasted values when reporting, regardless of whether resources are booked on an event. Other results of this check box being selected or unselected, are below:
Note: Once this check box is unselected, it cannot be modified. If the F/O field on the Event Search screen is set to visible and editable (via the configuration of the FCAST_REV_ONLY_DISP field on the Grid Definition screen), the Use Forecast Revenue Only check box can be edited from the Event Search screen. See Searching for an Event for details.
Loud Event. Select this check box if the event is expected to be noisy and might possibly disturb other functions. This will mark the room with a ~ (tilde) in the Function Diary.
Act. Manual. This option is controlled by the application setting Catering > Event Actual Edit. If the application setting value is set to EVENT_OPTION or RESOURCE_OPTION, the flag is visible. When Act. Manual is checked the actual event revenue can be edited on the event in the revenue grid and the Actual and Billed numbers will not be updated on the Resources. When unchecked, the Actual and Billed numbers on the Resources will be updated based on the actual attendees on the event and the actual revenue for the event is calculated from the resources attached to the event.
Note: When this flag on an Actual Event is unchecked, the message 'Do you want to change menu resources?' is displayed. Selecting Yes will update the Actual and Billed numbers on the Resources and the Event Billed Revenue will be recalculated based on the Resources. Selecting No will not update the Actual and Billed numbers on the Resources and the Event Billed Revenue will be recalculated based on the Resources. When this flag on an Actual Event is checked, the message 'Do you want to clear the existing Billed/Actual Revenue?', is displayed which prompts you to update the Resources. Selecting Yes will remove the Actual and Billed numbers from the Resources and the Event Billed Revenue will be recalculated. Selecting No will not allow the flag to be checked.
Exclude from Forecast Reports. This flag instructs OPERA to exclude the revenues of this booking from Forecast Reports.
The following reports are affected by this check box:
Registration Req. Visible when the application function Catering > Attendee Management is active. Users can select this check box to indicate that registration is required for the event. When selected, a field appears next to the expected Attendees field that displays the amount of attendees who have actually registered. Once attendees have registered for the event, this check box cannot be unselected. The Registration Req. check box can be automatically selected by activating the application parameter Catering > Attendee Registration Required.
This grid shows forecasted, expected, guaranteed and billed revenues by revenue type compared to cost. The forecast and billed grids are editable. Information in this grid is automatically updated as function spaces and resources are added and changed for the event.
Note: If an event is in ACTUAL status, any revenue change triggers a business event at the time of the change. The business event message communicates the revenue update to central SFA. (Before the event turns ACTUAL, revenue changes are communicated to central only upon change of status or other event changes, not upon the revenue change itself.)
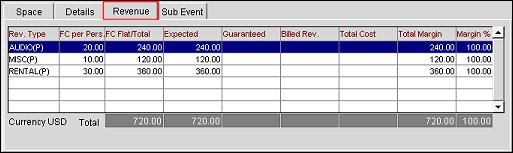
Rev. Type. Denotes the revenue types that are linked to this event. Revenue types can be configured to default forecast values via the forecast maintenance option (Configuration>Catering>Event Forecast Maintenance) or will be added into this grid automatically when resources that are linked to the appropriate revenue type are added to the event. It is not possible to manually add other revenue types than the linked ones to the event from this grid.
Note: When the application parameter Catering>COPY EXPECTED RENTAL TO FORECAST is active and the Use Forecast Revenue Only check box is selected on the Event>Details tab, if the Function Space Rental Revenue Type is equal to the value selected in the application setting Catering>DEFAULT SPACE REVENUE TYPE, then the latest rental Expected Revenue will be copied to the rental Forecast columns (FC per Pers and FC Flat / Total). The forecast revenue will continue to be updated until the Use Forecast Revenue Only check box is unselected.
Expected. This is the expected revenue for the event, based on revenue type, resources, rates, expected attendees, and so forth. This column will become updated once resources are attached to the event. Resources have revenue types linked to their rates and depending on this configuration, the revenue types are updated here from the resource level of event management. For F&B items that are priced per person, this column will be calculated by using the number of expected attendees x per person price of the item.
Forecast Revenue
Forecast revenue can be configured to default based on the Event Type and Start Date from the value entered in the forecast maintenance option (Configuration>Catering>Event Forecast Maintenance).
FC per person. Forecast per person. If this revenue type can be forecasted per person (rate code attached to the function space is per person), this column will be filled with the amount per person. This will either be through the pre- configured forecast figures or can be manually typed in here. Revenue types that generally are forecasted per person are food and beverage types. If a flat forecast amount has been entered, this column will be calculated by dividing the flat amount by the number of attendees on the event.
FC Flat / Total. Flat Forecast amount for this revenue type or total calculated through FC per Person multiplied by the number of attendees. Revenue types that are generally entered with flat forecast figures are miscellaneous items like audio visual equipment or decoration.
Note: See the report Meal Type Forecast by Day (BI) for information on how revenue is forecasted in reports based on whether the application parameter Catering>USE FORECAST VALUE ONLY is set to Y or N.
Note: If an event belongs to a package, revenue types will appear twice in this grid. Once to indicate the regular revenue of the event type that is NOT included in the package and a second time to indicate the revenue of each type that is included in the package. Revenue coming from a package is indicated in this grid with a (P) beside the revenue type code. When the application setting Catering>Event Actuals Edit is set to EVENT or EVENT_OPTION revenue of events that were created from a template are editable from the Revenue Tab. Package Revenue fields, however, are NOT editable when the event turns ACT, and only revenue from items that were added to package events but are not included in the package price can be modified. Otherwise, to edit Packaged Revenue in this case, you must edit from the Packaged Revenue screen (select the Edit button from the Attached Catering Packages screen). See Packaged Revenue for more details.
Guaranteed. For F&B resources that are priced per person this column will be calculated by using the number of guaranteed attendees x per person price of the item.
Billed Rev. This field will be updated depending on the setting of the Act. Manual check box on the Details tab. If the check box is not checked, the figures are updated from the resource level by entering the number of actual attendees after the event status has turned to actual. If Act. Manual is checked, these figures can be entered manually into the grid column from the event level.
Total Cost. This column is updated from the associated cost prices of the attached resources.
Total Margin. Entries in this column are calculated from the last entered revenue column minus the associated cost.
Margin %. Percentage of revenue to cost calculated from the last used revenue column.
Currency (Catering/Base). When the base currency of the property differs from the catering currency (Configuration>Properties>Property Details>Convention/Meeting Rooms Tab), the two configured currency types will display here as option buttons (Catering currency on the left, Base currency on the right). Select either option to toggle the values between the base and catering currencies.
Distributed Exch Rate. This check box becomes enabled when the option button for the base currency is selected. Based on if this check box is selected or not, the currency exchange from catering to base currency is made using the exchange rate that was valid when the Distributed check box was set on the block, or the current date's exchange rate.
Note: Updating the figures in the Revenue Tab does not affect the Updated On date at the bottom of the Events screen. The Revenue Tab figures for the event are recorded and can be viewed in the Event Change Log - Production Changes screen.
Note: Sub events must be in the same property as their Master events.
Event ID. Event ID of the attached sub-event.
Event Type. The type of event scheduled; for instance, a luncheon or meeting.
Start/End Time. The start and end time of the event.
Status. The event status (e.g., DEF, ACT, INQ, etc.).
Name. The event name.
The Master Event tab will only display when the selected event is a Sub or Alternate Event.
Note: Master events and their sub events must be in the same property.

Note: When a Master Event has a Rate Code attached requiring an F&B Minimum, a column is added to the Sub-Event tab labeled Revenue with a rollover that reads, 'Revenue contributing to the F&B Minimum'. The Revenue displayed is the Sub-Event revenue that contributes to the Master Event's F&B Minimum.
Master Event. The event type of the Master Event; for instance, a luncheon or meeting.
Master ID. Event ID of the master event.
Start/End Date. The start and end dates of the master event.
Master Space. Name of the Event Space.
This tab will only display when the selected event has an Alternate Event attached.

Event ID. Event ID of the attached alternate event.
Property. Name of the Property where the Event is to take place.
Event Name. Name of the Event (e.g., Reception, Dinner/Dance).
Space. Name of the Function Space to be used for this event.
Setup. Setup style for the selected Function Space.
Posting. (Available when the Catering>Event Posting is set to Y.) Access banquet posting for the event. See Posting Event Charges for details. This button is disabled when the event is not in an ACTUAL status.
Attendees. This button is available when the application function Catering>Attendee Management is active, if the event requires registration (Events>Details Tab>Registration Req. check box), and if the user has the permission Blocks>Attendees Manage or Attendees View. Select this button to display the Register Attendee screen that contains the list of registered attendees for the event.
Packages. Go to the Select Catering Package screen. This button is initially enabled when creating a new event. When the account profile (Company, Agent, or Source) associated with the business block has an attached Negotiated Catering Package, a prompt will first appear. The prompt identifies the type of profile and states that a Negotiated Catering Package is attached. Select OK to open the Select Catering Package screen which will be populated with packages linked to the profile. This prompt only appears when the application function Profiles>Negotiated Catering Packages is active for the selected property.
Resources. Display the Event Resources screen so you can attach new resource items to the highlighted event. If the event highlighted is an Alternate Event, this option is disabled.
Templates. Select a catering package template for the highlighted event. See Searching for a Catering Package.
Note: When a new event that has not yet been saved, it is necessary to have all mandatory fields populated first prior to being allowed to use the Template button. The new event will be saved automatically before the template selection is opened.
Reports. Manage, track and analyze Event data. See Reports for more details.
Notes. Attach notes that are relevant to an Event. See Event Notes for more details.
Options. Display the Event Options menu.
See Also