Setting Up to Print and View Paychecks and Year-End Pay Forms with BI Publisher (BIP)
To set up to print and view PDF paychecks and year-end pay forms with Oracle Business Intelligent Publisher (BI Publisher or BIP), and to control the display of PDF and non-PDF paychecks, use the Paycheck Options Table (PY_SSP_OPTIONS) component.
Note: These setup steps are not necessary if you use the SQR processes to print checks and advices.
|
Page Name |
Definition Name |
Usage |
|---|---|---|
|
PSXPRPTTMPL |
View or modify the existing template. |
|
|
PY_SSP_SETUP_OPTN |
Specify BI Publisher printing and self-service options, and control the display of PDF and non-PDF paychecks. |
|
|
PSXPRPTPROP |
Enter the PDF permission password that you want to be required to view or print self-service PDF (BI Publisher) reports such as W-2/W-2c forms, T4/T4A slips. |
For more information, see:
PeopleTools: BI Publisher for PeopleSoft
Before you can create paychecks and direct deposit advices in PDF format, you must complete these setup steps:
Configure Integration Broker and Report Manager.
Update the delivered report definitions:
Modify the delivered paycheck and advice templates if necessary for your organization.
For example, you probably want to add a signature image and update the MICR font. You might also want to add a company logo or watermark.
(Optional) Specify the output folder for the report files.
(Optional) Specify the users who can access the reports in Report Manager.
Specify BI Publisher printing and self-service options.
Set up the Form table with the form IDs and the last used form number.
See Setting Up the Form Table for Printing Checks and Direct Deposit Advices.
See:
PeopleTools: BI Publisher for PeopleSoft
PeopleTools: Integration Broker
PeopleTools: Process Scheduler
The PDF check and advice creation PSJob processes (PYCHKUSA, PYCHQCAN, PYDDAUSA, or PYDDACAN) use Oracle BI Publisher to print checks and advice forms. Payroll administrators can print the checks and advices, and employees can view and print the associated wage statements through employee self service.
Payroll for North America delivers BI Publisher reports as RTF templates that define the layout of the checks and advices that the processes print. Payroll for North America also delivers reports as RTF templates to display paychecks in the ePay self-service View Paycheck transaction.
Note: (USF) Oracle BI Publisher cannot be used to print checks and advice forms from a U.S. Federal database.
You can modify the delivered templates using BI Publisher functionality to address your specific formatting requirements. For example, you can add a signature image and MICR font to the check printing templates. After modifying each template, you must upload it to the corresponding report definition.
See Report Definition -Template Page.
(USA) Overflow Statements and FLSA Weekly Wage Detail
Using the BI Publisher print processes, you can create overflow wage checks and advices when the number of lines of earnings detail information exceeds the space available on a single-page wage statement. If you activate overflow statements, you also have the option for the overflow statement to include FLSA weekly wage detail information for employees subject to FLSA whose pay frequency is biweekly, semi-monthly, or monthly.
To create overflow items and print additional wage statements for the overflow, you must select the Overflow Statements check box on the Paycheck Options Table Page. To print single-page wage statements, deselect the Overflow Statements check box on the Paycheck Options Table page.
If the Overflow Statements check box is selected, the Print FLSA Weekly Wage Detail check box becomes visible, and you can select this check box to include the weekly wage detail on the overflow statement. FLSA wage detail is printed only if the pay group is defined as an FLSA pay group on the Pay Group Table - Calc Parameters Page and if you use the delivered overflow templates.
For overflow wage statements, the appropriate overflow report name must be specified in the Check Report ID and Advice Report ID fields on the Paycheck Options Table page. Blank check/advice stock must be used; preprinted stock cannot be used. Contact your check stock supplier with inquiries regarding compatible blank forms stock.
(USA) Templates for Overflow Wage Statements
When an employee’s number of earnings detail lines (all earnings with either a current pay period amount or a YTD balance greater than zero) exceeds 13, which is the maximum number that can be printed on the first wage statement page, you can generate an overflow wage statement to print 32 additional lines, for a total of 45 lines of wage detail.
When an employee’s number of tax, before-tax deduction, after-tax deduction or employer paid benefit detail lines (all taxes, deductions, or benefits with either a current pay period amount or a YTD balance amount greater than zero) exceeds 13, you can generate an overflow wage statement to print 13 additional lines, for a maximum total of 26 lines (lines 14–26) of detail for taxes, deductions, employer paid benefits, or all.
Note: PRTOFCHK, PRTOFADV, SSPOFCHK, and SSPOFADV are the only templates that Oracle’s PeopleSoft supports for U.S. paychecks and advices. PeopleSoft updates these templates to comply with legislative requirements. To incorporate legislative changes, Oracle revises and delivers templates in PeopleSoft Payroll for North America tax updates throughout the tax year. The templates listed in this product documentation are the most current templates as of the date of this publication. You must always use only the most current templates whenever new templates are delivered in a tax update. Using only the most current templates will help your organization comply with legislative requirements.
This table lists the U.S. templates that are delivered for wage overflow PDF check and advice creation:
|
Product |
Report Name |
Description |
Data Source Type |
Data Source ID |
|---|---|---|---|---|
|
PeopleSoft Payroll for North America |
PRTOFADV |
Print U.S. overflow advices. |
XML File |
OFADVICES |
|
PeopleSoft Payroll for North America |
PRTOFCHK |
Print U.S. overflow checks. |
XML File |
OFCHECKS |
|
PeopleSoft ePay (self-service View Paycheck transaction) |
SSPOFADV |
Print U.S. self-service overflow advices. |
XML File |
OFADVICES |
|
PeopleSoft ePay (self-service View Paycheck transaction) |
SSPOFCHK |
Print U.S. self-service overflow checks. |
XML File |
OFCHECKS |
See information about specifying BI Publisher printing and self-service options in PeopleTools: BI Publisher for PeopleSoft
(USA) Templates for Single-Page Checks and Advices (First 13 Lines)
To roll up earnings greater than 13 without using the overflow functionality, deselect the Overflow Statements check box on the Paycheck Options Table Page. When the Overflow Statements check box is deselected, the system prints one single-page wage statement per employee.
Note: (USA) You are required to use the PRTOFCHK, PRTOFADV, SSPOFCHK, and SSPOFADV templates for both single-page and overflow wage statements. They are being updated regularly by PeopleSoft to comply with USA legislative requirements. Refer to the (USA) Templates for Overflow Wage Statements section of this document for more information about these templates.
(USA) State Requirements
California, Colorado, Hawaii, New York, and Oregon have unique reporting requirements that are addressed in the U.S. templates (PRTOFCHK, PRTOFADV, SSPOFCHK, and SSPOFADV). For example, in addition to displaying regular hours for hourly and exception hourly, non-exempt employees in all states, the PeopleSoft U.S. templates also display regular hours and hourly rates for salaried, non-exempt employees in California, Colorado, Hawaii, New York, and Oregon. Also, California, Colorado, Hawaii, New York, and Oregon require that prior-period dates for adjustments appear on the wage statement. If the pay period is January 16–31, and the employee is paid for prior time for January 1-15 on the current check, PeopleSoft U.S. templates display January 1-15 (in appropriate date-with-year format) on the wage statement next to the earnings code.
When the employee has earnings in Oregon, the system prints the State Withholding Employer ID from the Company State Tax Table - General Page (CO_STATE_TAX_TBL) as the Oregon Employer BIN on the U.S. wage statements (checks and advices).
Some states, including but not limited to New York, require that the employer’s phone number be printed on the employee’s wage statements. The PeopleSoft system prints the employer’s phone number below the employer's address on all employee wage statements (check stubs/advices) for all states. The system uses the MAIN phone number from the Company Table. However, if the MAIN phone number on the Company Table is blank the employer's phone number will not print.
(CAN) Templates for Single-page Wage Statements
This table lists the CAN templates that are available for single-page wage statement creation.
|
Product |
Report Name |
Description |
Data Source Type |
Data Source ID |
|---|---|---|---|---|
|
PeopleSoft Payroll for North America |
PRTCNADV |
Print Canadian direct deposit advice forms. |
XML File |
CNADVICES |
|
PeopleSoft Payroll for North America |
PRTCNCHQ |
Print Canadian cheques. |
XML File |
CNCHEQUES |
|
PeopleSoft ePay (self-service View Paycheck transaction) |
SSPCNADV |
Print Canadian self-service advice forms. |
XML File |
CNADVICES |
|
PeopleSoft ePay (self-service View Paycheck transaction) |
SSPCNCHQ |
Print Canadian self-service paycheques. |
XML File |
CNCHEQUES |
Use the Template page (PSXPRPTTMPL) to view or modify the existing template.
Navigation
Image: Report Definition - Template page
This example illustrates the fields and controls on the Report Definition - Template page.
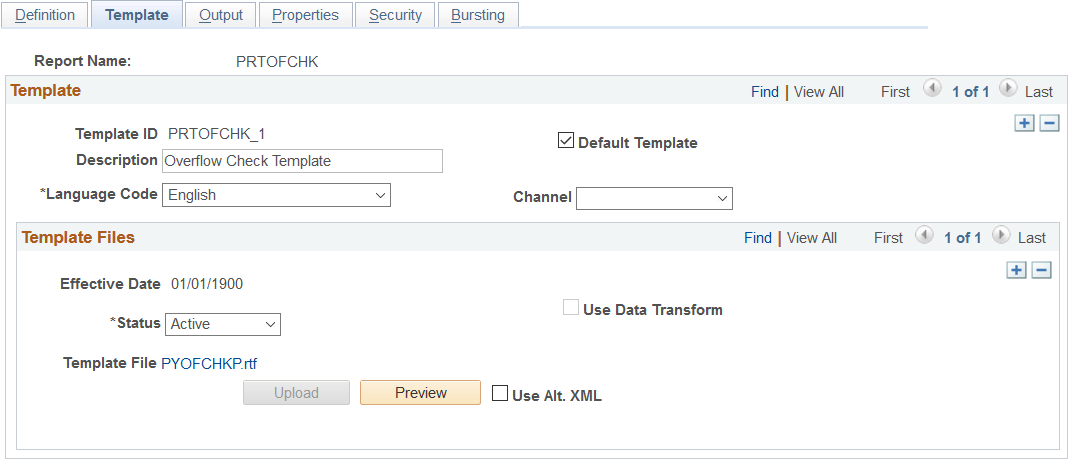
Viewing the Existing Template
|
Field or Control |
Definition |
|---|---|
| Template File |
Select the template file name to open the RTF template in a new window or save it to a location of your choice. |
| Preview |
Select to view an example of the report using sample data registered with the data source. |
Modifying the Existing Template
To modify an existing template:
Select Download on the Template page and row for the existing RTF template that you want to copy.
Save a copy of the downloaded template with a new RTF file name (*.rtf).
Make the desired modifications to the new template file and save.
These are some of the changes that you might want to make:
Change the dummy signature image.
Identify the valid signature image.
Change the MICR font.
For more information on how to make each change, see your PeopleTools: BI Publisher for PeopleSoft product documentation.
Add a new effective dated row in the Template Files scroll area on the Template page.
Update these options:
Field or Control
Definition
Effective Date Enter the date that the system should begin to print and display paychecks with this template.
Status Select the Active status for the new template.
Note: Retain the active status of all historical template files to ensure that the correct template is applied to paychecks viewed in self service.
Select Upload and select the new template file.
(Optional) Select Preview to confirm your updates and verify that the template uploaded successfully.
Note: Become familiar with XML Publisher before modifying any of the delivered templates.
Changing the Dummy Signature Image
The delivered paycheck template (PRTOFCHK or PRTCNCHQ) includes a dummy image in the signature area. If the valid signature image is not available when you print checks, the dummy image prints.
To change the dummy image on the check printing template:
Download and save a copy of the current check or cheque printing RTF template.
In the lower right corner, right-select the shaded box labeled BG and select Properties.
The Text Form Field Options page appears.
Select the Add Help Text button.
The Status Bar tab displays the address of the dummy image that is delivered with the system in the PSHome directory.
Modify the image address as necessary.
You can use the existing dummy image at the existing address, change either the address or the image, or change both the address and the image.
Select OK to save your changes.
Continue with additional template modifications or proceed with uploading the updated template.
Identifying the Valid Signature Image
Follow these instructions to identify a valid signature that you secure in a secured directory on a server or on a floppy drive. The valid signature prints on checks at run time. The dummy image prints on the check instead of the valid signature at run time if the valid signature is not available, for example, if the floppy is not inserted into the drive.
To identify the valid signature for check printing:
Download and save a copy of the current check or cheque printing RTF template.
In the lower right corner, select the signature image box to the right of the shaded box labeled BG.
When the signature image box is selected, you can see its outline.
Double-select the signature image box.
The Format Picture page appears.
Select the Web tab.
The box labeled Alternative text contains a delivered sample signature as a placeholder and associated URL.
Enter the URL that points to the location of your valid signature image.
BI Publisher resolves the value at run time.
Select OK to save your changes.
Continue with additional template modifications or proceed with uploading the updated template.
Changing the MICR Font
BI Publisher needs to know the location of the MICR font at run time so that it can use it in the final output. To specify your MICR font for check printing, you must first make the desired font available in the specific RTF template in which you want to use it. Then you must select that font for the MICR text in the template. This topic provides instructions for both tasks.
To specify your MICR font for check printing:
Download and save a copy of the current check or cheque printing RTF template.
At the bottom of the template, select in the MICR line to highlight it and select File, Properties, Custom in the Word application Toolbar.
The delivered value, xdo-font.GnuMICR.normal.normal, includes a font placeholder called GnuMICR.
In the Name field, replace the GnuMICR text with the name of your MICR font.
In the Value field, replace the GnuMICR font and location with the name and location of your MICR font.
Enter the location in which fonts used by Word are stored. This location depends upon your environment.
When you update the Value field, the Modify button changes to the Add button.
Select Add, then select OK.
In your RTF check template, highlight the MICR line and select the MICR font that you just made available in the list of fonts.
Save your changes.
Continue with additional template modifications or proceed with uploading the updated template.
Use the Report Definitions - Properties page (PSXPRPTPROP) to enter the PDF permission password that you want to be required to view or print self-service PDF (BI Publisher) reports such as W-2/W-2c forms, T4/T4A slips.
Navigation
Image: Report Definition - Properties Page
This example illustrates the fields and controls on the Report Definition - Properties page.
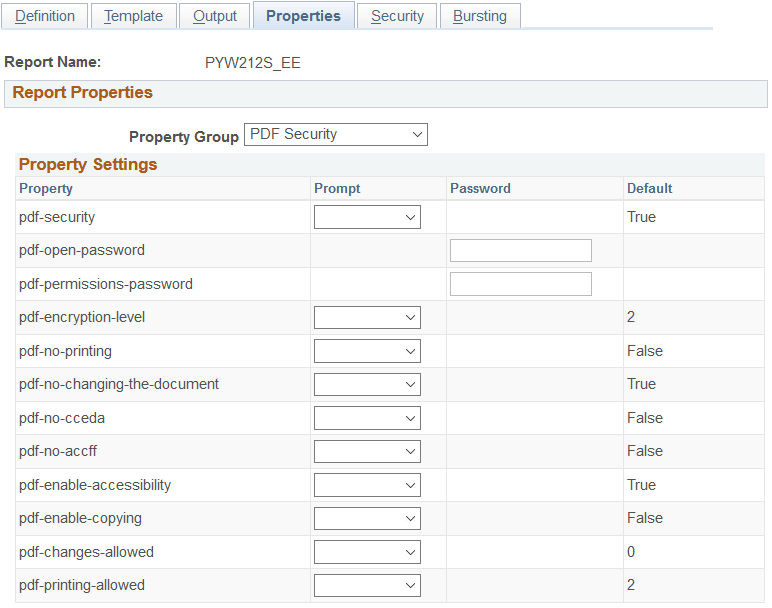
Property Settings
|
Field or Control |
Definition |
|---|---|
| PDF-permissions-password |
Enter a password here if you want the password to be required to view or print the following self-service PDF (BI Publisher) reports (YY = last two digits of the tax year):
|
Use the Paycheck Options Table page (PY_SSP_SETUP_OPTN) to specify BI Publisher printing and self-service options, and control the display of PDF and non-PDF paychecks.
Navigation
Image: Paycheck Options Table page
This example illustrates the fields and controls on the Paycheck Options Table page.

Setup ID and Parameters
|
Field or Control |
Definition |
|---|---|
| Paycheck Setup ID |
You must use one of the delivered setup IDs:
Payroll for North America does not provide support for user-defined setup IDs. |
| URL Identifier |
Payroll for North America delivers the Paycheck Options table with PY_SSP_ATTACHMENT table with associated URL address for storing the XML self-service paycheck data. If you create a separate table and URL to store the data, enter your URL here. |
Report Definitions - Printing and Viewing
|
Field or Control |
Definition |
|---|---|
| Printing |
Displays the current active report definitions for printing U.S. and Canadian paychecks and direct deposit advices. |
| Viewing |
Displays the current active report definitions for displaying self-service U.S. and Canadian paychecks and direct deposit advices in the ePay application. |
| (USA) Overflow Statements |
Select this check box and specify the appropriate overflow report names (PRTOFADV and PRTOFCHK for printing, and SSPOFADV and SSPOFCHK for employee self service) to print an additional 32 lines of earnings detail information on a separate page. A maximum of 13 lines prints on the first (single-page) wage statement. Using the overflow feature enables you to print a maximum of 45 earnings details lines on two pages. If selected, the process prints additional lines on the overflow page for the following items: taxes, before-tax deductions, after-tax deductions, and employer paid benefits. Selecting the Overflow Statements check box also makes the Print FLSA Weekly Wage Detail check box visible. Warning! A combination of the Overflow Statements check box and overflow report definitions is required. An error message appears if the Overflow Statements check box is selected but the report IDs specified are not overflow report definitions. If you specify the overflow report definitions, but do not also select the Overflow Statements check box, you can save the page, but overflow statements will not be generated. If more than 13 earnings detail lines exist, detail will not be printed for the thirteenth and subsequent earnings. Instead the dollar amounts will roll up into a total for Other earnings. When the Overflow Statements check box is selected, additional wage statement pages are generated whenever an employee’s number of earnings detail lines (all earnings with either a current pay period amount or a YTD balance greater than zero) exceeds 13. Overflow wage statement pages continue to be produced for the employee for each payroll processed for the remainder of the calendar year. Consider this in determining the quantities of form stock that you require for printing checks and advices. Note: Blank check/advice stock must be used for overflow statements; preprinted stock cannot be used. Contact your check stock supplier with inquiries regarding compatible blank forms stock. |
| (USA) Print FLSA Weekly Wage Detail |
Select this check box to print weekly FLSA wage detail information on overflow XMLP wage statements for employees subject to FLSA whose pay frequency is biweekly, semi-monthly, or monthly. This check box is visible only if the Overflow Statements check box is selected. Note: FLSA wage detail is printed only if the pay group is defined as an FLSA pay group on the Pay Group Table - Calc Parameters Page and you use the delivered overflow templates. |
Self Service Display Options - General
|
Field or Control |
Definition |
|---|---|
| PDF Paychecks Only |
Select this option to indicate whether you want employees to be able to view older paychecks as well as the PDF paychecks. Select this option to enable employees to view only the PDF self-service paychecks. Leave this option blank to enable employees to view all self-service paychecks. Note: In accessible mode, the system always displays checks on a PeopleSoft page (and not in a PDF file), regardless of whether this check box is selected. |
| $0 or Negative Manual Checks |
Select this check box if you want the system to display manual paychecks of zero dollars or manual paychecks with negative net pay amounts in self service. This check box is deselected by default; you must select it if you want these checks displayed in self-service. |
Self Service Display Options - Mobile Small Form Factor
Select options in this group box to configure self-service paychecks in PeopleSoft Fluid User Interface for the small form factor (smartphone) format. Selecting check boxes here causes items to be available on the Paycheck Summary Page.
|
Field or Control |
Definition |
|---|---|
| PDF Paychecks |
Select this check box to display the View PDF Paycheck link on the Fluid (USA, USF) Paycheck Summary or (CAN) Paycheque Summary page (PY_IC_PI_LIST_FLU). When selected, and the user clicks a paycheck row on the Fluid Pay page, the View PDF Paycheck link for that paycheck appears, enabling the user to click it and view the PDF of the selected paycheck in Fluid mobile self service. |
| Leave Balances |
Select this check box to display the Leave Balances row on the Fluid (USA, USF) Paycheck Summary or (CAN) Paycheque Summary page (PY_IC_PI_LIST_FLU),, enabling employees to click the row and view the Leave Balances page in Fluid mobile self service. |
| Paycheck Analytics |
Select this check box to display the Paycheck Analytics row on the Fluid (USA, USF) Paycheck Summary or (CAN) Paycheque Summary page (PY_IC_PI_LIST_FLU), enabling employees to click the row and view the Paycheck Analytics page in Fluid mobile self service. Note: If the user is in accessible mode, the Paycheck Analytics row is automatically hidden regardless of the setting on the Paycheck Options Table page. |
| Employer Paid Benefits |
Select this check box to display the Employer Paid Benefits row on the Fluid (USA, USF) Paycheck Summary or (CAN) Paycheque Summary page (PY_IC_PI_LIST_FLU),, enabling employees to click the row and view the Employer Paid Benefits page in Fluid mobile self-service. |
For more information on the smartphone Pay, Paycheck (or Paycheque) Summary, Leave Balances, Paycheck Analytics, and Employer Paid Benefits pages, see Using the PeopleSoft Fluid User Interface to View Paychecks in your PeopleSoft ePay product documentation.
Paycheck Availability
Use the Paycheck Availability fields to Indicate the default timing of when paychecks become available for viewing in the ePay self-service View Paycheck transaction. Indicate whether paychecks should be available on the check date or specify the number of days before or after the check date. You can specify paycheck availability differently for various company and pay group combinations.
You can override these values on the run control page when you run the check and advice PDF creation processes.
Note: The Paycheck Availability fields apply to all confirmed checks and advices, whether or not they are created with BI Publisher.
|
Field or Control |
Definition |
|---|---|
| Days From Check Date |
Enter 0 to make self-service paychecks available on the check date entered on the pay calendar for the pay run. Enter a negative number to make self-service paychecks available the specified number of days before the check date entered on the pay calendar. Enter a positive number to make self-service paychecks available the specified number of days after the check date entered on the pay calendar. If Paycheck Availability fields are blank, paychecks and advices are viewable as soon as the Confirm process is completed. Note: The paycheck data from the current pay run is visible to employes in self service as soon as you run pay confirmation. Running the BI Publisher PDF creation process uses the Paycheck Availability fields on the Paycheck Options Table Page for the PDF paycheck to determine when the PDF check is viewable in self service. For this reason, Oracle recommends that you run the BI Publisher PDF creation process immediately after confirming the payroll. If you are not using the BI Publisher PDF creation process, you can still define the Paycheck Availability fields on the Paycheck Options Table page to determine when the check will be viewable in self service for non-PDF wage statements. |