8Hosting an Event
Hosting an Event
This chapter discusses topics and procedures that help end users manage events onsite at the venue, using a direct connection to Siebel Events Management. The topics and procedures discussed include system requirements for hosting an event, managing activities onsite at the event, hosting onsite registration, and viewing venue, vendor, and partner information.
This chapter includes the following topics:
System Requirements for Hosting an Event
Using Siebel Events Management at an event site requires that you have a dedicated connection to your Siebel database. If an event takes place at a venue that allows you to connect directly to Siebel Events Management onsite, you can establish an event operations center where you can review and update event activities, add or change registrations, and quickly locate information about event vendors and partners.
Example Process Flow for Hosting an Event
The following image shows the recommended end-user procedures for hosting an event in Siebel Events Management.
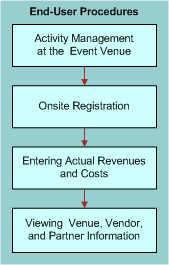
End-user procedures for hosting an event include the following:
Activity Management at the Event Venue
Onsite Registration
Entering Actual Revenues and Costs
Viewing Venue, Vendor and Partner Information
End-User Procedures for Hosting an Event
This section discusses the following topics and procedures:
Activity Management at the Event Venue
When you plan the activities that must be completed for your event, as described in Preparing for an Event, some of the activities may take place before, during, or after the event. To make sure that the event goes smoothly, review the status of event activities frequently during the preparation process.
If your event takes place at a venue that allows you to use Siebel Events Management onsite, you may want to review, update, add, and assign activities during the event.
Onsite Registration
If an event allows attendees to register onsite at the event, you may want to set up a registration area where event staff can use Siebel Events Management to register last-minute attendees.
For more information about how to perform this kind of registration, see Registering for an Event.
Entering Actual Revenues and Expenses
An important aspect of event management is determining whether an event produces a good return on investment. In order to determine this, you must record actual event income and expenses. In Siebel Events Management, you can record these amounts using the Revenue and Expenses views. These views are also useful for analyzing budget variances, if you have established a budget for your event. For information on setting up a budget for an event, see Adding Budget Details.
Actual revenues and expenses can be entered using the Revenue and Expenses views at the event plan, event, and session level. Each revenue and expense record is optionally related to an event and session. Records entered in the child, roll up to the parent. For example, a revenue record entered at the session level also appears at the event and event plan level.
Actual expenses can also be recorded at the venue and vendor level. For more information about creating expense for a venue, see Researching and Choosing a Venue. For more information about creating expenses for a vendor, see Researching and Hiring Vendors.
The following procedure describes how to record actual revenues for an event or session.
To record actual revenues for an event or session
Navigate to the Site Map > Events > Event view.
In the Events list, select and drill down on the event for which you want to record revenue.
Click the Plan view tab, and then click Revenue.
In the Revenue list, create a new record.
To associate the revenue with a session, in the Session field, click the select button.
The following procedure describes how to record actual expenses.
To create an invoice for an expense
From the application-level menu, select Navigate > Site Map > Invoices.
In the Invoices list, create a new record.
Note: Write down the Invoice # for reference.In the Status field, select Approved.
In the Bill To Account field, click the select button to select an account for billing identification purposes.
From the Pick Account dialog box, select the account, and click OK.
Complete the remaining fields.
To record an expense
Navigate to the Site Map > Events > Event view.
In the Events list, select and drill down on the event for which you want to record an expense.
Click the Plan view tab, and then click Expenses.
In the Expense list, create a new record.
To associate the expense with an event or session, in the Event or Session field, click the drop-down list, and select the event or session.
To associate the invoice information, in the Invoice # field, click the select button.
In the FS Invoice dialog box, select the Invoice number, and then click OK.
Viewing Venue, Vendor, and Partner Information
During an event, you may need to contact venue, vendor, and partner personnel, either to make sure that planned activities are carried out, or to address unforeseen needs that arise during the event. If you can access Siebel Events Management onsite, you can look up contact information for venue, vendor, and partner personnel.
The following procedures briefly describe how to look up this type of information. For information about entering new venue, vendor, and partner information, see Preparing for an Event.
To view venue information
Navigate to the Site Map > Events > Event Plans view.
In the Event Plans list, select and drill down on the event for which you need information.
Click the Schedule view tab, and then click Events.
In the Events list, select and drill down on the event for which you wish to view information.
Click the Resources view tab, and then click Venues.
Select the venue for which you need information.
Review the following areas for the information that you need:
Venues record
Billing subview
Expenses subview
Reviews subview (accessed from the Billings view drop-down list)
To view additional information about the venue, including location and account information, click the name link for the selected record in the Venues list.
To display venue room information, drill down on the venue record, and click the Rooms view tab.
To view vendor information
Navigate to the Site Map > Events > Event Plans view.
In the Event Plans list, select and drill down on the event for which you need information.
Click the Schedule view tab, and then click Events.
In the Events list, drill down on the event.
Click the Participants view tab and then click Vendors.
In the Vendors list, select the vendor for which you need information.
Review the following areas for the information you need:
The Vendors list
The Billing subview
The Reviews subview (In the Billings subview drop-down list)
To view account or contact information, click the selected record’s name link in the Name or Primary Contact column of the Vendors list.
To view partner information
Navigate to the Site Map > Events > Event Plans view.
In the Events list, select and drill down on the event for which you need information.
Click the Schedule view tab, and then click Events.
In the Events list, select and drill down on the Event Name.
Click the Participants view tab, and then click Partners.
In the Partners list, select the partner for which you need information.
To view account or contact information about the selected partner, click the name link in either the Name or Primary Contact column of the Partners list.
Event Leads and Opportunities
During an event, or after an event has occurred, leads or opportunities are often captured for distribution to the sales team. Using Siebel Events Management, you can capture opportunities associated with a particular event.
To create a new opportunity, see Siebel Applications Administration Guide.
To associate an opportunity to an event
Navigate to the Site Map > Events > Event view.
In the Events list, select and drill down on the event.
Click the Results view tab, and then click Opportunity.
In the Opportunity list, create a new record.
In the Name field, click the select button.
In the Pick Opportunity dialog box, select the opportunity, and click OK.
Complete the rest of the fields as necessary.
Correspondence Integration
Siebel Correspondence allows users to generate template-based correspondence to a group of contacts. You can leverage this functionality from within Siebel Events to send any type of correspondence to event attendees, for example, a registration package before the event or session or follow-up literature.
You can only send correspondence to attendees. You cannot send correspondence to prospects.
For information on setting up and administering Correspondence templates, see the Siebel Correspondence, Proposals, and Presentations Guide.
To send correspondence to attendees
Navigate to the appropriate view:
For an event, navigate to the Site Map > Events > Event > Attendees view.
For a session, navigate to the Site Map > Events > Sessions > Attendees view.
In the Participants list, select one or more attendees.
From the File menu, choose Send Letter.
In the Correspondence list, select an enclosure to send.
Click Submit.