In this topic:
• Accepting and Printing New Orders
• Canceling Items on Pickup Orders
• Viewing All Orders Across the Enterprise
Created in originating system: Orders are placed by customers through the web store, the call center, or in a store location. The originating system submits the orders to Store Connect, and communicates with Store Connect on a regular basis to track order status and activity.
Types of orders:
• Delivery orders: An order that needs to be shipped to the customer. Includes a shipping address that might be different from the sold-to customer placing the order. If the order is flagged as a gift, no prices print on the packing slip.
Delivery orders are typically assigned to a store location for fulfillment because the item isn’t currently available in the warehouse.
Once you pick and ship a delivery order, processing is complete.
• Pickup orders: An order that the customer wants to pick up at a specific store rather than wait for shipment.
When you confirm that the order is picked, Store Connect generates an email notification to the customer.
You confirm the order is complete when the customer picks up the order.
When are new orders available for processing? Your system administrator sets up a schedule to control when new orders are available for you to begin processing. The schedule for an order type might call for the orders to be available immediately, at regular time intervals (such as once an hour), or at set times of the day. The administrator also defines the start and end times and the days of the week when orders can become available.
When new orders are assigned and available for processing:
• an email notification is sent to the default email address for your store location
• the orders are listed at the View New Orders Screen
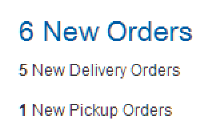
• the orders are included in the New Orders totals at the Home Screen:
Beginning order processing: The first step in order processing is Accepting and Printing New Orders.
How old is the order? The order date and time displayed on Locate Store Connect screens is based on the date and time when the earliest open line on the order was created in Locate Store Connect, even if that date and time was before the order was available to you for processing. For example, this might occur because:
• an order was submitted outside of your regular business hours
• a delivery order was initially submitted to a different store location, but that store rejected the order because it didn’t have sufficient inventory to fulfill it
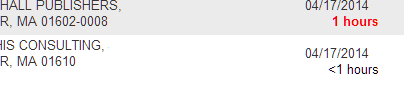
Late order? If the order’s Age exceeds the number of hours specified by the system administrator, the time is in red, bold text. For example, the age of the first order in the image below exceeded the length of one hour:
If new items are added to the order: It is possible for a new item to be added to an order after it was initially created, or even after you have begun processing the original order line(s). In this case, the order is again listed on the View New Orders Screen; however, the time and date displayed are based on the creation date and time of the earliest order line.
Two orders with the same order number: It is possible for two delivery orders to have the same order number if each order specifies a different carrier.
Accepting and Printing New Orders
Overview: As new orders arrive, you can accept them for processing at the:
What happens when you accept a new order? When you select the Accept & Print option for an order, multiple orders, or a line on an order, Store Connect:
• Confirms that you have started processing the order. When the originating system checks the status of the order, it receives notification of the order’s status.
• Generates the Pick List Pull Sheet. You can use this document as a worksheet for picking the items. The pull sheet can include both pickup and delivery orders.
• Generates the Packing Slip, if the system administrator has selected the preference to generate this document at order acceptance. You can use this document as a worksheet for picking the items, and can also include the slip when shipping a delivery order, or when the customer picks up a pickup order. You can also generate the packing slip at a later time.
• Changes the Next Action for the order or item from Accept & Print to Pick.
Selecting multiple orders: When you use the View New Orders Screen or the View All Open Orders Screen, you can accept and print more than one order at a time by clicking Accept & Print at the bottom of the screen. The Pick List Pull Sheet includes the items on all selected orders.
Selecting individual items: If you use the View Order Detail Screen and an order includes multiple items, you can accept and print individual items on the order. Only selected items are included in the generated documents, and have their Next Action change to Pick.
Note:
• If items on the order are grouped together, you can’t select them individually. See Why are some items on an order grouped together? for a discussion.
• If you accept and print individual items on an order, the Next Action for the order remains Accept & Print until all items have been accepted and printed.
Printing documents: When you accept and print one or more orders or items, you advance to the Pick List Pull Sheet. The pull sheet includes all the items on the selected orders, and can include both pickup and delivery orders.
After you print the pull sheet, click NEXT to advance to:
• the Packing Slip if the system administrator has selected the preference to generate this document at order acceptance. After you print the packing slip, click NEXT to return to the screen where you selected the Accept & Print option.
• otherwise, if the system administrator hasn’t selected the preference to generate the pack slip at order acceptance, you return to the screen where you selected the Accept & Print option.
Next steps: Once an order has been accepted and printed, the next steps required in Store Connect are to verify the order is picked. See Verifying Orders as Picked for more information.
Purpose: After you accept and print an order, the next step is to verify that the items on the order are picked. Pick verification:
• Confirms that the items are ready for shipment (delivery order) or pickup (pickup order)
• Generates the Packing Slip, if the system administrator has selected the preference to generate this document at pick verification, or if you select the Print Pack Slip? option at the Pick Order Window
• Changes the Next Action for the order or item from Pick to Pick Up (for pickup orders) or Ship (for delivery orders)
• Generates a notification to the customer that the order is ready for pickup, if it is a pickup order and isn’t UNDER REVIEW, and if email notifications were configured by your system administrator. The email lists the item(s) ready for pickup, and includes the store location, address, and phone number
Pick verification process: Your system administrator can select one of three different pick verification methods, each using different screens and steps. Each is described below.
If items on an order are grouped: See Why are some items on an order grouped together? for a discussion on why certain items on an order can’t be picked separately.
Pick and ship option? When you verify items or an order as picked, you have the option to also confirm shipment at the same time if the order is a delivery order and isn’t under review. See Pick and Ship for details.
Pick verification methods:
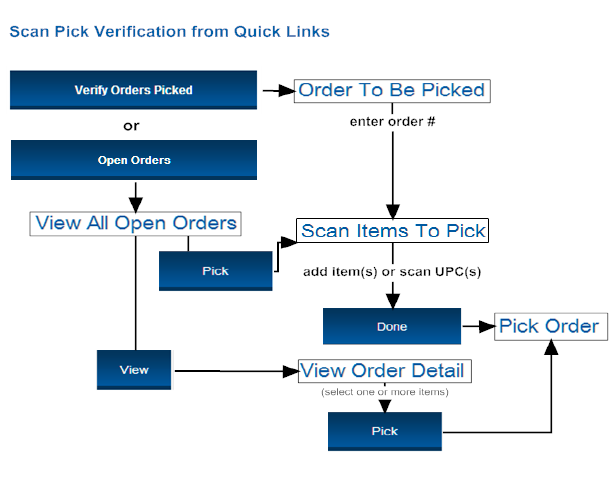
• Pick Verification by Scanning
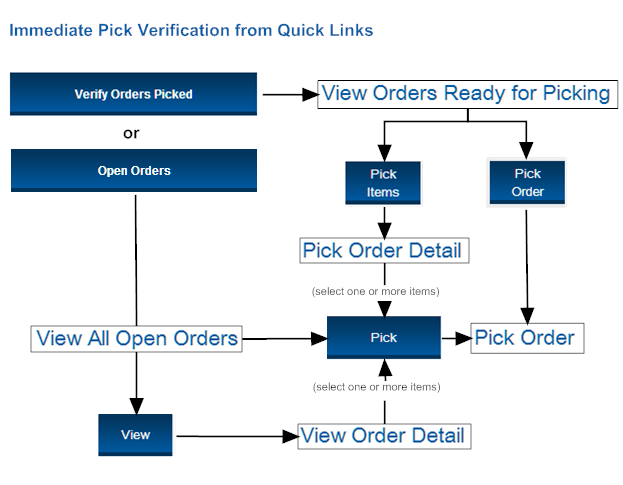
With the immediate pick verification method, the Verify Orders Picked link from the Home screen takes you to the View Orders Ready for Picking Screen, an order list screen similar to the View All Open Orders Screen, except that only orders eligible for pick verification are listed.
Pick Order or Pick Item: You can select orders to verify as picked directly at the View Orders Ready for Picking Screen by clicking Pick Order, or you can click Pick Items to advance to the Pick Order Detail Screen, where you can review the order and pick any eligible items.
Pick from View All Open Orders screen: You also have the option from the View All Open Orders Screen to:
• select Pick for an order to verify all eligible items as picked
• select View for an order to advance to the View Order Detail Screen, where you can verify any eligible items as picked
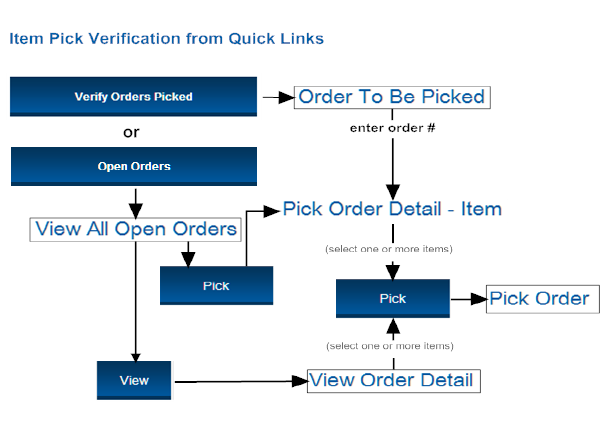
With the item pick verification method, the Verify Orders Picked link from the Home screen takes you to the Order To Be Picked Screen, where you need to enter a valid order with at least one item eligible for pick verification.
Review items and pick each or all: If your entry at the Order To Be Picked Screen is valid, you advance to the Pick Order Detail - Item Screen, where you can review the order and pick one or more eligible items.
Pick from View All Open Orders screen: You also have the option from the View All Open Orders Screen to:
• select Pick for an order to advance to the Pick Order Detail - Item Screen
• select View for an order to advance to the View Order Detail Screen, where you can pick one or more eligible items.
With the scanning pick verification method, the Verify Orders Picked link from the Home screen takes you to the Order To Be Picked Screen, where you need to enter a valid order with at least one item eligible for pick verification.
Scan each unit separately: If your entry at the Order To Be Picked Screen is valid, you advance to the Scan Items To Pick Screen, where you need to scan each unit on the order separately. Based on your system administrator’s selection, you need to scan items based on either the item code or the UPC (Universal Product Code).
Pick from View All Open Orders screen: You also have the option from the View All Open Orders Screen to:
• select Pick for an order to advance to the Scan Items To Pick Screen
• select View for an order to advance to the View Order Detail Screen, where you can pick one or more items.
Once you pick a delivery order that isn’t UNDER REVIEW, it is eligible for shipment. Depending on the configuration set up by your system administrator, you use:
• Integrated Shipping: Store Connect communicates with a shipping system that calculates shipping costs, assigns a tracking number, and generates a bar code label; or
• Manual Shipping: You enter the tracking number, if any, and confirm the package is shipped.
Each process is described below.
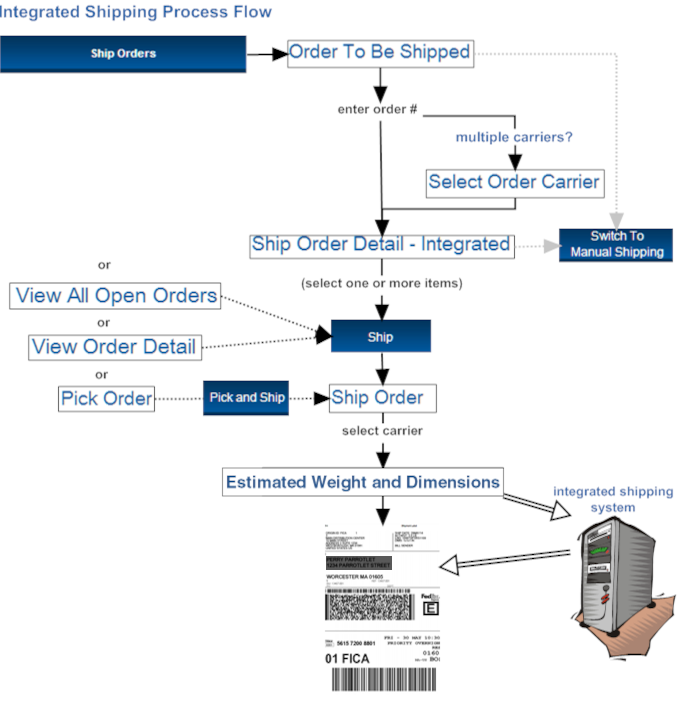
If your store location is configured to use integrated shipping, when you select the Ship Orders option from the Home Screen:
• Specify order: You advance to the Order To Be Shipped Screen, where you need to scan or enter the order number to ship.
• Review detail: After specifying the order, you advance to the Ship Order Detail - Integrated Screen, where you can review the items on the order and optionally select items for shipping rather than the whole order.
• Specify carrier: When you select the Ship option, the Ship Order Window (Integrated Shipping) opens for you to specify the carrier.
• Enter shipping weight: When you complete the Ship Order Window (Integrated Shipping), the Estimated Shipping Weight Window opens for you to specify the shipping weight.
• Communication with shipping system: When you complete the Estimated Shipping Weight Window, Store Connect communicates with the integrated shipping system, and the integrated shipping system sends the shipment information for the order.
• Print shipping label: A window opens displaying the shipping label for the package. You need to print the label.
• Packing slip generated: The Packing Slip is available for you to print.
Shipment confirmed: When you complete this process, the order or selected item(s) are confirmed as shipped. Typically, the customer receives a shipment confirmation email with the tracking number, if available. The shipped order or item(s) are no longer displayed on Store Connect order processing screens.
Ship from other screens: If you select the Ship option from any other screen, such as the View All Open Orders Screen or the View Order Detail Screen, the Ship Order Window (Integrated Shipping) opens, and you follow the process as described above, except that you advance directly to the Ship Order Window (Integrated Shipping). The flow is similar if you select the Pick and Ship option from the Pick Order Window.
Manual shipping available: The option to use manual shipping is available if, for example, communication is down between Store Connect and the integrated shipping system.
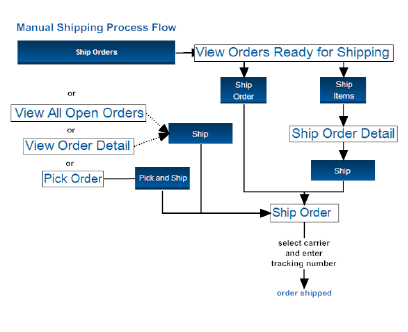
If your store location is configured to use manual shipping, when you select the Ship Orders option from the Home Screen:
• Specify order: You advance to the View Orders Ready for Shipping Screen, where you need to find the order to ship:
• Ship order? You can select the Ship Order option to ship all open items on the order, or
• Ship items? Select the Ship Items option to advance to the Ship Order Detail Screen, where you can review the items on the order and optionally select items for shipping rather than the whole order.
• Specify carrier and enter tracking number: When you select the Ship option for an order or one or more items, the Ship Order Window (Manual Shipping) opens for you to specify the carrier and enter the tracking number, if required for the carrier.
Shipment confirmed: When you complete this process, the order or selected item(s) are confirmed as shipped. Typically, the customer receives a shipment confirmation email with the tracking number, if available. The shipped order or item(s) are no longer displayed on Store Connect order processing screens.
Ship from other screens: If you select the Ship option from any other screen, such as the View All Open Orders Screen or the View Order Detail Screen, the Ship Order Window (Manual Shipping) opens, and you follow the process as described above. The flow is similar if you select the Pick and Ship option from the Pick Order Window.
When the customer picks up an order, you can use the View Pickup Ready Orders Screen to confirm the pickup. Confirming an order is picked up removes it from Store Connect screens for further processing.
You can also use the Pick Up Order Detail Screen to confirm that the customer picked up the entire order, or individual items on the order.
Both screens display the Ready for Pickup age, indicating the amount of time since you picked the order and the pickup ready notification email was sent. If the customer hasn’t picked up the order within the number of hours specified as the Unclaimed Order Hours threshold for your organization, the Ready for Pickup age is displayed in red, bold text. These orders are also listed on the View Unclaimed Pickup Ready Orders Screen.
The Packing Slip is available for printing at order pickup.
Only pickup orders that have been picked and are not UNDER REVIEW are available to work with on these screens.
Options for pickup-ready orders: You can:
• confirm the order or an item as picked up: see Pick Up
• reprint the packing slip: see Reprint Pack Doc
• cancel an item or the order: see Cancel
• send a reminder email: see Resend Email
You can also reject the order or an item at certain screens even after it is confirmed as picked. See How do I reject an order or item? for more information.
Canceling Items on Pickup Orders
Overview: You might need to cancel one or more items on a pickup order if, for example, the customer changed his mind about the items after arriving at the store. You can also cancel the entire order if, for example, the customer never arrives to claim the order.
When you cancel an order or item, it is removed from Store Connect order processing screens, and typically the customer is notified by email by the originating system.
Eligibility: Only pickup orders are eligible for cancellation, and the items’ Next Action must be Pick Up.
Cancellation reason: You need to select the reason for canceling the order(s) or item(s) from the Select Cancel Reason Window.
You can cancel pickup orders from the:
• View Pickup Ready Orders Screen
• View Unclaimed Pickup Ready Orders Screen
Not all items on the order canceled? Since only items whose Next Action is Pick Up are canceled when you cancel an order, it’s possible that you can cancel an order at the View Pickup Ready Orders Screen or the View Unclaimed Pickup Ready Orders Screen, but there could still uncanceled items on the order if their Next Action was not Pick Up.
Similarly, when you cancel all items at the Pick Up Order Detail Screen, only displayed items are canceled; as a result, it’s possible that there are still uncanceled items on the order if their Next Action was not Pick Up.
Overview: You can reject an order, or one or more items on an order, from processing in your store location if, for example, you do not have the requested inventory. When you reject an order or item(s):
• Delivery order: The system may attempt to find another location to fulfill the order or item.
• Pickup order: The order is automatically closed, and typically the customer is notified by email by the originating system.
• Store Connect order processing screens no longer display the rejected order or item(s).
Authority required: Rejecting an order or item requires specific authority. If you don’t have the required authority, the Reject Approval Login Window opens, so that an authorized user for your store location can approve the rejection. This approval is required each time you select one or more items or orders for rejection.
Rejection reason: You need to select the reason for rejecting the order(s) or item(s) from the Select Reject Reason Window.
Only items in same status rejected: When you reject an order, items whose Next Action match the screen you are using are rejected; however, there might be other items on the order whose Next Action is different if you processed the items on the order separately. In this case, the items whose Next Action is different aren’t rejected automatically. When you reject an order from the:
• View All Open Orders Screen: all open items are rejected, regardless of Next Action.
• View New Orders Screen: only items whose Next Action is Accept & Print are rejected.
• View Orders Ready for Picking Screen: only items whose Next Action is Pick are rejected.
• View Orders Ready for Shipping Screen: only items whose Next Action is Ship are rejected.
The following detail screens display items only if they have the same Next Action, so only the displayed items are eligible for rejection:
• Pick Order Detail - Item Screen
Not all processing screens include the Reject option. When you’re working at screens that display pickup-ready orders, you need to advance to a different screen if you want to reject, rather than cancel, an order or item.
Purpose: The basic steps of order processing are:
• a new delivery or pickup order is assigned to your store location
• you accept and print the order
• you confirm that the order is picked; if it is a pickup order, the customer is notified that the order is ready
• if it is a delivery order, you confirm shipment
• if it is a pickup order, the customer picks up the order
Additional options include:
• rejecting the order, or a line on the order, if your store location can’t fulfill it; proper authority required
• reprinting the pull sheet
• reprinting the packing slip
• sending a pickup reminder email
• canceling a pickup order, or a line on the order, if the customer no longer wants it
Basic processing steps for each type of order are presented below.
Delivery Orders

Pickup Orders

Viewing All Orders Across the Enterprise
Overview: The screens you use for processing orders in Store Connect include orders and items only if the orders are currently open, and assigned to your store location for processing. You can use the Search Orders Screen to look for orders regardless of status and assigned location.
Searching for orders: The criteria you can use to search for orders include:
• information about the customer, such as name, email address, or phone number
• information about the order, including date, order type, originating location, or fulfilling location
You can combine the criteria to restrict the search results.
Order detail information: The information displayed about an order at the View Order Information Screen is very similar to the information displayed on an order detail screen where you can process an order, such as the View Order Detail Screen; however, the View Order Information Screen also includes additional details, such as order totals and current status.
You can’t use these screens to process any updates for the orders; however, if the order is assigned to your current store location and is open, you can advance to the View Order Detail Screen and work with the order.
Order history: The View Order History Screen displays information about each activity that has taken place for the items on the order. For example, if the order was shipped, the tracking number is displayed.