Managing Job Openings
This topic provides an overview of the Manage Job opening pages and discusses how to perform job opening-related and applicant-related activities for the job opening.
This Talent Acquisition Manager overview video includes a demonstration of the Manage Job Opening page:
|
Page Name |
Definition Name |
Usage |
|---|---|---|
|
HRS_JO_360 |
Manage all aspects of a job opening, including managing applicants, searching for applicants, reviewing activity, creating notes, attachments, and expenses, and viewing or updating the job opening details. |
|
|
HRS_JO_360 |
Review applicants and perform applicant-specific recruiting activities. |
|
|
HRS_REC_SCHAPP |
Search for qualified applicants. Also, review saved automatch searches and saved compliance searches for the job opening. This tab embeds the Search Applicants Page into the job opening, and is only visible to users who have security access to the Search Applicants page. |
|
|
HRS_JO_SCR_LVL |
Review screening levels, run screening processes, and review screening results. This tab is visible only if the user has security access to the page. Also, it is visible only if the job opening has at least one standard screening level (a screening level that is not for prescreening or online screening). |
|
|
HRS_JO_360 |
Use this tab to review the job’s status history and to manage job-related notes, attachments, and expenses. This tab also displays the same saved searches that appear on the Applicant Search tab. |
|
|
HRS_JO_NOTE_SEC |
Enter details for a job opening note. |
|
|
HRS_JO_EXPENSE_SEC |
Enter details for a job opening expense. |
|
|
HRS_JOB_OPENING |
Manage job opening data, including general job information, job qualifications, screening settings, postings, and hiring team members. This tab corresponds to the Job Opening Page where you originally created the job opening. The job opening template controls the content and layout of this tab’s subsections. |
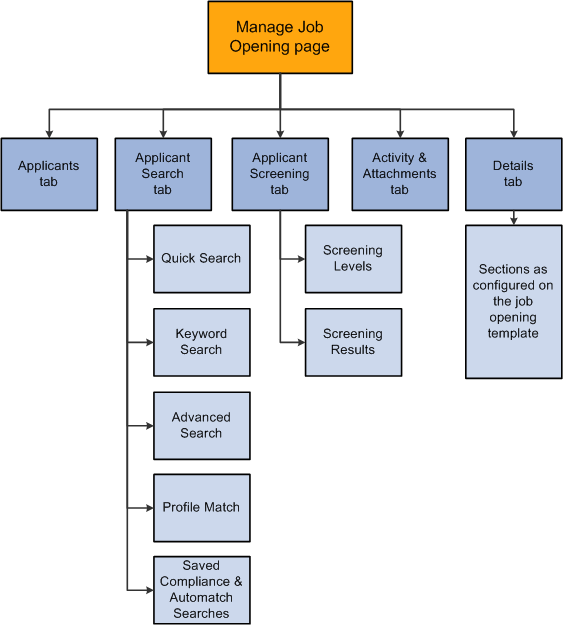
The Manage Job Opening page provides a single point from which you can complete many recruiting tasks for a job opening and its applicants. The page includes:
Five tabs where manage applicant and job opening information.
A toolbar that provides access to additional features for organizing and reviewing job opening data.
An additional link that provides access to related content charts.
This diagram illustrates structure of the Manage Job Opening page. Note that the Applicants tab and the Activity & Attachments tab do not have subsections.
Use the Manage Job Opening Page (HRS_JO_360) to manage all aspects of a job opening, including managing applicants, finding applicants, reviewing activity, tracking notes and attachments, tracking expenses, and viewing or updating the job opening details.
Navigation:
Click the job opening link in Search Results group box on the Search Job Openings page.
Note: You can also access this page by clicking a job opening on the Recruiting Home page, the Browse Job Openings page, the Manage Applicant page, the Manage Application page, Search Applications page, and many other pages that include job opening information.
This example illustrates the Manage Job Opening page.
Toolbar
Field or Control |
Description |
|---|---|
Save |
This button is visible only when you are on the Activity & Attachments tab or the Details tab. Click to save any changes you make to the data on these tabs. |
Return |
If you accessed the job opening by clicking a link on another recruiting page, click the Return toolbar button to return to the previous page. If you accessed this page using the global search and you want to return to your search results, use the Last Search Results link (next to the global search field) instead of the Return toolbar button. |
Recruiting Home |
Click to access the Recruiting Home Page. |
Search Job Openings |
Click to access the Search Job Openings Page. |
Previous and Next |
These buttons appear if you accessed the Manage Job Opening page from a grid that listed multiple job openings. Use the buttons to navigate between openings. |
Create New |
Click to access the Primary Job Opening Information Page, where you begin the process of creating a job opening. |
Clone |
Click to access the Clone Job Opening Page, where you can create new job openings based on the current job opening. |
Refresh |
This button is visible only when you are on the Applicants tab. Click to refresh the data on the page. |
Add Note |
Click to create a new job opening note on the Job Opening Notes Page. |
Interviews |
Click to access the Interview Summary Page, which provides a read-only summary of all interviews that have been scheduled for the job opening. |
Category |
Displays the icon for the personal category that you have assigned to the job (or the No Category icon if appropriate). Categories are a personal organizational tool, and your categorization is not visible to other users. Click the icon to access the My Job Categories Page, where you can change the category. |
Print Job Opening |
Click to access the Select Job Opening Sections Page, where you generate the Job Opening report after selecting which data to include in the report. |
Personalize |
Click to change the content and layout of the toolbar. |
Header Data
Note: If a header field does not have a value for a particular job opening, the field is hidden in the header. System-wide configuration options such as the template segmenting type and the position management option can cause related header fields to be hidden for all job openings.
Field or Control |
Description |
|---|---|
Job Opening ID |
Displays the job opening’s unique identifier. |
Status |
Displays the job opening’s current status. |
Job Posting Title |
Displays the job opening’s descriptive title. |
Business Unit |
Displays the job opening’s business unit. All job openings are associated with business units. |
Job Code |
Displays the primary job code for the opening. If a job opening does not have a job code (which is not required for continuous job openings), this field is hidden. |
Department |
Displays the job opening’s department. If the job opening is not associated with a Department, this header field is hidden. |
Position Number |
Displays the primary position for the opening. If you do not use position management, or if you use partial position management and the job opening does not specify a position, then this header field is hidden. |
Job Family, Job Profile ID, Company, or Salary Grade |
If one of these fields is used as the template segmenting type, the field appears in the header. Because there can be only one template segmenting type, the header never displays more than one of these fields. When the template segmenting type is Salary Grade, the Salary Grade field displays both the salary plan and the salary grade. |
|
The Hot Job field and icon appear when the job is a hot job. See Managing Hot Jobs. |

Tabs
Field or Control |
Description |
|---|---|
Applicants |
Use the Manage Job Opening Page: Applicants Tab to review applicants and perform applicant-specific recruiting activities. |
Applicant Search |
Use the Manage Job Opening Page: Applicant Search Tab to search for applicants to link to the job opening. |
Applicant Screening |
Use the Manage Job Opening Page: Applicant Screening Tab to run screening processes. |
Activity & Attachments |
Use the Manage Job Opening Page: Activity & Attachments Tab to review the job’s status history along with job-related notes, attachments, expenses, and saved applicant searches. |
Details |
Use the Manage Job Opening Page: Details Tab to manage job opening data, including general job information, job qualifications, screening settings, postings, and hiring team members. |
Use the Manage Job Opening page: Applicants tab (HRS_JO_360) to review applicants for a job opening and perform various applicant-related activities.
Navigation:
The Manage Job Opening Page appears, and the Applicants tab is the first tab on the page.
This example illustrates the Applicants page under Manage Job Opening page.
Flexible Processing and Applicant Actions
A job opening’s flexible recruiting process (if any) defines appropriate actions based on a user’s role and an applicant’s current disposition. If the flexible recruiting process disallows a particular action, the Manage Job Opening page does not display the icons or menu commands that would be used to perform the action. Hiding the irrelevant actions helps users to focus on the appropriate next steps in the recruiting process.
These actions can be made unavailable: Reject Applicant, Route Applicant, Manage Interviews, Created Interview Evaluation, Prepare Job Offer, Accept Offer, Reject Offer, Pre-Employment Check, Prepare for Hire, Withdraw from Hire, and Manage Applicant Contracts. (Although flexible processing can make the Manage Interviews action unavailable, it does not affect whether the Interviews toolbar button appears.)
Additionally, the Edit Disposition action is hidden if the flexible recruiting process does not provide the user with any valid disposition transitions.
When a flexible recruiting process makes actions unavailable:
The Applicants grid hides icons for unavailable actions, and the column where the icon appears is hidden entirely if an action is not valid for any applicants.
The Other Actions menu (for performing actions on individual applicants) hides any actions that are not available for the applicant.
The Group Actions menu does not hide actions, but the system performs the action for only those job openings where the action is permitted.
Disposition Phase Filter
Across the top of the Applicants tab, a horizontal bar provides a graphical representation of the phases of the recruiting process, with labels indicating both the phase name and the number of applicants currently in dispositions that belong to that phase. Dispositions are associated with phases on the Recruiting Status and Reason Page. To hide any recruitment phase from the filter, see Recruiting Installation – Manage Jobs Page.
Field or Control |
Description |
|---|---|
<Phase name> and <number of applicants in phase> |
The bar includes a section for every phase that has at least one associated disposition, even if the current job opening does not have any applicants in that phase. All, which appears before the first phase, represents all phases. Phase bar sections with at least one applicant are clickable. Clicking a section updates the Applicants grid so that it shows only applicants in the specified phase. Normally, the page initially shows All phases. However, if you access the page by clicking the number in the No Action Taken column on the My Job Openings pagelet, the system automatically uses the Applied phase as the filter. (The term “No Action Taken” refers to applicant who are still in the first phase of the application process.) Note: Be sure that all non-draft dispositions are associated with recruiting phases. The number shown for the All phase does not include applicants in dispositions that are not associated with phases. (However, those applicants are still shown in the Applicants grid when you click the All phases link.) |
Applicants
This grid displays applicants who are linked to the current job opening with a non-draft disposition.
Field or Control |
Description |
|---|---|
Select |
Before performing a group action, use this check box to select the applicants to which the group action applies. |
Applicant Name and Applicant ID |
These fields display identifying information about the applicant. Click the Applicant Name link to display the Manage Applicant Page. |
Type |
Possible applicant types are Employee, External, and Non-Employee. Non-employees are applicants such as contingent workers who have non-employee HR records. |
|
Date Applied |
Displays the date when the application was submitted. |
Disposition |
Displays the applicant's current disposition for this job opening. |
|
Last Updated |
Displays the date when the application status was updated. |
|
|
The Employee Referral icon appears if the referral source on the application indicates that the applicant was referred by an employee (that is, the referral source is a recruitment source with type Employee). If none of the applicants in the grid were referred by employees, this column is hidden entirely. |
|
|
The Former Employee icon appears if the applicant identifies himself as a former employee when applying for the job. If none of the applicants in the grid are former employees, then this column is hidden. |
|
Veteran |
Displays Yes if the applicant identifies himself as a veteran when applying for the job. If none of the applicants in the grid are veterans, then this column is hidden. |
|
Military Status |
Displays the military status if the applicant is a veteran. If none of the applicants in the grid are veterans, then this column is hidden. |
|
Click to access the Manage Application Page, where you can review and manage activity related to a single applicant for a single job opening. |
|
Click to open a new window that displays the applicant's resume.
If none of the applicants in the grid have resumes, the entire Resume column is hidden. |
|
References |
Displays Yes if the applicant provided references while applying for the job. Click Yes to go the Manage Applicant page: Applicant Data Tab and view the reference details. |
|
This column appears only if the Display Interest Indicator field on the Recruiting Installation – Applicants Page is set to Yes. Click the first, second, or third star on the interest widget to indicate the level of interest in this applicant for the current job opening. The stars up to and including the one you click change to solid yellow to provide a visual indication of your interest level. Click the x to clear the rating. All three stars turn gray. The interest level for an applicant is specific to the job opening. It is not, however, user-specific, so your selection is global and can be seen and changed by other users. Interest level is available as a search field on the Search Applications Page, where it also appears in the search results grid. |
|
Click to update the applicant’s disposition to 020 - Reviewed. Because this action always uses the disposition with status code 020, you should not modify this delivered disposition. This action is not controlled by flexible processing and is therefore always available. |
|
Click to perform the Route Applicant action. If the applicant has at least one existing routing for this job opening, this action displays the Manage Routings Page. If the applicant does not yet have any routings, this action displays the Route Applicant Page. |
|
Click to perform the Manage Interviews action. If the applicant has at least one existing interview for this job opening, , this action displays the Manage Interviews Page. If the applicant does not yet have any interviews, this action displays the Interview Schedule Page. |
|
Click to perform the Reject Applicant action, which displays the Reject Applicant Page. |
|
Click to access the Application Report Options Page, where you can choose report parameters and then generate an application details report. |
Other Actions |
Click to display a menu of additional actions that you can perform for the applicant shown in the row. The actions appear under two sub-menus. Under the Recruiting Actions sub-menu, you can choose these actions:
Under the Applicant Actions sub-menu, you can choose these actions:
|


Configuring the Columns in the Applicants Grid
Follow these steps to hide or relabel the columns in the applicants grid:
Navigate to and add a new value with component name HRS_JO_360, Market Global, and Configuration Type Standard. Enter description as Manage Job Openings.
Select Select Fields and choose the fields that you wish to hide or relabel. Select the check box under Hide Field column for the fields you want to hide from the Applicants grid. You can also relabel the fields by selecting the check box under Modify Label column and entering the required label. Save the configuration.
Under the Map to Portal Registry tab, select the row for EMPLOYEE and select Apply Configuration. You can see that the Review/Edit Mapping link is enabled after you apply the configuration.
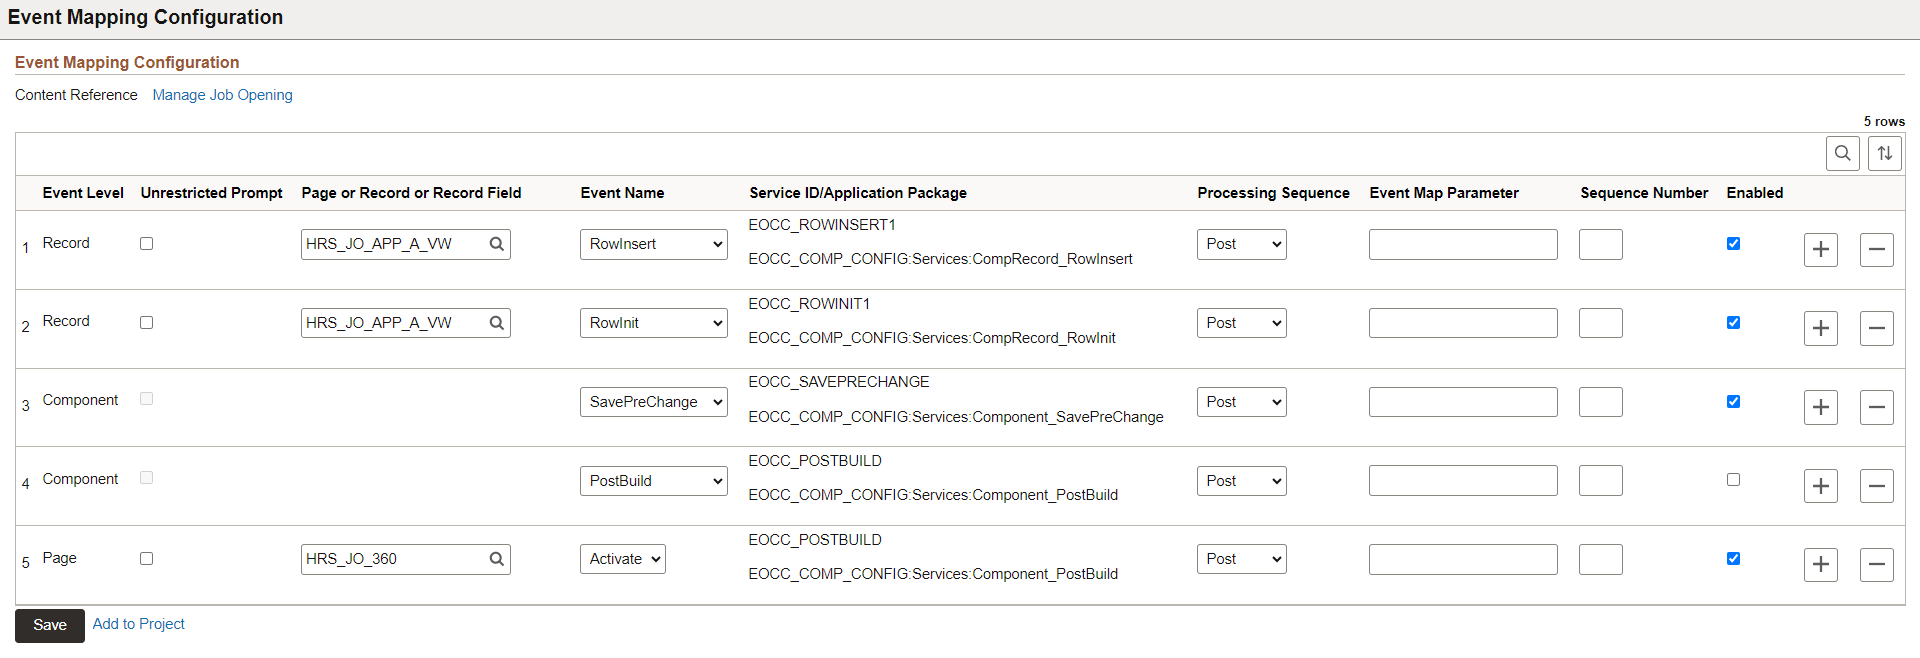
Select Review/Edit Mapping to open the Event Mapping Configuration page. Uncheck the Enabled field for component with Event Name PostBuild.
Add a new row under Event Mapping Configuration with the below details and save the page:
Event Level: Page
Page or Record or Record Field: HRS_JO_360
Event Name: Activate
Service ID/Application Package: Copy the Service ID from the row for component with Event Name PostBuild
Processing Sequence: Post
Enabled: select the check box
This example illustrates the Event Mapping Configuration for Manage Job Opening page.
Group Action
Note: The number of rows that can be included in a group action can be limited using the Group Action Limit field on the Recruiting Installation – Applicants Page. If a user attempts to perform a group action when too many rows are selected, the system displays a message informing the user of the limit.
Field or Control |
Description |
|---|---|
Select All and Deselect All |
Use these links to select or deselect grid rows so that you can perform group actions on the selected rows. |
Group Action |
Click to display a menu of group actions that you can perform for the selected applicants. The actions appear under two sub-menus. Under the Recruiting Actions sub-menu, you can choose these actions:
Under the Applicant Actions sub-menu, you can choose these actions:
See Understanding Actions for Managing Applicants. Note: The number of rows that can be included in a group action can be limited using the Group Action Limit field on the Recruiting Installation – Applicants Page. If a user attempts to perform a group action when too many rows are selected, the system displays a message informing the user of the limit and stating that only the allowed number of rows will be processed. If the user continues, the system processes the allowed number of rows, starting at the beginning of the list and following the grid sort order. Even if the user cancels, the system deselects all rows after the specified limit, and the user can review which rows will be processed before re-initiating the action with an allowable number of selected rows. |
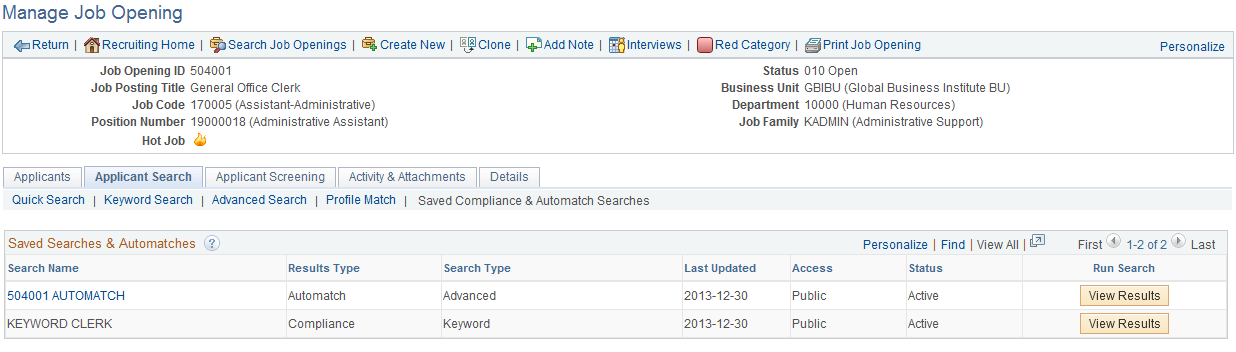
Use the Manage Job Opening page: Applicant Search tab (HRS_REC_SCHAPP) to search for applicants for the job opening.
Note: The Applicant Search tab on the Manage Job Opening page is actually the Search Applicants Page rendered in the context of the Manage Job Opening page. This tab is visible only to users who have security access to the Search Applicants page.
Navigation:
Access the Manage Job Opening Page, then click the Applicant Search tab.
This example illustrates the Manage Job Opening page: Search Job Openings tab. In this example, the Saved Compliance & Automatch Searches section is displayed. The other sections (Quick Search, Keyword Search, Advanced Search, and Profile Match) are identical to their counterparts on the Search Applicants page.
Search Sections
Field or Control |
Description |
|---|---|
Quick Search, Keyword Search, Advanced Search, and Profile Match |
These sections are identical to the search options on the Search Applicants Page. The search results in these sections provide access to the same actions (and group actions) that are available when you search applicants outside the context of a job opening. Note that if you perform the Link Applicant to Job action from the context of a job opening, the current job opening ID is the default job opening for the link action. |
Saved Compliance and Automatch Searches
The Saved Searches & Automatches section renders the Saved Searches Page within the context of the job opening. In this context, the grid shows only the saved searches that are associated with the current job opening (and therefore doesn’t include the column that normally identifies the associated job opening).
Searches are associated with a job opening only if the job opening ID is part of the search criteria. It is not relevant whether the search is saved from the stand-alone Search Applicants page or from the context of the job opening.
The same grid also appears on the Manage Job Opening Page: Activity & Attachments Tab
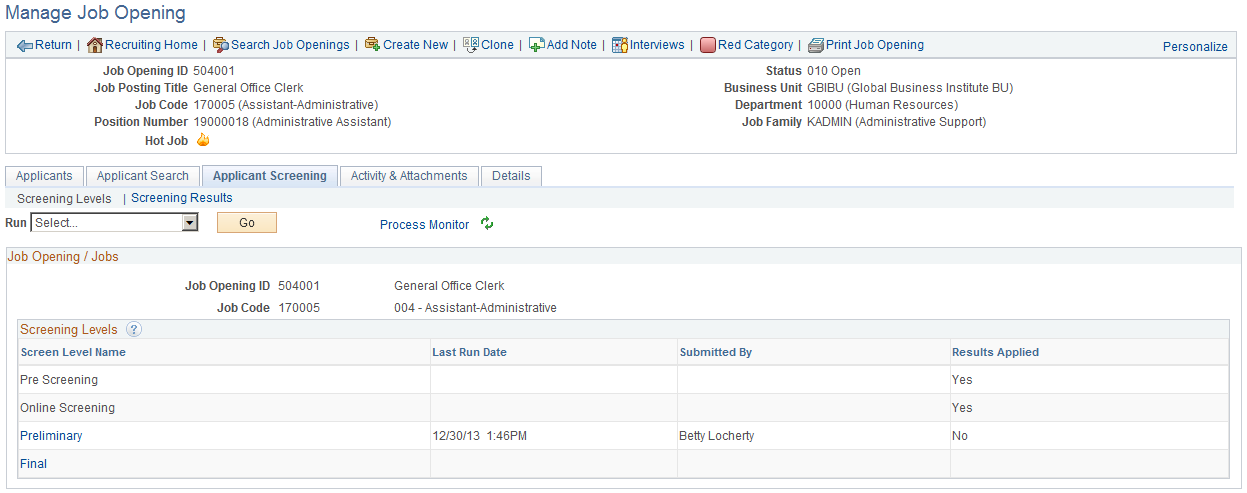
Use the Manage Job Opening page: Applicant Screening tab (HRS_JO_SCR_LVL) to run screening processes.
Note: This tab is visible only if the user has security access to screening pages and if the job opening has at least one standard screening level (a screening level that is not for prescreening or online screening).
Navigation:
Access the Manage Job Opening Page, then click the Applicant Screening tab.
This example illustrates the Manage Job Opening page: Applicant Screening tab.
Note: For detailed information about screening applicants, see Running Screening Levels and Applying Results
Field or Control |
Description |
|---|---|
Screening Level |
This section displays summary information about the job opening’s screening levels. If the job opening has multiple job codes, you can scroll to see the screening levels for each job code. For detailed information, see Manage Job Opening Page: Applicant Screening Tab: Screening Level Section |
Screening Results |
This section is available only if screening results exist, either because applicants have undergone prescreening or online screening, or because a recruiting user has run a standard screening level. The Screening Results section lists all screening levels that have results and provides summary statistics about the applicants who were processed. You can select any screening level to see a complete list of applicants who were processed, along with results for each applicant. For detailed information, see Manage Job Opening Page: Applicant Screening Tab: Screening Results Section |
Use the Manage Job Opening page: Activity & Attachments tab page (HRS_JO_360) to review job status history, notes, attachments, expenses, and saved results from applicant searches.
Navigation:
Access the Manage Job Opening Page, then click the Activity & Attachments tab.
This example illustrates the Manage Job Opening page: Activity & Attachments tab.
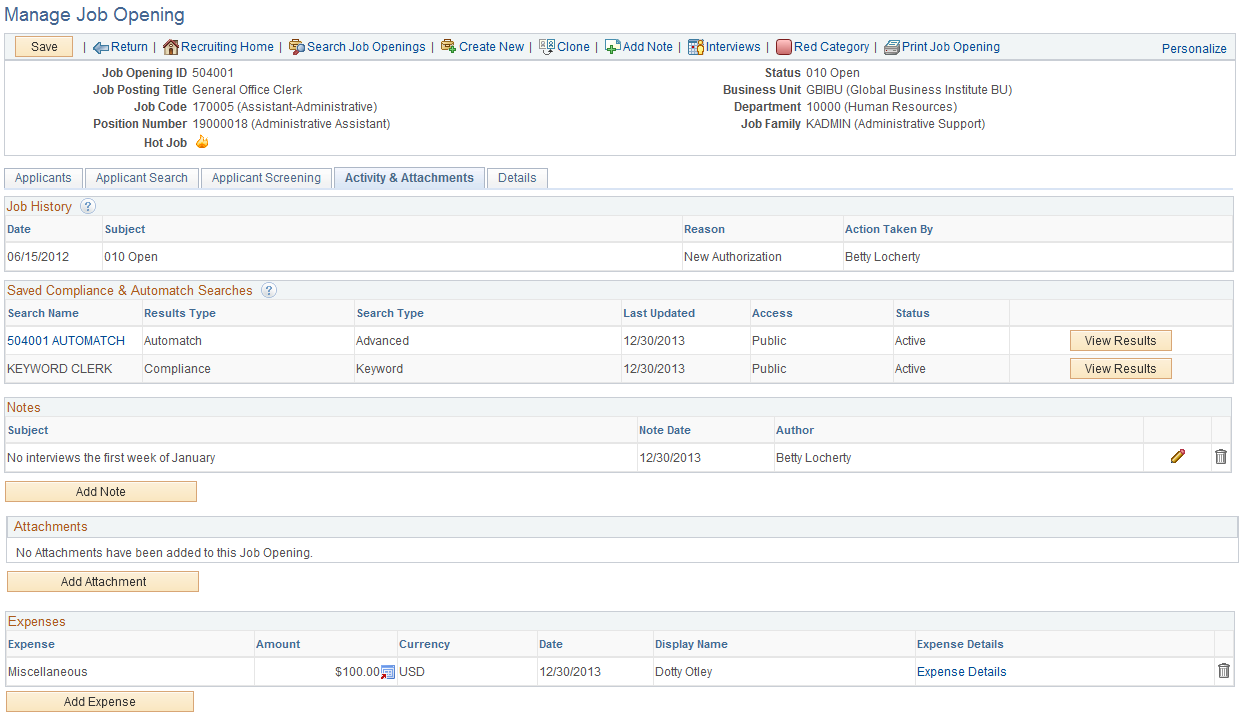
Job History
This grid provides a status history of the job opening.
Field or Control |
Description |
|---|---|
Date |
Displays the date the status was assigned. |
Subject |
Displays the status description. |
Reason |
Displays the status reason, if one was supplied when the status was assigned. |
Action Taken By |
Displays the name of the person whose action updated the status. |
Saved Compliance & Automatch Searches
This grid renders the Saved Searches Page within the context of the job opening. In this context, the grid shows only the saved searches that are associated with the current job opening (and therefore doesn’t include the column that normally identifies the associated job opening).
Searches are associated with a job opening only if the job opening ID is part of the search criteria. It is not relevant whether the search is saved from the stand-alone Search Applicants page or from the context of the job opening.
The same grid also appears on the Manage Job Opening Page: Applicant Search Tab.
Notes
This grid displays a list of notes related to the job opening.
Note: The audience for the note determines which users can access note details. The audience is set on the Job Opening Notes detail page and is not visible in this grid.
Field or Control |
Description |
|---|---|
Subject |
Displays the subject of the note. |
Note Date |
Displays the date that the note was created. |
Author |
Displays the name of the person who created the note. If the note is private, only the author can access the note details. |
|
Click to access the note details on the Job Opening Notes Page. The note audience determines which users can access or edit note details:
|
|
Regardless of the note audience, the only users who can delete a note are the author or an administrator. |
Add Note |
Click to display the Job Opening Notes page and enter a new note. |


Attachments
This grid displays a list of attachments related to the job opening.
Field or Control |
Description |
|---|---|
File Name |
Displays the file name of the attachment:
|
Description |
Enter a description for the attachment:
|
Audience |
The audience controls access to the attachment:
Regardless of the audience, the person who uploaded the attachment and administrators are the only users who can delete attachments and modify the attachment audience. Interview attachments don't automatically appear on the Interview Schedule page, but the Interview Schedule page provides links that enable you to copy Interview attachments from the job opening to the interview. |
Updated |
Displays the date and time that the attachment information was last updated. |
Uploaded By |
Displays the name of the user who uploaded the attachment. |
Add Attachment |
Click to display the File Attachment dialog box and upload a new attachment. |
Expenses
This grid displays a list of expenses associated with the job opening.
Field or Control |
Description |
|---|---|
Expense |
Displays the value from the Expense Code field on the Add Expenses page. |
Amount, Currency, and Date |
These fields show the amount and date of the expense. |
Display Name |
If the expense is associated with an applicant, this field displays the applicant’s name. |
Expense Details |
Click to display the Add Expenses page and view the detailed information of the expense. |
Add Expense |
Click to display the Add Expenses page, where you can add a new job opening related expense. |
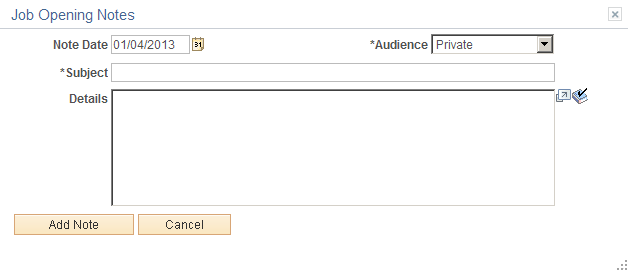
Use the Job Opening Notes page (HRS_JO_NOTE_SEC) to add or edit a job opening note.
Navigation:
On the Manage Job Opening page: Activity & Attachments tab, click the Add Note button or click the Edit icon for an existing note.
Click the Add Note toolbar button on the Manage Job Opening page.
This example illustrates the Job Opening Notes page.
Field or Control |
Description |
|---|---|
Note Date |
Enter a date for the note. |
Audience |
Select the audience for this note. Valid options are:
Note: Only the note author or an administrator can modify the audience for an existing note. |
Subject |
Enter the note subject. The subject is visible to everyone with access to the job opening. |
Details |
Enter the note details. Details for private notes are visible only to the creator of the note. |
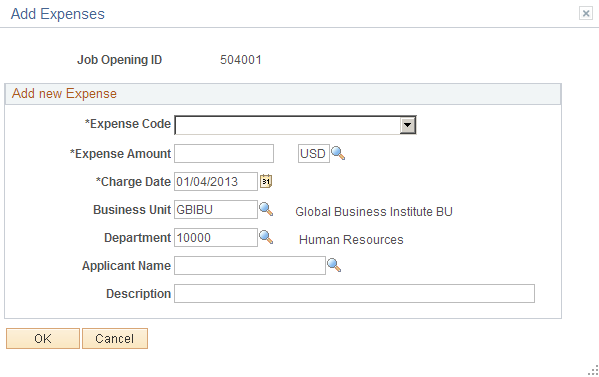
Use the Add Expenses page (HRS_JO_EXPENSE_SEC) to add an expense to a job opening.
Navigation:
Click the Add Expense link on the Manage Job Opening page: Activity & Attachments tab, or click the Expense Details link for an existing expense.
This example illustrates the Add Expenses page.
Field or Control |
Description |
|---|---|
Expense Code |
Select the expense code. The available values are the same as those for recording employee expenses on the Employee business expenses Page. These values come from the translate table. To modify the list of expense codes, update the translate table values for the field EXPENSE_CD. |
Expense Amount |
Enter the amount of the expense. |
Charge Date |
Enter the date the expense was incurred. |
Business Unit |
Select the business unit. The default is the business unit that is associated with the job opening. |
Department |
Select the department. The default is the department that is associated with the job opening. |
Applicant Name |
Enter the applicant name if the expense is associated with a specific applicant. |
Description |
Enter a description of this expense. |
Use the Manage Job Opening page: Details tab (HRS_JOB_OPENING) to review or edit job opening data, including job information, job qualifications, screening settings, postings, and hiring team members.
Note: The Details tab on the Manage Job Opening page is actually the Job Opening Page rendered in the context of the Manage Job Opening page.
Navigation:
Access the Manage Job Opening Page, then click the Details tab.
This example illustrates the Manage Job Opening page: Details tab.
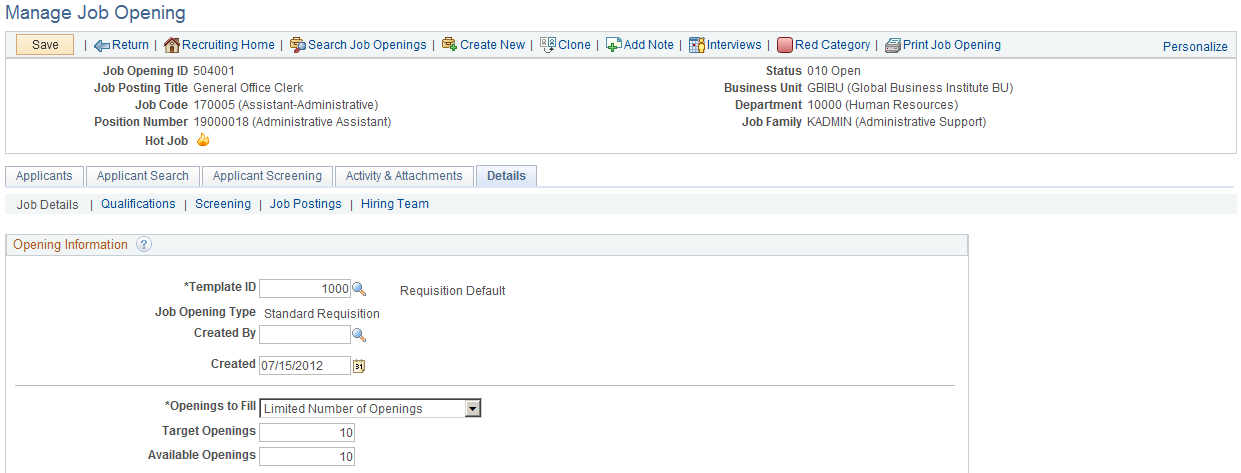
This tab provides access to the same job opening data that was shown on the Job Opening Page when the opening was initially created. In both cases, the layout and content of the page come from the job opening template.