Understanding Additional Payment Processing Options
The payment process routine should satisfy your business needs, but there may be times when you need additional options. If you need to print a check immediately, for example, you cannot wait for the next pay cycle run. For this reason, PeopleSoft Payables provides additional payment processing options.
This section discusses the following:
Express payments.
Manual payments.
Manual payment eligibility requirements.
Payment request.
Payment request approval using Fluid user Interface
Payment cancellation.
Payment escheatment.
Payment forecasting.
Bank transfer charge process.
Reschedule payments process.
PeopleSoft Payables express payments enable you to create payments quickly outside of your regular payment cycles. Vouchers must be entered into the system and be approved for payment before you can create an express payment. Express payments offer you a lot of flexibility on paying your suppliers on demand. You can pay a single voucher or you can search other vouchers for that supplier and select only those that you want paid. If there are multiple payment schedules within a voucher, you can select all or just the payment schedule numbers that you want to pay.
In addition, you identify the payment details, such as the date that prints on the check, and the number of the check. You can also specify the bank information and pay method associated with the express payment.
You can also enter a voucher and record a manual payment at the same time.
Pay method options available on the Express Payment page include:
ACH (automated clearing house).
EFT Draft (electronic funds transfer customer draft).
Cust Draft (customer-initiated draft).
Check (system check).
EFT (electronic funds transfer).
Giro - EFT (giro electronic funds transfer).
Important! Express payments do not support overflow advice.
Note: If financial sanctions validation is enabled at the installation level or the bank level, you cannot create an express payment if the supplier has a financial sanctions status of Review or Blocked. However, if financial sanctions validation is enabled at the bank level and you no longer validate for a particular supplier's bank, the system may allow you to create an express payment for a supplier with a financial sanctions status of Review. The system validates the supplier against financial sanctions lists (for example, the Specially Designated Nationals (SDN) list) when you attempt to create an express payment.
There are two ways of creating manual payments in PeopleSoft Payables:
Using the online voucher entry component.
Using the Manual Payment Creation feature.
Manual Payments Using Online Voucher Entry
When you record manual payments in the online voucher entry component you create a voucher for the payment just as you would for a normal invoice and select Record as the payment Action on the Payments page. Basically, you create a voucher and a payment for that voucher simultaneously, but the system does not generate a check or other payment form.
Payment posting, reissuing, closing, and voiding all work the same as they do for payments created with the pay cycle.
Note: If financial sanctions validation is enabled at the installation level or the bank level, you cannot select Record as the payment action if the supplier has a financial sanctions status of Review or Blocked. However, if financial sanctions validation is enabled at the bank level and you no longer validate for a particular supplier's bank, the system may allow you to create a manual payment for a supplier with a financial sanctions status of Review. The system validates the supplier against financial sanctions lists (for example, the SDN list) when you attempt to save a voucher.
Manual Payments Using the Manual Payment Creation Feature
Using the Manual Payment Creation feature, you create a payment, but you apply it to existing vouchers rather than creating a voucher specifically for the payment. The Manual Payment Creation feature enables you to track manual payments in your PeopleSoft Payables system by creating manual payment worksheets and applying one or more vouchers to them. For example, if you write a check to a supplier outside the system, you can record that manual payment in PeopleSoft Payables and apply vouchers for that supplier against the payment so that your balance with the supplier reflects the manual payment.
Payment posting, reissuing, closing, and voiding work the same as they do for payments created with the pay cycle.
Note: If financial sanctions validation is enabled at the installation level or the bank level, you cannot create a manual payment worksheet if the supplier has a financial sanctions status of Review or Blocked. However, if financial sanctions validation is enabled at the bank level and you no longer validate for a particular supplier's bank, the system may allow you to create a manual payment worksheet for a supplier with a financial sanctions status of Review. The system validates the supplier against financial sanctions lists (for example, the SDN list) when you attempt to build a manual payment worksheet.
Manual Payment Methods Compared
These features provide different benefits. Decide on a case by case basis which feature meets your business needs.
|
Manual Payment Creation Process |
Recording Manual Payments Using Online Voucher Entry |
|---|---|
|
Enables you to associate multiple scheduled payments for multiple vouchers. |
Enables you to associate only one scheduled payment for one voucher. |
|
Once you save the manual payment, you cannot delete it. You can, however, cancel the manual payment using payment cancellation. |
You can toggle back and forth between the Record and Schedule options on the Voucher - Payments page. If you decide not to record the payment, you can switch from Record to Schedule and the system deletes the payment from the PAYMENT_TBL at save time. |
|
Payments are not created in the PAYMENT_TBL until they are fully applied. This means that you can only create a manual payment for amounts equal to existing scheduled payments, or the sum of two or more scheduled payments. For example, if you create a payment for 5000 USD, but you only have voucher scheduled payments for this supplier equal to 4500 USD, you cannot fully apply the manual payment and therefore the payment cannot be created. Likewise, if you have one scheduled payment equal to 4000 USD and another equal to 2000 USD, you cannot partially apply either of the scheduled payments and cannot fully apply the manual payment. You can, however, save the manual payment worksheet and modify it later. When you save the worksheet, Pay Cycle Manager and Express Check bypass any voucher checked for select on the Apply Vouchers page of the worksheet, so that those vouchers remain available for application to manual payments. When you create the worksheet, it is inserted into the worksheet tables APD_MANDFT_SRCH and APD_MANDFT_WS. Once you successfully create the manual payment in PAYMENT_TBL, the system deletes the worksheet data from the worksheet tables. |
Payments selected as Record are created in the PAYMENT_TBL at save time, as long as the amount of the payments entered adds up either to the gross amount or to the gross less the discount, as specified on the Invoice Information page. |
Withholding On Manual Payments
In PeopleSoft Payables, you can elect to calculate withholding at payment time or at voucher posting time via a setting on the withholding entity. This withholding calculation setting appears by default onto the voucher. If withholding for a voucher is set to be calculated at payment time, users with the appropriate authority can override this setting to have withholding calculated at voucher posting time.
In the case of manual payments, the system invokes the withholding calculation routine for any payments applied to withholding applicable vouchers. The withholding reporting tables are updated accordingly.
On the Create Manual Payment page, you can apply manual payments to vouchers that have already had withholding calculated at voucher posting time. If the Withholding Calculated field is selected (the default setting), the system allows you to apply manual payments to vouchers that are set to withhold at voucher post and have been posted.
You also have the option of deselecting this check box, in which case the system allows you to apply manual payments to all withholding applicable vouchers for the remit supplier, regardless of whether or not withholding has been calculated. The only exception are vouchers requiring withholding calculation at voucher post that have not been posted as of yet. In this case, the system does not physically withhold, but does update the withholding reporting table with the applicable withholding transaction amount for reporting purposes.
Scheduled payments are only available for application on the Apply Voucher page, if they meet certain eligibility requirements:
Voucher Style: Regular, Register Voucher, Reversal Voucher, Third-Party Voucher, or Adjustment Voucher.
Prepaid vouchers are not eligible.
Voucher: Approved, budget-checked, and postable.
Scheduled Payment: No netting and no payment hold.
Match status: Matched and no match.
Note: If you select the Pay Unmatched Voucher option on the Procurement - Payables Online Vouchering page, vouchers with the following match statuses are also available for payment: manually overridden, match dispute, match exceptions exist, overridden - credit note, and to be matched.
Business Unit and Currency Considerations
Depending on your setup, the list on the Apply Voucher page may contain scheduled payments from multiple business units with multiple payment methods or multiple payment currencies.
If you select the Do Not Mix with other Units option for the selected business unit on the Payables Definition - Payments page, the list contains scheduled payments for other business units, but you can only select and apply scheduled payments that have the same business unit.
If the supplier has scheduled payments with different payment currencies, the system converts the amount to the currency of the manual payment and displays it in the Paid Amount field. At save time, if the payment amount is fully applied, the payment is created and scheduled payments are updated with appropriate paid information, converted currency amounts, and status.
PeopleSoft Payables provides users with a feature to enter payment requests such as non-PO, miscellaneous and other expenses into PeopleSoft. Payment Request empowers the users to submit their own expenses, which results in alleviating the workload in Payables by limiting it to review, correct, and audit the transactions. This self-service feature enables users to create payment requests outside of the purchasing system and without having to know Payables.
Click to watch a short video about PeopleSoft Payment Request
Configuration Options and Requirements for Payment Request
A configuration template enables users to configure fields or functionality on the payment request pages. The Payment Request template is located on a separate tab on the Payables Product Related component.
Payment Request Approval Workflow and Review Submittal
The payment request has the following methods of approval and workflow processes:
Workflow Approval: Users can enable the workflow framework to approve the Payment Request. The approver having Reviewer permissions will have access to the Payment Request pages to make necessary changes to the request and then to return to approval framework for approving it. Diagram 1 illustrates the AWE Workflow Approval.
Review before Workflow Approval: Users can enable to initiate a review/edit process for reviewers before the Payment Request goes to workflow approval for approval. Diagram 2 illustrates Review before Workflow Approval.
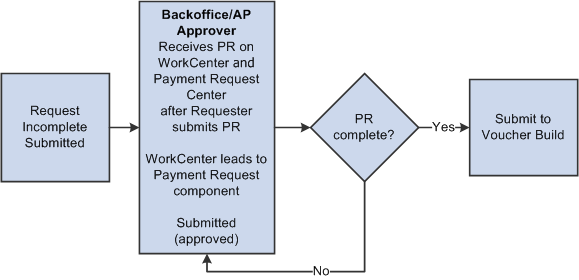
AP Review - No Workflow Engine: Enable a review/edit process for users with Reviewer Role permissions before the Payment Request goes to Voucher Build process. Diagram 3 illustrates the process with no workflow approval implementation.
This diagram illustrates the concept of AWE Workflow - AP as Final Approver:
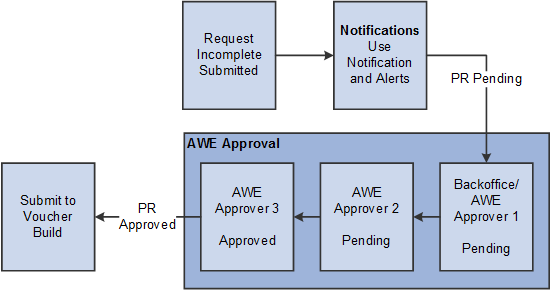
Note: One of the AWE Approvers can be designated as the Backoffice user.
This diagram illustrates the concept of AWE Workflow - Back Office Separate from Final Approver:

This diagram illustrates the concept of No AWE - Back Office same as Final Approver:
Payment Request Center
Payment Request Center is a centralized page where users can see all their payment requests, filter payment requests, add, edit, cancel, and view payment requests, along with answering questions.
The Payment Request occurs through a “train stop” comprising of four pages, from creating a request to submitting it:
Payment Summary Information.
Supplier Information.
Line Details.
Review and Submit.
Users create Payment Requests by accessing the pages and completing the request using a train stop progression. When a user initiates a Payment Request, it is assigned an auto-generated Payment Request ID number. Payment request ID uses auto numbering to assign the next available ID when a new Payment Request gets created.
An approver can view transactions pending their approval under one interface, thus eliminating the need to go to several different components to look for pending approvals. The Pending Approvals pages:
Group pending approvals by type, date received, from (last sender), and person.
Filter pending approvals by type, date, and from
Display details of each approval request, including the approval chain.
Provide AWE actions like Approve and Deny.
PeopleSoft Payables provides two methods for cancelling payments:
The Cancel Payment component (PYMNT_CANCEL) enables you to cancel individual payment.
The Mass Payment Cancellation component (AP_PMT_MASS_CNL) enables you to cancel multiple payments.
The Mass Payment Cancellation component provides you the ability to cancel a selected population of payments. For example, an interface from payroll may have been processed in error and all payments for that source may need to be cancelled. You can also cancel an entire pay cycle or single or multiple ranges of payment references within a pay cycle.
With PeopleSoft Payables, you can record:
Stop payments: Checks that you have already sent out for which you have asked the bank to stop the payment.
Void payments: Payments that you decide to cancel before you send them out.
The system automatically reconciles a voided payment.
PeopleSoft Payables backs out all payment information for the vouchers affected by a canceled payment. You can optionally reopen or close those vouchers the next time that you run voucher and payment posting. If you reopen vouchers for payment, you can specify whether to pay the same amount or to recalculate the payment amount.
You can only cancel reconciled payments if you have the Federal Payments feature enabled. If you do not have this feature enabled, the system only returns unreconciled payments.
Important! You cannot cancel prepayments, nor can you cancel a payment if it is for a regular voucher that you have applied to a prepayment.
When you cancel a payment, select one of two processing options to create the necessary accounting entries information:
For canceled payments marked with the Do Not Reissue/Close Liability option, run both the Payment Posting Application Engine process (AP_PSTPYMNT) and the Voucher Posting Application Engine process (AP_PSTVCHR), which creates accounting entries from both payment-related transactions and vouchers.
For all other canceled payments, run the Payment Posting process, which creates accounting entries from payment-related transactions.
Note: You must run the Journal Generator Application Engine process (FS_JGEN) to generate General Ledger journals for these accounting entries.
Payment Cancellation and PeopleSoft Financial Gateway
When you cancel payments that are settled through PeopleSoft Financial Gateway, the system creates and sends a cancel payment message to PeopleSoft Financial Gateway. This message can contain an individual cancel payment or multiple cancel payments depending on if you use the Cancel Payment component or the Mass Payment Cancellation component, respectively.
To cancel payments settled through PeopleSoft Financial Gateway, the payment's settlement status must have a value of Error, Hold, or Loaded.
The system handles PeopleSoft Financial Gateway payment cancellation in one of two ways, depending on if the payment is processed or not. Assuming that a payment is pending processing—meaning, it has a Loaded status in the PeopleSoft Financial Gateway staging tables—one of the following two scenarios happens:
If PeopleSoft Financial Gateway receives the cancellation message in time, it removes the payment from the staging table and sends it back to the PeopleSoft Payables system. PeopleSoft Payables then updates the payment's status to Canceled.
If PeopleSoft Financial Gateway does not receive the cancellation message in time—meaning, PeopleSoft Financial Gateway is currently processing the payment—the system prevents payment cancellation, even though payment displays only a Loaded status. In this scenario, PeopleSoft Financial Gateway sends an error acknowledgement message to PeopleSoft Payables. Until PeopleSoft Payables receives another message and updates the payment status to Paid, you cannot cancel the payment.
PeopleSoft Financial Gateway payments can also be out of synchronization ("out of sync") between PeopleSoft Financial Gateway and Payables. This occurs when you attempt to reverse (or undo) a canceled payment, as no message is sent to PeopleSoft Financial Gateway to keep the systems synchronized. The system displays a warning message when you try to save these types of reversed canceled payments.
Occasionally, an organization issues a check to a supplier, but the supplier does not deposit it. Perhaps the supplier goes out of business. Whatever the reason, the check becomes stale-dated. In rare cases, a stale-dated check must revert to the state if no legal heirs or claimants exist.
When you identify a check as stale dated, it is informational only. When you decide to escheat a stale-dated check, you use the Payment Escheatment component (PYMNT_ESCHEATED) to escheat an individual payment:
PeopleSoft Payables enables you to reclassify the stale-dated check to an escheat liability account by debiting cash and crediting escheatment liability. When users escheat payments, they enter an escheatment date. The system uses the escheatment date to control the accounting for the escheatment entry.
Note: The system uses the escheatment date to compare to the effective date of the Accounting Entry template and then selects the active template.
Payment posting treats an escheated payment like a voided payment except that there is no option to close or restate the voucher liability.
When you escheat a payment, you can select on-demand processing options to run just the Payment Posting process, or both the Payment Posting process and Journal Generator process.
Running only the Payment Posting process creates accounting entries that reverse the cash entries to an escheatment liability account, which users predefine on the Accounting Entry template.
The system records the escheatment liability account to the vouchering GL business unit and the cash entry to the bank's cash GL business unit. If they are different business units, the system generates InterUnit entries.
Note: Use the Accounting Entry Template page to modify the accounts and effective dates if you use separate accounts for different periods. For example, you report California escheated payment transactions on November 1, 2006. You use a different escheatment account for the following year's transactions. Enter a new effective row dated November 1, 2006 and modify the account. This ensures the system uses the new account for the following year's escheated payment transactions.
Running both processes does the accounting entry work (discussed in the first bullet point) and also creates the General Ledger journals.
Note: Escheatment liability entries will reverse all chartfields from the expense entry, except ACCOUNT and ALTACCT. Intra Unit entries will not be generated as chartfield values will be inherited from cash entries. Inter Unit entries will be created accordingly.
PeopleSoft Payables provides payment forecasting, which enables you to view expected cash disbursements over a longer time span rather than the next pay through date.
PeopleSoft Payables provides bank transfer charge processing for businesses in which suppliers are often responsible for the bank transfer charge that is deducted from the payment. The system automatically calculates and creates electric funds transfer (EFT) payments and creates reports of bank transfer charge transactions.
The bank transfer charge process calculates the actual payment amount by deducting the bank transfer charge from the payment amount in cases when the supplier pays the charge. This operation is processed only for EFT payments and takes place within the pay cycle. The system generates the EFT file using the adjusted payment amount. The applicable amount of the bank transfer charge is defined in the bank transfer charge code and identified by the combination of bank and file layout. Alternatively, the amount of the charge can be a unique specified amount at the supplier location. This process is enabled at the bank and supplier location levels.
Bank Transfer Charge Autodeduction
If you enable the bank transfer charge option, the system creates a transaction for the charge during the pay cycle, and generates the accounting entry for the charge at the payment posting.
Consider the following during autodeduction:
Calculation basis.
Separate payments, pay groups, and mixing with other business units.
Canceling payments.
Non-EFT payments.
Bank Transfer Charge Calculation Basis
When you enable the bank transfer charge option using the Bank Transfer Charge table, the system calculates the amount of the charge based on the payment amount.
Separate Payments, Pay Groups, and Mixing with Other Business Units
The bank transfer charge is calculated based on the payment. If one voucher has the Separate Payment check box selected on the Voucher component (VCHR_EXPRESS), the bank transfer charge of this payment is calculated separately from other payments.
The process is the same for calculations based on the pay group. When the payments are grouped using group IDs, the charge is calculated for each group ID.
In the same manner, if one business unit has the Do Not Mix with other Units option selected on the Payables Definition component (BUS_UNIT_TBL_AP), and if payment for this business unit is made separately, the bank transfer charge is also calculated separately based on the payment amount of the business unit.
On the other hand, if one business unit has the Do Not Mix with other Units option disabled (which means that the transactions of this business unit can be paid with the transactions of other business units), the bank transfer charge is calculated based on the payment amount that includes the transactions of other business units.
Canceling Payments
The accounting entry for a bank transfer charge suspense is created during payment posting. At this point, the gross amount is divided into two parts: the actual payment and the bank transfer charge. If this payment is canceled, reverse accounting will generate for all entries, including the bank transfer charge.
Non-EFT Payments
The bank transfer charge is processed only for EFT payments. (EFT does not include Draft EFT and Giro EFT.)
Important! If there are any setup steps missing, the bank charge is not deducted. For instance, if supplier location is set up to use the Bank Transfer Charge table, but the table was not found during the payment process, the pay cycle completes without errors and the bank transfer charge is not deducted from the payment amount. In this case, a message is logged to the PeopleSoft Process Monitor.
Rescheduling payments is a common business process in some countries. The Reschedule Payments Application Engine process (which includes both the AP_SMT_SEL and AP_SMT_SPLIT Application Engine processes) provides the functionality in PeopleSoft Payables.
To run the Reschedule Payments process, first set up reschedule payments conditions—which define agreements between you and suppliers—and reschedule payments options for suppliers—which associate suppliers with the Reschedule Payments process.
Generally, reschedule payments is a settlement method that profiles the payment methods, conditions, and amounts, depending on the total number of transactions in a certain period of time.
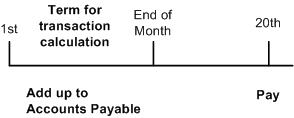
In some countries, such as Japan, customers usually do not issue a payment to their suppliers for each transaction. Instead, the supplier summarizes the transactions and charges for the total amount of the transactions based on prior agreements. The supplier summarizes the transactions and charges for the total amount of the transactions. Then, the customer issues a payment to the supplier on a specific date. Suppose that you made an agreement with a supplier to issue a payment on the 20th day of the next month for all transactions in that month. The supplier charges you for the total amount of transactions in the month, and you issue a payment on the 20th day of the next month. The period of time for transactions is usually one month, which can start on any day (the 1st, 15th, 20th, 25th, and so forth).
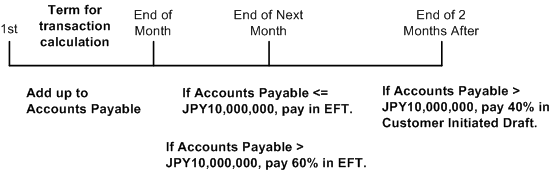
Split Multiple Payment Terms diagram.
Different payment conditions and methods are applied depending on the total amount of the invoices, as illustrated by the following examples.
Example 1
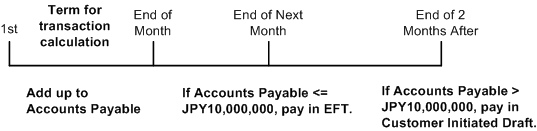
If the total amount of the invoices is less than or equal to 10,000,000 JPY, pay in EFT at the end of the next month. If the total amount of the invoices is over 10,000,000 JPY, pay in customer initiated draft at the end of the next month.
Example 1
Example 2
You could choose to reschedule the total amount of invoices and apply different payment methods and conditions to each amount.
If the total amount of the invoices is less than or equal to 10,000,000 JPY, pay in EFT at the end of the next month. If the total amount of the invoices is over 10,000,000 JPY, reschedule the total amount into portions of 60 percent and 40 percent. Then pay the 60 percent amount in EFT at the end of the next month and pay the 40 percent amount in customer initiated draft at the end of two months.
Example 2
Example 3
In a more complicated scenario, you might run the Reschedule Payments process several times in a certain period of time.
Run it on the 15th and at the end of the month. On the 15th, reschedule the total amount of the invoices into two portions: pay in EFT for 60 percent, and then pay in customer initiated draft for 40 percent with a due date of the 10th of the next month. At the end of the next month, you pay the sum of the amount corresponding to 40 percent in the previous process and the amount of the invoices that come after the 15th in customer initiated draft.
Example 3

Processing Vouchers with Reschedule Payments Processing
For example, you run the Reschedule Payments process twice every month (on the 15th and at the end of the month) for the vouchers with due dates in the month that you run it. Use the 10th as the basis date when you run the Reschedule Payments process on the 15th and use the 20th as the basis date when you run it at the end of month.
The total amount of vouchers for a supplier that you process with the Reschedule Payments process is 15,000,000 JPY on July 15, 2006.
In this case, the Reschedule Payments process reschedules the total amount into portions of 60 percent and 40 percent because the basis date is July 10, 2006. For vouchers for 60 percent (9,000,000 JPY), the end of the month (July 31, 2006) is set as the payment condition and EFT is set as the payment method. For vouchers for 40 percent (6,000,000 JPY), the end of the month (July 31, 2006) is set as the payment condition, customer initiated draft is set as the payment method, and MONT3 (October 31, 2006) is set as the draft sight. The system recalculates the due date, scheduled pay date, and draft maturity date based on the basis date of July 10, 2006.
New vouchers worth 14,000,000 JPY are entered after July 15, 2006. Because the Reusable check box for vouchers for 40 percent (6,000,000 JPY) was selected in the previous process, the vouchers worth 6,000,000 JPY plus newly entered vouchers worth 14,000,000 JPY are processed by the Reschedule Payments process this time. Therefore, the vouchers worth 20,000,000 JPY are split into portions of 50%, because the basis date is July 20, 2006. For vouchers for one half (10,000,000 JPY), the 10th of the next month (August 10, 2006) is set as the payment condition and CHK is set as the payment method. For vouchers of the other half (10,000,000 JPY), the 10th of the next month (August 10, 2006) is set as the payment condition, the customer initiated draft is set as the payment method, and MONT3 (November 10, 2006) is set as the draft sight. The due date, scheduled pay date, and draft maturity date are recalculated based on the basis date of July 20, 2006.