Creating Connections
You define connections to the specific cloud applications that you want to integrate. The following topics describe how to define connections:
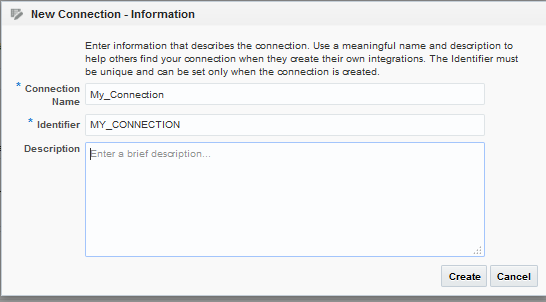
Creating a Connection
The first step in creating an integration is to create the connections to the applications with which you want to share data.
Adding a Contact Email
From the Connection Administrator section of the connection, you can add a contact email address for notifications.
- In the Email Address field, enter an email address to receive email notifications when problems occur.
- In the upper right corner, click Save.
Configuring Connection Properties
Enter connection information so your application can process requests.
Specifying the Oracle RightNow Cloud WSDL
The following table describes the Oracle RightNow WSDL requirements.
| WSDL Requirements | Where Do You Get the WSDL |
|---|---|
|
Only the standard WSDL is supported. The partner WSDL is not supported. |
The standard WSDL can include support for both business objects and event subscriptions. This enables you to receive either a business object or an event subscriptions as a request from the Oracle RightNow application. Event subscriptions are supported only if the Oracle RightNow application version is equal to or greater than version 15.5 (May 2015 release). Otherwise, only business objects are visible for selection in the configuration wizard. To obtain the standard WSDL:
|
Specifying the Oracle Sales Cloud Adapter Service Catalog Service WSDL or Event Catalog URL
You must specify a mandatory Oracle Sales Cloud Adapter service catalog service WSDL (for accessing business objects) and optionally an event catalog URL (for accessing event subscriptions) in the Connection Properties dialog.
A mandatory Oracle Sales Cloud Adapter service catalog service WSDL is required to configure the adapter for both inbound and outbound endpoints using either business objects or business services. You can also optionally specify an event catalog URL for accessing and configuring the inbound adapter to use event subscriptions.
Obtaining the Service Catalog Service WSDL
| WSDL Requirements | Where Do You Get the WSDL? |
|---|---|
|
The URL must be that of a service catalog service WSDL. The service catalog service is a Fusion Application service that returns a list of external services available for integration. It allows clients to retrieve information about all public Fusion Application service endpoints available for that instance. The service catalog service enables clients to retrieve information about all public Oracle Fusion Application service endpoints available for that instance. The information it returns is specific to the particular cloud instance and also reflects the new services that may have been introduced in patches applied to the instance. This service is used to programmatically discover the SOAP services available on the cloud instance and retrieve the necessary metadata to invoke the SOAP services to manage business objects. |
The developer creating an Oracle Sales Cloud connection must work with the Oracle Sales Cloud service administrator to get the concrete WSDL URL for the service catalog service provisioned for the specific SaaS application. |
This section describes how to derive the external virtual host and port for a tokenized service catalog service WSDL. The topology information in the Topology Registration setup task contains the external virtual host and port for the domains and applications. The following instructions describe the steps for deriving the values using the service catalog service WSDL URL as an example: https://atf_server:port/fndAppCoreServices/ServiceCatalogService.
To access the Review Topology page, the ASM_REVIEW_TOPOLOGY_HIERARCHY_PRIV entitlement must be granted to the user’s job role. The entitlement is granted to the ASM_APPLICATION_DEPLOYER_DUTY duty role, which is inherited by the duty roles ASM_APPLICATION_DEVELOPER_DUTY and ASM_APPLICATION_ADMIN_DUTY.
If the menu items and tasks described in the following procedure are not available in your cloud instance, your user account is missing the required role. Contact your cloud instance security administrator for assistance.
-
Log in to the cloud instance.
-
Click the Navigator icon in the global area in the top part of the window, then chose Setup and Maintenance under the Tools heading.
-
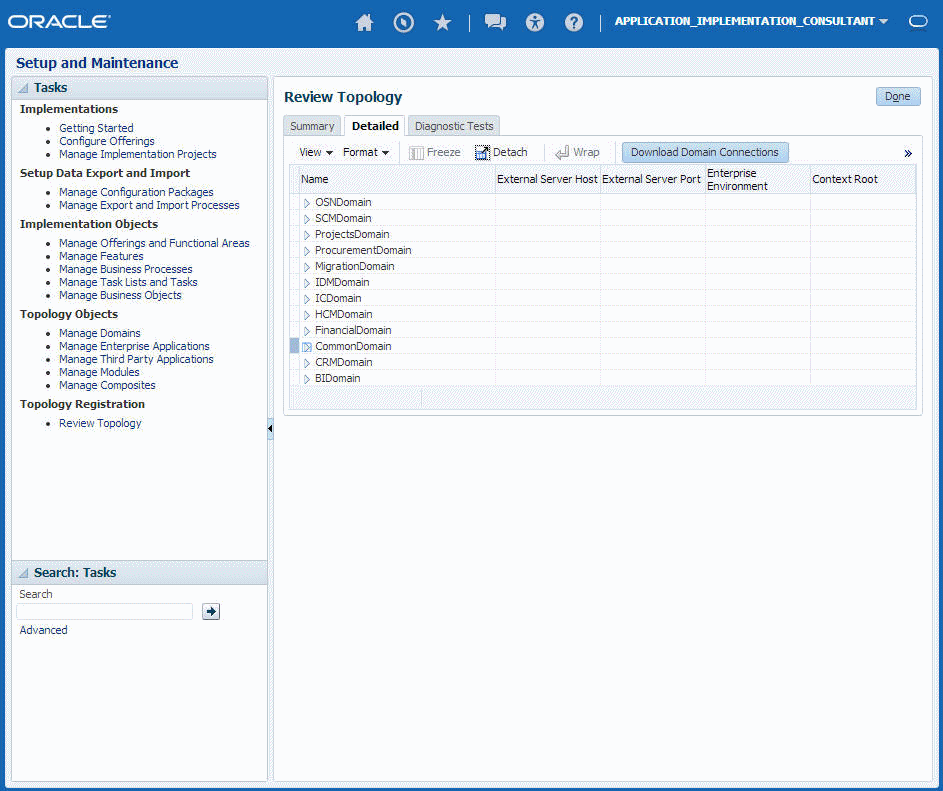
Select Review Topology under the Topology Registration section in the Tasks regional area on the left side of the window.
-
Click the Detailed tab in the middle of the window.
The tab shows the list of domains configured in the cloud instance.
Description of the illustration GUID-A83FF1BE-84D9-49C5-8820-9F7EBB92A3FD-default.png -
Map the token name for the service path value to the domain name in the Topology Manager:
Token Name in Service Path Domain Name atf_server CommonDomain crm_server CRMDomain fin_server FinancialDomain hcm_server HCMDomain ic_server ICDomain prc_server ProcurementDomain prj_server ProjectsDomain scm_server SCMDomain -
Expand the domain name and select any external virtual host and port for the J2EE applications that are deployed on the domain. In the sample window, the values for this particular instance are fs-your-cloud-hostname and 443, respectively.
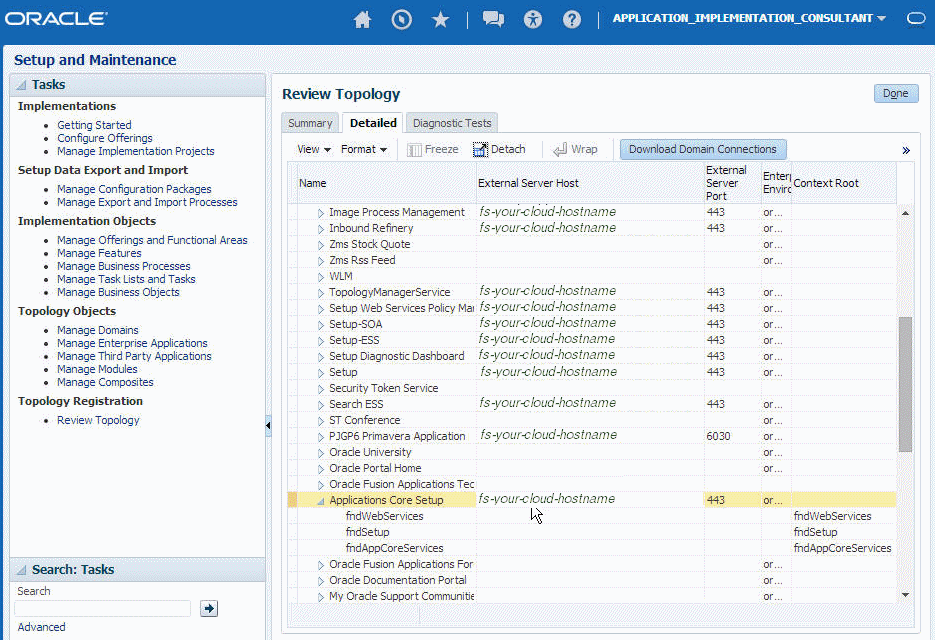
Description of the illustration GUID-CB01D3AF-462B-4765-81A8-7E2BBEE1BA6F-default.png -
Replace the
domainName_server:PortNumberwith the external virtual host and port identified in the previous step. For example:https://fs-your-cloud-hostname:port/fndAppCoreServices/ServiceCatalogService?wsdl
Obtaining the Event Catalog URL
You must know the customer relationship management (CRM) URL format to access the CRM application user interface. Follow the URL format to determine the event catalog URL. For example, if the CRM URL format is:
https://fusxxxx-crm-ext.us.oracle.com/customer/faces/CrmFusionHome
Then the event catalog URL is:
https://fusxxxx-crm-ext.us.oracle.com/soa-infra
Specifying the Oracle Messaging Service Cloud Service Messaging URI
The following table describes the Oracle Messaging Cloud Service messaging URI requirements.
| WSDL Requirements | Where Do You Get the WSDL |
|---|---|
|
No restrictions. |
Specify the URI of the messaging service to which you subscribed. |
Specifying the Oracle Eloqua Cloud Company Name
The following table describes the Oracle Eloqua company name requirements.
| Company Name Requirements | Where Do You Get the Company Name |
|---|---|
|
There are no special requirements. |
Not applicable. |
Specifying the Oracle HCM Cloud Service Catalog Service WSDL or Event Catalog URL
You must specify a mandatory Oracle HCM Cloud service catalog service WSDL (for accessing business objects) and optionally an event catalog URL (for accessing event subscriptions).
Obtaining the Service Cloud Service WSDL
A mandatory Oracle HCM Cloud service catalog service WSDL is required for accessing business objects. You can also optionally specify an event catalog URL for event subscriptions. The service catalog service WSDL is required to configure the adapter for both inbound and outbound endpoints using either business objects or business services. The event catalog URL is required for configuring the inbound adapter for event subscriptions.
| WSDL Requirements | Where Do You Get the WSDL |
|---|---|
|
The URL must be that of a service catalog service WSDL. The service catalog service enables clients to retrieve information about all public Oracle Fusion Application service endpoints available for that instance. The information it returns is specific to the particular cloud instance and also reflects the new services that may have been introduced in patches applied to the instance. This service is used to programmatically discover the SOAP services available on the cloud instance and retrieve the necessary metadata to invoke the SOAP services to manage business objects. |
The developer creating an Oracle HCM Cloud connection must work with the Oracle HCM Cloud service administrator to get the concrete WSDL URL for the service catalog service provisioned for the specific SaaS application. The concrete WSDL URL must be supplied while creating the connection. |
Prerequisites
This section describes how to derive the external virtual host and port for a tokenized service WSDL. The topology information in the Topology Registration setup task contains the external virtual host and port for the domains and applications. The following instructions describe the steps for deriving the values using the service catalog service WSDL URL as an example: https://atf_server:port/fndAppCoreServices/ServiceCatalogService.
To access the Review Topology page, the ASM_REVIEW_TOPOLOGY_HIERARCHY_PRIV entitlement must be granted to the user's job role. The entitlement is granted to the ASM_APPLICATION_DEPLOYER_DUTY duty role, which is inherited by the duty roles ASM_APPLICATION_DEVELOPER_DUTY and ASM_APPLICATION_ADMIN_DUTY.
If the menu items and tasks described in the following procedure are not available in your cloud instance, your user account is missing the required role. Contact your cloud instance security administrator for assistance.
-
Log in to the cloud instance.
-
Click the Navigator icon in the global area in the top part of the window, then chose Setup and Maintenance under the Tools heading.
-
Select Review Topology under the Topology Registration section in the Tasks regional area on the left side of the window.
-
Click the Detailed tab in the middle of the window.
The tab shows the list of domains configured in the cloud instance.

Description of the illustration GUID-A83FF1BE-84D9-49C5-8820-9F7EBB92A3FD-default.png -
Map the token name for the service path value to the domain name in the Topology Manager:
Token Name in Service Path Domain Name atf_server CommonDomain crm_server CRMDomain fin_server FinancialDomain hcm_server HCMDomain ic_server ICDomain prc_server ProcurementDomain prj_server ProjectsDomain scm_server SCMDomain -
Expand the domain name and select any external virtual host and port for the J2EE applications that are deployed on the domain. In the sample window, the values for this particular instance are fs-your-cloud-hostname and 443, respectively.

Description of the illustration GUID-CB01D3AF-462B-4765-81A8-7E2BBEE1BA6F-default.png -
Replace the
domainName_server:PortNumberwith the external virtual host and port identified in the previous step. For example:https://fs-your-cloud-hostname:port/fndAppCoreServices/ServiceCatalogService?wsdl
Obtaining the Event Catalog URL
You must know the CRM URL format to access the CRM application user interface. Follow the URL format to determine the event catalog URL. For example, if the CRM URL format is:
https://fusxxxx-crm-ext.us.oracle.com/customer/faces/CrmFusionHome
Then the event catalog URL is:
https://fusxxxx-crm-ext.us.oracle.com/soa-infra
Specifying the Salesforce WSDL
The following table describes the Salesforce WSDL requirements.
| WSDL Requirements | Where Do You Get the WSDL |
|---|---|
|
Only enterprise WSDLs are supported. |
See the instructions below. |
-
Log in to your Enterprise, Unlimited, or Developer Edition Salesforce.com account. Open the Web browser and enter the following URL:
www.salesforce.com -
Log in to
Salesforce.comusing a valid user name and password.You must log in as an administrator or user with the Modify All Data permission. Logins are checked to ensure that they are from a known IP address.
-
Under App Setup, Expand Develop and click API to display the WSDL download page.
-
If the organization has managed packages installed in the organization, click Generate Enterprise WSDL. Salesforce prompts you to select the version of each installed package to include in the generated WSDL or right-click Generate Enterprise WSDL and save it to a local directory.
In the right-click menu, Internet Explorer users can choose Save Target As, while Mozilla Firefox users can choose Save Link As to save it to the local directory.
The Save dialog is displayed.
-
Provide a name for the WSDL file and a location to save the file on your file system, and click Save.
Specifying the Oracle ERP Cloud Service Catalog Service WSDL or Event Catalog URL
You specify a mandatory Oracle ERP Cloud service catalog service WSDL (for accessing business objects) and optionally an event catalog URL (for accessing event subscriptions). The service catalog service WSDL is required to configure the adapter for both inbound and outbound endpoints using either business objects or business services. The event catalog URL is required for configuring the inbound adapter for event subscriptions.
Obtaining the Service Cloud Service WSDL
| WSDL Requirements | Where Do You Get the WSDL |
|---|---|
|
The URL must be that of a service catalog service WSDL. The service catalog service is a Fusion Application service that returns a list of external services available for integration. It allows clients to retrieve information about all public Fusion Application service endpoints available for that instance. The service catalog service enables clients to retrieve information about all public Oracle Fusion Application service endpoints available for that instance. The information it returns is specific to the particular cloud instance and also reflects the new services that may have been introduced in patches applied to the instance. This service is used to programmatically discover the SOAP services available on the cloud instance and retrieve the necessary metadata to invoke the SOAP services to manage business objects. |
The developer creating an Oracle ERP Cloud connection must work with the Oracle ERP Cloud service administrator to get the concrete WSDL URL for the service catalog service provisioned for the specific SaaS application. |
This section describes how to derive the external virtual host and port for a tokenized service WSDL. The topology information in the Topology Registration setup task contains the external virtual host and port for the domains and applications. The following instructions describe the steps for deriving the values using the service catalog service WSDL URL as an example: https://atf_server:port/fndAppCoreServices/ServiceCatalogService.
To access the Review Topology page, the ASM_REVIEW_TOPOLOGY_HIERARCHY_PRIV entitlement must be granted to the user's job role. The entitlement is granted to the ASM_APPLICATION_DEPLOYER_DUTY duty role, which is inherited by the duty roles ASM_APPLICATION_DEVELOPER_DUTY and ASM_APPLICATION_ADMIN_DUTY.
If the menu items and tasks described in the following procedure are not available in your cloud instance, your user account is missing the required role. Contact your cloud instance security administrator for assistance.
-
Log in to the cloud instance.
-
Click the Navigator icon in the global area in the top part of the window, then chose Setup and Maintenance under the Tools heading.
-
Select Review Topology under the Topology Registration section in the Tasks regional area on the left side of the window.
-
Click the Detailed tab in the middle of the window.
The tab shows the list of domains configured in the cloud instance.

Description of the illustration GUID-A83FF1BE-84D9-49C5-8820-9F7EBB92A3FD-default.png -
Map the token name for the service path value to the domain name in the Topology Manager:
Token Name in Service Path Domain Name atf_server CommonDomain crm_server CRMDomain fin_server FinancialDomain hcm_server HCMDomain ic_server ICDomain prc_server ProcurementDomain prj_server ProjectsDomain scm_server SCMDomain -
Expand the domain name and select any external virtual host and port for the J2EE applications that are deployed on the domain. In the sample window, the values for this particular instance are fs-your-cloud-hostname and 443, respectively.

Description of the illustration GUID-CB01D3AF-462B-4765-81A8-7E2BBEE1BA6F-default.png -
Replace the
domainName_server:PortNumberwith the external virtual host and port identified in the previous step. For example:https://fs-your-cloud-hostname:port/fndAppCoreServices/ServiceCatalogService?wsdl
Obtaining the Event Catalog URL
You must know the CRM URL format to access the CRM application user interface. Follow the URL format to determine the event catalog URL. For example, if the CRM URL format is:
https://fusxxxx-crm-ext.us.oracle.com/customer/faces/CrmFusionHome
Then the event catalog URL is:
https://fusxxxx-crm-ext.us.oracle.com/soa-infra
Specifying the SOAP Adapter WSDL
The following table describes the SOAP Adapter WSDL requirements.
| WSDL Requirements | Where Do You Get the WSDL |
|---|---|
|
There is no restriction on the type of WSDL to use. |
Any valid WSDL is an acceptable input. |
Specifying the REST Adapter Endpoint
The following table describes the REST Adapter endpoint requirements.
| Endpoint Requirements | Where Do You Get the Endpoint |
|---|---|
|
Specify an endpoint that adheres to the following format.
https://hostname:443/integration/flowapi/rest/RESTTORESTINTEGRATIONPUT_TEST/v01/
|
Not applicable. |
Specifying the Oracle CPQ Cloud WSDL
The following table describes the Oracle CPQ Cloud WSDL requirements.
| WSDL Requirements | Where Do You Get the WSDL |
|---|---|
|
Integration Cloud Service uses the Oracle CPQ Cloud transaction WSDL to understand the valid data and operations provided by Oracle CPQ Cloud. To access the Oracle CPQ Cloud transaction WSDL:
|
Specifying the NetSuite Adapter WSDL
The following table describes the NetSuite Adapter WSDL requirements.
| WSDL Requirements | Where Do You Get the WSDL |
|---|---|
|
You must specify the NetSuite WSDL. |
Specify the following NetSuite WSDL:
https://webservices.netsuite.com/wsdl/NetSuite_application_version/netsuite.wsdl
where https://webservices.netsuite.com/wsdl/v2014_2_0/netsuite.wsdl https://webservices.netsuite.com/wsdl/v2015_1_0/netsuite.wsdl The web services may or may not be hosted at the above location. The adapter can programmatically determine the correct URL for the web services. NetSuite hosts customer accounts in multiple locations. For example:
|
Configuring Connection Security
Configure security for your connection by selecting the security policy and specifying login credentials.
Configuring the Connection Security Policy
The different adapters support a variety of security policies. Some support only a single type, others support multiple types of security policies.
The following table lists the different adapters, the types of security policies they support, and the fields required by those policies.
| Adapter Type | Security Policies | Fields |
|---|---|---|
|
SOAP Adapter |
Username Password Token |
|
|
Basic Authentication (In the trigger (inbound) direction, HTTP basic authentication over SSL is supported.) If Basic Authentication is required for both trigger and invoke, you must create two separate connections
|
|
|
|
No Security Policy |
||
|
REST Adapter |
Basic Authentication |
|
|
OAuth Client Credentials |
|
|
|
OAuth Resource Owner Password Credentials |
|
|
| OAuth Authorization Code Credentials |
|
|
|
OAuth Custom Three Legged Flow |
Complete the fields appropriate to your integration. You must already have created your client application to complete the necessary fields.
|
|
|
OAuth Custom Two Legged Flow |
Complete the fields appropriate to your integration. You must already have created your client application to complete the necessary fields.
|
|
|
No Security Policy |
||
|
Salesforce Adapter |
Salesforce Login |
|
|
NetSuite Adapter |
NetSuite Authentication |
|
|
Oracle Eloqua Cloud Adapter |
Eloqua HTTP Basic Authentication |
|
|
Oracle Sales Cloud Adapter |
Username Password Token |
|
|
Oracle HCM Cloud Adapter |
Username Password Token |
|
|
Oracle ERP Cloud Adapter |
Username Password Token |
|
|
Oracle RightNow Cloud Adapter |
Username Password Token |
|
|
Oracle Message Cloud Service |
Username Password Token |
|
|
Oracle CPQ Cloud |
Username Password Token |
|
For the security policies of additional adapters, see the following:
-
For the Eventbrite Adapter, see Using the Eventbrite Adapter.
-
For the Evernote Adapter, see Using the Evernote Adapter.
-
For the Facebook Adapter, see Using the Facebook Adapter.
-
For the FTP Adapter, see Using the FTP Adapter.
-
For the Gmail Adapter, see Using the Gmail Adapter.
-
For the Google Calendar Adapter, see Using the Google Calendar Adapter.
-
For the Google Task Adapter, see Using the Google Task Adapter.
-
For the LinkedIn Adapter, see Using the LinkedIn Adapter.
-
For the MailChimp Adapter, see Using the MailChimp Adapter.
-
For the Microsoft Calendar Adapter, see Using the Microsoft Calendar Adapter.
-
For the Microsoft Contact Adapter, see Using the Microsoft Contact Adapter.
-
For the Microsoft Email Adapter, see Using the Microsoft Email Adapter.
-
For the MySQL Adapter, see Using the MySQL Adapter.
-
For the Oracle Commerce Cloud Adapter, see Using the Oracle Commerce Cloud Adapter.
-
For the Oracle Database Adapter, see Using the Oracle Database Adapter.
-
For the Oracle E-Business Suite Adapter, see Using Oracle E-Business Suite Adapter.
-
For the Oracle Siebel Adapter, see Using the Oracle Siebel Adapter.
-
For the SurveyMonkey Adapter, see Using the SurveyMonkey Adapter.
-
For the SAP Adapter, see Using the SAP Adapter.
-
For the Twitter Adapter, see Using the Twitter Adapter.
Cloning a Connection
You can clone a copy of an existing connection. It is a quick way to create a new connection.
Refreshing Integration Metadata
You can manually refresh the currently-cached metadata available to adapters that have implemented metadata caching. Metadata changes typically relate to customizations of integrations, such as adding custom objects and attributes to integrations. There may also be cases in which integrations have been patched, which results in additional custom objects and attributes being added. This option is similar to clearing the cache in your browser. Without a manual refresh, a staleness check is only performed when you drag a connection into an integration. This is typically sufficient, but in some cases you may know that a refresh is required. For these cases, the Refresh Metadata menu option is provided.
Note:
The Refresh Metadata menu option is only available with adapters that have implemented metadata caching.
