Use Rules to Monitor and Maintain Assets

Use rules to monitor and maintain your assets. Rules set conditions on asset sensor or KPI values. When a rule condition is met, the associated alert, warning, or incident is triggered. You can also use rules to trigger asset actions.

You can apply the rule to specific assets, or to all assets of an asset type. The default scope of the rule is all assets of the asset type in the organization, but you can selectively apply the rule to select asset group hierarchies.

Asset monitoring rules can be broadly categorized into the following categories:

  • Location-Based Rules: Location rules are based on location conditions. Use location rules to track when an asset enters or leaves a place. For example, you can track when an asset leaves its assigned place, and use the rule to generate an incident.

  • Threshold-Based Rules: Threshold rules are based on sensor or KPI (key performance indicator) values. Use threshold rules to track sensor values, such as fuel levels and temperature values. For example, you can configure a threshold rule to raise a warning when the fuel levels of an asset goes below a threshold value.

    You can configure a threshold rule to trigger an asset action based on the sensor value. For example, you may want to power off an overheating device automatically.

    Threshold rules also let you track KPI values, such as the number of open incidents. For example, you may want to trigger a warning if the number of open outage incidents cross a threshold number.

  • Alert Rules: Use alert rules to respond to device alert conditions. If your sensor device supports alerts, then you can use alert rules to configure alert responses. For example, an alert rule can trigger a device action based on an alert.

Use rules to trigger the following:

  • Incidents: Use incidents to report issues and work with the maintenance staff for resolutions.

    The number of open incidents prominently appears on the KPI ribbon in the Map view. Open incidents against an asset are also flagged under the Asset Details page for an asset. You can access all reported incidents from the Incidents page.

    Note that the Asset Availability KPI number goes down when there are assets with open outage incidents against them.

  • Warnings: Use warnings to create a log of issues that don’t require your immediate attention.

    You can access all reported warnings from the Warnings page. Warnings against individual assets can be accessed in the Asset Details page.

  • Alerts: Use alerts to pass device-related alerts to Oracle Internet of Things Intelligent Applications Cloud. These alerts can in turn be passed on to integrated applications.

    Alerts generated by Oracle IoT Asset Monitoring Cloud Service appear in the Oracle Internet of Things Intelligent Applications Cloud management console.

  • Asset Actions: If your asset type includes asset actions supported by your device model, then you can use to trigger these asset actions. For example, you may choose to trigger the Power Off action for a device if the device is overheating.

Create a Location Rule

Create a location rule to generate an incident, alert, action, or warning when an asset enters or exits a location.

  1. Click Menu (Menu icon), and then click Design Center.
  2. Select Asset Types from the Design Center sub-menu.
  3. Select an asset type from the Asset Types list.
    You can also search for an asset type.
  4. Click Rules.
  5. Click the Create New Rule (Create New Rule icon) icon.
  6. Enter a name for the rule in the Name field.
  7. Select an option in the Apply To list:
    • To assign the rule to the selected asset type, leave the default option set to All Assets of Type: AssetType.

    • To assign the rule to specific assets, select Specific Assets of Type: AssetType and then select one or more assets.

  8. If you selected All Assets of Type: AssetType in the preceding step, then you can optionally choose to change the Scope of the rule to a specific asset group or asset group hierarchy.
    1. Under Scope, select Specific Groups, and then select the asset group to which you wish to apply the rule.
    2. If the group also has subgroups, and you wish to apply the rule to the whole group hierarchy, then select Include Subgroups.
  9. In the Condition area, define the location condition:
    1. Select Location from the drop-down list.

      A second drop-down list appears.

    2. Select Entered or Exited in the second drop-down list:

      If you want to generate an incident, alert, action, or warning when an asset enters a geo-boundary, select Entered.

      If you want to generate an incident, alert, action, or warning when an asset exits a geo-boundary, select Exited.

      A third drop-down list appears.

    3. Select the location in the third list.
  10. (Optional) Add additional location conditions.
  11. (Optional) Add additional alert conditions.

    See Create an Alert Rule for more information on alert conditions.

  12. (Optional) Add additional threshold conditions for asset attribute values.

    See Create a Threshold Rule for more information on creating threshold conditions.

  13. In the Fulfillment section, select an option for the Fulfill when field:
    • All Conditions Apply : Select this option to generate an incident, alert, action, or warning when all the conditions are met.

    • Any Conditions Apply: Select this option to generate an incident, alert, action, or warning when any of the conditions are met.

  14. In the Fulfillment section, select an option for the Generate field:
    • Incident: Select to receive an incident notification when the rule conditions are met.

      Use incidents to report issues and work with the maintenance staff for resolutions.

    • Alert: Select to generate an alert message when the rule conditions are met.

      Use alerts to pass device-related alerts to Oracle Internet of Things Intelligent Applications Cloud. These alerts can in turn be passed on to integrated applications.

    • Warning: Select to generate a warning message when the rule conditions are met.

      Use warnings to create a log of issues that don’t require your immediate attention.

    • Action: Select to trigger an asset action when the rule conditions are met.

      If your asset type includes asset actions, then you can use rules to trigger these asset actions.

  15. Complete the mandatory and optional fields that appear, depending on your choice in the preceding step:
    • Summary: Enter a summary of the incident, alert, or warning.

      The Summary field for incidents and warnings can include dynamic contextual parameters. See Use Contextual Parameters in Warnings, Incidents, and Action Messages for more details.

    • Type: Specify the incident or warning type. For incidents, you can select between Outage, Maintenance, and Routine.

    • Priority: (Optional) Select an incident priority.

    • Tags: (Optional) Specify string tags that you can use to search the logs.

    • Description: (Optional) Enter a detailed description of the incident or warning.

      The Description field for incidents and warnings can include dynamic contextual parameters. See Use Contextual Parameters in Warnings, Incidents, and Action Messages for more details.

    • Severity: (Optional) Select the severity of the alert message.

    • Suppression: (Optional) Specify a wait time, in minutes, after which a fresh alert or warning is generated for an unresolved issue.

    • Level: (Optional) Select the severity of the warning.

    • Action: Select the asset action to trigger. Also specify or select the values for any action attributes that appear.

      For asset actions, the Parameter Value field can contain dynamic contextual parameters. You can use contextual parameters only in string parameters. See Use Contextual Parameters in Warnings, Incidents, and Action Messages for more details.

    • Subscribers:Under Notification Subscription, you can add one or more subscriber groups to receive notifications when incidents or warnings are triggered by the rule. See Use SMS, Email, and HTTP Notifications for more information on configuring notifications.

  16. If you are creating a rule incident, and you wish to use failure modes for your asset type, select Include Failure Mode Details.
    You must have already defined at least one failure mode for your asset type.
    1. Select a pre-existing Failure Mode that corresponds to the incident.
    2. Select one or more pre-existing Failure Causes that apply to the failure incident.
    See Add Failure Diagnostics Information to Asset Incidents and Anomalies for more information on using failure modes.
  17. Optionally specify a weekly or monthly schedule during which the rule is in force.
    A rule is active at all times, by default. You can change this behavior to choose a custom schedule for the rule.
    1. Under Rule Schedule, select Custom.
    2. Select Repeat Weekly to create a weekly schedule. Alternatively, select Repeat Monthly to create a monthly schedule.
    3. Click or drag inside the rows to select a data window.
      You can click an incorrectly selected cell to deselect it. Alternatively, click Clear to start afresh.
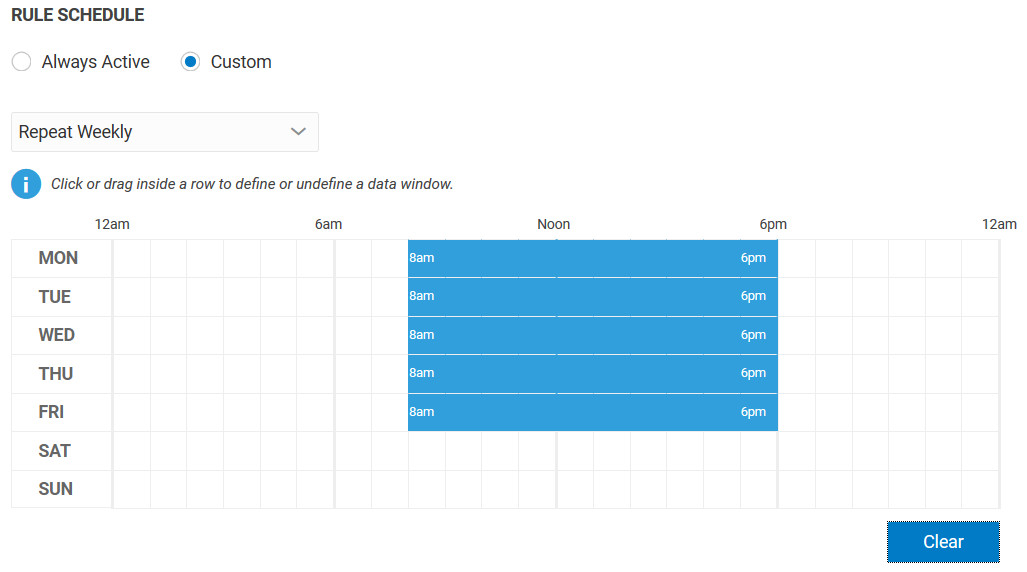
    The following example shows a weekly schedule for a rule that it is active from 8:00 a.m. to 6:00 p.m. on weekdays.
    Rule Schedule

  18. Click Save.
  19. Click Back to return to the Rules list.

Create a Threshold Rule

Create a threshold rule to generate an incident, alert, action, or warning when an asset type or a specific asset meets or exceeds a set threshold.

  1. Click Menu (Menu icon), and then click Design Center.
  2. Select Asset Types from the Design Center sub-menu.
  3. Select an asset type from the Asset Types list.
    You can also search for an asset type.
  4. Click Rules.
  5. Click the Create New Rule (Create New Rule icon) icon.
  6. Enter a name for the rule in the Name field.
  7. Select an option in the Apply To list:
    • To assign the rule to the selected asset type, leave the default option set to All Assets of Type: AssetType.

    • To assign the rule to specific assets, select Specific Assets of Type: AssetType and then select one or more assets.

  8. If you selected All Assets of Type: AssetType in the preceding step, then you can optionally choose to change the Scope of the rule to a specific asset group or asset group hierarchy.
    1. Under Scope, select Specific Groups, and then select the asset group to which you wish to apply the rule.
    2. If the group also has subgroups, and you wish to apply the rule to the whole group hierarchy, then select Include Subgroups.
  9. In the Condition section, define the threshold condition:
    1. Select an asset attribute in the drop-down list.

      For example, a temperature sensor asset specifies attributes like maxTemp and minTemp.

      You can also select Key Performance Indicator (KPI) attributes for your conditions. These attribute names start with metric/. For example, the metric/sys_openIncidents KPI attribute keeps track of the number of open incidents.

      A second drop-down list appears.

    2. Select a threshold condition for the attribute in the second drop-down list.

      For example, a numeric attribute specifies conditions like Greater Than and Less Than.

      A third field appears.

    3. Specify an attribute value in the third field.

      For example, a complete condition may look like: maxtemp Greater Than 50.

      A complete condition that uses a KPI metric may look like: metric/sys_openIncidents Greater Than 5.

  10. (Optional) Add additional threshold conditions for attribute values.
  11. (Optional) Add additional alert and location conditions.

    See Create an Alert Rule for more information on alert conditions.

    See Create a Location Rule for more information on location conditions.

  12. In the Fulfillment section, select an option for the Fulfill when field:
    • All Conditions Apply : Select this option to generate an incident, alert, action, or warning when all the conditions are met.

    • Any Conditions Apply: Select this option to generate an incident, alert, action, or warning when any of the conditions are met.

  13. In the Fulfillment section, select an option for the Generate field:
    • Incident: Select to receive an incident notification when the rule conditions are met.

      Use incidents to report issues and work with the maintenance staff for resolutions.

    • Alert: Select to generate an alert message when the rule conditions are met.

      Use alerts to pass device-related alerts to Oracle Internet of Things Intelligent Applications Cloud. These alerts can in turn be passed on to integrated applications.

    • Warning: Select to generate a warning message when the rule conditions are met.

      Use warnings to create a log of issues that don’t require your immediate attention.

    • Action: Select to trigger an asset action when the rule conditions are met.

      If your asset type includes asset actions supported by your device model, then you can use rules to trigger these asset actions.

  14. Complete the mandatory and optional fields that appear, depending on your choice in the preceding step:
    • Summary: Enter a summary of the incident, alert, or warning.

      The Summary field for incidents and warnings can include dynamic contextual parameters. See Use Contextual Parameters in Warnings, Incidents, and Action Messages for more details.

    • Type: Specify the incident or warning type. For incidents, you can select between Outage, Maintenance, and Routine.

    • Priority: (Optional) Select an incident priority.

    • Tags: (Optional) Specify string tags that you can use to search the logs.

    • Description: (Optional) Enter a detailed description of the incident or warning.

      The Description field for incidents and warnings can include dynamic contextual parameters. See Use Contextual Parameters in Warnings, Incidents, and Action Messages for more details.

    • Severity: (Optional) Select the severity of the alert message.

    • Suppression: (Optional) Specify a wait time, in minutes, after which a fresh alert or warning is generated for an unresolved issue.

    • Level: (Optional) Select the severity of the warning.

    • Action: Select the asset action to trigger. Also specify or select the values for any action attributes that appear.

      For asset actions, the Parameter Value field can contain dynamic contextual parameters. You can use contextual parameters only in string parameters. See Use Contextual Parameters in Warnings, Incidents, and Action Messages for more details.

    • Subscribers:Under Notification Subscription, you can add one or more subscriber groups to receive notifications when incidents or warnings are triggered by the rule. See Use SMS, Email, and HTTP Notifications for more information on configuring notifications.

  15. If you are creating a rule incident, and you wish to use failure modes for your asset type, select Include Failure Mode Details.
    You must have already defined at least one failure mode for your asset type.
    1. Select a pre-existing Failure Mode that corresponds to the incident.
    2. Select one or more pre-existing Failure Causes that apply to the failure incident.
    See Add Failure Diagnostics Information to Asset Incidents and Anomalies for more information on using failure modes.
  16. Optionally specify a weekly or monthly schedule during which the rule is in force.
    A rule is active at all times, by default. You can change this behavior to choose a custom schedule for the rule.
    1. Under Rule Schedule, select Custom.
    2. Select Repeat Weekly to create a weekly schedule. Alternatively, select Repeat Monthly to create a monthly schedule.
    3. Click or drag inside the rows to select a data window.
      You can click an incorrectly selected cell to deselect it. Alternatively, click Clear to start afresh.
    The following example shows a weekly schedule for a rule that it is active from 8:00 a.m. to 6:00 p.m. on weekdays.
    Rule Schedule

  17. Click Save.
  18. Click Back to return to the Rules list.

Create an Anomaly Rule

Create an anomaly rule to generate an incident, alert, action, or warning when an anomaly occurs for an asset.

To create anomaly rules, you must have the anomalies defined. See Use Anomalies to Track Deviations in Asset Behavior for more information on anomalies.
  1. Click Menu (Menu icon), and then click Design Center.
  2. Select Asset Types from the Design Center sub-menu.
  3. Select an asset type from the Asset Types list.
    You can also search for an asset type.
  4. Click Rules.
  5. Click the Create New Rule (Create New Rule icon) icon.
  6. Enter a name for the rule in the Name field.
  7. Select an option in the Apply To list:
    • To assign the rule to the selected asset type, leave the default option set to All Assets of Type: AssetType.

    • To assign the rule to specific assets, select Specific Assets of Type: AssetType and then select one or more assets.

  8. If you selected All Assets of Type: AssetType in the preceding step, then you can optionally choose to change the Scope of the rule to a specific asset group or asset group hierarchy.
    1. Under Scope, select Specific Groups, and then select the asset group to which you wish to apply the rule.
    2. If the group also has subgroups, and you wish to apply the rule to the whole group hierarchy, then select Include Subgroups.
  9. In the Condition section, select the anomaly condition:
    1. Select the anomaly name from the list.

      A second drop-down list appears.

    2. Select one of the following:
      • Select Occurred to trigger the rule when the anomaly occurs.

      • Select Occurred in Last to specify a time duration. The rule gets triggered if the anomaly occurred in the specified time duration.

        Enter the number of seconds, minutes, hours, days, months, or years, and choose the appropriate time unit in the drop-down list that appears.

  10. (Optional) Add additional anomaly or alert conditions.

    See Create an Alert Rule for more information on alert conditions.

  11. (Optional) Add additional location conditions.

    See Create a Location Rule for more information on location conditions.

  12. (Optional) Add additional threshold conditions for asset attribute values.

    See Create a Threshold Rule for more information on creating threshold conditions.

  13. In the Fulfillment section, select an option for the Fulfill when field:
    • All Conditions Apply : Select this option to generate an incident, alert, action, or warning when all the conditions are met.

    • Any Conditions Apply: Select this option to generate an incident, alert, action, or warning when any of the conditions are met.

  14. In the Fulfillment section, select an option for the Generate field:
    • Incident: Select to receive an incident notification when the rule conditions are met.

      Use incidents to report issues and work with the maintenance staff for resolutions.

    • Alert: Select to generate an alert message when the rule conditions are met.

      Use alerts to pass device-related alerts to Oracle Internet of Things Intelligent Applications Cloud. These alerts can in turn be passed on to integrated applications.

    • Warning: Select to generate a warning message when the rule conditions are met.

      Use warnings to create a log of issues that don’t require your immediate attention.

    • Action: Select to trigger an asset action when the rule conditions are met.

      If your asset type includes asset actions supported by your device model, then you can use rules to trigger these asset actions.

  15. Complete the mandatory and optional fields that appear, depending on your choice in the preceding step:
    • Summary: Enter a summary of the incident, alert, or warning.

      The Summary field for incidents and warnings can include dynamic contextual parameters. See Use Contextual Parameters in Warnings, Incidents, and Action Messages for more details.

    • Type: Specify the incident or warning type. For incidents, you can select between Outage, Maintenance, and Routine.

    • Priority: (Optional) Select an incident priority.

    • Tags: (Optional) Specify string tags that you can use to search the logs.

    • Description: (Optional) Enter a detailed description of the incident or warning.

      The Description field for incidents and warnings can include dynamic contextual parameters. See Use Contextual Parameters in Warnings, Incidents, and Action Messages for more details.

    • Severity: (Optional) Select the severity of the alert message.

    • Suppression: (Optional) Specify a wait time, in minutes, after which a fresh alert or warning is generated for an unresolved issue.

    • Level: (Optional) Select the severity of the warning.

    • Action: Select the asset action to trigger. Also specify or select the values for any action attributes that appear.

      For asset actions, the Parameter Value field can contain dynamic contextual parameters. You can use contextual parameters only in string parameters. See Use Contextual Parameters in Warnings, Incidents, and Action Messages for more details.

    • Subscribers:Under Notification Subscription, you can add one or more subscriber groups to receive notifications when incidents or warnings are triggered by the rule. See Use SMS, Email, and HTTP Notifications for more information on configuring notifications.

  16. If you are creating a rule incident, and you wish to use failure modes for your asset type, select Include Failure Mode Details.
    You must have already defined at least one failure mode for your asset type.
    1. Select a pre-existing Failure Mode that corresponds to the incident.
    2. Select one or more pre-existing Failure Causes that apply to the failure incident.
    See Add Failure Diagnostics Information to Asset Incidents and Anomalies for more information on using failure modes.
  17. Optionally specify a weekly or monthly schedule during which the rule is in force.
    A rule is active at all times, by default. You can change this behavior to choose a custom schedule for the rule.
    1. Under Rule Schedule, select Custom.
    2. Select Repeat Weekly to create a weekly schedule. Alternatively, select Repeat Monthly to create a monthly schedule.
    3. Click or drag inside the rows to select a data window.
      You can click an incorrectly selected cell to deselect it. Alternatively, click Clear to start afresh.
    The following example shows a weekly schedule for a rule that it is active from 8:00 a.m. to 6:00 p.m. on weekdays.
    Rule Schedule

  18. Click Save.
  19. Click Back to return to the Rules list.

Create a Prediction Based Rule

Create a prediction based rule to generate an incident, alert, action, or warning based on the prediction value.

To create a prediction based rule, you must have the prediction defined. See Use Predictions to Identify Asset Risks for more information on predictions.
  1. Click Menu (Menu icon), and then click Design Center.
  2. Select Asset Types from the Design Center sub-menu.
  3. Select an asset type from the Asset Types list.
    You can also search for an asset type.
  4. Click Rules.
  5. Click the Create New Rule (Create New Rule icon) icon.
  6. Enter a name for the rule in the Name field.
  7. Select an option in the Apply To list:
    • To assign the rule to the selected asset type, leave the default option set to All Assets of Type: AssetType.

    • To assign the rule to specific assets, select Specific Assets of Type: AssetType and then select one or more assets.

  8. If you selected All Assets of Type: AssetType in the preceding step, then you can optionally choose to change the Scope of the rule to a specific asset group or asset group hierarchy.
    1. Under Scope, select Specific Groups, and then select the asset group to which you wish to apply the rule.
    2. If the group also has subgroups, and you wish to apply the rule to the whole group hierarchy, then select Include Subgroups.
  9. In the Condition section, select the prediction condition:
    1. Select the prediction name from the list.
    2. Select a condition and specify the values.
      You can select an exact value (Equals) or specify a range of values (Range). You can also choose to specify just the minimum (Start) or maximum (End) value of the prediction.
    3. Optionally specify an accuracy percentage for the prediction value.
  10. (Optional) Add additional prediction or alert conditions.

    See Create an Alert Rule for more information on alert conditions.

  11. (Optional) Add additional location conditions.

    See Create a Location Rule for more information on location conditions.

  12. (Optional) Add additional threshold conditions for asset attribute values.

    See Create a Threshold Rule for more information on creating threshold conditions.

  13. In the Fulfillment section, select an option for the Fulfill when field:
    • All Conditions Apply : Select this option to generate an incident, alert, action, or warning when all the conditions are met.

    • Any Conditions Apply: Select this option to generate an incident, alert, action, or warning when any of the conditions are met.

  14. In the Fulfillment section, select an option for the Generate field:
    • Incident: Select to receive an incident notification when the rule conditions are met.

      Use incidents to report issues and work with the maintenance staff for resolutions.

    • Alert: Select to generate an alert message when the rule conditions are met.

      Use alerts to pass device-related alerts to Oracle Internet of Things Intelligent Applications Cloud. These alerts can in turn be passed on to integrated applications.

    • Warning: Select to generate a warning message when the rule conditions are met.

      Use warnings to create a log of issues that don’t require your immediate attention.

    • Action: Select to trigger an asset action when the rule conditions are met.

      If your asset type includes asset actions supported by your device model, then you can use rules to trigger these asset actions.

  15. Complete the mandatory and optional fields that appear, depending on your choice in the preceding step:
    • Summary: Enter a summary of the incident, alert, or warning.

      The Summary field for incidents and warnings can include dynamic contextual parameters. See Use Contextual Parameters in Warnings, Incidents, and Action Messages for more details.

    • Type: Specify the incident or warning type. For incidents, you can select between Outage, Maintenance, and Routine.

    • Priority: (Optional) Select an incident priority.

    • Tags: (Optional) Specify string tags that you can use to search the logs.

    • Description: (Optional) Enter a detailed description of the incident or warning.

      The Description field for incidents and warnings can include dynamic contextual parameters. See Use Contextual Parameters in Warnings, Incidents, and Action Messages for more details.

    • Severity: (Optional) Select the severity of the alert message.

    • Suppression: (Optional) Specify a wait time, in minutes, after which a fresh alert or warning is generated for an unresolved issue.

    • Level: (Optional) Select the severity of the warning.

    • Action: Select the asset action to trigger. Also specify or select the values for any action attributes that appear.

      For asset actions, the Parameter Value field can contain dynamic contextual parameters. You can use contextual parameters only in string parameters. See Use Contextual Parameters in Warnings, Incidents, and Action Messages for more details.

    • Subscribers:Under Notification Subscription, you can add one or more subscriber groups to receive notifications when incidents or warnings are triggered by the rule. See Use SMS, Email, and HTTP Notifications for more information on configuring notifications.

  16. If you are creating a rule incident, and you wish to use failure modes for your asset type, select Include Failure Mode Details.
    You must have already defined at least one failure mode for your asset type.
    1. Select a pre-existing Failure Mode that corresponds to the incident.
    2. Select one or more pre-existing Failure Causes that apply to the failure incident.
    See Add Failure Diagnostics Information to Asset Incidents and Anomalies for more information on using failure modes.
  17. Optionally specify a weekly or monthly schedule during which the rule is in force.
    A rule is active at all times, by default. You can change this behavior to choose a custom schedule for the rule.
    1. Under Rule Schedule, select Custom.
    2. Select Repeat Weekly to create a weekly schedule. Alternatively, select Repeat Monthly to create a monthly schedule.
    3. Click or drag inside the rows to select a data window.
      You can click an incorrectly selected cell to deselect it. Alternatively, click Clear to start afresh.
    The following example shows a weekly schedule for a rule that it is active from 8:00 a.m. to 6:00 p.m. on weekdays.
    Rule Schedule

  18. Click Save.
  19. Click Back to return to the Rules list.

Create a Trend Based Rule

Create a trend based rule to generate an incident, alert, action, or warning based on trends occurring for your sensor or metric values.

To create trend based rules, you must have the trends defined. See Use Statistical Trends for Your Asset Sensor Attributes and Metrics for more information on trends.
  1. Click Menu (Menu icon), and then click Design Center.
  2. Select Asset Types from the Design Center sub-menu.
  3. Select an asset type from the Asset Types list.
    You can also search for an asset type.
  4. Click Rules.
  5. Click the Create New Rule (Create New Rule icon) icon.
  6. Enter a name for the rule in the Name field.
  7. Select an option in the Apply To list:
    • To assign the rule to the selected asset type, leave the default option set to All Assets of Type: AssetType.

    • To assign the rule to specific assets, select Specific Assets of Type: AssetType and then select one or more assets.

  8. If you selected All Assets of Type: AssetType in the preceding step, then you can optionally choose to change the Scope of the rule to a specific asset group or asset group hierarchy.
    1. Under Scope, select Specific Groups, and then select the asset group to which you wish to apply the rule.
    2. If the group also has subgroups, and you wish to apply the rule to the whole group hierarchy, then select Include Subgroups.
  9. In the Condition section, select a predefined trend:
    1. Select the trend name from the list.

      A second drop-down list appears.

    2. Select one of the following:
      • Select Occurred to trigger the rule when the trend occurs.

      • Select Occurred in Last to specify a time duration. The rule gets triggered if the trend occurred within the specified time duration.

        Enter the number of seconds, minutes, hours, days, months, or years, and choose the appropriate time unit in the drop-down list that appears.

    3. (Optional) If you wish the rule to be triggered only by specific Nelson Rule trends, then select one or more Nelson rules that will trigger the rule.
      If you do not select specific rules, then the rule checks for all Nelson Rules included in the trend by default.
      To select specific Nelson Rule trends, select one Nelson Rule at a time from the list until you have added all the required rules.
  10. (Optional) Add additional trend or alert conditions.

    See Create an Alert Rule for more information on alert conditions.

  11. (Optional) Add additional location conditions.

    See Create a Location Rule for more information on location conditions.

  12. (Optional) Add additional threshold conditions for asset attribute values.

    See Create a Threshold Rule for more information on creating threshold conditions.

  13. In the Fulfillment section, select an option for the Fulfill when field:
    • All Conditions Apply : Select this option to generate an incident, alert, action, or warning when all the conditions are met.

    • Any Conditions Apply: Select this option to generate an incident, alert, action, or warning when any of the conditions are met.

  14. In the Fulfillment section, select an option for the Generate field:
    • Incident: Select to receive an incident notification when the rule conditions are met.

      Use incidents to report issues and work with the maintenance staff for resolutions.

    • Alert: Select to generate an alert message when the rule conditions are met.

      Use alerts to pass device-related alerts to Oracle Internet of Things Intelligent Applications Cloud. These alerts can in turn be passed on to integrated applications.

    • Warning: Select to generate a warning message when the rule conditions are met.

      Use warnings to create a log of issues that don’t require your immediate attention.

    • Action: Select to trigger an asset action when the rule conditions are met.

      If your asset type includes asset actions supported by your device model, then you can use rules to trigger these asset actions.

  15. Complete the mandatory and optional fields that appear, depending on your choice in the preceding step:
    • Summary: Enter a summary of the incident, alert, or warning.

      The Summary field for incidents and warnings can include dynamic contextual parameters. See Use Contextual Parameters in Warnings, Incidents, and Action Messages for more details.

    • Type: Specify the incident or warning type. For incidents, you can select between Outage, Maintenance, and Routine.

    • Priority: (Optional) Select an incident priority.

    • Tags: (Optional) Specify string tags that you can use to search the logs.

    • Description: (Optional) Enter a detailed description of the incident or warning.

      The Description field for incidents and warnings can include dynamic contextual parameters. See Use Contextual Parameters in Warnings, Incidents, and Action Messages for more details.

    • Severity: (Optional) Select the severity of the alert message.

    • Suppression: (Optional) Specify a wait time, in minutes, after which a fresh alert or warning is generated for an unresolved issue.

    • Level: (Optional) Select the severity of the warning.

    • Action: Select the asset action to trigger. Also specify or select the values for any action attributes that appear.

      For asset actions, the Parameter Value field can contain dynamic contextual parameters. You can use contextual parameters only in string parameters. See Use Contextual Parameters in Warnings, Incidents, and Action Messages for more details.

    • Subscribers:Under Notification Subscription, you can add one or more subscriber groups to receive notifications when incidents are triggered by the rule. See Use SMS, Email, and HTTP Notifications for more information on configuring notifications.

  16. If you are creating a rule incident, and you wish to use failure modes for your asset type, select Include Failure Mode Details.
    You must have already defined at least one failure mode for your asset type.
    1. Select a pre-existing Failure Mode that corresponds to the incident.
    2. Select one or more pre-existing Failure Causes that apply to the failure incident.
    See Add Failure Diagnostics Information to Asset Incidents and Anomalies for more information on using failure modes.
  17. Optionally specify a weekly or monthly schedule during which the rule is in force.
    A rule is active at all times, by default. You can change this behavior to choose a custom schedule for the rule.
    1. Under Rule Schedule, select Custom.
    2. Select Repeat Weekly to create a weekly schedule. Alternatively, select Repeat Monthly to create a monthly schedule.
    3. Click or drag inside the rows to select a data window.
      You can click an incorrectly selected cell to deselect it. Alternatively, click Clear to start afresh.
    The following example shows a weekly schedule for a rule that it is active from 8:00 a.m. to 6:00 p.m. on weekdays.
    Rule Schedule

  18. Click Save.
  19. Click Back to return to the Rules list.

Create an Alert Rule

Create an alert rule to generate an incident, alert, action, or warning when an asset type or a specific asset meets or exceeds the requirements set for an alert condition.

  1. Click Menu (Menu icon), and then click Design Center.
  2. Select Asset Types from the Design Center sub-menu.
  3. Select an asset type from the Asset Types list.
    You can also search for an asset type.
  4. Click Rules.
  5. Click the Create New Rule (Create New Rule icon) icon.
  6. Enter a name for the rule in the Name field.
  7. Select an option in the Apply To list:
    • To assign the rule to the selected asset type, leave the default option set to All Assets of Type: AssetType.

    • To assign the rule to specific assets, select Specific Assets of Type: AssetType and then select one or more assets.

  8. If you selected All Assets of Type: AssetType in the preceding step, then you can optionally choose to change the Scope of the rule to a specific asset group or asset group hierarchy.
    1. Under Scope, select Specific Groups, and then select the asset group to which you wish to apply the rule.
    2. If the group also has subgroups, and you wish to apply the rule to the whole group hierarchy, then select Include Subgroups.
  9. In the Condition section, define the alert condition:
    1. Select Alert from the drop-down list.

      Your asset device model determines the alerts and message formats that are available.

      A second drop-down list appears.

    2. Select the message format in the second list.

      For example, a temperature sensor asset may define the following alert message format: tooColdAlert - urn:com:oracle:iot:device:temperature_sensor:too_cold.

  10. (Optional) Add additional alert conditions.
  11. (Optional) Add additional location conditions.

    See Create a Location Rule for more information on location conditions.

  12. (Optional) Add additional threshold conditions for asset attribute values.

    See Create a Threshold Rule for more information on creating threshold conditions.

  13. In the Fulfillment section, select an option for the Fulfill when field:
    • All Conditions Apply : Select this option to generate an incident, alert, action, or warning when all the conditions are met.

    • Any Conditions Apply: Select this option to generate an incident, alert, action, or warning when any of the conditions are met.

  14. In the Fulfillment section, select an option for the Generate field:
    • Incident: Select to receive an incident notification when the rule conditions are met.

      Use incidents to report issues and work with the maintenance staff for resolutions.

    • Alert: Select to generate an alert message when the rule conditions are met.

      Use alerts to pass device-related alerts to Oracle Internet of Things Intelligent Applications Cloud. These alerts can in turn be passed on to integrated applications.

    • Warning: Select to generate a warning message when the rule conditions are met.

      Use warnings to create a log of issues that don’t require your immediate attention.

    • Action: Select to trigger an asset action when the rule conditions are met.

      If your asset type includes asset actions supported by your device model, then you can use rules to trigger these asset actions.

  15. Complete the mandatory and optional fields that appear, depending on your choice in the preceding step:
    • Summary: Enter a summary of the incident, alert, or warning.

      The Summary field for incidents and warnings can include dynamic contextual parameters. See Use Contextual Parameters in Warnings, Incidents, and Action Messages for more details.

    • Type: Specify the incident or warning type. For incidents, you can select between Outage, Maintenance, and Routine.

    • Priority: (Optional) Select an incident priority.

    • Tags: (Optional) Specify string tags that you can use to search the logs.

    • Description: (Optional) Enter a detailed description of the incident or warning.

      The Description field for incidents and warnings can include dynamic contextual parameters. See Use Contextual Parameters in Warnings, Incidents, and Action Messages for more details.

    • Severity: (Optional) Select the severity of the alert message.

    • Suppression: (Optional) Specify a wait time, in minutes, after which a fresh alert or warning is generated for an unresolved issue.

    • Level: (Optional) Select the severity of the warning.

    • Action: Select the asset action to trigger. Also specify or select the values for any action attributes that appear.

      For asset actions, the Parameter Value field can contain dynamic contextual parameters. You can use contextual parameters only in string parameters. See Use Contextual Parameters in Warnings, Incidents, and Action Messages for more details.

    • Subscribers:Under Notification Subscription, you can add one or more subscriber groups to receive notifications when incidents or warnings are triggered by the rule. See Use SMS, Email, and HTTP Notifications for more information on configuring notifications.

  16. If you are creating a rule incident, and you wish to use failure modes for your asset type, select Include Failure Mode Details.
    You must have already defined at least one failure mode for your asset type.
    1. Select a pre-existing Failure Mode that corresponds to the incident.
    2. Select one or more pre-existing Failure Causes that apply to the failure incident.
    See Add Failure Diagnostics Information to Asset Incidents and Anomalies for more information on using failure modes.
  17. Optionally specify a weekly or monthly schedule during which the rule is in force.
    A rule is active at all times, by default. You can change this behavior to choose a custom schedule for the rule.
    1. Under Rule Schedule, select Custom.
    2. Select Repeat Weekly to create a weekly schedule. Alternatively, select Repeat Monthly to create a monthly schedule.
    3. Click or drag inside the rows to select a data window.
      You can click an incorrectly selected cell to deselect it. Alternatively, click Clear to start afresh.
    The following example shows a weekly schedule for a rule that it is active from 8:00 a.m. to 6:00 p.m. on weekdays.
    Rule Schedule

  18. Click Save.
  19. Click Back to return to the Rules list.

Use Contextual Parameters in Warnings, Incidents, and Action Messages

When creating rules, you can use dynamic contextual parameters in the incident and warning details. You can also use contextual parameters in string message values of your asset actions.

Contextual parameters can include variables, such as asset names, sensor values, metric values, and location coordinates of the asset. These variables are dynamically resolved each time the rule is triggered.

The following warning and incident fields can include dynamic contextual parameters:

  • Summary
  • Description

Here's an example of the rule configuration screen containing dynamic contextual parameters in the Summary and Description fields:


Summary reads "Temperature for ${asset.name} is high." Description reads "Temperature for ${asset.name} is high. The current temperature is ${event.sensor.temp}."

And here's an actual Incident created by the preceding rule:
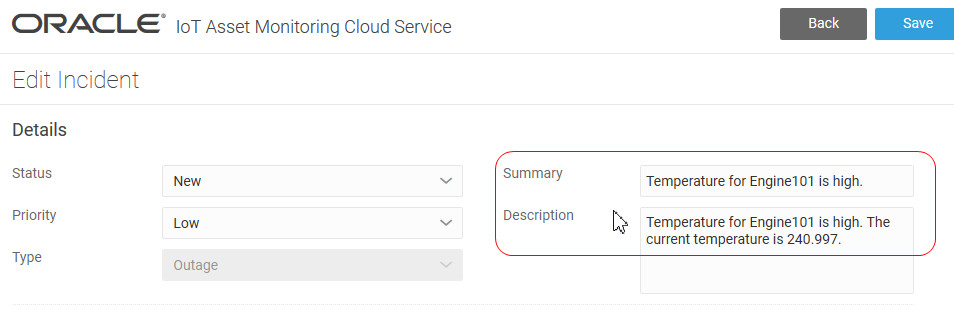
Summary reads "Temperature for Engine101 is high.". Description reads "Temperature for Engine101 is high. The current temperature is 240.997."

For asset actions, the Parameter Value field can contain dynamic contextual parameters. You can use contextual parameters only in string parameters.

The following contextual parameters can dynamically retrieve asset, sensor, metric, rule, and location related information:

  • Asset Parameters

    • ${asset.name}: Retrieves the name of the asset for which the warning, incident, or action is generated.

      For example: The asset ${asset.name} has low fuel.

      May translate to:

      The asset RedTruck has low fuel.

    • ${asset.id}: Retrieves the ID (GUID) of the asset for which the warning, incident, or action is generated.

  • Sensor Parameters

    • ${event.sensor.attributeName}: Retrieves the value of the specifed sensor attribute name.

      For example: The asset ${asset.name} has low fuel level: ${event.sensor.fuel}%.

      May translate to:

      The asset Truck1 has low fuel level: 10%.

      Here, fuel is a sensor attribute for the truck asset.

  • Metric Parameters: You can use metric-related parameters only if the rule condition uses the metric.

    • ${event.metric.name}: Retrieves the name of the metric that triggered the rule.

    • ${event.metric.value}: Retrieves the value of the metric that triggered the rule.

      For example: ${event.metric.name} for ${asset.name} is High: It is ${event.metric.value}.

      May translate to:

      Average Temperature for Engine1 is High: It is 150.

  • Rule Parameter

    ${rule.id}: Retrieves the ID (GUID) of the rule for which the warning, incident, or action is generated.

  • Location Parameters: You can use these contextual parameters only in location-based rules.

    • ${event.location.deviceId}: Retrieves the Device ID of the asset device.

    • ${event.location.latitude}: Retrieves the latitude co-ordinates of the device.

    • ${event.location.longitude}: Retrieves the longitude co-ordinates of the device.

    • ${event.location.altitude}: Retrieves the altitude reading of the device.

      For example: The asset ${asset.name} has exited its designated location. The asset's co-ordinates are: ${event.location.longitude} ${event.location.latitude}.

      May translate to:

      The asset Forklift1 has exited its designated location. The asset's co-ordinates are: -122 37.

Use Built-In Functions to Format Your Contextual Parameters

You can choose to use built-in functions to format the output of your contextual parameters.

For example, string keys can use the following format options:

  • ${asset.name?cap_first} converts the first letter of the string to uppercase.
  • ${asset.name?uncap_first} converts the first letter of the string to lowercase.
  • ${asset.name?capitalize} converts the string into title case (the first letter of every word is capitalized).
  • ${asset.name?lower_case} converts the string to lowercase.
  • ${asset.name?upper_case} converts the string to uppercase.
  • ${asset.name?remove_beginning("STRING")} removes the specified sub string from the beginning of the string.
  • ${asset.name?remove_ending("STRING")} removes the specified sub string from the end of the string.
  • ${asset.name?trim} removes any leading and trailing white spaces from the string.

The following examples describe some available format options for number outputs:

  • ${event.sensor.<sensor_name>?abs} converts a number to its absolute (non-negative) value.
  • ${event.sensor.<sensor_name>?c} converts a numeric value to the computer language value, as opposed to the default human readable format. Doesn't use grouping separators (commas, for example), uses dot as a decimal separator. Prints up to 16 digits after the dot. Never uses exponential form.
  • ${event.sensor.<sensor_name>?round} rounds the number to the nearest whole number. In case a decimal number ends with .5, rounds it to the next whole number.
  • ${event.sensor.<sensor_name>?floor} rounds the number downwards.
  • ${event.sensor.<sensor_name>?ceiling} rounds the number upwards.

Edit a Rule

Edit a rule to change the assets the rule applies to and the rules for generating the incident or alert report.
  1. Click Menu (Menu icon), and then click Design Center.
  2. Select Asset Types from the Design Center sub-menu.
  3. Select an asset type from the Asset Types list.
    You can also search for an asset type.
  4. Click Rules.
  5. Select a rule in the Rules list.
  6. Click the Edit (Edit Icon) icon.
  7. Edit the rule name.
  8. Edit the options in the Apply To area.
  9. Edit the settings in the Condition area.
  10. Edit the settings in the Fulfillment area.
  11. Click Save.
  12. Click Back to return to the Rules list.

Duplicate a Rule

Duplicate a rule to quickly copy the settings of an existing rule to a new rule.

  1. Click Menu (Menu icon), and then click Design Center.
  2. Select Asset Types from the Design Center sub-menu.
  3. Select an asset type from the Asset Types list.
    You can also search for an asset type.
  4. Click Rules.
  5. Select a rule in the Rules list.
  6. Click the Duplicate (Duplicate icon) icon.
  7. Enter a name for the rule in the Name field and then modify the other rule settings including the apply to, condition, type, create incident, and create alert values.
  8. Click Save.

Activate or Deactivate a Rule

Activate an existing rule to generate an incident or alert report when the incident rule criteria are met. Deactivate a rule to stop incident or alert report generation.

  1. Click Menu (Menu icon), and then click Design Center.
  2. Select Asset Types from the Design Center sub-menu.
  3. Select an asset type from the Asset Types list.
    You can also search for an asset type.
  4. Click Rules.
  5. Select a rule in the Rules list.
  6. Select one on these options:
    1. To deactivate a rule, clear the Enabled checkbox.
    2. To enable a rule, select the Enabled checkbox.

Delete a Rule

Delete a rule when it is no longer required.

  1. Click Menu (Menu icon), and then click Design Center.
  2. Select Asset Types from the Design Center sub-menu.
  3. Select an asset type from the Asset Types list.
    You can also search for an asset type.
  4. Click Rules.
  5. Select a rule in the Rules list.
  6. Click the Delete (Delete icon) icon.
  7. Click Yes.