Self-checkout Kiosk
Applies to NSPOS 2024.1 and later.
NetSuite Point of Sale (NSPOS) includes a self-checkout kiosk feature. The kiosk lets your shoppers make purchases without needing a cashier for every step.
Use these topics to learn how to use an NSPOS kiosk workstation. To stage a kiosk or customize your kiosk welcome page and item images, see Stage a Self-checkout Kiosk.
The NSPOS kiosk works in three modes:
Also see Comparing NSPOS Kiosk vs. Register Functionality.
NSPOS SuiteTax isn't available for use with a self-checkout kiosk.
Idle Mode
This mode greets the shopper with a custom welcome page. By default, it guides the consumer to tap Start Checkout or scan an item's bar code to get started.

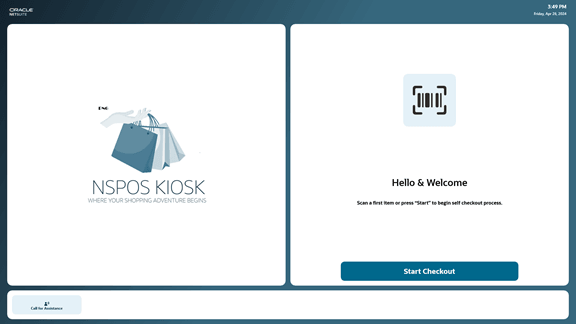
Idle mode includes a button the shopper can tap to Call for Assistance from the attendant.
You can configure the kiosk to replace the image on the left with your business logo.

Sales Mode
This mode opens the journal for the shopper to add their purchase items, tender payment, and receive a printed receipt.
Journal
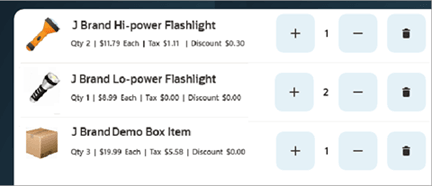
The journal provides a list of items as they are added to a transaction. In other applications the journal might be called the cart or basket.

When a shopper scans an item, it appears in the journal with these details:
-
Item image
-
Item display name
The display name will wrap if it's longer than the line width.
-
Price subtotal = (quantity x regular unit price) - discount
Subtotal doesn't include tax
-
Item quantity
-
Item price without tax and discounts and the sell unit, for example "each"
-
Tax calculation based on the item quantity and price
-
Discounts calculated for the line. All discounts are summarized and display in a different color. Transaction discounts appear on a separate line.
-
Dimensions are included for matrix items.

A shopper must scan or key-in a bar code one item at a time. Only the attendant can:
-
Change an item quantity
-
Void an item
-
Void the transaction
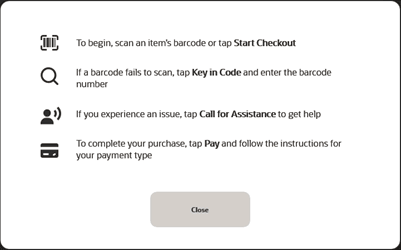
Help at the Kiosk
Help provides tips that can resolve many questions or issues. Help is available to shoppers or attendants in all modes - Idle, Sales, and Assistance. When a user taps the Help button, the type of guidance depends on the active mode.

Key In Code
If an item's bar code or coupon code will not scan, the shopper can tap this button to enter the code manually. The keyboard supports entering most alphanumeric characters.

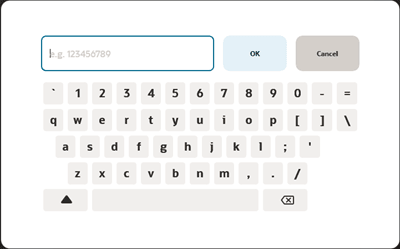
If a shopper's entry doesn't match an item in the database, they are prompted with Item not found. The shopper can tap Call for Assistance or tap OK to close the message prompt.
Assistance mode includes a Find Item search that isn't available to the shopper. This search can use an item name or other item details.
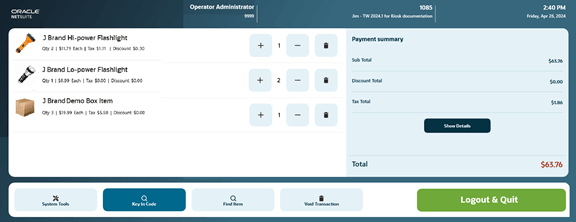
Payment Summary
Located on the right, the payment summary shows the subtotal, combined discounts, and the total tax due.

Under the Tax Total the shopper can tap Show Details to view the tax breakdown by tax schedule or tax code/group. They also see the percentage charged for each tax nexus.


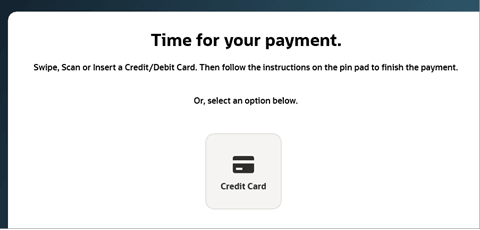
After the shopper is done adding items, the next step is to tap the Pay button. The kiosk guides the shopper to swipe their payment card and follow instructions on the attached PIN pad.
The kiosk supports payments by credit and debit card only.
After the shopper tenders their payment card, the kiosk advises that the payment is processing.
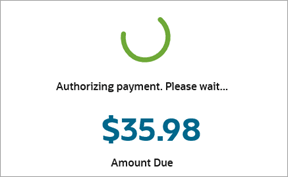
The receipt printer prints the transaction receipt when payment is complete. The kiosk then returns to idle mode.
Call For Assistance
If a shopper needs attention from an attendant, they can tap Call for Assistance.
The message icons and background display in red to make the request visible to the attendant from a distance. The kiosk attendant on duty should watch for these requests and arrive to assist.
The kiosk attendant on duty should watch for these requests and help when needed.

Assistance Mode
Assistance mode gives attendants tools to fix common issues and help shoppers finish transactions. The attendant must enter NSPOS login credentials to switch the kiosk to assistance mode.
Assistance Login
An NSPOS login is required to access assistance mode. This login is the same as used by employees authorized to handle transactions at an NSPOS register in the location.
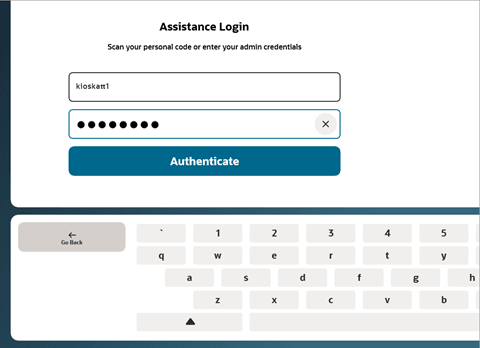

When you're setting up an attendant's login credentials, remember they'll enter them using the kiosk's onscreen keyboard.
Adjust Item Quantities
The attendant can update items in the journal to assist the shopper. They can:
-
Change an item quantity
-
Void an item
Key in Code
If an item's bar code will not scan, an attendant can use the "key in code" button to manually enter the bar code numbers for the shopper. This button is available to shoppers.

Find Item
Enter a portion of an item name, bar code, or UPC to find an item and add it to the journal. This item-search feature is available in assistance mode only. Shoppers are limited to using Key in Code when a bar code will not scan.


Void Transaction
Remove an open transaction from the journal, making the kiosk ready for the next transaction.

System Tools
An attendant in Assistance Mode can use System Tools to configure printers and bar code scanners. The kiosk will automatically find a connected device or you can enter the device ID manually.
The attendant can also close or minimize the application from the System Tools page.
-
Printers - Configure a printer, check the printer status, and print a sample page
-
Scanners - Configure a scanner, check the scanner status
-
Go Back - Return to the previous Assistance Mode page

-
Close - Shut down the NSPOS kiosk application. NSPOS prompts the attendant for confirmation before shutting down the kiosk
-
Minimize App - Minimize the kiosk to perform other tasks on the computer
-
Save & Quit - Save any changes and exit the system tools page

When using Assistance Mode > System Tools to search for a printer or scanner, you may experience issues with kiosk UI (User Interface). For example, the UI might freeze or buttons become locked or disabled. These issues are related to Windows functionality.
To restore the interface, tap Go Back to exit System Tools. Then try configuring the device again.
An attendant can use the system tools to work with the receipt printer. They can also minimize the kiosk app to gain access to the Windows OS or other applications.
Printers used with NSPOS kiosks must support OLE for Retail Point of Sale (OPOS). OPOS is a point of sale (POS) peripheral-device standard for Microsoft Windows operating systems. The driver enables communication between a supported device and an OPOS-compliant POS application, such as a printer or bar code scanner and NSPOS.
To configure a kiosk printer:
-
Connect the printer to the kiosk and power on the printer.
-
Log into the NPSOS kiosk.
-
Go to Assistant Mode > System Tools.
-
Select Printers.

-
Choose how to identify the printer:
-
Find Printer - Let kiosk find the connected printer automatically.
Important:The Find Printer function may fail to detect the printer if the kiosk operating system (OS) is configured to use Windows Kiosk mode. You can manually enter the printer ID or temporarily switch the OS to a non-kiosk mode.


-
Enter ID - Manually enter the printer ID.
This ID was set up when the device was configured for OPOS (OLE for Retail Point of Sale). Typically, the ID is the device name.
-
-
Tap OK to confirm your printer choice. NSPOS begins configuring the printer for use with the kiosk.
Tip:The Connected section shows a red icon while the printer is being configured. The icon turns green when the setup is complete.
If you're alerted with the message Printer not claimed, you may have another NSPSO instance running on the workstation.

-
When the icon turns green, you can tap Check Status to verify the printer is configured and connected.
-
Tap Print Sample to inspect the printer output.
-
If your printer requires special formatting, select it from the ESC/POS command formatting list. These formats are mainly used for printing bar codes.
-
None
-
Epson
-
TGP
-
-
If you want to test your receipt setup, check the Debug Printer box.
Debug mode displays the receipt in a window instead of printing to paper. Use this mode to verify what information will appear on a printed receipt or to test for other changes.
-
Tap Save & Quit to keep your changes and exit the printer configuration page.
To configure a kiosk scanner:
-
Connect the scanner to the kiosk and power on the scanner.
-
Log into the NPSOS kiosk.
-
Go to Assistant Mode > System Tools.
-
Select Scanners.

-
Tap Enter ID and enter the scanner ID.
This ID was set up when the device was configured for OPOS (OLE for Retail Point of Sale). Typically, the ID is the device name.

-
Tap OK to confirm the scanner ID.
-
Tap Claim. NSPOS begins configuring the scanner for use with the kiosk.
 Tip:
Tip:The Connected section shows a red icon while the kiosk is setting up the scanner connection. The icon turns green when the connection is complete.
-
When the icon turns green, tap Check Status to verify the scanner is configured and connected.
-
Tap Save & Quit to keep your changes and exit the scanner configuration page.
Assistance Mode Inactivity
NSPOS automatically ends an assistance mode session and logs off the attendant if the kiosk detects no activity for 60 seconds.

Comparing NSPOS Kiosk vs. Register Functionality
This topic lists key ways in which an NSPOS register and self-checkout kiosk are similar or different.
Backward Compatibility
The ability to have the server on the latest release while waiting for an opportunity to upgrade individual workstations that are on the previous release works the same for a kiosk setup as it does for an NSPOS register.
However, because 2024.1.0 is the first release of the NSPOS kiosk, backward compatibility is unavailable for this version.
Customer Record Updates
Specific customer records aren't available to "find" from a kiosk. Transactions made on a kiosk are assigned to the "anonymous customer."
Inventory Items and Images
Items for sale are configured in NetSuite ERP in the same way for both NSPOS and KIOSK. For the kiosk, you can add an item image to be displayed with the item when it's added to the journal. Item images aren't available for NSPOS registers.
Offline Mode
Similar to an NSPOS register, shoppers can continue using a kiosk if internet connectivity is lost. Synchronization is paused but will resume when the connection is restored. However, credit and debit card processing will be affected unless the kiosk is configured to accept payments (within defined limits) in offline mode.
You can set up FreedomPay to accept offline payments for NSPOS transactions done in offline mode. NSPOS processes the payments using the FreedomPay configuration.
See Working offline and handling errors for more information about how NSPOS works in offline mode.
Payments at the Kiosk
The functionality to accept multiple forms of payment at the kiosk is limited in NSPOS 2024.1.0.
-
Kiosk supports payments through the U.S. FreedomPay payment gateway only
-
Payments must be tendered using a credit or debit card.
-
Cash payments aren't supported
-
Gift card payments aren't supported
A standard NSPOS register can take multiple forms of payment.
An error message appears if the kiosk application starts without a Payment Provider configured on the kiosk's RA-Workstation record. If this error occurs, configure the payment provider and then restart the NSPOS kiosk application. The update will downsync to the kiosk.
Receipts
Only paper receipts are supported in NSPOS 2024.1. Receipts customized for use with NSPOS will appear different when printed from a kiosk. NetSuite Customer Support or Professional Services can provide customization assistance to modify your kiosk-receipt content.
Returns and Refunds
Returns and refunds can't be processed at the kiosk. These transactions must be done using an NSPOS register. The transaction from a kiosk purchase synchronizes to the server and then to registers in the store. Synchronization occurs within a short period, after which the cashier can process a validated return from an NSPOS register.
Suspend and Resume
A transaction on the kiosk can't be suspended or resumed. Note that if a kiosk with an open transaction must be restarted due to an issue, the transaction will remain open. When the kiosk is available again, the attendant can let the transaction continue or void it to begin again or free-up the kiosk for the next shopper.
Tax Process
Only the default NSPOS tax process is supported for kiosks in NSPOS 2024.1.0. The NSPOS SuiteTax feature for new accounts isn't supported for kiosk workstations. We expect to make SuiteTax available for the kiosk in a future release.