Working with Inventory Items
Inventory items are the physical products you sell online or in your stores. This section lists the steps to create basic inventory items. You set up your items in NetSuite ERP using Item records. When you add or update an item, it downloads to your server for synchronization with your NetSuite Point of Sale (NSPOS) registers.
This topic includes only the basic fields used for NSPOS. For information about different item types and fields not listed, review the NetSuite ERP help topic Creating Item Records.
NetSuite Assistant (not advised) - Items created through the NetSuite Assistant don't contain all fields required for NSPOS, such as the Tax Schedule. Also, items created or updated through the Assistant don't trigger automatic synchronization with your registers.
You should add inventory items using the following procedure or through imports such as a CSV upload.
When updating items, prices, or other data using a CSV import, always select to Run Server SuiteScript and Trigger Workflows. This option triggers the processes needed for proper synchronization between NetSuite and NSPOS. See Run Server SuiteScript and Trigger Workflows.
To add a new inventory item:
-
Log in to NetSuite as an administrator.
-
Go to Lists > Accounting > Items.
-
Review the current list to ensure the item was not previously added.
-
Click New Item.
-
For Item Type, click Inventory Item. Most items you sell in stores will be inventory items.
-
Under Custom Form, select RA Inventory Part Form. This form includes custom fields for use with NSPOS.
-
Complete the fields used in NSPOS transactions.
-
Item Name/Number - Enter the name of the item or your internal item number, up to 60 characters. You can enter both a name and a number if desired.
-
UPC Code (optional) - Enter the Universal Product Code (UPC) or Global Trade Item Number (GTIN) associated with the item's bar code. A stock keeping unit (SKU) is also acceptable.
-
Display Name/Code (optional) - This name appears in the Journal, in item searches, and on receipts. If you do not enter a display name, NSPOS uses the Item Name/Number.
-
Basic subtab > Tax Schedule - Select the tax schedule for the tax rate to be applied when selling the item.
All other fields are optional, but you might want to consider a field if it will benefit your business process. All fields are available to include in searches and reports.
Note:Most fields have pop up help. You can also click Help to display the NetSuite ERP item help topic.
-
-
You add prices for an item under the Sales / Pricing subtab. See Add a Price or Price Levels to an Item.
-
Click Save.
The new item will sync to your registers during the next download.
Restricting where an item is offered for sale:
Editing an existing item:
-
Log in to NetSuite as an administrator.
-
Go to Lists > Accounting > Items.
-
Locate the desired item and click Edit.
-
Make changes as needed.
-
Click Save.
The change will sync to your registers during the next download.
You can mark an item Inactive to stop it from syncing with your registers or appearing in searches. You can't delete an item that's part of any past transaction.
Making an item inactive:
-
Log in to NetSuite as an administrator.
-
Go to Lists > Accounting > Items.
-
Locate the desired item and click Edit.
-
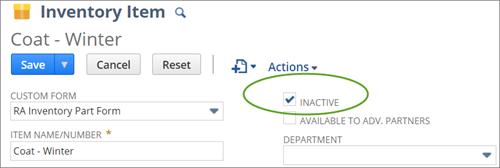
Check the Inactive box.
The box location depends on the Custom Form choice:
-
If RA Inventory Part Form, then Inactive is near the top.
-
If Standard Inventory Part Form, go to the System Information tab.
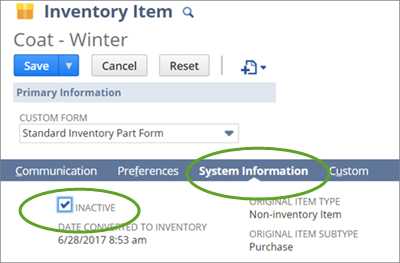
Note:Other forms customized for your business might have the Inactive box in a different location.
-
-
Click Save.
The change will replicate to your registers during the next synchronization download.
Reactivating an inactive item:
-
Log in to NetSuite as an administrator.
-
Go to Lists > Accounting > Items.
-
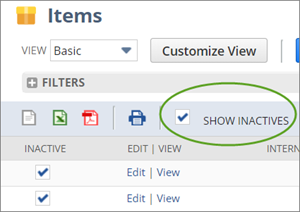
Locate the inactive item.
Tip:You might need to check the Show Inactives box at the top of the list
-
Click Edit and clear the Inactive box.

-
Click Save.
Deleting an Unused Item
You can delete an unused item if you set it up by mistake or change your plans, However, if the item is used in any NetSuite ERP or NSPOS transaction, you can only make it Inactive, not delete it.
You can't recover a deleted item.
Deleting an unused item:
-
Log in to NetSuite as an administrator.
-
Go to Lists > Accounting > Items.
-
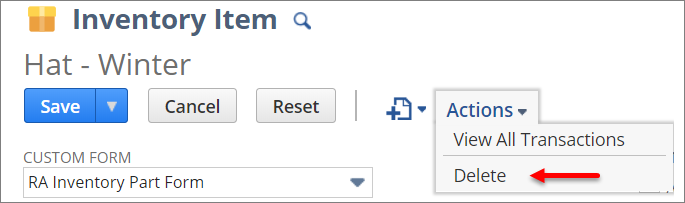
Locate the desired item and click Edit.
-
Click Actions > Delete.
-
Click OK.
Related Topics
- Items
- Setting up a Services for Sale Item
- Gift Cards and Gift Certificates in NSPOS
- Disable Item from Searches on the POS
- Do Not Download Item to POS
- Item Restrictions by Subsidiary or Location
- Searching for Items in NetSuite ERP Using RA-Barcodes
- Save Previous UPCs If Replaced
- Multiple Bar Codes for Single Items
- Weighted Bar Codes - Enabling Scans
- Bin Management
- Item Synchronization - NetSuite ERP to NSPOS