Configuring the ODBC Data Source on Windows
To set up the Connect Service, you must enter the required values to connect to your data center. You must create a Data Source Name (DSN) to add or edit the required values. The standard way to configure the required values is to use the ODBC data source on Windows. However, if you didn't follow the standard option to upgrade your driver, you may need to edit an additional attribute using the Windows registry.
To verify your connection attributes, see Verifying the ODBC Driver Installation on Windows.
Using the ODBC Administrator Tool
Use the ODBC administrator tool to set up the values for your Data Source Names.
To use the ODBC administrator tool:
-
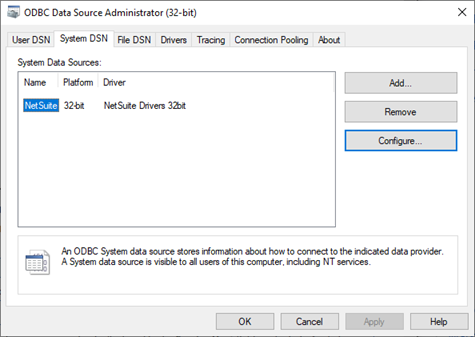
Open the ODBC administrator tool.
-
Click the System DSN tab.

-
From the list of System Data Sources, select the NetSuite data source name and click Configure.
If the System Data Sources list doesn't contain the NetSuite data source, click the Add button, select the NetSuite driver in the drivers list, and click Finish.
-
On the General tab, set the configuration fields. You can find these values under Your Configuration on the SuiteAnalytics Connect Driver Download page. You can access the SuiteAnalytics Connect Driver Download page using the Set Up Analytics Connect link in the Settings portlet when you're logged in to NetSuite. For more information, see Finding Your Settings Portlet.
The following table describes the configuration fields:
Data Source Setup Fields
Description
Name
Enter a data source name (DSN) to help you identify the connection, for example, NetSuite.
Description
Enter a description.
Account ID
The NetSuite account ID that will access the SuiteAnalytics Connect schema.
Role ID
Role ID corresponding to the Account ID.
Service Host
The Connect Service host name. The host name you should use for your connection is displayed in the Service Host field on the SuiteAnalytics Connect Driver Download page, under Your Configuration.
By default, this field is automatically populated. To edit the field, check the Customize box.
Service Port
1708
By default, this field is automatically populated. To edit the field, check the Customize box.
Hostname in Certificate
You should leave the Hostname in Certificate field blank.
Service Data Source
NetSuite2.com
To select the data source, use the Browse button.
Important:The NetSuite.com data source is no longer supported as of 2025.1 and will be removed in 2026.1. You should use the NetSuite2.com data source when working with SuiteAnalytics Connect to avoid any disruptions. If you stopped using NetSuite.com for a long period, the outdated data source will be removed earlier. For more information, see the following topics:
Static Data Model
Check this box to enable the
Static Data Modelattribute, which allows you to see the see the structure and the name of all available record types and fields.For more information about this attribute, see Working with the Static Data Model.
Uppercase Schema
Check this box to enable the
Uppercaseattribute, which changes all record type and field names to uppercase. If you use SuiteAnalytics Connect with applications that are case sensitive and don't support changes in case, you can use theUppercaseattribute to avoid case change problems.For more information about this attribute see Using the Uppercase Attribute.
For information about the connection attributes, see Connection Attributes.
-
Click Test Connect to verify the connection. Use your account username and password to connect.
-
Click OK.
When you try to connect your external tools to NetSuite using the SuiteAnalytics Connect ODBC driver, in addition to the settings you configured in the ODBC Administrator tool, you may need to enter a user ID (or user name) and a password for your connection. You can use your NetSuite account email address and password as the user ID and password for your connection.
Tracing is an optional feature available in the ODBC Administrator tool that creates a log of all the calls to ODBC drivers. Note that enabling tracing may slow down performance.
Using a Connection String
When you installed the driver and verified the data source settings, you can configure your applications to access the SuiteAnalytics Connect service. One of the options is to connect your application using a connection string. To learn more about connection strings, see Connecting Using a Connection String.
Using the Windows Registry
You only need to do this if you uninstalled the old driver and kept the existing DSNs. The old DSNs don't include the required attribute for the latest driver and you need to use the Windows registry to add the AllowSinglePacketLogout attribute. If you upgraded your driver using the preferred option this action is not required. Fore more information, see Upgrading the Connect Driver.
To use the Windows registry:
-
Open the Registry Editor application.
-
Locate the ODBC.ini folder.
Note:When you configure your driver, some systems allow you to create a User DSN or a System DSN, and some systems allow you to choose between both. This depends on the permissions on your machine. There are no relevant differences between User DSNs and System DSNs. However, the location of the INI file that you must edit changes.
For most Windows versions, do the following:
-
For System DSNs, go to the following folders:
-
For 64-bit drivers, go to Computer\HKEY_LOCAL_MACHINE\SOFTWARE\ODBC\ODBC.INI
-
For 32-bit drivers, go to Computer\HKEY_LOCAL_MACHINE\SOFTWARE\WOW6432Node\ODBC\ODBC.INI
-
-
For User DSNs in 64-bit and 32-bit drivers go to Computer\HKEY_CURRENT_USER\SOFTWARE\ODBC\ODBC.INI
-
-
To create the
AllowSinglePacketLogoutattribute, right-click the ODBC.ini folder, and select New > String Value.Note:If the folder includes the
AllowSinglePacketLogoutattribute, right-click the attribute to modify the value. -
In the Name column, enter AllowSinglePacketLogout.
-
Right-click AllowSinglePacketLogout and select Modify. In the Value data field, enter 1.