Setting Validation and Defaulting Properties
Validation options are constraints you can place on your custom fields to help control what's entered in your custom fields. Defaults are preset values that appear in your custom fields when you create a new record or transaction.
Watch the following video for an example of setting a default selection to a custom field.
To set validation and defaulting properties:
-
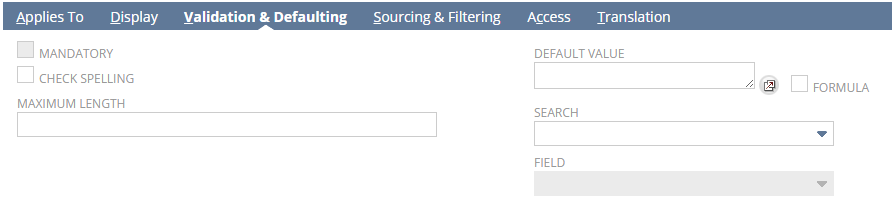
On the custom field setup page, click the Validation & Defaulting subtab.
-
Set the validation options, which may vary depending on the field type selected and its data type.
Here are some possible options.
-
Mandatory: Enable to require information to be entered in the custom fields before saving a record or transaction.
For instance, you can create a mandatory contact number field for your sales transactions. Sales representatives will need to enter a contact number for the customer before saving the transaction.
Note:You can also make fields mandatory when customizing a form. When using the same custom field on various forms, consider setting required field at the form level, rather than on the field itself. Applying the setting at the form level is useful in cases where the field information is required on one form but not on another form.
-
Minimum Value: Set the minimum number that can be entered in the custom field. You won't be able to save a record or transaction if the value is less than the minimum.
For example, you can create a sales quota field for your employee records. If you set a limit of $500.00, you won't be able to enter less than 500 in the field.
You can set a minimum value for a percent field that's less than 0. If you don't enter a minimum, it'll default to 0.
-
Maximum Value: Set the maximum number that can be entered in the custom field. You won't be able to save a record or transaction if the value exceeds the maximum.
For instance, you can create a spending limit custom field for employee records. Set a limit of $700.00 when creating the custom field to cap employee spending limits at $700.00.
You can set a maximum value for a percent field that's over 100. If you don't set the maximum, it'll default to 100.
-
Maximum Length: Set the maximum number of characters that can be entered in the custom field. You won't be able to save a record or transaction if the field exceeds the character limit.
For example, you can create a gift message field for your sales transactions to record a special message from your customers. You can set a character limit to keep messages consise.
-
Allow Delete of List/Record Values: Controls how the system handles deletions of records referenced by the custom field. This field is available for custom field definitions that have a type of List/Record or Multiple Select and have the Store Value box checked.
-
To prevent deletions and return an error message stating that the record could not be deleted due to dependencies and providing a link to dependent records, select Prevent and Return Error.
-
To permit deletions, null out field values that use the deleted record, and log system notes for deletions, select Allow and Set Dependent Field Values to Null.
For more information, see Customizing Delete Behavior for Records Referenced by Custom Fields.
-
-
Formula: Enable to validate SQL formula expressions for formula fields. For more information about defining a custom formula field, see Creating Formula Fields.
-
Search: Select a search with summary results to be used to calculate a value for the custom field. Search fields display a rollup value for a selected search results field. The value is dynamically calculated each time a form containing the summary search field is displayed. For example, you can display the total quantity of all line items on a transaction.
The Search option is available only for custom fields and data types that support summary search derived values. For details, see Creating Custom Fields with Values Derived from Summary Search Results.
-
Field: You can base values for the custom field on summary search results. Optionally, select a comparison field to join related records in cases where you want to place the custom field on a form for a record type that's different from the summary search record type. For example, you may want to p;ace a custom entity field showing the result of a customer record summary search on an employee custom form. To do so, you could select an employee record field whose values could be matched to the values for the search's Available Filter field. Search results field values for all records with matching values for the Compare To field and Available Filter field would be used to calculate the value of the summary search custom field.
The Field option is available only for custom fields and data types that support summary search derived values. For details, see Creating Custom Fields with Values Derived from Summary Search Results.
-
-
If needed, enter default parameters for the field.
- To set values into an Inline Text or Disabled field, you must specify a default value or source the information for the field from another field.
- Depending on the field type, various default values can be specified. Possible options include:
-
Default Checked: To indicate that the check box custom field should display checked by default, check the box. The custom fields can still be cleared on individual transactions and records.
For example, you can add a Subscribe to Newsletter check box to your customer records. When you set the field to default checked, new customers are automatically subscribed to your newsletter.
Custom transaction line fields have a limitation that occurs when several conditions are met. For more information, see Creating Custom Transaction Line Fields.
-
Default Value: If needed, enter a value to display in the field by default. The value can still be changed on individual records and transactions if the field isn't locked.
When working with Inline HTML field, the default value is applied when you create a new record or when you load an existing record.
When working with Free-form text, Text area, Rich Text or Hyperlink fields, you can include NetSuite tags in the default definition. These tags are populated with field values when the page is loaded or saved. For more information, see Dynamic Defaults and Dynamic Hyperlinks.
For example, you can add a spending limit field to your employee records with a default value of $150.00. When you enter new employee records, the field automatically fills with the amount.
Default values defined here are applied only at creation time for any specified record. After a record has been created, subsequent edits to that record store the previously stored value unless it also has been edited.
-
Dynamic Default: Dynamic default enables you to select from preset default options specific to the custom field you're creating based on its field type. There are six types of dynamic defaults:
-
- Current Date/Time: For Date fields, your custom field is automatically filled with the current date or time.
- For example, you can add an information-only date field to your sales orders. Setting the field to current date and time lets you track when your sales representatives are most productive.
Important:The date and time for the field are based on the user's NetSuite Time Zone preference. The preference is set at Home > Set Preferences, not on the browser client time zone.
-
Current User: For Entity List/Record fields, have the name of the entity entering the record or transaction automatically filled in the field. For example, you have data entry employees as well as sales representatives. You can add a field to your transactions to record who enters the transaction as well as the sales representative who made the sale.
-
Current User's Supervisor: For Entity List/Record fields, have the name of the supervisor selected on the entity record automatically filled in the field. For example, you can create a field for your task records that lists the Assignee's supervisor. This information can help your management team stay informed of team projects.
-
Current User's Department: For Entity List/Record fields, have the department of the entity entering the record or transaction automatically filled in the field. For example, you have data entry employees in various departments. You can add a field to your transactions to record the department of the employee who enters the transaction.
-
Current User's Location: For Entity List/Record fields, have the location of the entity entering the record or transaction automatically filled in the field. For example, you have data entry employees in various locations. You can add a field to your transactions to record the location of the employee who enters the transaction.
-
Current User's Subsidiary: For Entity List/Record fields, have the subsidiary of the entity entering the record or transaction automatically filled in the field. For example, you have data entry employees in various subsidiaries. You can add a field to your transactions to record the subsidiary of the employee who enters the customer.
-
-
Default Selection: Set a selection list to display in the custom field by default. The choices are limited to the list selected in the List/Record field when creating the custom field.
For example, you can create a custom field to record advertising preferences for your customers. You can set a default of Email if you know that the majority of your customers prefer to receive ads by email. When a customer loads the page, Email is displayed in the selection list by default but they can choose Fax or Mail if needed.
-
After you've entered validation and defaulting properties, you should set any sourcing criteria. See Setting Sourcing Criteria.
Related Topics
- Creating a Custom Field
-
let you to specify
- Assigning Custom Fields to Specific Record Types
- Behavior of View from Order Only Settings on Transaction Line and Transaction Body Custom Fields
- Setting Display Options for Custom Fields
- Setting Sourcing Criteria
- Sourcing and Filtering Examples
- Setting Filtering Criteria
- Dependent Dropdown Lists
- Restricting Access to Custom Fields
- Restricting Access to Employee Custom Fields
- Creating Read-Only Custom Fields
- Adding Translations for Custom Fields
- Adding Custom Fields to Transaction Forms
- Tracking Changes to Custom Fields