Creating a Custom Field
Create various types of custom record and custom transaction fields to track business-specific information.
For an overview of custom field types, see Custom Field Types.
To create a custom field:
-
Go to Customization > Lists, Records, & Fields > [Custom Field] > New, where [Custom Field] is the required field type. The Custom Field page appears with options that vary by field type. The Custom Item Field page looks similar to this:
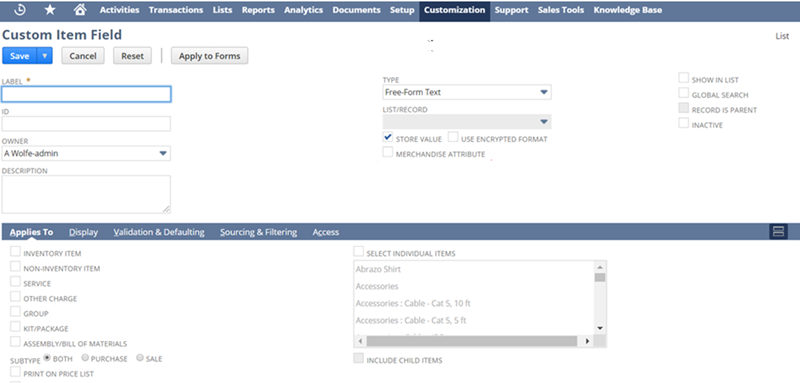
To display all settings for a custom field, click the Expand Tabs icon.
-
In the Label field, enter a meaningful name or description for the field. Labels can be up to 200 characters, but consider how long labels will look on pages and printed forms.
The label appears by the field on the transactions you select. Changing a custom field's name doesn't update it on custom forms that use the field. For information, see Renaming Custom Fields.
-
In the ID field, enter a unique ID using numbers and letters. For best practices and naming conventions, see Conventions for Naming Custom Objects. For information about changing an existing ID, see Changing the ID of a Custom Object.
-
Select the owner of the custom field.
Only the owner can modify the record. Your name is selected by default.
-
In the Description field, enter a description of the custom field.
-
For custom item fields, to indicate that the field is an option for matrix items, check the Matrix Items box. Checking this box automatically sets the Type field to Multiple Select and the Subtab field on the Display subtab to Matrix. Changing any of these settings clears the Matrix Option box. For more information about matrix items, see Matrix Items.
-
In the Type field, select the type of custom field you want to create.
For more information about custom field types, see Field Type Descriptions for Custom Fields.
The type of field you select determines the other options you can set on the page.
Note:If you later edit a field and change it to a type that isn't supported, any data stored for the field is deleted. If you change a field type or a list/record that's used for sourcing or filtering on other custom fields to a field type that isn't supported, all sourcing and filtering based on the field is removed.
Type conversion of the field takes a significant amount of time because many records are affected. A timeout can occur. For more information, see Converting the Field Type of a Custom Field.
-
If you selected List/Record or Multiple Select in the Type field, select the list or record in the List/Record field that contains the items for the list field.
Important:For List/Record or Multiple Select custom field types, standard security restrictions aren't applied to the options in the related List/Record list. It's possible to select a record from the list even if you don't have permission to view the record. However, you can't edit the record if you don't have edit permission.
-
By default, the Store Value option is enabled so that custom field values are stored in your NetSuite account. If you don't want any changes entered stored in the custom field, clear the Store Value box. Not storing the value enables you to look at data that's stored elsewhere. If you don't store the value, changes will be discarded, so you may want to make the field read-only. If you clear the Store Value box, the field value is accessible in the current workflow instance only.
You can't clear the Store Value box if the value is used for criteria in duplicate detection. You'll get an error message if you try. For more information about duplicate detection, see Setting Up Duplicate Detection.
-
Some custom field data types provide a Use Encrypted Format option. To encrypt the field values stored in the database, check the box.
Warning:After a custom field has been saved, the Use Encrypted Format setting can't be changed. Before you set the option, review Encrypted Custom Field Stored Values and ensure you fully understand the consequences of your selected setting.
When you specify that a field be encrypted, any value in the encrypted field displays as ENCRYPTED in all accounts except the account where the value was first created.
-
If you're creating a custom item field, to use this custom item as a merchandise hierarchy attribute, check the Merchandise Attribute box. When the box is checked, the custom item field is available to apply to items assigned to a merchandise hierarchy. The Merchandise Attribute box appears only on a custom item field and when the Merchandise Hierarchy feature is enabled.
For more information about merchandise hierarchies, see Merchandise Hierarchy
-
To have the field automatically show in the list of records the field is applied to, check the Show In List box. The lists the custom field appears in depends on the field type. For example, entity fields appear in applicable entity lists, transaction body fields appear in transaction lists, CRM fields appear in CRM record lists, and so on.
-
To index this custom field for global search, so that this field's values are searched for matches to global search keywords, check this box. You can index the field for global searches if Store Value is checked, and if you've selected any of the following in the Type field: Currency, Decimal Number, Email Address, Free-Form Text, Help, Hyperlink, Inline HTML, Integer Number, Percent, Phone Number, Text Area.
You can't index a custom field for global search if None is selected for any Level for Search/Reporting option on the Access subtab of the custom field record.
After you check the Global Search box for a custom field, each global search compares keywords to that custom field's values, in addition to comparing with record name and ID field values. For more information, see Global Search.
-
If you're creating a List/Record custom field, and the record type selected is a parent record, check the Record is Parent box.
The field is used to create a parent-child relationship between two record types.
For more information about parent-child relationships, see Parent-Child Record Relationships.
-
If you want to inactivate the field after it's created, check the Inactive box. For more information, see Inactivating a Custom Field.
You can't clear the Inactive box if the custom field is used for criteria in duplicate detection. If you try to do so, you'll receive an error message. For more information about duplicate detection, see Setting Up Duplicate Detection.
-
To enable the Enhance Text feature Long Text, Text Area, or Rich Text field types, check the Enable Generic Text Enhance Actions box. When this feature is enabled for a field, you can clean up, make longer, or make shorter the text entered in the field. You can also select specific text to clean up. For more information, see Text Enhance.
Note:Users with access to Prompt Studio can add custom Text Enhance actions and their corresponding prompts for custom records and custom fields. For example, when creating a custom field, if you want to add a Text Enhance action specific to that field, you can create a Text Enhance action and a prompt for the record and field combination. For more information, see Prompt Studio.
-
(If available) In the AI Description field, enter a clear, detailed description of this custom field. AI features use AI descriptions to answer user questions. Be specific about what the field is for and how it's used. Click Optimize for AI to ensure the content is clear, complete, and effective for AI-powered search and responses. A meaningful description helps AI give better answers to user questions.
For more details and guidelines about what information to provide, see AI Description for Custom Object Definitions.
-
After you've created a custom field, you should define which record types the field can be used in. See Assigning Custom Fields to Specific Record Types.
If you're creating an other record field, you don't assign the field to a specific record type. Continue with Setting Display Options for Custom Fields.
Watch this video for an example of creating and adding a custom field to a record type.
You can hide a field on a form by setting it to not display or by hiding its subtab. For more information, see Setting Display Options for Custom Fields and Configuring Subtabs for Custom Entry and Transaction Forms. Note that if a field is hidden on your preferred form, you can't make inline edits to it on saved search results.
Use your account-specific domains for custom field types.
When you create a custom field, if add a URL that includes a data center-specific domain, the URL is automatically modified to your account-specific domain for users in their current session. Your account-specific domain is in the format https://<accountID>.app.netsuite.com, where <accountID> represents your account ID. The modification happens for these custom field types
-
hyperlink
-
rich text
-
long text
-
free-form text
-
text area
-
help
-
inline HTML
The configuration stays the same. You should update all links in custom fields to use your account-specific domain. For more information, see Account-Specific Domains in Custom Fields.
See the following topics.